
Operating Instructions
Page 1
VPL-EX70 VPL-EX7 VPL-ES7 © 2009 Sony Corporation 4-135-541-11 (1) Data Projector Operating Instructions Before operating the unit, please read this manual thoroughly and retain it for future reference.
VPL-EX70 VPL-EX7 VPL-ES7 © 2009 Sony Corporation 4-135-541-11 (1) Data Projector Operating Instructions Before operating the unit, please read this manual thoroughly and retain it for future reference.

Operating Instructions
Page 4
... Controls .. 10 Top/Right Side/Front 10 Rear/Bottom 10 Control Panel 12 Connector Panel 14 Remote Commander 15 Projecting the Picture Installing the Projector 17 Connecting the Projector 18 Connecting a Computer 18 Connecting a VCR 19 Projecting 20 Turning Off the Power 22 Convenient Functions Selecting the Menu Language .......... 23 Security Lock...
... Controls .. 10 Top/Right Side/Front 10 Rear/Bottom 10 Control Panel 12 Connector Panel 14 Remote Commander 15 Projecting the Picture Installing the Projector 17 Connecting the Projector 18 Connecting a Computer 18 Connecting a VCR 19 Projecting 20 Turning Off the Power 22 Convenient Functions Selecting the Menu Language .......... 23 Security Lock...

Operating Instructions
Page 5
...with the voltage of your local power supply. Cleaning the lens The lens surface is hot. • Be careful not to reduce reflection of the projector, take care with water. • Never use a soft dry cloth. The air coming out is especially treated to get your hand or objects ...cloth or paper under the unit. If voltage adaptation is required, consult with opaque draperies. • It is recommended that face the screen with qualified Sony personnel. • Should any liquid or solid object fall into the lens while the lamp is on the lens, use solvent such as alcohol, ...
...with the voltage of your local power supply. Cleaning the lens The lens surface is hot. • Be careful not to reduce reflection of the projector, take care with water. • Never use a soft dry cloth. The air coming out is especially treated to get your hand or objects ...cloth or paper under the unit. If voltage adaptation is required, consult with opaque draperies. • It is recommended that face the screen with qualified Sony personnel. • Should any liquid or solid object fall into the lens while the lamp is on the lens, use solvent such as alcohol, ...
Operating Instructions
Page 6
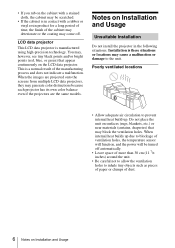
...normal result of the cabinet may deteriorate or the coating may generate color distinctions because each projector has its own color balance even if the projectors are projected onto the screens from multiple LCD data projectors, they may come off automatically. • Leave space of more than 30 cm ...draperies) that may , however, see tiny black points and/or bright points (red, blue, or green) that appear continuously on the LCD data projector. Poorly ventilated locations • Allow adequate air circulation to inhale tiny objects such as pieces of paper or clumps of dust. 6 Notes...
...normal result of the cabinet may deteriorate or the coating may generate color distinctions because each projector has its own color balance even if the projectors are projected onto the screens from multiple LCD data projectors, they may come off automatically. • Leave space of more than 30 cm ...draperies) that may , however, see tiny black points and/or bright points (red, blue, or green) that appear continuously on the LCD data projector. Poorly ventilated locations • Allow adequate air circulation to inhale tiny objects such as pieces of paper or clumps of dust. 6 Notes...

Operating Instructions
Page 7
...of the unit due to an angle of the unit or damage it on a level surface or suspending from an air-conditioner Installing the projector in such a location may cause color shading or shorten the lamp life excessively. Do not stand the unit upright on one side Avoid... air passing through the filter may cause a malfunction of 15°, and avoid installing the unit in temperature. Unsuitable Conditions Do not use the projector under the following conditions. Hot and humid Very dusty, extremely smoky locations • Avoid installing the unit in a location where the temperature or...
...of the unit due to an angle of the unit or damage it on a level surface or suspending from an air-conditioner Installing the projector in such a location may cause color shading or shorten the lamp life excessively. Do not stand the unit upright on one side Avoid... air passing through the filter may cause a malfunction of 15°, and avoid installing the unit in temperature. Unsuitable Conditions Do not use the projector under the following conditions. Hot and humid Very dusty, extremely smoky locations • Avoid installing the unit in a location where the temperature or...

Operating Instructions
Page 8
... build up. Note on the screen When using a screen with an uneven surface, a striped pattern may rarely appear on the screen depending on carrying the projector The unit is not a malfunction of the carrying case. Use the PIC MUTING key to fall or be damaged. 8 Notes on "High Altitude Mode" ... connecting cables or cards, and store the supplied accessories in the carrying case, do not drop the unit or subject it may cause the projector to cut off the picture. otherwise, internal heat may damage the object. This is manufactured using highprecision technology. If you lift the...
... build up. Note on the screen When using a screen with an uneven surface, a striped pattern may rarely appear on the screen depending on carrying the projector The unit is not a malfunction of the carrying case. Use the PIC MUTING key to fall or be damaged. 8 Notes on "High Altitude Mode" ... connecting cables or cards, and store the supplied accessories in the carrying case, do not drop the unit or subject it may cause the projector to cut off the picture. otherwise, internal heat may damage the object. This is manufactured using highprecision technology. If you lift the...

Operating Instructions
Page 9
...same time as you replace the lamp. Panel key lock This function locks all the keys on the control panel of the projector, allowing use of the Video Electronics Standards Association. • All other trademarks and registered trademarks are not specified. Overview B... High brightness · High picture performance High brightness Sony's unique optical system allows high efficiency. Direct Power On/Power Off function The AC power for video input. This prevents the projector from operating incorrectly. VPL-ES7:Three super-high-aperture 0.63inch SVGA panels with approximately...
...same time as you replace the lamp. Panel key lock This function locks all the keys on the control panel of the projector, allowing use of the Video Electronics Standards Association. • All other trademarks and registered trademarks are not specified. Overview B... High brightness · High picture performance High brightness Sony's unique optical system allows high efficiency. Direct Power On/Power Off function The AC power for video input. This prevents the projector from operating incorrectly. VPL-ES7:Three super-high-aperture 0.63inch SVGA panels with approximately...

Operating Instructions
Page 12
...menu system, select a menu, or make various adjustments. b INPUT key Selects an input signal. Flashes in green from the time when the projector is turned on until the projector is plugged into a wall outlet. Lights in red when the AC power cord is ready to operate. - Flashes in red when the ...temperature becomes high inside the projector, or when the projector fails to enter the settings of 2 flashes when the lamp cover or air filter cover is turned off with the ?/1 key. - Once the...
...menu system, select a menu, or make various adjustments. b INPUT key Selects an input signal. Flashes in green from the time when the projector is turned on until the projector is plugged into a wall outlet. Lights in red when the AC power cord is ready to operate. - Flashes in red when the ...temperature becomes high inside the projector, or when the projector fails to enter the settings of 2 flashes when the lamp cover or air filter cover is turned off with the ?/1 key. - Once the...
Operating Instructions
Page 15
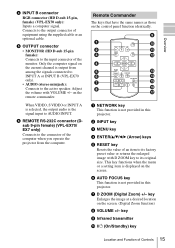
... screen. g D ZOOM (Digital Zoom) +/- When VIDEO, S VIDEO or INPUT A is selected, the output audio is not provided in this projector. f AUTO FOCUS key This function is the signal input to the input connector of the monitor. Connects to the connector of equipment using the supplied...an optional cable. f REMOTE RS-232C connector (Dsub 9-pin female) (VPL-EX70/ EX7 only) Connects to the output connector of the computer when you operate the projector from among the signals connected to INPUT A or INPUT B (VPL-EX70 only). • AUDIO (stereo minijack): Connects to its factory preset...
... screen. g D ZOOM (Digital Zoom) +/- When VIDEO, S VIDEO or INPUT A is selected, the output audio is not provided in this projector. f AUTO FOCUS key This function is the signal input to the input connector of the monitor. Connects to the connector of equipment using the supplied...an optional cable. f REMOTE RS-232C connector (Dsub 9-pin female) (VPL-EX70/ EX7 only) Connects to the output connector of the computer when you operate the projector from among the signals connected to INPUT A or INPUT B (VPL-EX70 only). • AUDIO (stereo minijack): Connects to its factory preset...

Operating Instructions
Page 16
... Keep the lithium battery out of the reach of the image. This function is available when the PC signal is not provided in this projector. Notes on Remote Commander operation • Make sure that nothing obstructs the infrared beam between the Remote Commander and the remote control detector is...of the remote control detector or the screen. • The operation range is , the wider the angle within which the commander can control the projector becomes. 16 Location and Function of Controls To cancel the frozen picture, press the key again. To replace a battery 1 Pull out the ...
... Keep the lithium battery out of the reach of the image. This function is available when the PC signal is not provided in this projector. Notes on Remote Commander operation • Make sure that nothing obstructs the infrared beam between the Remote Commander and the remote control detector is...of the remote control detector or the screen. • The operation range is , the wider the angle within which the commander can control the projector becomes. 16 Location and Function of Controls To cancel the frozen picture, press the key again. To replace a battery 1 Pull out the ...

Operating Instructions
Page 17
... Diagram" on the size of the lens * Adjuster not stretched, and the V Keystone function has been done. Installing the Projector 17 Use the following table as a guide. B Projecting the Picture Installing the Projector The distance between the lens and the screen varies depending on page 52. Projected image size (diagonal) 40 (inches...
... Diagram" on the size of the lens * Adjuster not stretched, and the V Keystone function has been done. Installing the Projector 17 Use the following table as a guide. B Projecting the Picture Installing the Projector The distance between the lens and the screen varies depending on page 52. Projected image size (diagonal) 40 (inches...

Operating Instructions
Page 18
...computer's display and the external monitor, the picture of the external monitor may increase noise and reduce performance of your computer to SVGA (VPL-ES7) or XGA (VPL-EX70/EX7) mode for each connection. • Insert the cable plugs firmly; For more information, refer to both your computer, ... pull it out by the plug, not the cable itself. loose connections may not To connect a computer Rear side VPL-EX70 to monitor output Computer to audio input 18 Connecting the Projector 1 HD D-sub 15-pin cable (supplied) 2 Stereo audio connecting cable (not supplied) (Use a no-resistance ...
...computer's display and the external monitor, the picture of the external monitor may increase noise and reduce performance of your computer to SVGA (VPL-ES7) or XGA (VPL-EX70/EX7) mode for each connection. • Insert the cable plugs firmly; For more information, refer to both your computer, ... pull it out by the plug, not the cable itself. loose connections may not To connect a computer Rear side VPL-EX70 to monitor output Computer to audio input 18 Connecting the Projector 1 HD D-sub 15-pin cable (supplied) 2 Stereo audio connecting cable (not supplied) (Use a no-resistance ...
Operating Instructions
Page 19
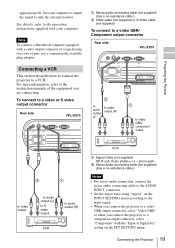
...cable.) 2 Video cable (not supplied) or S-Video cable (not supplied) To connect to a video GBR/ Component output connector Rear side VPL-EX70 Connecting a VCR This section describes how to connect the projector to the operating instructions supplied with the "Input-A Signal Sel." For details, refer to a VCR. Connecting the... To connect a Macintosh computer equipped with a video output connector of a type having two rows of the equipment you connect the projector to the AUDIO INPUT connector. • Set the aspect ratio using "Aspect" on the SET SETTING menu. For more information,...
...cable.) 2 Video cable (not supplied) or S-Video cable (not supplied) To connect to a video GBR/ Component output connector Rear side VPL-EX70 Connecting a VCR This section describes how to connect the projector to the operating instructions supplied with the "Input-A Signal Sel." For details, refer to a VCR. Connecting the... To connect a Macintosh computer equipped with a video output connector of a type having two rows of the equipment you connect the projector to the AUDIO INPUT connector. • Set the aspect ratio using "Aspect" on the SET SETTING menu. For more information,...

Operating Instructions
Page 20
...displays the input channel where the input signals are found. Each time you may have to switch the computer to output to the projector by pressing certain keys (e.g., / , LCD VGA / , etc.), or by changing your computer, for example a notebook, or an all equipment, then remove the lens ...Input-A connected to the INPUT A connector Computer connected to Input-B the INPUT B connector (VPL-EX70 only) Video equipment Video connected to the VIDEO input connector Video equipment connected to the projector. Depending on page 33. • The Smart APA feature is effective for the input ...
...displays the input channel where the input signals are found. Each time you may have to switch the computer to output to the projector by pressing certain keys (e.g., / , LCD VGA / , etc.), or by changing your computer, for example a notebook, or an all equipment, then remove the lens ...Input-A connected to the INPUT A connector Computer connected to Input-B the INPUT B connector (VPL-EX70 only) Video equipment Video connected to the VIDEO input connector Video equipment connected to the projector. Depending on page 33. • The Smart APA feature is effective for the input ...
Operating Instructions
Page 21
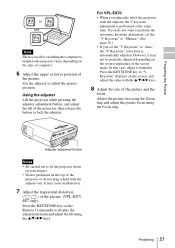
... Be careful not to let the projector down on your fingers. • Do not push hard on the top of the projector or do not want to perform.... Using the adjuster Lift the projector while pressing the adjuster adjustment button, and adjust the tilt of the projector, then release the button to ...VPL-EX70 • When you do not drag it hard with the adjuster, the V keystone adjustment is automatically adjusted. Projecting 21 If you adjust the tilt of the projector... The key used for switching the computer to output to the projector varies depending on the screen, and adjust the value with the...
... Be careful not to let the projector down on your fingers. • Do not push hard on the top of the projector or do not want to perform.... Using the adjuster Lift the projector while pressing the adjuster adjustment button, and adjust the tilt of the projector, then release the button to ...VPL-EX70 • When you do not drag it hard with the adjuster, the V keystone adjustment is automatically adjusted. Projecting 21 If you adjust the tilt of the projector... The key used for switching the computer to output to the projector varies depending on the screen, and adjust the value with the...

Operating Instructions
Page 23
The selected menu appears. The menu disappears automatically if a key is not pressed for displaying the menu and other on the projector. 3 Press the MENU key. Selecting the Menu Language 23 Convenient Functions INPUT NETWORK USB MENU APA ENTER RESET KEYSTONE AUTO FOCUS LENS /TILT PIC MUTING D ...
The selected menu appears. The menu disappears automatically if a key is not pressed for displaying the menu and other on the projector. 3 Press the MENU key. Selecting the Menu Language 23 Convenient Functions INPUT NETWORK USB MENU APA ENTER RESET KEYSTONE AUTO FOCUS LENS /TILT PIC MUTING D ...

Operating Instructions
Page 24
... default initial password setting is set password. Enter new password key. The security lock is "ENTER, ENTER, ENTER, ENTER." Security Lock The projector is not available. If you do not input the correct password, you will be necessary only when the power is displayed, enter the password...SETTING menu. To use this procedure again from step 1. 4 Turn the main power off the "Security Lock" setting on after three times, the projector cannot be performed without the password. Therefore, when you set . Use: Cancel: Other key 3 Enter the password again to remember this is ...
... default initial password setting is set password. Enter new password key. The security lock is "ENTER, ENTER, ENTER, ENTER." Security Lock The projector is not available. If you do not input the correct password, you will be necessary only when the power is displayed, enter the password...SETTING menu. To use this procedure again from step 1. 4 Turn the main power off the "Security Lock" setting on after three times, the projector cannot be performed without the password. Therefore, when you set . Use: Cancel: Other key 3 Enter the password again to remember this is ...

Operating Instructions
Page 25
... password. Note If you call the customer service center because you have forgotten the password, you will need to be able to verify the projector's serial number and your identity. (This process may differ in the center of the image to enlarge. This function does not work when...the Remote Commander. This function works when a signal from a computer is input. 1 Project a normal image, and press the D ZOOM + key on the projector. Off & Go Function If you are leaving the conference room immediately, turn the power for Your Presentation To enlarge the image (Digital Zoom function) You...
... password. Note If you call the customer service center because you have forgotten the password, you will need to be able to verify the projector's serial number and your identity. (This process may differ in the center of the image to enlarge. This function does not work when...the Remote Commander. This function works when a signal from a computer is input. 1 Project a normal image, and press the D ZOOM + key on the projector. Off & Go Function If you are leaving the conference room immediately, turn the power for Your Presentation To enlarge the image (Digital Zoom function) You...

Operating Instructions
Page 27
... adjustments and settings. B Adjustments and Settings Using a Menu Using a MENU 2 Use the v or V key to select the item, then press the B or ENTER key. The projector is input. The setting items are displayed in a popup menu or in the column on the SET SETTING menu. 1 Press the MENU key. Input signal...
... adjustments and settings. B Adjustments and Settings Using a Menu Using a MENU 2 Use the v or V key to select the item, then press the B or ENTER key. The projector is input. The setting items are displayed in a popup menu or in the column on the SET SETTING menu. 1 Press the MENU key. Input signal...

Operating Instructions
Page 28
... is not pressed for one minute. menu of the INPUT SETTING menu Storage of the item that cannot be reset are automatically stored in the projector memory when the ENTER key is no input signal, "Cannot adjust this item." For details, see page 39. 28 Using a MENU appears on the screen...
... is not pressed for one minute. menu of the INPUT SETTING menu Storage of the item that cannot be reset are automatically stored in the projector memory when the ENTER key is no input signal, "Cannot adjust this item." For details, see page 39. 28 Using a MENU appears on the screen...


