Quick Reference Guide
Page 18
... countries. • Adobe and Acrobat Reader is not installed in the supplied CD-ROM. About the Quick Reference Manual This Quick Reference Manual explains the connections and basic operations of this case, open "index.htm" file, doubleclick on the Operating Instructions you want to read. Select the Operating Instructions you can download free Acrobat Reader software from among those in the CD-ROM, Adobe...
... countries. • Adobe and Acrobat Reader is not installed in the supplied CD-ROM. About the Quick Reference Manual This Quick Reference Manual explains the connections and basic operations of this case, open "index.htm" file, doubleclick on the Operating Instructions you want to read. Select the Operating Instructions you can download free Acrobat Reader software from among those in the CD-ROM, Adobe...

Quick Reference Guide
Page 19
Notes on Use Note on Use GB Check the positions of the ventilation holes shown in the following illustrations. For other precautions, read the separate "Safety Regulations" carefully. 1 2 1 Ventilation holes (exhaust) 2 Indicators 3 3 Remote control detector 4 Ventilation holes (intake) GB 4 English 3 Notes on the Ventilation Holes Do not block ventilation holes (exhaust/intake). If they are blocked, internal heat may build up and cause fire or damage to the unit.
Notes on Use Note on Use GB Check the positions of the ventilation holes shown in the following illustrations. For other precautions, read the separate "Safety Regulations" carefully. 1 2 1 Ventilation holes (exhaust) 2 Indicators 3 3 Remote control detector 4 Ventilation holes (intake) GB 4 English 3 Notes on the Ventilation Holes Do not block ventilation holes (exhaust/intake). If they are blocked, internal heat may build up and cause fire or damage to the unit.
Quick Reference Guide
Page 20
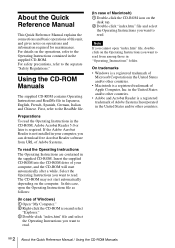
Connecting with a computer INPUT AUDIO VIDEO AUDIO INPUT A/B INPUT A video input HD D-sub 15 pin cable (supplied) stereo audio connecting cable (not supplied) Use a no-resistance cable. Refer also to the instruction manual of the computer to pull it out from the plug, not the cable itself. Note For stereo audio connection, connect the stereo audio connecting cable to the AUDIO connector for VPL-ES4, or to the AUDIO INPUT A/B connector for each connection. • Insert the cable plugs firmly. Projecting Connecting the Projector When you connect the...
Connecting with a computer INPUT AUDIO VIDEO AUDIO INPUT A/B INPUT A video input HD D-sub 15 pin cable (supplied) stereo audio connecting cable (not supplied) Use a no-resistance cable. Refer also to the instruction manual of the computer to pull it out from the plug, not the cable itself. Note For stereo audio connection, connect the stereo audio connecting cable to the AUDIO connector for VPL-ES4, or to the AUDIO INPUT A/B connector for each connection. • Insert the cable plugs firmly. Projecting Connecting the Projector When you connect the...

Quick Reference Guide
Page 21
...)* cable (not supplied) 3 Component (D-sub 15-pin y 3 × phono plug)* cable (not supplied) Note If connection 3 is made with VPL-EX4, connect the stereo audio connecting cable to select the input signal with a VCR/DVD player INPUT AUDIO S VIDEO VIDEO AUDIO INPUT A/B INPUT A 3 1 2 stereo audio connecting cable (not supplied) Use a no-resistance cable. in the CDROM. 5 Projecting GB If connection 3 is made , you may have to the AUDIO INPUT A/B connector. For details, see the Operating Instructions contained in the SET SETTING menu. Connecting with the "Input-A Signal...
...)* cable (not supplied) 3 Component (D-sub 15-pin y 3 × phono plug)* cable (not supplied) Note If connection 3 is made with VPL-EX4, connect the stereo audio connecting cable to select the input signal with a VCR/DVD player INPUT AUDIO S VIDEO VIDEO AUDIO INPUT A/B INPUT A 3 1 2 stereo audio connecting cable (not supplied) Use a no-resistance cable. in the CDROM. 5 Projecting GB If connection 3 is made , you may have to the AUDIO INPUT A/B connector. For details, see the Operating Instructions contained in the SET SETTING menu. Connecting with the "Input-A Signal...
Quick Reference Guide
Page 22
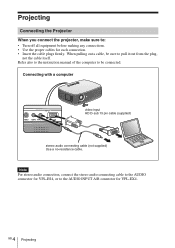
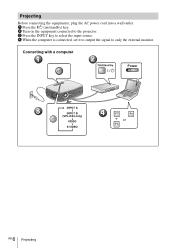
Connecting with a computer 1 2 Power INPUT A INPUT B (VPL-EX4 only) VIDEO S VIDEO 4 F7 Fx or Fn 6 GB Projecting Projecting Before connecting the equipments, plug the AC power cord into a wall outlet. 1 Press the ?/1 (on/standby) key. 2 Turn on the equipment connected to the projector. 3 Press the INPUT key to select the input source. 4 When the computer is connected, set it to output the signal to only the external monitor.
Connecting with a computer 1 2 Power INPUT A INPUT B (VPL-EX4 only) VIDEO S VIDEO 4 F7 Fx or Fn 6 GB Projecting Projecting Before connecting the equipments, plug the AC power cord into a wall outlet. 1 Press the ?/1 (on/standby) key. 2 Turn on the equipment connected to the projector. 3 Press the INPUT key to select the input source. 4 When the computer is connected, set it to output the signal to only the external monitor.
Quick Reference Guide
Page 23
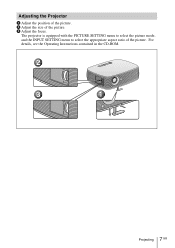
For details, see the Operating Instructions contained in the CD-ROM. 2 3 1 7 Projecting GB Adjusting the Projector 1 Adjust the position of the picture. 2 Adjust the size of the picture. The projector is equipped with the PICTURE SETTING menu to select the picture mode, and the INPUT SETTING menu to select the appropriate aspect ratio of the picture. 3 Adjust the focus.
For details, see the Operating Instructions contained in the CD-ROM. 2 3 1 7 Projecting GB Adjusting the Projector 1 Adjust the position of the picture. 2 Adjust the size of the picture. The projector is equipped with the PICTURE SETTING menu to select the picture mode, and the INPUT SETTING menu to select the appropriate aspect ratio of the picture. 3 Adjust the focus.
Quick Reference Guide
Page 24
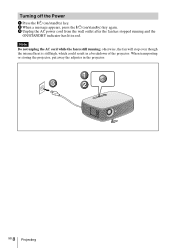
When transporting or storing the projector, put away the adjuster in a breakdown of the projector. Note Do not unplug the AC cord while the fan is still high, which could result in the projector. 1 3 2 8 GB Projecting Turning off the Power 1 Press the ?/1 (on/standby) key. 2 When a message appears, press the ?/1 (on/standby) key again. 3 Unplug the AC power cord from the wall outlet after the fan has stopped running ; otherwise, the fan will stop even though the internal heat is still running and the ON/STANDBY indicator has lit in red.
When transporting or storing the projector, put away the adjuster in a breakdown of the projector. Note Do not unplug the AC cord while the fan is still high, which could result in the projector. 1 3 2 8 GB Projecting Turning off the Power 1 Press the ?/1 (on/standby) key. 2 When a message appears, press the ?/1 (on/standby) key again. 3 Unplug the AC power cord from the wall outlet after the fan has stopped running ; otherwise, the fan will stop even though the internal heat is still running and the ON/STANDBY indicator has lit in red.
Quick Reference Guide
Page 25
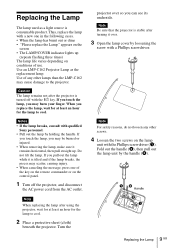
... replacement lamp. Use of use. Notes • If the lamp breaks, consult with a new one of the key on the remote commander or on the control panel. 1 Turn off with the ?/1 key. Turn the projector over . 3 Open the lamp cover by the handle (3). appears on the lamp unit with a Phillips screwdriver. Note For safety reasons, do not loosen any other screws. 4 Loosen the two screws on the screen • The LAMP/COVER indicator lights...
... replacement lamp. Use of use. Notes • If the lamp breaks, consult with a new one of the key on the remote commander or on the control panel. 1 Turn off with the ?/1 key. Turn the projector over . 3 Open the lamp cover by the handle (3). appears on the lamp unit with a Phillips screwdriver. Note For safety reasons, do not loosen any other screws. 4 Loosen the two screws on the screen • The LAMP/COVER indicator lights...
Quick Reference Guide
Page 26
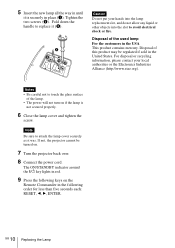
... to touch the glass surface of the lamp. • The power will not turn on . 7 Turn the projector back over. 8 Connect the power cord. The ON/STANDBY indicator around the ?/1 key lights in red. 9 Press the following order for less than five seconds each: RESET, b, B, ENTER. Disposal of the used lamp For the customers in place (1). Tighten the two screws (2). Notes • Be careful not to...
... to touch the glass surface of the lamp. • The power will not turn on . 7 Turn the projector back over. 8 Connect the power cord. The ON/STANDBY indicator around the ?/1 key lights in red. 9 Press the following order for less than five seconds each: RESET, b, B, ENTER. Disposal of the used lamp For the customers in place (1). Tighten the two screws (2). Notes • Be careful not to...
Quick Reference Guide
Page 27
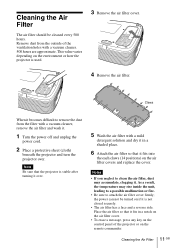
... value varies depending on the remote commander. Note Be sure that the projector is used. 3 Remove the air filter cover. 4 Remove the air filter. the power can not be cleaned every 500 hours. Remove dust from the filter with a vacuum cleaner, remove the air filter and wash it. 1 Turn the power off and unplug the power cord. 2 Place a protective sheet (cloth) beneath the projector and turn the projector over . 5 Wash the air filter with a mild detergent solution and...
... value varies depending on the remote commander. Note Be sure that the projector is used. 3 Remove the air filter cover. 4 Remove the air filter. the power can not be cleaned every 500 hours. Remove dust from the filter with a vacuum cleaner, remove the air filter and wash it. 1 Turn the power off and unplug the power cord. 2 Place a protective sheet (cloth) beneath the projector and turn the projector over . 5 Wash the air filter with a mild detergent solution and...
Quick Reference Guide
Page 28
... signal is colored strangely. c Select the input source correctly using the following procedures. 1 Connect the projector to the computer's operating instructions supplied with the power on the LCD panel. The picture from the connector and the numbers of your computer, for example a notebook, or an all-in the CD-ROM. c Leave the projector for about two hours with your computer's settings. c Wait for about 45 seconds before turning on . 3 Start...
... signal is colored strangely. c Select the input source correctly using the following procedures. 1 Connect the projector to the computer's operating instructions supplied with the power on the LCD panel. The picture from the connector and the numbers of your computer, for example a notebook, or an all-in the CD-ROM. c Leave the projector for about two hours with your computer's settings. c Wait for about 45 seconds before turning on . 3 Start...
Quick Reference Guide
Page 29
... then turn on the INPUT SETTING menu properly. The picture flickers. c Replace the lamp. • The lamp has reached a high temperature. c Ensure that "High Altitude Mode" in the Setup menu is set to see that nothing is blocking the ventilation holes. • The projector is detached. c Adjust "Dot Phase" on again. flashes) ON/STANDBY flashes in orange. ON/STANDBY flashes in orange. (Repetition rate of 3 flashes) • The lamp has reached the end of 6 flashes) Unplug the AC power cord from...
... then turn on the INPUT SETTING menu properly. The picture flickers. c Replace the lamp. • The lamp has reached a high temperature. c Ensure that "High Altitude Mode" in the Setup menu is set to see that nothing is blocking the ventilation holes. • The projector is detached. c Adjust "Dot Phase" on again. flashes) ON/STANDBY flashes in orange. ON/STANDBY flashes in orange. (Repetition rate of 3 flashes) • The lamp has reached the end of 6 flashes) Unplug the AC power cord from...
Quick Reference Guide
Page 30
... × 3) VPL-EX4: 0.63-inch XGA panel, 2,360,000 pixels (786,432 pixels × 3) Lens 1.2 times zoom lens f 18.8 to 22.6 mm/F1.6 to 1.94 Lamp 165 W Ultra high pressure lamp Projected picture size 40 to 300 inches (measured diagonally) Light output 2100 lm (When the Lamp Mode is operating properly before use. Optional accessories Projector Lamp LMP-C162 (for replacement) Some of the items may be available in standby: 5 W Supplied accessories Remote Commander (1) Lithium...
... × 3) VPL-EX4: 0.63-inch XGA panel, 2,360,000 pixels (786,432 pixels × 3) Lens 1.2 times zoom lens f 18.8 to 22.6 mm/F1.6 to 1.94 Lamp 165 W Ultra high pressure lamp Projected picture size 40 to 300 inches (measured diagonally) Light output 2100 lm (When the Lamp Mode is operating properly before use. Optional accessories Projector Lamp LMP-C162 (for replacement) Some of the items may be available in standby: 5 W Supplied accessories Remote Commander (1) Lithium...
Quick Reference Guide
Page 104
Sony Corporation Printed in cabinets and printed wiring boards. Halogenated flame retardants are not used in China
Sony Corporation Printed in cabinets and printed wiring boards. Halogenated flame retardants are not used in China


