
Operating Instructions
Page 1
4-101-719-11 (1) Data Projector Operating Instructions VPL-DS100 © 2003 Sony Corporation
4-101-719-11 (1) Data Projector Operating Instructions VPL-DS100 © 2003 Sony Corporation

Operating Instructions
Page 5
.../Front/Left Side 10 Rear/Right Side/Bottom 10 Control Panel 11 Connector Panel 13 Remote Commander 14 Setting Up and Projecting Installing the Projector 16 Connecting the Projector 17 Connecting with a Computer ...... 17 Connecting with a VCR or 15k RGB/Component Equipment 19 Selecting the Menu Language ..........21 Projecting 23 Effective Tools...
.../Front/Left Side 10 Rear/Right Side/Bottom 10 Control Panel 11 Connector Panel 13 Remote Commander 14 Setting Up and Projecting Installing the Projector 16 Connecting the Projector 17 Connecting with a Computer ...... 17 Connecting with a VCR or 15k RGB/Component Equipment 19 Selecting the Menu Language ..........21 Projecting 23 Effective Tools...
Operating Instructions
Page 6
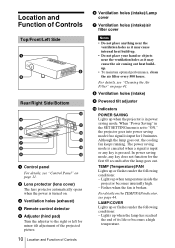
...internal heat build-up may occur, causing picture degradation or damage to the projector. To remove dust on . • Do not place your hand or objects near the ventilation holes. On LCD data projector • The LCD data projector is a normal result of the manufacturing process and does not indicate a malfunction...should not be changed to a dark color. The powered tilt adjuster of this unit automatically extends when the power is turned on the LCD data projector. On illumination • To obtain the best picture, the front of the screen should be near these will damage the cabinet. &#...
...internal heat build-up may occur, causing picture degradation or damage to the projector. To remove dust on . • Do not place your hand or objects near the ventilation holes. On LCD data projector • The LCD data projector is a normal result of the manufacturing process and does not indicate a malfunction...should not be changed to a dark color. The powered tilt adjuster of this unit automatically extends when the power is turned on the LCD data projector. On illumination • To obtain the best picture, the front of the screen should be near these will damage the cabinet. &#...

Operating Instructions
Page 7
...Toppling the unit Avoid using when the unit is a lot of the adjuster setting. Tilting the unit out of the range of the projector. When the internal heat builds up due to the block-up . Highly heated and humid Unsuitable Conditions Do not use the...lamp life. Poorly ventilated Very dusty Avoid installing the unit in the following conditions. Clean it up periodically. • Allow adequate air circulation to the projector. Overview Notes on surfaces (rugs, blankets, etc.) or near materials (curtains, draperies) that the ventilation holes may inhale tininess such as the unit...
...Toppling the unit Avoid using when the unit is a lot of the adjuster setting. Tilting the unit out of the range of the projector. When the internal heat builds up due to the block-up . Highly heated and humid Unsuitable Conditions Do not use the...lamp life. Poorly ventilated Very dusty Avoid installing the unit in the following conditions. Clean it up periodically. • Allow adequate air circulation to the projector. Overview Notes on surfaces (rugs, blankets, etc.) or near materials (curtains, draperies) that the ventilation holes may inhale tininess such as the unit...
Operating Instructions
Page 8
... in the INSTALL SETTING menu. This function is manufactured using highprecision technology. Failing to set this may cause damage. The projector opens the lens protector, corrects the V Keystone, and sets optimum conditions for video input. Such installation may build up....Intelligent Auto-setup. Features High brightness, high picture quality • High brightness Adopting Sony's unique, high-efficiency optical system and the 157 W UHP lamp allows high brigtness (light output 1200 ANSI lumen). • High resolution Three superhigh-aperture 0.62-inch SVGA panels with approximately ...
... in the INSTALL SETTING menu. This function is manufactured using highprecision technology. Failing to set this may cause damage. The projector opens the lens protector, corrects the V Keystone, and sets optimum conditions for video input. Such installation may build up....Intelligent Auto-setup. Features High brightness, high picture quality • High brightness Adopting Sony's unique, high-efficiency optical system and the 157 W UHP lamp allows high brigtness (light output 1200 ANSI lumen). • High resolution Three superhigh-aperture 0.62-inch SVGA panels with approximately ...
Operating Instructions
Page 9
...trademark of Video Electronics Standard Association. • Display Data Channel is disconnected. High portability • Light weight/small size/simple design This projector has been miniaturized to approx. 2.8 kg (6 lb 3 oz) in your office. Its simple yet sophisticated design fits comfortably in weight and... PAL-N color system can enable the security lock to -use Remote Commander The Remote Commander is equipped with external equipment This projector is preset for this projector. ...* NTSC4.43 is the color system used when playing back a video recorded on NTSC on a NTSC4.43 system VCR...
...trademark of Video Electronics Standard Association. • Display Data Channel is disconnected. High portability • Light weight/small size/simple design This projector has been miniaturized to approx. 2.8 kg (6 lb 3 oz) in your office. Its simple yet sophisticated design fits comfortably in weight and... PAL-N color system can enable the security lock to -use Remote Commander The Remote Commander is equipped with external equipment This projector is preset for this projector. ...* NTSC4.43 is the color system used when playing back a video recorded on NTSC on a NTSC4.43 system VCR...
Operating Instructions
Page 10
...panel For details, see "Cleaning the Air Filter" on page 41. 8 Ventilation holes (intake) 9 Powered tilt adjuster 0 Indicators POWER SAVING Lights up when the projector is in the SET SETTING menu is set to the right or left for minor tilt adjustment of the projected picture. 10 Location and Function... the lamp goes out. For details on . 3 Ventilation holes (exhaust) 4 Remote control detector 5 Adjuster (hind pad) Turn the adjuster to "ON," the projector goes into power saving mode if no signal is turned on the TEMP/FAN indicator, see page 44. When "Power Saving" in power saving mode...
...panel For details, see "Cleaning the Air Filter" on page 41. 8 Ventilation holes (intake) 9 Powered tilt adjuster 0 Indicators POWER SAVING Lights up when the projector is in the SET SETTING menu is set to the right or left for minor tilt adjustment of the projected picture. 10 Location and Function... the lamp goes out. For details on . 3 Ventilation holes (exhaust) 4 Remote control detector 5 Adjuster (hind pad) Turn the adjuster to "ON," the projector goes into power saving mode if no signal is turned on the TEMP/FAN indicator, see page 44. When "Power Saving" in power saving mode...

Operating Instructions
Page 11
... size. qd Connector panel For details, see "Connector Panel" on the LAMP/COVER indicator, see page 44. When turning off the power, see on the projector with the I / 1 key. Lights in standby mode. Web page address: http://www.kensington.com/ Control Panel INPUT 123 TILT MENU PUSH ENTER 4 567 1 I... AC power cord is not secured firmly. Lights in standby mode, you cannot light up or flashes under the following the message on the projector when the projector is turned on . - The fan runs for the first 60 seconds. During this time, you can turn off . Location and Function...
... size. qd Connector panel For details, see "Connector Panel" on the LAMP/COVER indicator, see page 44. When turning off the power, see on the projector with the I / 1 key. Lights in standby mode. Web page address: http://www.kensington.com/ Control Panel INPUT 123 TILT MENU PUSH ENTER 4 567 1 I... AC power cord is not secured firmly. Lights in standby mode, you cannot light up or flashes under the following the message on the projector when the projector is turned on . - The fan runs for the first 60 seconds. During this time, you can turn off . Location and Function...

Operating Instructions
Page 12
... page 12. 5 MENU key Displays the on-screen menu. How to use the powered tilt adjuster To adjust the height Adjust the height of the projector as follows: 1 Press the I / 1 key The lens protector opens, and the powered tilt adjuster rises automatically. It may press the D KEYSTONE ...key on the top of the projector. Powered tilt adjuster 2 Press f or F of the TILT key to display the Tilt menu and adjust the tilt using the v/V/b/B keys. t 3 INPUT key ...
... page 12. 5 MENU key Displays the on-screen menu. How to use the powered tilt adjuster To adjust the height Adjust the height of the projector as follows: 1 Press the I / 1 key The lens protector opens, and the powered tilt adjuster rises automatically. It may press the D KEYSTONE ...key on the top of the projector. Powered tilt adjuster 2 Press f or F of the TILT key to display the Tilt menu and adjust the tilt using the v/V/b/B keys. t 3 INPUT key ...

Operating Instructions
Page 14
... to enlarge. key reduces an image that has been enlarged with the D ZOOM + key. 5 Infrared transmitter 6 FREEZE key Used to adjust the tilt of the projector, or the trapezoidal distortion of the image manually. To cancel the freeze function, press the key again. 7 INPUT key 8 APA (Auto Pixel Alignment) key Adjusts...
... to enlarge. key reduces an image that has been enlarged with the D ZOOM + key. 5 Infrared transmitter 6 FREEZE key Used to adjust the tilt of the projector, or the trapezoidal distortion of the image manually. To cancel the freeze function, press the key again. 7 INPUT key 8 APA (Auto Pixel Alignment) key Adjusts...

Operating Instructions
Page 15
...toward the remote control detector. • The operation range is , the wider the angle within which the commander can control the projector becomes. Notes on Remote Commander operation • Make sure that nothing obstructs the infrared beam between the Remote Commander and the remote... and the remote control detector on the lithium battery • Keep the lithium battery out of the reach of Controls 15 Notes on the projector. Location and Function of children. • Should the battery be swallowed, immediately consult a doctor. Overview 2 Install the lithium battery. +...
...toward the remote control detector. • The operation range is , the wider the angle within which the commander can control the projector becomes. Notes on Remote Commander operation • Make sure that nothing obstructs the infrared beam between the Remote Commander and the remote... and the remote control detector on the lithium battery • Keep the lithium battery out of the reach of Controls 15 Notes on the projector. Location and Function of children. • Should the battery be swallowed, immediately consult a doctor. Overview 2 Install the lithium battery. +...

Operating Instructions
Page 16
... design value shown in the table above. Note When using the projector by suspending it from the ceilling, consult with qualified Sony personel. (fee charged) 16 Installing the Projector B Setting Up and Projecting Installing the Projector This section describes how to install the projector. Distance between the screen and the center of the lens Unit...
... design value shown in the table above. Note When using the projector by suspending it from the ceilling, consult with qualified Sony personel. (fee charged) 16 Installing the Projector B Setting Up and Projecting Installing the Projector This section describes how to install the projector. Distance between the screen and the center of the lens Unit...

Operating Instructions
Page 17
...Channel 2B). For more information, refer to the computer by using the supplied HD D-sub 15 pin cable. 2 Turn the projector on. 3 Start the computer. Notes • The projector accepts VGA, SVGA, XGA signals. If your computer's display and the external monitor, the picture of the external monitor may ... the computer's instruction manual. When pulling out a cable, be sure to pull it out from the plug, not the cable itself To connect the projector, refer to : • Turn off all equipment before making any connections. • Use the proper cables for the external monitor. • If you...
...Channel 2B). For more information, refer to the computer by using the supplied HD D-sub 15 pin cable. 2 Turn the projector on. 3 Start the computer. Notes • The projector accepts VGA, SVGA, XGA signals. If your computer's display and the external monitor, the picture of the external monitor may ... the computer's instruction manual. When pulling out a cable, be sure to pull it out from the plug, not the cable itself To connect the projector, refer to : • Turn off all equipment before making any connections. • Use the proper cables for the external monitor. • If you...

Operating Instructions
Page 18
To connect a Macintosh computer To connect a Macintosh computer equipped with video output connector of a type having two rows of pins, use a commercially available plug adaptor. 18 Connecting the Projector To connect an IBM PC/AT compatible computer Left side AUDIO VIDEO S VIDEO INPUT A to monitor output HD D-sub 15-pin cable (supplied) Computer Stereo audio connecting cable (not supplied)a) to audio output a) Use a no-resistance cable.
To connect a Macintosh computer To connect a Macintosh computer equipped with video output connector of a type having two rows of pins, use a commercially available plug adaptor. 18 Connecting the Projector To connect an IBM PC/AT compatible computer Left side AUDIO VIDEO S VIDEO INPUT A to monitor output HD D-sub 15-pin cable (supplied) Computer Stereo audio connecting cable (not supplied)a) to audio output a) Use a no-resistance cable.

Operating Instructions
Page 19
... Stereo audio connecting cable (not supplied)a) Video cable (not supplied) or S-Video cable (not supplied) to RGB/ component output 15k RGB/Component equipment Connecting the Projector 19 to audio output to video output Left side AUDIO AUDIO VIDEO S VIDEO INPUT A a) Use a no -resistance cable. Setting Up and Projecting Connecting with a VCR...
... Stereo audio connecting cable (not supplied)a) Video cable (not supplied) or S-Video cable (not supplied) to RGB/ component output 15k RGB/Component equipment Connecting the Projector 19 to audio output to video output Left side AUDIO AUDIO VIDEO S VIDEO INPUT A a) Use a no -resistance cable. Setting Up and Projecting Connecting with a VCR...

Operating Instructions
Page 20
Notes • Set the aspect ratio using "Wide Mode" in the SET SETTING menu. • Use the composite sync signal when you connect the unit to the input signal. • When you input the external sync signal from 15k RGB/component equipment. 20 Connecting the Projector setting in the INPUT SETTING menu according to 15k RGB or component video equipment, select video GBR or component with the "Input-A Signal Sel."
Notes • Set the aspect ratio using "Wide Mode" in the SET SETTING menu. • Use the composite sync signal when you connect the unit to the input signal. • When you input the external sync signal from 15k RGB/component equipment. 20 Connecting the Projector setting in the INPUT SETTING menu according to 15k RGB or component video equipment, select video GBR or component with the "Input-A Signal Sel."

Operating Instructions
Page 21
... detector INPUT TILT MENU PUSH ENTER Setting Up and Projecting 1 Plug the AC power cord into a wall outlet. 2 Press the I / 1 key to turn on the projector. 3 Press the MENU key.
... detector INPUT TILT MENU PUSH ENTER Setting Up and Projecting 1 Plug the AC power cord into a wall outlet. 2 Press the I / 1 key to turn on the projector. 3 Press the MENU key.

Operating Instructions
Page 23
...position. 3 Turn on the type of your computer, for example a notebook, or an all equipment. Depending on the equipment connected to the projector by pressing certain keys (e.g., LCD / VGA , / , etc.), or by changing your computer's settings. Projecting Remote control detector INPUT TILT MENU PUSH ENTER ON/STANDBY indicators ... Projecting 1 Plug the AC power cord into standby mode. 2 Press the I / 1 key. The ON/STANDBY indicator lights in red and the projector goes into a wall outlet, then connect all -inone LCD type, you may have to switch the computer to output to the...
...position. 3 Turn on the type of your computer, for example a notebook, or an all equipment. Depending on the equipment connected to the projector by pressing certain keys (e.g., LCD / VGA , / , etc.), or by changing your computer's settings. Projecting Remote control detector INPUT TILT MENU PUSH ENTER ON/STANDBY indicators ... Projecting 1 Plug the AC power cord into standby mode. 2 Press the I / 1 key. The ON/STANDBY indicator lights in red and the projector goes into a wall outlet, then connect all -inone LCD type, you may have to switch the computer to output to the...

Operating Instructions
Page 24
..." on page 35. • The Smart APA is performed at the same time. The Fx key varies depending on the Remote Commander to "On," the projector searches for the input signal from Press INPUT to display Computer connected to the INPUT A connector INPUT A Video equipment connected to the VIDEO input connector...
..." on page 35. • The Smart APA is performed at the same time. The Fx key varies depending on the Remote Commander to "On," the projector searches for the input signal from Press INPUT to display Computer connected to the INPUT A connector INPUT A Video equipment connected to the VIDEO input connector...
Operating Instructions
Page 25
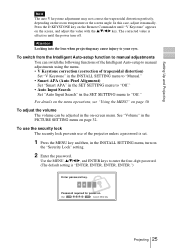
... volume The volume can switch the following functions of the Intelligent Auto-setup to manual adjustments using the menu. • V Keystone correction (correction of the projector unless a password is set. 1 Press the MENU key and then, in the on-screen menu. See "Volume" in the SET SETTING menu to "Off." For...
... volume The volume can switch the following functions of the Intelligent Auto-setup to manual adjustments using the menu. • V Keystone correction (correction of the projector unless a password is set. 1 Press the MENU key and then, in the on-screen menu. See "Volume" in the SET SETTING menu to "Off." For...


