User Manual
Page 2
... a circuit different from that interference will not occur in the literature accompanying the appliance. This symbol is intended to alert the user to operate this manual could void your authority to the presence of electric shock to which the receiver is for help. Declaration of the FCC Rules. If this equipment... are designed to provide reasonable protection against harmful interference in the USA If you may cause harmful interference to Part 15 of Conformity Trade Name: SONY Model No.: VPL-CS7/VPL-ES2 Responsible Party: Sony Electronics Inc.
... a circuit different from that interference will not occur in the literature accompanying the appliance. This symbol is intended to alert the user to operate this manual could void your authority to the presence of electric shock to which the receiver is for help. Declaration of the FCC Rules. If this equipment... are designed to provide reasonable protection against harmful interference in the USA If you may cause harmful interference to Part 15 of Conformity Trade Name: SONY Model No.: VPL-CS7/VPL-ES2 Responsible Party: Sony Electronics Inc.
User Manual
Page 14
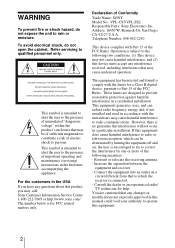
.../standby) key 2 ENTER/arrow key (v/V/b/B) Press the center of the key to adjust the tilt of the projector, or the trapezoidal distortion of the image manually. Before using the Remote Commander Pull out the clear film from the Remote Commander. 2 Install the lithium battery. + side facing upward 3 Put the lithium battery...
.../standby) key 2 ENTER/arrow key (v/V/b/B) Press the center of the key to adjust the tilt of the projector, or the trapezoidal distortion of the image manually. Before using the Remote Commander Pull out the clear film from the Remote Commander. 2 Install the lithium battery. + side facing upward 3 Put the lithium battery...
User Manual
Page 17
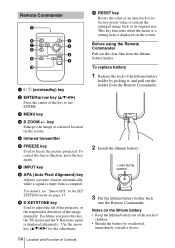
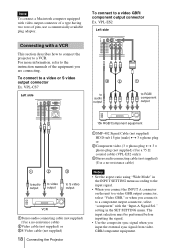
..., refer to the computer's operating instructions supplied with a Computer This section describes how to connect the projector to the computer's instruction manual. loose connections may increase noise and reduce performance of the external monitor may not appear properly. However, we recommend that you set your... type, to output the signal to both your computer to SVGA mode for each connection. • Insert the cable plugs firmly; VPL-CS7 Left side When you set the output mode of your computer's display and the external monitor, the picture of picture signals. Projecting the...
..., refer to the computer's operating instructions supplied with a Computer This section describes how to connect the projector to the computer's instruction manual. loose connections may increase noise and reduce performance of the external monitor may not appear properly. However, we recommend that you set your... type, to output the signal to both your computer to SVGA mode for each connection. • Insert the cable plugs firmly; VPL-CS7 Left side When you set the output mode of your computer's display and the external monitor, the picture of picture signals. Projecting the...
User Manual
Page 18
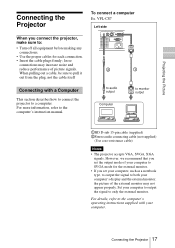
...connector of a type having two rows of the equipment you connect it to a component output connector, select "component" with the "Input-A Signal Sel." VPL-CS7 Left side AUDIO AUDIO VIDEO S VIDEO INPUT A MONITOR OUT AUAUDDIIOO VIDEO S VIDEO INPUT A PR/CR PB/CB Y 32 to audio output 1 to... GBR," or when you are connecting. To connect to a video or S video output connector Ex. For more information, refer to the instruction manuals of pins, use a commercially available plug adaptor. To connect to a video GBR/ component output connector Ex. The input selection must be performed ...
...connector of a type having two rows of the equipment you connect it to a component output connector, select "component" with the "Input-A Signal Sel." VPL-CS7 Left side AUDIO AUDIO VIDEO S VIDEO INPUT A MONITOR OUT AUAUDDIIOO VIDEO S VIDEO INPUT A PR/CR PB/CB Y 32 to audio output 1 to... GBR," or when you are connecting. To connect to a video or S video output connector Ex. For more information, refer to the instruction manuals of pins, use a commercially available plug adaptor. To connect to a video GBR/ component output connector Ex. The input selection must be performed ...
User Manual
Page 19
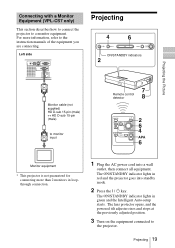
...opens, and the powered tilt adjuster rises and stops at the previously adjusted position. 3 Turn on the equipment connected to the instruction manuals of the equipment you are connecting. The ON/STANDBY indicator lights in red and the projector goes into a wall outlet, then ...Projecting 19 The ON/STANDBY indicator lights in green and the Intelligent Auto-setup starts. Projecting the Picture Connecting with a Monitor Equipment (VPL-CS7 only) This section describes how to connect the projector to monitor input Remote control detector 8 Monitor equipment * This projector is not ...
...opens, and the powered tilt adjuster rises and stops at the previously adjusted position. 3 Turn on the equipment connected to the instruction manuals of the equipment you are connecting. The ON/STANDBY indicator lights in red and the projector goes into a wall outlet, then ...Projecting 19 The ON/STANDBY indicator lights in green and the Intelligent Auto-setup starts. Projecting the Picture Connecting with a Monitor Equipment (VPL-CS7 only) This section describes how to connect the projector to monitor input Remote control detector 8 Monitor equipment * This projector is not ...
User Manual
Page 20
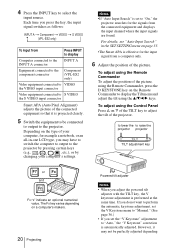
...; When you set to be perfectly adjusted depending If you do not want to perform the automatic keystone adjustment, set the V Keystone menu to "Manual." (See page 36.) • If you adjust the powered tilt adjuster with the TILT key, the V keystone adjustment is set the "V Keystone... input signal from Press INPUT to display Computer connected to the INPUT A INPUT A connector Equipment connected to the component connector Component (VPL-ES2 only) Video equipment connected to VIDEO the VIDEO input connector Video equipment connected to display the Tilt menu and adjust the tilt ...
...; When you set to be perfectly adjusted depending If you do not want to perform the automatic keystone adjustment, set the V Keystone menu to "Manual." (See page 36.) • If you adjust the powered tilt adjuster with the TILT key, the V keystone adjustment is set the "V Keystone... input signal from Press INPUT to display Computer connected to the INPUT A INPUT A connector Equipment connected to the component connector Component (VPL-ES2 only) Video equipment connected to VIDEO the VIDEO input connector Video equipment connected to display the Tilt menu and adjust the tilt ...

User Manual
Page 21
... Turn the focus ring to reduce the internal heat. Also, the ON/ STANDBY indicator flashes quickly for about two seconds. During this case, adjust it manually. Attention Looking into the lens when projecting may be able to light up again the ON/STANDBY indicator with the I / 1 key, or if you... 1 Press the I / 1 key again." Note A message disappears if you press any key for five seconds. 2 Press the I / 1 key for about 90 seconds (VPL-ES2) to adjust the focus. The corrected value is put away in green and the fan continues to your fingers. • Do not push hard...
... Turn the focus ring to reduce the internal heat. Also, the ON/ STANDBY indicator flashes quickly for about two seconds. During this case, adjust it manually. Attention Looking into the lens when projecting may be able to light up again the ON/STANDBY indicator with the I / 1 key, or if you... 1 Press the I / 1 key again." Note A message disappears if you press any key for five seconds. 2 Press the I / 1 key for about 90 seconds (VPL-ES2) to adjust the focus. The corrected value is put away in green and the fan continues to your fingers. • Do not push hard...
User Manual
Page 34
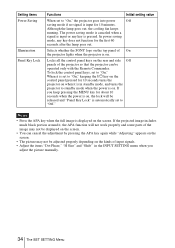
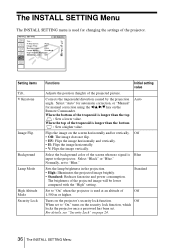
Selects whether the SONY logo on the top panel of the projector so that the projector can cancel the adjustment by pressing the APA key again while "Adjusting" appears ... seconds when the power is in the INPUT SETTING menu when you keep pressing the MENU key for 10 minutes. If you adjust the picture manually. 34 The SET SETTING Menu When it is displayed on . In power saving mode, any key is input or any key does not function for...
Selects whether the SONY logo on the top panel of the projector so that the projector can cancel the adjustment by pressing the APA key again while "Adjusting" appears ... seconds when the power is in the INPUT SETTING menu when you keep pressing the MENU key for 10 minutes. If you adjust the picture manually. 34 The SET SETTING Menu When it is displayed on . In power saving mode, any key is input or any key does not function for...
User Manual
Page 36
...trapezoid is longer than the top : Sets a lower value. Select the background color of the screen when no signal is used for manual correction using the b/v/B/V key on the projector's security lock function. The brightness of the projected picture. INSTALL SETTING Tilt... Sets the... on the security lock function, which locks the projector once a password has been set to the projector. Select "Auto" for automatic correction, or "Manual" for changing the settings of the projector. Off • Off: The image does not flip. • HV: Flips the image horizontally and vertically...
...trapezoid is longer than the top : Sets a lower value. Select the background color of the screen when no signal is used for manual correction using the b/v/B/V key on the projector's security lock function. The brightness of the projected picture. INSTALL SETTING Tilt... Sets the... on the security lock function, which locks the projector once a password has been set to the projector. Select "Auto" for automatic correction, or "Manual" for changing the settings of the projector. Off • Off: The image does not flip. • HV: Flips the image horizontally and vertically...
User Manual
Page 47
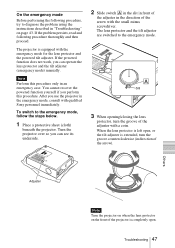
... projector in the emergency mode, consult with a coin. Note Perform this procedure. After you can operate the lens protector and the tilt adjuster (emergency mode) manually. To switch to the emergency mode. A Slit 3 When opening/closing the lens protector, turn the groove counterclockwise (in an emergency case. You cannot recover the..., turn the groove of the arrow). If the powered function does not work, you perform this procedure only in direction of the adjuster with qualified Sony personnel immediately. When the lens protector is left open .
... projector in the emergency mode, consult with a coin. Note Perform this procedure. After you can operate the lens protector and the tilt adjuster (emergency mode) manually. To switch to the emergency mode. A Slit 3 When opening/closing the lens protector, turn the groove counterclockwise (in an emergency case. You cannot recover the..., turn the groove of the arrow). If the powered function does not work, you perform this procedure only in direction of the adjuster with qualified Sony personnel immediately. When the lens protector is left open .
User Manual
Page 48
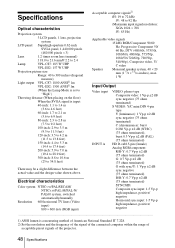
...(480,000 pixels × 3) Lens 1.2 times zoom lens (manual) f 18.0 to 21.6 mm/F 2.2 to 2.4 Lamp VPL-CS7: 185 W UHP VPL-ES2: 157 W UHP Projection picture size Range: 40 to 300 inches (diagonal measure) Light output VPL-CS7: 1800 ANSI1) lm VPL-ES2: 1500 ANSI1) lm (When the Lamp Mode is set ... signals of the projector. 48 Specifications Electrical characteristics Color system NTSC3.58/PAL/SECAM/ NTSC4.43/PAL-M/PAL-N/ PAL60 system, switched automatically/manually Resolution 600 horizontal TV lines (Video input) 800 × 600 dots (RGB input) Acceptable computer signals2) fH: 19 to 72 ...
...(480,000 pixels × 3) Lens 1.2 times zoom lens (manual) f 18.0 to 21.6 mm/F 2.2 to 2.4 Lamp VPL-CS7: 185 W UHP VPL-ES2: 157 W UHP Projection picture size Range: 40 to 300 inches (diagonal measure) Light output VPL-CS7: 1800 ANSI1) lm VPL-ES2: 1500 ANSI1) lm (When the Lamp Mode is set ... signals of the projector. 48 Specifications Electrical characteristics Color system NTSC3.58/PAL/SECAM/ NTSC4.43/PAL-M/PAL-N/ PAL60 system, switched automatically/manually Resolution 600 horizontal TV lines (Video input) 800 × 600 dots (RGB input) Acceptable computer signals2) fH: 19 to 72 ...

User Manual
Page 49
Optional accessories Projector Lamp (for replacement) LMP-E180 (for VPL-CS7 only) LMP-E150 (for replacement) (1) Operating Instructions (CD-ROM) (1) Quick Reference Manual (1) Security Label (1) Design and specifications are subject to 90% Supplied accessories Remote Commander (1) Lithium battery CR2025 (1) HD D-...ohms terminated) CR/PR: 0.7 Vp-p ± 2 dB (75 ohms terminated) AUDIO Stereo minijack 500 mVrms, impedance more than 47 kilohms OUTPUT MONITOR OUT (VPL-CS7 only): HD D-sub 15-pin (female) R, G, B: Gain Unity: 75 ohms SYNC/HD, VD: 4 Vp-p (open), 1 Vp-p (75 ohms) ...
Optional accessories Projector Lamp (for replacement) LMP-E180 (for VPL-CS7 only) LMP-E150 (for replacement) (1) Operating Instructions (CD-ROM) (1) Quick Reference Manual (1) Security Label (1) Design and specifications are subject to 90% Supplied accessories Remote Commander (1) Lithium battery CR2025 (1) HD D-...ohms terminated) CR/PR: 0.7 Vp-p ± 2 dB (75 ohms terminated) AUDIO Stereo minijack 500 mVrms, impedance more than 47 kilohms OUTPUT MONITOR OUT (VPL-CS7 only): HD D-sub 15-pin (female) R, G, B: Gain Unity: 75 ohms SYNC/HD, VD: 4 Vp-p (open), 1 Vp-p (75 ohms) ...
Brochure
Page 2
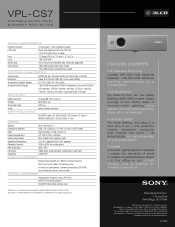
...VPL-CS7 achieves big-time performance at a modest price. in and turn out the lights! Sony and Remote Commander are approximate. Standby 4.6W 0 to 35 C degrees (32 to 95 F degrees) 35% to be clearly seen in part without notice. Since there is supplied for replacement), operating instructions (CD-ROM), quick reference manual... of Sony or their respective owners. Features and specifications are trademarks of small to 240V, 50/60Hz Max: 250W (max); All non-metric weights and measures are trademarks of the American National Standards Institute IT7.228. VPL-CS7 PORTABLE ...
...VPL-CS7 achieves big-time performance at a modest price. in and turn out the lights! Sony and Remote Commander are approximate. Standby 4.6W 0 to 35 C degrees (32 to 95 F degrees) 35% to be clearly seen in part without notice. Since there is supplied for replacement), operating instructions (CD-ROM), quick reference manual... of Sony or their respective owners. Features and specifications are trademarks of small to 240V, 50/60Hz Max: 250W (max); All non-metric weights and measures are trademarks of the American National Standards Institute IT7.228. VPL-CS7 PORTABLE ...

