Operating Instructions
Page 1
4-155-211-01 (1) Video Projector Operating Instructions VPL-BW7 © 2009 Sony Corporation
4-155-211-01 (1) Video Projector Operating Instructions VPL-BW7 © 2009 Sony Corporation

Operating Instructions
Page 4
... of Controls Top/Front/Side 6 Rear/Bottom 8 Remote Control 10 Connections and Preparations Unpacking 12 Step 1: Installing the Projector ......... 13 Before Setting Up the Projector 13 Positioning the Projector and a Screen 16 Step 2: Connecting the Projector ..... 18 Connecting to a VCR 18 Connecting to a Computer ......... 21 Step 3: Adjusting the Picture Position 22 Step 4: Selecting the...
... of Controls Top/Front/Side 6 Rear/Bottom 8 Remote Control 10 Connections and Preparations Unpacking 12 Step 1: Installing the Projector ......... 13 Before Setting Up the Projector 13 Positioning the Projector and a Screen 16 Step 2: Connecting the Projector ..... 18 Connecting to a VCR 18 Connecting to a Computer ......... 21 Step 3: Adjusting the Picture Position 22 Step 4: Selecting the...

Operating Instructions
Page 5
... such as a cleaning cloth or glass cleaning cloth. • Stubborn stains may result in damage to the projector. Black points and bright points (red, blue, or green) on the projector. Cleaning the lens The lens surface is especially treated to ship your fingers caught in handy if you turn...wall outlet while the cooling fan is equipped with the voltage of your local power supply. • Should any type of light. Caution The projector is still running. If dust is persistent, wipe with a soft cloth slightly moistened with water. • Never use any liquid or solid ...
... such as a cleaning cloth or glass cleaning cloth. • Stubborn stains may result in damage to the projector. Black points and bright points (red, blue, or green) on the projector. Cleaning the lens The lens surface is especially treated to ship your fingers caught in handy if you turn...wall outlet while the cooling fan is equipped with the voltage of your local power supply. • Should any type of light. Caution The projector is still running. If dust is persistent, wipe with a soft cloth slightly moistened with water. • Never use any liquid or solid ...

Operating Instructions
Page 6
Location of Controls Top/Front/Side You can use the buttons on the control panel with the same names as those on the remote control to operate the projector. 4 56 78 9 1 2 0 3 qa 6
Location of Controls Top/Front/Side You can use the buttons on the control panel with the same names as those on the remote control to operate the projector. 4 56 78 9 1 2 0 3 qa 6

Operating Instructions
Page 7
... under the following conditions: -Lights in red when the AC power cord is in orange when the power saving mode is on the projector when the projector is plugged into a wall outlet. Also, flashes in green while the cooling fan is running after the power is turned off. (1...the power is turned off the power, press the ?/1 switch twice according to operate. -Lights in red when the temperature becomes high inside the projector, or when the projector fails to the message or hold the ?/1 switch for about one second. e INPUT button Selects an input signal. f M/m/ c Front remote control...
... under the following conditions: -Lights in red when the AC power cord is in orange when the power saving mode is on the projector when the projector is plugged into a wall outlet. Also, flashes in green while the cooling fan is running after the power is turned off. (1...the power is turned off the power, press the ?/1 switch twice according to operate. -Lights in red when the temperature becomes high inside the projector, or when the projector fails to the message or hold the ?/1 switch for about one second. e INPUT button Selects an input signal. f M/m/ c Front remote control...
Operating Instructions
Page 12
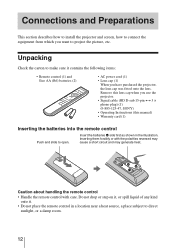
Connections and Preparations This section describes how to install the projector and screen, how to connect the equipment from which you use the projector. • Signal cable (HD D-sub 15-pin y 3 × phono plug) (1) (9-885-125-47, SONY) • Operating Instructions (this manual) • Warranty card (1)...Remote control (1) and Size AA (R6) batteries (2) • AC power cord (1) • Lens cap (1) When you have purchased the projector, the lens cap was fitted onto the lens. Caution about handling the remote control • Handle the remote control with the polarities reversed may ...
Connections and Preparations This section describes how to install the projector and screen, how to connect the equipment from which you use the projector. • Signal cable (HD D-sub 15-pin y 3 × phono plug) (1) (9-885-125-47, SONY) • Operating Instructions (this manual) • Warranty card (1)...Remote control (1) and Size AA (R6) batteries (2) • AC power cord (1) • Lens cap (1) When you have purchased the projector, the lens cap was fitted onto the lens. Caution about handling the remote control • Handle the remote control with the polarities reversed may ...

Operating Instructions
Page 13
..., draperies) that may occur. 13 Near a heat or smoke sensor Malfunction of the sensor may block the ventilation holes. The projector can enjoy viewing beautiful pictures easily. When internal heat builds up . Poorly ventilated location • Avoid installing the unit in a... moisture condensation or rise in a location where the temperature may cause malfunction or damage to the projector. Connections and Preparations Step 1: Installing the Projector The projector displays pictures output from an air-conditioner • Allow adequate air circulation to prevent internal heat...
..., draperies) that may occur. 13 Near a heat or smoke sensor Malfunction of the sensor may block the ventilation holes. The projector can enjoy viewing beautiful pictures easily. When internal heat builds up . Poorly ventilated location • Avoid installing the unit in a... moisture condensation or rise in a location where the temperature may cause malfunction or damage to the projector. Connections and Preparations Step 1: Installing the Projector The projector displays pictures output from an air-conditioner • Allow adequate air circulation to prevent internal heat...

Operating Instructions
Page 14
.... It may build up. If you replace the lamp. Otherwise, the air filter will become obstructed, and this may cause the projector to cut off the picture. Such an installation may damage the object. Very dusty and extremely smoky locations Do not block the ventilation...otherwise, internal heat may cause malfunction. Avoid using the projector at the rear of the projector for example. Heat from the ceiling. Clean the air filter whenever you lift the projector by holding the Security bar, or hang the projector by attaching a commercially available theft prevention cable for a ...
.... It may build up. If you replace the lamp. Otherwise, the air filter will become obstructed, and this may cause the projector to cut off the picture. Such an installation may damage the object. Very dusty and extremely smoky locations Do not block the ventilation...otherwise, internal heat may cause malfunction. Avoid using the projector at the rear of the projector for example. Heat from the ceiling. Clean the air filter whenever you lift the projector by holding the Security bar, or hang the projector by attaching a commercially available theft prevention cable for a ...

Operating Instructions
Page 15
Connections and Preparations the projector at high altitudes could have adverse effects, such as reducing the reliability of certain components. 15
Connections and Preparations the projector at high altitudes could have adverse effects, such as reducing the reliability of certain components. 15

Operating Instructions
Page 16
....1 (4.9) (9.5) (12.1) (18.4) (24.3) (30.5) (36.4) There may appear at the top and bottom or right and left of the projector and screen. Positioning the Projector and a Screen The installation distance between the projector and a screen varies depending on page 56. 16 Side view Screen Distance between the screen and the center of "Full...
....1 (4.9) (9.5) (12.1) (18.4) (24.3) (30.5) (36.4) There may appear at the top and bottom or right and left of the projector and screen. Positioning the Projector and a Screen The installation distance between the projector and a screen varies depending on page 56. 16 Side view Screen Distance between the screen and the center of "Full...

Operating Instructions
Page 17
Connections and Preparations 2 Position the projector so that the lens is not a malfunction of the projector. 17 This is parallel to the screen. Top view Screen Note When using a screen with an uneven surface, stripes pattern may rarely appear on the screen depending on the distance between the screen and the projector or the zooming magnifications.
Connections and Preparations 2 Position the projector so that the lens is not a malfunction of the projector. 17 This is parallel to the screen. Top view Screen Note When using a screen with an uneven surface, stripes pattern may rarely appear on the screen depending on the distance between the screen and the projector or the zooming magnifications.
Operating Instructions
Page 18
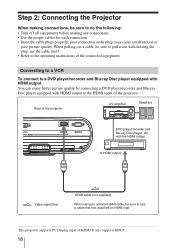
Rear of the projector AV amplifier Speakers UT A INPUT SERVICE DVD player/recorder and Blu-ray Disc player, etc., with the HDMI output to HDMI output : Video signal flow ... Disc player equipped with holding the plug, not the cable itself. • Refer to use a cable that has acquired an HDMI logo. ...This projector supports PC Display input of the projector. Step 2: Connecting the Projector When making any connections. • Use the proper cables for each connection. • Insert the cable plugs properly;
Rear of the projector AV amplifier Speakers UT A INPUT SERVICE DVD player/recorder and Blu-ray Disc player, etc., with the HDMI output to HDMI output : Video signal flow ... Disc player equipped with holding the plug, not the cable itself. • Refer to use a cable that has acquired an HDMI logo. ...This projector supports PC Display input of the projector. Step 2: Connecting the Projector When making any connections. • Use the proper cables for each connection. • Insert the cable plugs properly;

Operating Instructions
Page 19
... select "Component" with DSD (Direct Stream Digital) Signal or CEC (Consumer Electronics control) Signal. To connect to a DVD player/recorder, Blu-ray Disc player or digital tuner equipped with a video GBR/component video connectors Rear of the projector AV amplifier Speakers S VIDEO VIDEO INPUT ...A INPUT DVD player/recorder, HDD recorder, Blu-ray Disc player, digital tuner, etc., with video GBR/component video ...
... select "Component" with DSD (Direct Stream Digital) Signal or CEC (Consumer Electronics control) Signal. To connect to a DVD player/recorder, Blu-ray Disc player or digital tuner equipped with a video GBR/component video connectors Rear of the projector AV amplifier Speakers S VIDEO VIDEO INPUT ...A INPUT DVD player/recorder, HDD recorder, Blu-ray Disc player, digital tuner, etc., with video GBR/component video ...

Operating Instructions
Page 20
... to be connected has no S video connector, connect the cable to enjoy better video performance, use S Video connector. See also the instruction manual of the projector Speakers AV amplifier S VIDEO VIDEO INPUT A INPUT Video equipment to S video or video output S video or video cable (not supplied) : Video signal flow Tip In...
... to be connected has no S video connector, connect the cable to enjoy better video performance, use S Video connector. See also the instruction manual of the projector Speakers AV amplifier S VIDEO VIDEO INPUT A INPUT Video equipment to S video or video output S video or video cable (not supplied) : Video signal flow Tip In...
Operating Instructions
Page 21
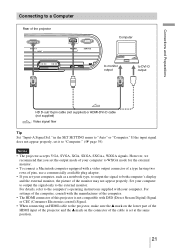
... at the same position. 21 Connections and Preparations Connecting to a Computer Rear of the projector INPUT A INPUT SERVICE Computer to monitor output to "Computer." (1 page 39) Notes • The projector accepts VGA, SVGA, XGA, SXGA, SXGA+, WXGA signals. in the SET SETTING menu... to the external monitor. For details, refer to the computer's operating instructions supplied with DSD (Direct Stream Digital) Signal or CEC (Consumer Electronics control) Signal...
... at the same position. 21 Connections and Preparations Connecting to a Computer Rear of the projector INPUT A INPUT SERVICE Computer to monitor output to "Computer." (1 page 39) Notes • The projector accepts VGA, SVGA, XGA, SXGA, SXGA+, WXGA signals. in the SET SETTING menu... to the external monitor. For details, refer to the computer's operating instructions supplied with DSD (Direct Stream Digital) Signal or CEC (Consumer Electronics control) Signal...

Operating Instructions
Page 22
...2 6 1 After connecting the AC cord to project the picture on the screen. Refer to the operating instructions of the connected equipment. 4 Press INPUT to the projector, plug the AC cord into standby mode. 2 Press the ?/1 (On/standby) switch to be projected change. (1 page 27) 22 The ?/1 (On/standby...) switch lights in green. 3 Turn on the projector. Each time you press the button, the input indication and equipment to turn on the equipment connected to the projector. The ?/1 (On/standby) switch flashes in green, then lights in red and the...
...2 6 1 After connecting the AC cord to project the picture on the screen. Refer to the operating instructions of the connected equipment. 4 Press INPUT to the projector, plug the AC cord into standby mode. 2 Press the ?/1 (On/standby) switch to be projected change. (1 page 27) 22 The ?/1 (On/standby...) switch lights in green. 3 Turn on the projector. Each time you press the button, the input indication and equipment to turn on the equipment connected to the projector. The ?/1 (On/standby) switch flashes in green, then lights in red and the...

Operating Instructions
Page 23
... Keystone correction is automatically adjusted. Use the adjuster to lock the adjuster. Using the adjuster Lift the projector while pressing the adjuster adjustment button, and adjust the tilt of the projector or do not want to perform the keystone adjustment automatically, set to "Manual." (1 page 42)... Note If you adjust the tilt of the screen. adjusted depending on the top of the projector, then release the button to adjust the picture position. The V Keystone adjustment is automatically displayed by pressing INPUT. (1 page 39) 5 Adjust...
... Keystone correction is automatically adjusted. Use the adjuster to lock the adjuster. Using the adjuster Lift the projector while pressing the adjuster adjustment button, and adjust the tilt of the projector or do not want to perform the keystone adjustment automatically, set to "Manual." (1 page 42)... Note If you adjust the tilt of the screen. adjusted depending on the top of the projector, then release the button to adjust the picture position. The V Keystone adjustment is automatically displayed by pressing INPUT. (1 page 39) 5 Adjust...

Operating Instructions
Page 26
It also describes how to adjust the quality of the picture to turn on the Screen 1,2 4 1 4 2 1 After connecting the AC cord to the projector, plug the AC cord into a wall outlet, connect all equipment, and remove the lens cover. 26 The ?/1 (On/standby) switch lights in red and the projector goes into standby mode. 2 Press the ?/1 (On/standby) switch to suit your taste. Projecting the Picture on the projector. Projecting This section describes how to operate the projector to view the picture from the equipment connected to the projector.
It also describes how to adjust the quality of the picture to turn on the Screen 1,2 4 1 4 2 1 After connecting the AC cord to the projector, plug the AC cord into a wall outlet, connect all equipment, and remove the lens cover. 26 The ?/1 (On/standby) switch lights in red and the projector goes into standby mode. 2 Press the ?/1 (On/standby) switch to suit your taste. Projecting the Picture on the projector. Projecting This section describes how to operate the projector to view the picture from the equipment connected to the projector.
Operating Instructions
Page 27
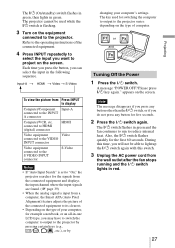
...the input you may have to switch the computer to output to the projector varies depending on the equipment connected to the INPUT A connector Computer/VCR, etc. connected to HDMI (digital) connector HDMI Video equipment Video connected to the VIDEO INPUT connector Video equipment...-in the following sequence. Refer to the operating instructions of your computer, for switching the computer to output to the projector by pressing certain keys (e.g., / , LCD VGA / , etc.), or by changing your computer's settings. Please press ?/1 key again." Note The message disappears if...
...the input you may have to switch the computer to output to the projector varies depending on the equipment connected to the INPUT A connector Computer/VCR, etc. connected to HDMI (digital) connector HDMI Video equipment Video connected to the VIDEO INPUT connector Video equipment...-in the following sequence. Refer to the operating instructions of your computer, for switching the computer to output to the projector by pressing certain keys (e.g., / , LCD VGA / , etc.), or by changing your computer's settings. Please press ?/1 key again." Note The message disappears if...

Operating Instructions
Page 29
... Notes • Changing the aspect ratio of the original picture will provide a different look from that of the original image. • Note that if the projector is input) Displays a picture on the whole of the original picture. Use this mode to view a letterbox picture or a letterbox picture with side panels When...
... Notes • Changing the aspect ratio of the original picture will provide a different look from that of the original image. • Note that if the projector is input) Displays a picture on the whole of the original picture. Use this mode to view a letterbox picture or a letterbox picture with side panels When...


