User Guide
Page 6
...with your entire hard disk drive to the Sony online support Web site at: http://esupport.sony.com/EN/VAIO/ for customers in USA, http://www.sony.ca/support for customers in Canada, http://esupport.sony.com/ES/VAIO/ for customers in Spanish speaking Latin American ...To access this on solving common problems. ❑ Specifications - The online Specifications describe the hardware and software configuration of your VAIO computer. Provides information about using Windows Media Center. To access this manual) - n6 N Before Use Non-printed Documentation ❑ User Guide (this on-...
...with your entire hard disk drive to the Sony online support Web site at: http://esupport.sony.com/EN/VAIO/ for customers in USA, http://www.sony.ca/support for customers in Canada, http://esupport.sony.com/ES/VAIO/ for customers in Spanish speaking Latin American ...To access this on solving common problems. ❑ Specifications - The online Specifications describe the hardware and software configuration of your VAIO computer. Provides information about using Windows Media Center. To access this manual) - n6 N Before Use Non-printed Documentation ❑ User Guide (this on-...

User Guide
Page 7
Choose from Microsoft and Sony. ❑ VAIO Sites Contains links to other VAIO documents, and system and software information for your personal data. ❑ Wireless & Network Learn about wireless connections including Bluetooth Wireless technology and ... ❑ Backup & Recovery Find information on how to back up and restore your operating system, system software, and your VAIO computer. Run utilities that include VAIO Media Setup and Windows Network and Sharing, and access to wireless tutorials. ❑ Security Keep your data safe and your computer running efficiently with ...
Choose from Microsoft and Sony. ❑ VAIO Sites Contains links to other VAIO documents, and system and software information for your personal data. ❑ Wireless & Network Learn about wireless connections including Bluetooth Wireless technology and ... ❑ Backup & Recovery Find information on how to back up and restore your operating system, system software, and your VAIO computer. Run utilities that include VAIO Media Setup and Windows Network and Sharing, and access to wireless tutorials. ❑ Security Keep your data safe and your computer running efficiently with ...

User Guide
Page 25
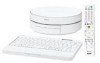
...for more information. when the F Power switch Slide the power switch to batteries wear out. J Directional arrow keys Move the pointer on the screen. G Windows key Displays the Start menu. H Touch pad See Using the Touch Pad (page 31) for the wireless keyboard are sufficient and switches to turn on... and off the wireless keyboard. n 25 N Using Your VAIO Computer E Indicators (Num lock): Turns on while in the Num Lock state. (Caps lock): Turns on while in the Caps Lock state. (Scroll lock):...
...for more information. when the F Power switch Slide the power switch to batteries wear out. J Directional arrow keys Move the pointer on the screen. G Windows key Displays the Start menu. H Touch pad See Using the Touch Pad (page 31) for the wireless keyboard are sufficient and switches to turn on... and off the wireless keyboard. n 25 N Using Your VAIO Computer E Indicators (Num lock): Turns on while in the Num Lock state. (Caps lock): Turns on while in the Caps Lock state. (Scroll lock):...
User Guide
Page 29
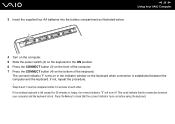
...on the front of the computer. 7 Press the CONNECT button (4) on the bottom of each other. The connect indicator turns on in the indicator window on before using the keyboard. Steps 6 and 7 must be completed within 10 seconds of the keyboard. 3 Insert the supplied four AA batteries ...into the battery compartment as illustrated below: n 29 N Using Your VAIO Computer 4 Turn on the computer. 5 Slide the power switch (2) on the keyboard to check that the connection between the computer and the keyboard....
...on the front of the computer. 7 Press the CONNECT button (4) on the bottom of each other. The connect indicator turns on in the indicator window on before using the keyboard. Steps 6 and 7 must be completed within 10 seconds of the keyboard. 3 Insert the supplied four AA batteries ...into the battery compartment as illustrated below: n 29 N Using Your VAIO Computer 4 Turn on the computer. 5 Slide the power switch (2) on the keyboard to check that the connection between the computer and the keyboard....

User Guide
Page 30
If the wireless keyboard does not operate properly, the batteries may need to avoid possible damage from battery leakage. If the wireless keyboard is not being used for its battery power level. n 30 N Using Your VAIO Computer ✍ You can check the battery indicator ( or ) in the LCD window on the wireless keyboard for an extended period of time, remove the batteries to be replaced.
If the wireless keyboard does not operate properly, the batteries may need to avoid possible damage from battery leakage. If the wireless keyboard is not being used for its battery power level. n 30 N Using Your VAIO Computer ✍ You can check the battery indicator ( or ) in the LCD window on the wireless keyboard for an extended period of time, remove the batteries to be replaced.

User Guide
Page 40
If the AutoPlay window appears, click Burn files to disc and follow the on the desktop, then click Start, All Programs, and the desired CD software to the empty ... the file(s) you want to copy and drag them to play the CD. If the Audio CD window appears, click to a disc ! Copying Files to CDs To copy files to select an option. n 40 N Using Your VAIO Computer Playing CDs To play an audio CD 1 Insert a disc into the optical disc drive.
If the AutoPlay window appears, click Burn files to disc and follow the on the desktop, then click Start, All Programs, and the desired CD software to the empty ... the file(s) you want to copy and drag them to play the CD. If the Audio CD window appears, click to a disc ! Copying Files to CDs To copy files to select an option. n 40 N Using Your VAIO Computer Playing CDs To play an audio CD 1 Insert a disc into the optical disc drive.
User Guide
Page 42
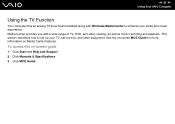
n 42 N Using Your VAIO Computer Using the TV Function Your computer has an analog TV tuner board installed along with a wide range of TV, DVD, and video viewing, as well as music recording and playback. See the on-screen MCE Guide for more information on -screen guide 1 Click Start and Help and Support. 2 Click Manuals & Specifications. 3 Click MCE Guide. To access this on Media Center features. Media Center provides you with Windows Media Center to set up your audio and visual experience. This section describes how to enhance your TV, set-top box, and other equipment.
n 42 N Using Your VAIO Computer Using the TV Function Your computer has an analog TV tuner board installed along with a wide range of TV, DVD, and video viewing, as well as music recording and playback. See the on-screen MCE Guide for more information on -screen guide 1 Click Start and Help and Support. 2 Click Manuals & Specifications. 3 Click MCE Guide. To access this on Media Center features. Media Center provides you with Windows Media Center to set up your audio and visual experience. This section describes how to enhance your TV, set-top box, and other equipment.

User Guide
Page 53
Skip B? button Press to fast-forward media at three speeds. B Back button Press to return to resume playback. Press again to the previous window. C Volume buttons Press to stop media playback or TV recording session. Stop x button Press to increase (+) or decrease (-) the volume. Forward M button Press to move ... Press to begin recording. Play N button Press to move media backward at three speeds. D Recorded TV button Press to pause media playback. n 53 N Using Your VAIO Computer A Pause X button Press to view previously recorded TV programs (In My TV...
Skip B? button Press to fast-forward media at three speeds. B Back button Press to return to resume playback. Press again to the previous window. C Volume buttons Press to stop media playback or TV recording session. Stop x button Press to increase (+) or decrease (-) the volume. Forward M button Press to move ... Press to begin recording. Play N button Press to move media backward at three speeds. D Recorded TV button Press to pause media playback. n 53 N Using Your VAIO Computer A Pause X button Press to view previously recorded TV programs (In My TV...
User Guide
Page 54
...J Standby button Press to place the computer into Sleep mode to switch among open the Media Center Start menu. n 54 N Using Your VAIO Computer E Guide button Press to open applications. This button works the same as the Alt+Tab keys. K Start button Press to view the...to select specific channels or enter text. (Press ENTER or OK to activate the channel selection.) G CLEAR button Press to close the active application window. I APPLICATION CLOSE button Press to backspace and delete entered text. M Directional arrow buttons Press the M, m, L More button Press to view additional...
...J Standby button Press to place the computer into Sleep mode to switch among open the Media Center Start menu. n 54 N Using Your VAIO Computer E Guide button Press to open applications. This button works the same as the Alt+Tab keys. K Start button Press to view the...to select specific channels or enter text. (Press ENTER or OK to activate the channel selection.) G CLEAR button Press to close the active application window. I APPLICATION CLOSE button Press to backspace and delete entered text. M Directional arrow buttons Press the M, m, L More button Press to view additional...

User Guide
Page 61
Do not insert more than one Memory Stick media into the slot. Improper insertion of the media may damage both your Computer window as you cannot insert it into the slot. While the Memory Stick media is automatically detected by your system and appears in your computer and .... 4 Carefully slide the Memory Stick media into the slot until it clicks into place. Be sure to close the front panel door. n 61 N Using Your VAIO Computer Inserting a Memory Stick Media To insert a Memory Stick media 1 Slide open the front panel door with your computer or the Memory Stick media, do...
Do not insert more than one Memory Stick media into the slot. Improper insertion of the media may damage both your Computer window as you cannot insert it into the slot. While the Memory Stick media is automatically detected by your system and appears in your computer and .... 4 Carefully slide the Memory Stick media into the slot until it clicks into place. Be sure to close the front panel door. n 61 N Using Your VAIO Computer Inserting a Memory Stick Media To insert a Memory Stick media 1 Slide open the front panel door with your computer or the Memory Stick media, do...

User Guide
Page 62
You can insert a Memory Stick Duo media directly into the slot. For more information on the Memory Stick Duo media, visit the Memory Stick Web site at http://www.memorystick.com/en/. and duo-size media. n 62 N Using Your VAIO Computer ✍ Your computer supports Memory Stick Duo media and is equipped with the Memory Stick PRO/Duo slot that is compatible with both standard- To view the contents of the Memory Stick media 1 Click Start and Computer to open the Computer window. 2 Double-click the Memory Stick media icon to view the list of data files saved in the Memory Stick media.
You can insert a Memory Stick Duo media directly into the slot. For more information on the Memory Stick Duo media, visit the Memory Stick Web site at http://www.memorystick.com/en/. and duo-size media. n 62 N Using Your VAIO Computer ✍ Your computer supports Memory Stick Duo media and is equipped with the Memory Stick PRO/Duo slot that is compatible with both standard- To view the contents of the Memory Stick media 1 Click Start and Computer to open the Computer window. 2 Double-click the Memory Stick media icon to view the list of data files saved in the Memory Stick media.

User Guide
Page 63
n 63 N Using Your VAIO Computer To format a Memory Stick media The Memory Stick media has been formatted in Format options. Do not remove the Memory Stick media from the ... the Memory Stick media erases the entire data on the media. The size of your computer, follow these steps. ! Be sure to open the Computer window. 3 Right-click the Memory Stick media icon and select Format. 4 Click Restore device defaults. ! If you select Quick Format in the factory default setting and...
n 63 N Using Your VAIO Computer To format a Memory Stick media The Memory Stick media has been formatted in Format options. Do not remove the Memory Stick media from the ... the Memory Stick media erases the entire data on the media. The size of your computer, follow these steps. ! Be sure to open the Computer window. 3 Right-click the Memory Stick media icon and select Format. 4 Click Restore device defaults. ! If you select Quick Format in the factory default setting and...

User Guide
Page 75
To communicate without an access point (ad-hoc) ! You cannot select the 5 GHz bandwidth, which is used for the IEEE 802.11a standard, on ad-hoc networks. 1 Turn on -screen instructions. The Set up a connection or network on the left pane. The Wireless LAN indicator lights up. 2 Click Start and Control Panel. 3 Click View network status and tasks under Network and Internet. 4 Click Set up a connection or network window appears. 5 Select an option to specify the ad-hoc network settings and click Next. 6 Follow the on the WLAN switch. n 75 N Using Your VAIO Computer
To communicate without an access point (ad-hoc) ! You cannot select the 5 GHz bandwidth, which is used for the IEEE 802.11a standard, on ad-hoc networks. 1 Turn on -screen instructions. The Set up a connection or network on the left pane. The Wireless LAN indicator lights up. 2 Click Start and Control Panel. 3 Click View network status and tasks under Network and Internet. 4 Click Set up a connection or network window appears. 5 Select an option to specify the ad-hoc network settings and click Next. 6 Follow the on the WLAN switch. n 75 N Using Your VAIO Computer

User Guide
Page 79
The Display Settings window appears. 3 Follow the on-screen instructions to change the settings. ✍ You may not be used as the primary monitor when two displays (TV, desktop ...
The Display Settings window appears. 3 Follow the on-screen instructions to change the settings. ✍ You may not be used as the primary monitor when two displays (TV, desktop ...

User Guide
Page 80
... software applications may not work properly. Set fewer colors or a lower resolution for each display, do not expand a single window across separate displays. If you to distribute portions of your desktop across two displays; otherwise your computer does not enter Sleep ...Devices Using the Multiple Monitors Function The Multiple Monitors function allows you set different colors on each display. You can function as an open application window or a toolbar, from one display to the other . ✍ Your external display may not return to drag objects, such as a single...
... software applications may not work properly. Set fewer colors or a lower resolution for each display, do not expand a single window across separate displays. If you to distribute portions of your desktop across two displays; otherwise your computer does not enter Sleep ...Devices Using the Multiple Monitors Function The Multiple Monitors function allows you set different colors on each display. You can function as an open application window or a toolbar, from one display to the other . ✍ Your external display may not return to drag objects, such as a single...

User Guide
Page 81
The Display Settings window appears. 3 Follow the on the desktop and select Personalize from the shortcut menu. 2 Click Display Settings. n 81 N Using Peripheral Devices To select the Multiple Monitors mode 1 Right-click on -screen instructions to change the settings. ✍ Additionally, you can set the display colors and resolution for each display and customize the Multiple Monitors mode.
The Display Settings window appears. 3 Follow the on the desktop and select Personalize from the shortcut menu. 2 Click Display Settings. n 81 N Using Peripheral Devices To select the Multiple Monitors mode 1 Right-click on -screen instructions to change the settings. ✍ Additionally, you can set the display colors and resolution for each display and customize the Multiple Monitors mode.

User Guide
Page 84
... the taskbar. If the computer is off . A message appears stating it is in Sleep mode may cause the computer to close the Safely Remove Hardware window. 9 Disconnect the floppy disk drive from the computer. To disconnect a USB floppy disk drive 1 Close all programs accessing the floppy disk drive. 2...the drive when the computer is now safe to remove the hardware device. 7 Click OK. 8 Click Close to malfunction. The Stop a Hardware device window appears. 5 Confirm that the floppy disk drive can unplug the USB cable directly from the system. 6 Click OK. The Safely Remove Hardware...
... the taskbar. If the computer is off . A message appears stating it is in Sleep mode may cause the computer to close the Safely Remove Hardware window. 9 Disconnect the floppy disk drive from the computer. To disconnect a USB floppy disk drive 1 Close all programs accessing the floppy disk drive. 2...the drive when the computer is now safe to remove the hardware device. 7 Click OK. 8 Click Close to malfunction. The Stop a Hardware device window appears. 5 Confirm that the floppy disk drive can unplug the USB cable directly from the system. 6 Click OK. The Safely Remove Hardware...

User Guide
Page 85
... port 1 Plug the power cord (1) of your computer to access the USB ports on the front. Connecting a Printer Using the USB Port You can connect a Windows-compatible printer to your printer into an AC outlet. 2 Choose the USB port (3) you prefer to use. 3 Plug one end of...
... port 1 Plug the power cord (1) of your computer to access the USB ports on the front. Connecting a Printer Using the USB Port You can connect a Windows-compatible printer to your printer into an AC outlet. 2 Choose the USB port (3) you prefer to use. 3 Plug one end of...

User Guide
Page 94
The setting of the desired item has been changed. ✍ Some of the control items will not be visible if you to consult system information and specify preferences for system behavior. n 94 N Customizing Your VAIO Computer Setting Up Your Computer with VAIO Central The VAIO Central utility allows you open VAIO Central as a standard user. To use VAIO Central 1 Click Start, All Programs, and VAIO Central. The VAIO Central window appears. 2 Click the System Information tab. 3 Select the desired control item and change the settings. 4 Once finished, click OK.
The setting of the desired item has been changed. ✍ Some of the control items will not be visible if you to consult system information and specify preferences for system behavior. n 94 N Customizing Your VAIO Computer Setting Up Your Computer with VAIO Central The VAIO Central utility allows you open VAIO Central as a standard user. To use VAIO Central 1 Click Start, All Programs, and VAIO Central. The VAIO Central window appears. 2 Click the System Information tab. 3 Select the desired control item and change the settings. 4 Once finished, click OK.

User Guide
Page 98
... cover or panel from the computer. The package protects the module from its power source (that is not detected by the computer or the Windows operating system becomes unstable, contact your sales dealer or the manufacturer of your memory module. ❑ Electrostatic discharge (ESD) can damage electronic ... is not available, do not work in a carpeted area, and do so may cause damage to change the module. n 98 N Upgrading Your VAIO Computer Adding and Removing Memory If you want to do not handle materials that are ready to your computer's memory, read the notes and procedures...
... cover or panel from the computer. The package protects the module from its power source (that is not detected by the computer or the Windows operating system becomes unstable, contact your sales dealer or the manufacturer of your memory module. ❑ Electrostatic discharge (ESD) can damage electronic ... is not available, do not work in a carpeted area, and do so may cause damage to change the module. n 98 N Upgrading Your VAIO Computer Adding and Removing Memory If you want to do not handle materials that are ready to your computer's memory, read the notes and procedures...


