User Guide
Page 2
n2 N Contents Before Use ...5 Documentation ...5 Getting Started ...8 Locating Controls and Ports...9 About the Indicator Lights ...13 Setting Up Your Computer ...14 Shutting Down Your Computer Safely ...21 Using Your VAIO Computer ...22 Using the Keyboard ...23 Using the Touch Pad ...31 Using the Optical Disc Drive ...32 Using the TV Function ...42 Using the Memory Stick Media ...60 Using Other Memory Cards ...66 Using the Internet...69 Using Wireless LAN (WLAN) ...70
n2 N Contents Before Use ...5 Documentation ...5 Getting Started ...8 Locating Controls and Ports...9 About the Indicator Lights ...13 Setting Up Your Computer ...14 Shutting Down Your Computer Safely ...21 Using Your VAIO Computer ...22 Using the Keyboard ...23 Using the Touch Pad ...31 Using the Optical Disc Drive ...32 Using the TV Function ...42 Using the Memory Stick Media ...60 Using Other Memory Cards ...66 Using the Internet...69 Using Wireless LAN (WLAN) ...70
User Guide
Page 6
...://esupport.sony.com/ES/VAIO/BR/ for customers in Brazil. ❑ VAIO Recovery Guide - Provides information about restoring individual software programs, software drivers, and drive partition(s) or your computer, as well as information on -screen guide: 1 Click Start and Help and Support. 2 Click Manuals & Specifications. 3 Click MCE Guide. To access this on solving common problems. ❑ Specifications - Provides information about using Windows Media Center. To view the online Specifications: 1 Connect to the Internet. 2 Go to the original factory installed settings.
...://esupport.sony.com/ES/VAIO/BR/ for customers in Brazil. ❑ VAIO Recovery Guide - Provides information about restoring individual software programs, software drivers, and drive partition(s) or your computer, as well as information on -screen guide: 1 Click Start and Help and Support. 2 Click Manuals & Specifications. 3 Click MCE Guide. To access this on solving common problems. ❑ Specifications - Provides information about using Windows Media Center. To view the online Specifications: 1 Connect to the Internet. 2 Go to the original factory installed settings.

User Guide
Page 10
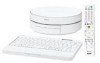
D Optical disc drive (page 32) E Memory Stick PRO/Duo media slot*1 (page 60) F Air vent G Media Access indicator (page 13) H Hi-Speed USB (USB 2.0) ports*2 (page 82) I i.LINK (IEEE 1394) S400 port (page 86) J CONNECT button (page 27) K Front panel door To open the front panel door, put your fingertip on its own and shut. *1 Your computer supports Memory Stick Duo media and Memory Stick PRO media with high speed and high capacity capabilities. *2 Supports high...
D Optical disc drive (page 32) E Memory Stick PRO/Duo media slot*1 (page 60) F Air vent G Media Access indicator (page 13) H Hi-Speed USB (USB 2.0) ports*2 (page 82) I i.LINK (IEEE 1394) S400 port (page 86) J CONNECT button (page 27) K Front panel door To open the front panel door, put your fingertip on its own and shut. *1 Your computer supports Memory Stick Duo media and Memory Stick PRO media with high speed and high capacity capabilities. *2 Supports high...

User Guide
Page 16
... Set Default. Your computer is used, the image will not be displayed and the audio will not be heard. To change the device for sound output. 1 Close all open programs. 2 Click Start and Control Panel. 3 Click Hardware and Sound. 4 Click Manage audio devices under Sound. 5 On the Playback tab, select the desired device for the purpose of copyright protection, which enables you use the device driver provided by Sony is compliant with an HDMI port and a DVI-D port...
... Set Default. Your computer is used, the image will not be displayed and the audio will not be heard. To change the device for sound output. 1 Close all open programs. 2 Click Start and Control Panel. 3 Click Hardware and Sound. 4 Click Manage audio devices under Sound. 5 On the Playback tab, select the desired device for the purpose of copyright protection, which enables you use the device driver provided by Sony is compliant with an HDMI port and a DVI-D port...

User Guide
Page 20
... Started Attaching the Rear Cover An exclusively designed rear cover is supplied with your both hands when attaching it. ! Be sure to attach the rear cover depending on the shape or size of your computer, attach the rear cover. You may hurt your computer for port protection and tidy cabling. Stepping on the floor. In such a case, leave the rear of connected cable plugs. To remove the rear cover, grasp...
... Started Attaching the Rear Cover An exclusively designed rear cover is supplied with your both hands when attaching it. ! Be sure to attach the rear cover depending on the shape or size of your computer, attach the rear cover. You may hurt your computer for port protection and tidy cabling. Stepping on the floor. In such a case, leave the rear of connected cable plugs. To remove the rear cover, grasp...
User Guide
Page 34
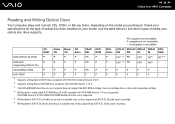
... DVD-RAM discs (2.6 GB) compliant with removable cartridge. *4 Writing data to see which types of optical disc drive installed on discs supporting DVD+R DL (Double Layer) recording. *6 Writing data to DVD-RW discs compliant with DVD-R for the type of media your model. DVD-R/ DVD+R/ DVD+R DVD-R DVD- Use non-cartridge discs or discs with DVD-RAM Version 1.0 is not supported. PR: playable and recordable P: playable but not recordable -: not playable or recordable CDROM Video Music CD CD-R/ DVD- DVD-RAM Version 2.2/12X-SPEED DVD-RAM Revision 5.0 disc...
... DVD-RAM discs (2.6 GB) compliant with removable cartridge. *4 Writing data to see which types of optical disc drive installed on discs supporting DVD+R DL (Double Layer) recording. *6 Writing data to DVD-RW discs compliant with DVD-R for the type of media your model. DVD-R/ DVD+R/ DVD+R DVD-R DVD- Use non-cartridge discs or discs with DVD-RAM Version 1.0 is not supported. PR: playable and recordable P: playable but not recordable -: not playable or recordable CDROM Video Music CD CD-R/ DVD- DVD-RAM Version 2.2/12X-SPEED DVD-RAM Revision 5.0 disc...

User Guide
Page 35
...*3 *4 PR*7 Disc Drive *7 Supports writing data to DVD drives). A DualDisc is not supported. USING NON-COMPLIANT DISCS CAN CAUSE FATAL DAMAGE TO YOUR VAIO PC OR CREATE SOFTWARE CONFLICTS AND CAUSE SYSTEM HANGING. n 35 N Using Your VAIO Computer PR: playable and recordable P: playable but not recordable -: not playable or recordable CDROM Video Music CD CD-R/ DVD- Sony does NOT guarantee the compatibility of 50 GB). BDVideo ROM DVD-R/ DVD+R/ DVD+R DVD-R DVD-
...*3 *4 PR*7 Disc Drive *7 Supports writing data to DVD drives). A DualDisc is not supported. USING NON-COMPLIANT DISCS CAN CAUSE FATAL DAMAGE TO YOUR VAIO PC OR CREATE SOFTWARE CONFLICTS AND CAUSE SYSTEM HANGING. n 35 N Using Your VAIO Computer PR: playable and recordable P: playable but not recordable -: not playable or recordable CDROM Video Music CD CD-R/ DVD- Sony does NOT guarantee the compatibility of 50 GB). BDVideo ROM DVD-R/ DVD+R/ DVD+R DVD-R DVD-
User Guide
Page 38
R DL, DVD+R, DVD+RW, DVD-R, DVD-RW, or DVD-RAM disc media. ❑ Do not use memory-resident utility software to malfunction. ❑ Deactivate the screen saver and exit anti-virus software before playing a disc. ❑ Some discs recorded at 20 or 24 bits may produce noise while playing. If you have exceeded this number, the drive's DVD region code is different from the label on the DVD disc or on the packaging...
R DL, DVD+R, DVD+RW, DVD-R, DVD-RW, or DVD-RAM disc media. ❑ Do not use memory-resident utility software to malfunction. ❑ Deactivate the screen saver and exit anti-virus software before playing a disc. ❑ Some discs recorded at 20 or 24 bits may produce noise while playing. If you have exceeded this number, the drive's DVD region code is different from the label on the DVD disc or on the packaging...

User Guide
Page 55
... one manufacturer code, you have specified one used by your TV with the supplied remote commander by changing the remote commander's signal setting to control the TV volume with the one of them for Sony: Sony (02). For example, press and hold the OK button and press alphanumeric buttons to enter the manufacturer code for matching the signal setting. In such a case, try another code. Sony assumes no...
... one manufacturer code, you have specified one used by your TV with the supplied remote commander by changing the remote commander's signal setting to control the TV volume with the one of them for Sony: Sony (02). For example, press and hold the OK button and press alphanumeric buttons to enter the manufacturer code for matching the signal setting. In such a case, try another code. Sony assumes no...

User Guide
Page 80
... you set different colors on each display. For example, if you have a display connected to the HDMI port and another connected to the other . ✍ Your external display may not work properly. You can move the cursor from one display to the monitor (VGA) port, two displays can function as an open application window or a toolbar, from one display to distribute portions of your desktop across two displays; n 80 N Using Peripheral Devices Using...
... you set different colors on each display. For example, if you have a display connected to the HDMI port and another connected to the other . ✍ Your external display may not work properly. You can move the cursor from one display to the monitor (VGA) port, two displays can function as an open application window or a toolbar, from one display to distribute portions of your desktop across two displays; n 80 N Using Peripheral Devices Using...

User Guide
Page 85
... N Using Peripheral Devices Connecting a Printer You can connect a USB printer compatible with your version of a USB printer cable (2) (not supplied) into the USB port and the other end to print documents. To connect a printer using the USB port 1 Plug the power cord (1) of your printer. Connecting a Printer Using the USB Port You can connect a Windows-compatible printer to your computer to your printer into an AC outlet. 2 Choose the USB port (3) you prefer to use. 3 Plug...
... N Using Peripheral Devices Connecting a Printer You can connect a USB printer compatible with your version of a USB printer cable (2) (not supplied) into the USB port and the other end to print documents. To connect a printer using the USB port 1 Plug the power cord (1) of your printer. Connecting a Printer Using the USB Port You can connect a Windows-compatible printer to your computer to your printer into an AC outlet. 2 Choose the USB port (3) you prefer to use. 3 Plug...

User Guide
Page 88
... an Ethernet network cable. Connect a 10BASE-T or 100BASE-TX cable to the network (Ethernet) port on its back. Your computer has a protective sticker covering the network (Ethernet) port located on the left of the computer and the other end to your network. n 88 N Using Peripheral Devices Connecting to a Network (LAN) You can connect your computer to 100BASE-TX/10BASE-T-type networks with the default settings. For help on connecting to a network, ask your network administrator. ! Using an incorrect cable...
... an Ethernet network cable. Connect a 10BASE-T or 100BASE-TX cable to the network (Ethernet) port on its back. Your computer has a protective sticker covering the network (Ethernet) port located on the left of the computer and the other end to your network. n 88 N Using Peripheral Devices Connecting to a Network (LAN) You can connect your computer to 100BASE-TX/10BASE-T-type networks with the default settings. For help on connecting to a network, ask your network administrator. ! Using an incorrect cable...

User Guide
Page 92
... is to configure your computer to prompt password entry when you turn it on the computer. 2 Press the F2 key when the VAIO logo appears. Press the space bar to change the setting from Disabled to Enabled. 7 Press the < or , key to display the Security tab, select Set Machine Password, and then press the Enter key. 4 On the password entry screen, enter the password twice and press the Enter key. If not...
... is to configure your computer to prompt password entry when you turn it on the computer. 2 Press the F2 key when the VAIO logo appears. Press the space bar to change the setting from Disabled to Enabled. 7 Press the < or , key to display the Security tab, select Set Machine Password, and then press the Enter key. 4 On the password entry screen, enter the password twice and press the Enter key. If not...

User Guide
Page 96
... this mode. To change the Sleep mode settings. The orange power light is not used for more than 20 minutes, it will lose any unsaved data. To activate Sleep mode Click Start, the arrow next to place your computer will turn off automatically. If you can change the Sleep mode settings 1 Right-click the power status icon on the keyboard or the remote commander to the Lock button, and Sleep. ✍...
... this mode. To change the Sleep mode settings. The orange power light is not used for more than 20 minutes, it will lose any unsaved data. To activate Sleep mode Click Start, the arrow next to place your computer will turn off automatically. If you can change the Sleep mode settings 1 Right-click the power status icon on the keyboard or the remote commander to the Lock button, and Sleep. ✍...

User Guide
Page 120
... any patches or updates to download. ❑ Make sure you can select using the Windows power options, for the automatic turn off action has passed? To find the nearest center or agent, see Sony Support Information (page 140) or visit the Sony online support Web site. What should I do if I do if my game software does not work or it take some VAIO models, the graphics memory is shared...
... any patches or updates to download. ❑ Make sure you can select using the Windows power options, for the automatic turn off action has passed? To find the nearest center or agent, see Sony Support Information (page 140) or visit the Sony online support Web site. What should I do if I do if my game software does not work or it take some VAIO models, the graphics memory is shared...

User Guide
Page 121
n 121 N Troubleshooting System Security This section provides information about keeping your computer. To download and install the latest security update 1 Click Start, All Programs, Norton Internet Security, and Norton Internet Security. 2 Click the item to update the software on the left pane. 3 Follow the on-screen instructions to set up automatic or scheduled updates. The Microsoft Windows operating system is to download and install the latest Windows updates regularly. Your...
n 121 N Troubleshooting System Security This section provides information about keeping your computer. To download and install the latest security update 1 Click Start, All Programs, Norton Internet Security, and Norton Internet Security. 2 Click the item to update the software on the left pane. 3 Follow the on-screen instructions to set up automatic or scheduled updates. The Microsoft Windows operating system is to download and install the latest Windows updates regularly. Your...

User Guide
Page 126
... computer. 2 Remove the disc from the optical disc drive. 3 Check the disc for instructions. ❑ If you are using external speakers, check the volume settings on the speakers and the connections between the speakers and your computer. ❑ Make sure the correct driver software is dirty or damaged, your computer will stop responding. The Device Manager window appears with the label facing upward. ❑ Make sure the necessary program(s) is installed according...
... computer. 2 Remove the disc from the optical disc drive. 3 Check the disc for instructions. ❑ If you are using external speakers, check the volume settings on the speakers and the connections between the speakers and your computer. ❑ Make sure the correct driver software is dirty or damaged, your computer will stop responding. The Device Manager window appears with the label facing upward. ❑ Make sure the necessary program(s) is installed according...
User Guide
Page 129
... securely plugged into power sources. ❑ Make sure that your computer and TV are properly connected. ❑ Make sure that both your computer and TV are turned on. ❑ When two displays are connected to brighten the screen. What should I do if my TV shows distorted images? See Selecting Display Modes (page 79). If they also appear dark, see the manual that the display settings...
... securely plugged into power sources. ❑ Make sure that your computer and TV are properly connected. ❑ Make sure that both your computer and TV are turned on. ❑ When two displays are connected to brighten the screen. What should I do if my TV shows distorted images? See Selecting Display Modes (page 79). If they also appear dark, see the manual that the display settings...
User Guide
Page 131
This change to cancel the Enable bidirectional support check box. 6 Click OK. Follow these steps: 1 Click Start and Control Panel. 2 Click Printer under Hardware and Sound. 3 Right-click the printer icon and select Properties. 4 Click the Ports tab. 5 Click to the settings disables the bidirectional communication functions of the printer, such as data transfer, status monitoring, and remote panel. See the manual that came with your...
This change to cancel the Enable bidirectional support check box. 6 Click OK. Follow these steps: 1 Click Start and Control Panel. 2 Click Printer under Hardware and Sound. 3 Right-click the printer icon and select Properties. 4 Click the Ports tab. 5 Click to the settings disables the bidirectional communication functions of the printer, such as data transfer, status monitoring, and remote panel. See the manual that came with your...

User Guide
Page 134
... the Windows setup, the key configuration will be activated. These devices may cause interference, causing the keyboard to stop working properly. ❑ Do not place metal furniture near the wireless keyboard. n 134 N Troubleshooting Keyboard What should I do if my computer does not recognize my keyboard? ❑ Make sure the power switch on the wireless keyboard is in the ON position. ❑ Make sure the supplied AA batteries are properly installed. ❑...
... the Windows setup, the key configuration will be activated. These devices may cause interference, causing the keyboard to stop working properly. ❑ Do not place metal furniture near the wireless keyboard. n 134 N Troubleshooting Keyboard What should I do if my computer does not recognize my keyboard? ❑ Make sure the power switch on the wireless keyboard is in the ON position. ❑ Make sure the supplied AA batteries are properly installed. ❑...


