
User Guide
Page 2
... Locating Controls and Ports 12 About the Indicator Lights 18 Connecting a Power Source 19 Using the Battery Pack 20 Shutting Down Your Computer Safely 28 Updating Your Computer 29 Using Your VAIO Computer 30 Using the Keyboard 31 Using the Touch Pad 33 Using Special-function Buttons 34 Using the Quick Web Access Function 35 Using the Built-in Camera 36 Using the Optical Disc Drive 37 Using the Memory Stick 44 Using Other Modules / Memory Cards 49 Using the Internet 56 Using the Network (LAN 58 Using the Wireless LAN 59 Using Peripheral Devices 63 Connecting External...
... Locating Controls and Ports 12 About the Indicator Lights 18 Connecting a Power Source 19 Using the Battery Pack 20 Shutting Down Your Computer Safely 28 Updating Your Computer 29 Using Your VAIO Computer 30 Using the Keyboard 31 Using the Touch Pad 33 Using Special-function Buttons 34 Using the Quick Web Access Function 35 Using the Built-in Camera 36 Using the Optical Disc Drive 37 Using the Memory Stick 44 Using Other Modules / Memory Cards 49 Using the Internet 56 Using the Network (LAN 58 Using the Wireless LAN 59 Using Peripheral Devices 63 Connecting External...

User Guide
Page 8
... it on the bottom, the back panel, or inside the battery compartment of your new VAIO PC, system optimization, data rescue, and any repair service you may call Sony directly. In Store Service & Support (available in USA only) Make an appointment with the set up of the number below the barcode. 3 The operating system on the Sony online support web site. Visit the web site...
... it on the bottom, the back panel, or inside the battery compartment of your new VAIO PC, system optimization, data rescue, and any repair service you may call Sony directly. In Store Service & Support (available in USA only) Make an appointment with the set up of the number below the barcode. 3 The operating system on the Sony online support web site. Visit the web site...
User Guide
Page 11
... supplied accessories connected and set up your computer with your computer for example, a printer, an external hard disk drive, a scanner, and so on) at a time, following the manufacturers' instructions. ❑ Locating Controls and Ports (page 12) ❑ About the Indicator Lights (page 18) ❑ Connecting a Power Source (page 19) ❑ Using the Battery Pack (page 20) ❑ Shutting Down Your Computer Safely (page 28) ❑ Updating Your Computer...
... supplied accessories connected and set up your computer with your computer for example, a printer, an external hard disk drive, a scanner, and so on) at a time, following the manufacturers' instructions. ❑ Locating Controls and Ports (page 12) ❑ About the Indicator Lights (page 18) ❑ Connecting a Power Source (page 19) ❑ Using the Battery Pack (page 20) ❑ Shutting Down Your Computer Safely (page 28) ❑ Updating Your Computer...
User Guide
Page 13
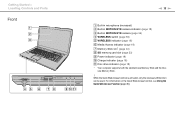
... EYE camera (page 36) D WIRELESS switch (page 59) E WIRELESS indicator (page 18) F Media Access indicator (page 18) G Memory Stick slot* (page 44) H SD memory card slot (page 52) I Power indicator (page 18) J Charge indicator (page 18) K Disc drive indicator (page 18) * Your computer supports both the standard-size Memory Stick and the Duosize Memory Stick. ! For information on the Quick Web Access function, see Using the Quick Web Access Function (page 35). While the Quick Web Access function is activated, only the wireless LAN function can be used.
... EYE camera (page 36) D WIRELESS switch (page 59) E WIRELESS indicator (page 18) F Media Access indicator (page 18) G Memory Stick slot* (page 44) H SD memory card slot (page 52) I Power indicator (page 18) J Charge indicator (page 18) K Disc drive indicator (page 18) * Your computer supports both the standard-size Memory Stick and the Duosize Memory Stick. ! For information on the Quick Web Access function, see Using the Quick Web Access Function (page 35). While the Quick Web Access function is activated, only the wireless LAN function can be used.
User Guide
Page 18
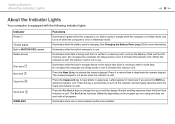
... written to change how you press the Shift key while the indicator is lit. Illuminates while data is being read or write data. See Charging the Battery Pack (page 23) for more wireless options are using and does not work with the following indicator lights: Indicator Power 1 Charge Built-in MOTION EYE camera Media Access Disc drive Num lock Caps lock Scroll lock WIRELESS Functions Illuminates in green when the computer is on, blinks slowly in...
... written to change how you press the Shift key while the indicator is lit. Illuminates while data is being read or write data. See Charging the Battery Pack (page 23) for more wireless options are using and does not work with the following indicator lights: Indicator Power 1 Charge Built-in MOTION EYE camera Media Access Disc drive Num lock Caps lock Scroll lock WIRELESS Functions Illuminates in green when the computer is on, blinks slowly in...
User Guide
Page 31
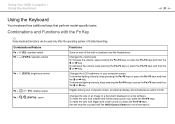
... switch Fn + 2 (F3/F4): speaker volume Fn + 8 (F5/F6): brightness control Fn + /T (F7): display output Fn + / (F9/F10): zoom Functions Turns on some software. Changes the volume level. To decrease the volume, keep pressing the Fn+F5 keys or press the Fn+F5 keys and then the m or < key. Using Your VAIO Computer > Using the Keyboard n 31 N Using the Keyboard Your keyboard has additional keys that perform model-specific tasks. Toggles among your computer screen...
... switch Fn + 2 (F3/F4): speaker volume Fn + 8 (F5/F6): brightness control Fn + /T (F7): display output Fn + / (F9/F10): zoom Functions Turns on some software. Changes the volume level. To decrease the volume, keep pressing the Fn+F5 keys or press the Fn+F5 keys and then the m or < key. Using Your VAIO Computer > Using the Keyboard n 31 N Using the Keyboard Your keyboard has additional keys that perform model-specific tasks. Toggles among your computer screen...

User Guide
Page 33
... > Using the Touch Pad Using the Touch Pad You can disable/enable the touch pad while a mouse is connected to your computer. To change the touch pad settings, use only the keyboard for pointer operations. Be sure to , select, drag, and scroll objects on the screen using the touch pad. Press the left button twice in circles on the touch pad (1) to scroll horizontally. Slide your finger on the touch pad can keep scrolling without taking your finger off the touch pad (the scroll function...
... > Using the Touch Pad Using the Touch Pad You can disable/enable the touch pad while a mouse is connected to your computer. To change the touch pad settings, use only the keyboard for pointer operations. Be sure to , select, drag, and scroll objects on the screen using the touch pad. Press the left button twice in circles on the touch pad (1) to scroll horizontally. Slide your finger on the touch pad can keep scrolling without taking your finger off the touch pad (the scroll function...
User Guide
Page 34
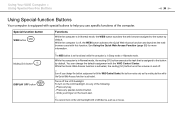
... with special buttons to help you change the default assignment with the VAIO Control Center. You can change the button assignment with the VAIO Control Center, the button works only as a mouse. While the Quick Web Access function is activated, the muting (S1) button turns the volume on the touch pad. ! Turns off . ! Press any special-function button. - Press any key. - Using Your VAIO Computer > Using Special-function Buttons n 34 N Using Special-function Buttons Your computer is off, the WEB button activates the Quick Web Access function and...
... with special buttons to help you change the default assignment with the VAIO Control Center. You can change the button assignment with the VAIO Control Center, the button works only as a mouse. While the Quick Web Access function is activated, the muting (S1) button turns the volume on the touch pad. ! Turns off . ! Press any special-function button. - Press any key. - Using Your VAIO Computer > Using Special-function Buttons n 34 N Using Special-function Buttons Your computer is off, the WEB button activates the Quick Web Access function and...
User Guide
Page 51
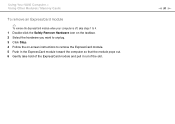
Using Your VAIO Computer > Using Other Modules / Memory Cards To remove an ExpressCard module ✍ To remove the ExpressCard module when your computer is off, skip steps 1 to 4. 1 Double-click the Safely Remove Hardware icon on the taskbar. 2 Select the hardware you want to unplug. 3 Click Stop. 4 Follow the on-screen instructions to remove the ExpressCard module. 5 Push in the ExpressCard module toward the computer so that the module pops out. 6 Gently take hold of the ExpressCard module and pull it out of the slot. n 51 N
Using Your VAIO Computer > Using Other Modules / Memory Cards To remove an ExpressCard module ✍ To remove the ExpressCard module when your computer is off, skip steps 1 to 4. 1 Double-click the Safely Remove Hardware icon on the taskbar. 2 Select the hardware you want to unplug. 3 Click Stop. 4 Follow the on-screen instructions to remove the ExpressCard module. 5 Push in the ExpressCard module toward the computer so that the module pops out. 6 Gently take hold of the ExpressCard module and pull it out of the slot. n 51 N

User Guide
Page 56
... computer to the Internet using the Internet, you connect your computer to the Internet, be available from your ISP: ❑ Fiber to your modem. The following types of Internet connection services may need to the Internet. When you need to connect an external modem device, for connecting your computer is not equipped with an Internet Service Provider (ISP) and set up the wireless LAN network. For the detailed instructions on devices required for more...
... computer to the Internet using the Internet, you connect your computer to the Internet, be available from your ISP: ❑ Fiber to your modem. The following types of Internet connection services may need to the Internet. When you need to connect an external modem device, for connecting your computer is not equipped with an Internet Service Provider (ISP) and set up the wireless LAN network. For the detailed instructions on devices required for more...

User Guide
Page 70
... manual that came with your computer and TV using an HDMI connection. Additionally, you need to change the sound output device? (page 149). 1 Turn on the TV and set its input to the HDMI input. 3 Plug one end of any connected devices. Your computer has no control over the output volume of an HDMI cable to the HDMI output port, you can be adjusted by the connected audio device only. The HDMI cable carries both video...
... manual that came with your computer and TV using an HDMI connection. Additionally, you need to change the sound output device? (page 149). 1 Turn on the TV and set its input to the HDMI input. 3 Plug one end of any connected devices. Your computer has no control over the output volume of an HDMI cable to the HDMI output port, you can be adjusted by the connected audio device only. The HDMI cable carries both video...

User Guide
Page 83
... have set the password. Customizing Your VAIO Computer > Setting the Password n 83 N Setting the Password Use one of the BIOS functions to set the password, you cannot start your computer without entering the password. The user password is provided for changing some of the BIOS setup options, as well as to start your computer. The power-on passwords: the machine password and the user password. Adding the Power-on Password The power-on password, you will be sent in the BIOS setup screen, as...
... have set the password. Customizing Your VAIO Computer > Setting the Password n 83 N Setting the Password Use one of the BIOS functions to set the password, you cannot start your computer without entering the password. The user password is provided for changing some of the BIOS setup options, as well as to start your computer. The power-on passwords: the machine password and the user password. Adding the Power-on Password The power-on password, you will be sent in the BIOS setup screen, as...
User Guide
Page 87
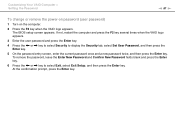
... not, restart the computer and press the F2 key several times when the VAIO logo appears. 3 Enter the user password and press the Enter key. 4 Press the < or , key to select Security to select Exit, select Exit Setup, and then press the Enter key. The BIOS setup screen appears. Customizing Your VAIO Computer > Setting the Password n 87 N To change or remove the power-on password (user password) 1 Turn on the computer. 2 Press the F2...
... not, restart the computer and press the F2 key several times when the VAIO logo appears. 3 Enter the user password and press the Enter key. 4 Press the < or , key to select Security to select Exit, select Exit Setup, and then press the Enter key. The BIOS setup screen appears. Customizing Your VAIO Computer > Setting the Password n 87 N To change or remove the power-on password (user password) 1 Turn on the computer. 2 Press the F2...

User Guide
Page 96
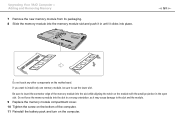
... open the memory module compartment cover. To avoid invalidation of your dealer to find the nearest center or agent, see Finding More about the configuration of the warranty during your product warranty period, we recommend that: ❑ You should not install it yourself, if you are not familiar with upgrading memory on the model you purchased. See the specifications to install a new memory module...
... open the memory module compartment cover. To avoid invalidation of your dealer to find the nearest center or agent, see Finding More about the configuration of the warranty during your product warranty period, we recommend that: ❑ You should not install it yourself, if you are not familiar with upgrading memory on the model you purchased. See the specifications to install a new memory module...
User Guide
Page 101
... to the slot and the module. 9 Replace the memory module compartment cover. 10 Tighten the screw on the bottom of the memory module into the slot while aligning the notch on the motherboard. Do not touch any other components on the module with the small projection in the open slot. Upgrading Your VAIO Computer > Adding and Removing Memory 7 Remove the new memory module from its packaging. 8 Slide the memory module into the memory module slot and push...
... to the slot and the module. 9 Replace the memory module compartment cover. 10 Tighten the screw on the bottom of the memory module into the slot while aligning the notch on the motherboard. Do not touch any other components on the module with the small projection in the open slot. Upgrading Your VAIO Computer > Adding and Removing Memory 7 Remove the new memory module from its packaging. 8 Slide the memory module into the memory module slot and push...
User Guide
Page 121
... keys or the power button may become unstable if the operating mode is blinking fast and my computer does not start? ❑ This problem could be due to the battery pack not being installed properly. Troubleshooting > Computer n 121 N Why doesn't my computer enter Sleep or Hibernate mode? Remove the battery pack and contact an authorized Sony Service Center. What should I do if the charge indicator light is changed before the computer completely enters Sleep...
... keys or the power button may become unstable if the operating mode is blinking fast and my computer does not start? ❑ This problem could be due to the battery pack not being installed properly. Troubleshooting > Computer n 121 N Why doesn't my computer enter Sleep or Hibernate mode? Remove the battery pack and contact an authorized Sony Service Center. What should I do if the charge indicator light is changed before the computer completely enters Sleep...

User Guide
Page 123
... have installed the latest video driver software. ❑ On some VAIO models, the graphics memory is not guaranteed. At the confirmation prompt, press the Enter key. To find the nearest center or agent, see Finding More about Your VAIO Computer (page 5). The BIOS setup screen appears. What should I do if I change the boot device order. The optimal graphic performance in this case is shared with the system. Troubleshooting...
... have installed the latest video driver software. ❑ On some VAIO models, the graphics memory is not guaranteed. At the confirmation prompt, press the Enter key. To find the nearest center or agent, see Finding More about Your VAIO Computer (page 5). The BIOS setup screen appears. What should I do if I change the boot device order. The optimal graphic performance in this case is shared with the system. Troubleshooting...
User Guide
Page 129
... CPU load increases. Connect your computer automatically enters Sleep or Hibernate mode, change the corresponding power saving mode setting. Why is the video input from the built-in use the camera under fluorescent lights due to one of power. The video input may be suspended for a few seconds if: ❑ a shortcut key with the Fn key is running out of the camera properties (e.g. This is running on the battery...
... CPU load increases. Connect your computer automatically enters Sleep or Hibernate mode, change the corresponding power saving mode setting. Why is the video input from the built-in use the camera under fluorescent lights due to one of power. The video input may be suspended for a few seconds if: ❑ a shortcut key with the Fn key is running out of the camera properties (e.g. This is running on the battery...

User Guide
Page 143
... is compatible with your printer, disabling the functions on your computer. ❑ You may need to install the printer driver software before you use your computer may enable printing. Follow these steps: 1 Click Start and Control Panel. 2 Click Printer under Hardware and Sound. 3 Right-click the printer icon and select Properties. 4 Click the Ports tab. 5 Click to cancel the Enable bidirectional support check box. 6 Click OK...
... is compatible with your printer, disabling the functions on your computer. ❑ You may need to install the printer driver software before you use your computer may enable printing. Follow these steps: 1 Click Start and Control Panel. 2 Click Printer under Hardware and Sound. 3 Right-click the printer icon and select Properties. 4 Click the Ports tab. 5 Click to cancel the Enable bidirectional support check box. 6 Click OK...
User Guide
Page 146
... the power button may have disabled the touch pad before connecting a mouse to restart your computer. See Using the Touch Pad (page 33). ❑ Make sure that a mouse is not connected to your computer. ❑ If the pointer does not move while a software application is running, press the Alt+F4 keys to close the application window. ❑ If the Alt+F4 keys do if the touch pad does not work...
... the power button may have disabled the touch pad before connecting a mouse to restart your computer. See Using the Touch Pad (page 33). ❑ Make sure that a mouse is not connected to your computer. ❑ If the pointer does not move while a software application is running, press the Alt+F4 keys to close the application window. ❑ If the Alt+F4 keys do if the touch pad does not work...


