
User Guide
Page 3
...LINK Device ...78 Connecting to a Network (LAN) ...80 Customizing Your VAIO Computer ...82 Setting the Password ...83 Setting Up Your Computer with VAIO Central ...86 Using the Power Saving Modes ...87 Upgrading Your VAIO Computer...90 Before Upgrading Your Computer ...91 Adding and Removing Memory...92 ...Installing the Hard Disk Drive...102 Precautions ...113 On Handling the LCD Screen ...114 On Using the...
...LINK Device ...78 Connecting to a Network (LAN) ...80 Customizing Your VAIO Computer ...82 Setting the Password ...83 Setting Up Your Computer with VAIO Central ...86 Using the Power Saving Modes ...87 Upgrading Your VAIO Computer...90 Before Upgrading Your Computer ...91 Adding and Removing Memory...92 ...Installing the Hard Disk Drive...102 Precautions ...113 On Handling the LCD Screen ...114 On Using the...
User Guide
Page 5
Documentation Your documentation includes printed information and user guides to read on -screen User Guide. Contains safety guidelines and owner information. Printed Documentation ❑ Welcome mat - Sony has combined leading-edge technology in audio, video, computing, and communications to provide state-of connections, setting up information, etc. ❑ Safety information - Contains an overview of -the-art personal computing. n5 N Before Use Before Use Congratulations on your purchase of this Sony VAIO® computer, and welcome to the on your VAIO computer.
Documentation Your documentation includes printed information and user guides to read on -screen User Guide. Contains safety guidelines and owner information. Printed Documentation ❑ Welcome mat - Sony has combined leading-edge technology in audio, video, computing, and communications to provide state-of connections, setting up information, etc. ❑ Safety information - Contains an overview of -the-art personal computing. n5 N Before Use Before Use Congratulations on your purchase of this Sony VAIO® computer, and welcome to the on your VAIO computer.
User Guide
Page 11
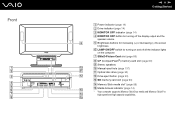
... indicator (page 14) D MONITOR OFF button for turning off all the indicator lights on the computer. F LAMP ON/OFF switch for increasing (+) or decreasing (-) the screen brightness. E Brightness buttons for turning on and off the display output and the speaker volume. G SM/xD-Picture Card slot (page 60) H CF (CompactFlash®...
... indicator (page 14) D MONITOR OFF button for turning off all the indicator lights on the computer. F LAMP ON/OFF switch for increasing (+) or decreasing (-) the screen brightness. E Brightness buttons for turning on and off the display output and the speaker volume. G SM/xD-Picture Card slot (page 60) H CF (CompactFlash®...
User Guide
Page 20
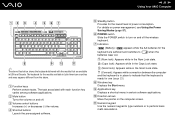
.... J Direction arrows Move the pointer on and off . F POWER switch Slide the POWER switch to turn on the computer screen. I Applications key Displays a shortcut menu in USA and Canada. n 20 N Using Your VAIO Computer ✍ The above . B Mute button Turns the volume on power management, see Using the Power Saving Modes (page...
.... J Direction arrows Move the pointer on and off . F POWER switch Slide the POWER switch to turn on the computer screen. I Applications key Displays a shortcut menu in USA and Canada. n 20 N Using Your VAIO Computer ✍ The above . B Mute button Turns the volume on power management, see Using the Power Saving Modes (page...

User Guide
Page 33
... the surface of the disc irreparably. Supports 8cm disc reading, but does not support 8cm disc writing. Do not use circular discs. n 33 N Using Your VAIO Computer ✍ Supports writing to a disc. To complete this may cause the computer to burn discs, make the data on a disc readable on discs supporting... General version 2.0/2.1. This may damage the optical disc drive. ❑ Do not strike or shake the computer while writing data onto a disc. ❑ Deactivate the screen saver and exit anti-virus software before writing data onto a disc. ❑ Do not use of the disc.
... the surface of the disc irreparably. Supports 8cm disc reading, but does not support 8cm disc writing. Do not use circular discs. n 33 N Using Your VAIO Computer ✍ Supports writing to a disc. To complete this may cause the computer to burn discs, make the data on a disc readable on discs supporting... General version 2.0/2.1. This may damage the optical disc drive. ❑ Do not strike or shake the computer while writing data onto a disc. ❑ Deactivate the screen saver and exit anti-virus software before writing data onto a disc. ❑ Do not use of the disc.

User Guide
Page 34
If you insert an audio CD disc, then click Start, point to All Programs, and click to malfunction. ❑ Deactivate the screen saver and exit anti-virus software before playing a disc. ❑ Some discs recorded at 20 or 24 bits may produce noise while playing. If the ... disc into the optical disc drive. 2 If nothing appears on the DVDs to select an option. Playing CDs To play the disc. n 34 N Using Your VAIO Computer Notes on this player.
If you insert an audio CD disc, then click Start, point to All Programs, and click to malfunction. ❑ Deactivate the screen saver and exit anti-virus software before playing a disc. ❑ Some discs recorded at 20 or 24 bits may produce noise while playing. If the ... disc into the optical disc drive. 2 If nothing appears on the DVDs to select an option. Playing CDs To play the disc. n 34 N Using Your VAIO Computer Notes on this player.
User Guide
Page 47
...collection. M MORE button Press to increase (+) or decrease (-) the volume. n 47 N Using Your VAIO Computer D BACK button Press to return to view previously recorded TV programs (In My TV window). F RECORDED TV button Press to the previous window. K MY PICTURES button Press to reduce power consumption. J STANDBY button... channels or enter text. (Press Enter or OK to activate the channel selection.) I CLEAR button Use to view the TV program guide for Media Center features. N Directional arrow buttons Press the M, m, G GUIDE button Press to backspace and delete entered text.
...collection. M MORE button Press to increase (+) or decrease (-) the volume. n 47 N Using Your VAIO Computer D BACK button Press to return to view previously recorded TV programs (In My TV window). F RECORDED TV button Press to the previous window. K MY PICTURES button Press to reduce power consumption. J STANDBY button... channels or enter text. (Press Enter or OK to activate the channel selection.) I CLEAR button Use to view the TV program guide for Media Center features. N Directional arrow buttons Press the M, m, G GUIDE button Press to backspace and delete entered text.

User Guide
Page 63
...cable, you need to connect your computer to a telephone line via a telephone cable (not supplied). If the Location Information window appears, follow the on-screen instructions. 3 If it is not already selected, click to select Connect to the Internet, and click Next. 4 Follow the on the computer. 2 Plug... the other end into the modem port on -screen instructions. n 63 N Using Your VAIO Computer Using the Internet Setting Up a Dial-up Internet Connection Before you can connect to the Internet, you 're ready to connect ...
...cable, you need to connect your computer to a telephone line via a telephone cable (not supplied). If the Location Information window appears, follow the on-screen instructions. 3 If it is not already selected, click to select Connect to the Internet, and click Next. 4 Follow the on the computer. 2 Plug... the other end into the modem port on -screen instructions. n 63 N Using Your VAIO Computer Using the Internet Setting Up a Dial-up Internet Connection Before you can connect to the Internet, you 're ready to connect ...

User Guide
Page 67
... is a computer-to -computer (ad hoc) networks only option button. 18 Click Close. 19 Click OK. n 67 N Using Your VAIO Computer 13 Enter exactly the same Network key again, for confirmation. 14 Select the check box This is ready to communicate with another computer..... *3 Hexadecimal: A number representation using the digits 0-9, with their usual meaning, plus the letters A-F (or a-f) to represent hexadecimal digits with values of the screen. 15 Click OK. The Advanced window appears. 17 Select the Computer-to -computer (ad hoc) network; wireless access points are not used at the bottom...
... is a computer-to -computer (ad hoc) networks only option button. 18 Click Close. 19 Click OK. n 67 N Using Your VAIO Computer 13 Enter exactly the same Network key again, for confirmation. 14 Select the check box This is ready to communicate with another computer..... *3 Hexadecimal: A number representation using the digits 0-9, with their usual meaning, plus the letters A-F (or a-f) to represent hexadecimal digits with values of the screen. 15 Click OK. The Advanced window appears. 17 Select the Computer-to -computer (ad hoc) network; wireless access points are not used at the bottom...

User Guide
Page 70
The Wireless Network Connection window appears. 7 Follow the on the WIRELESS LAN switch. The WIRELESS LAN indicator lights up . See the instructions that accompanied the access point for more information. 2 Turn on -screen instructions. n 70 N Using Your VAIO Computer To connect to a wireless network 1 Make sure an access point is set up . 3 Click Start and then Control Panel. 4 Click Network and Internet Connections. 5 Click Network Connections. 6 In the right panel under LAN or High-Speed Internet, double-click Wireless Network Connection.
The Wireless Network Connection window appears. 7 Follow the on the WIRELESS LAN switch. The WIRELESS LAN indicator lights up . See the instructions that accompanied the access point for more information. 2 Turn on -screen instructions. n 70 N Using Your VAIO Computer To connect to a wireless network 1 Make sure an access point is set up . 3 Click Start and then Control Panel. 4 Click Network and Internet Connections. 5 Click Network Connections. 6 In the right panel under LAN or High-Speed Internet, double-click Wireless Network Connection.

User Guide
Page 71
...characters. Select the Enable 2.4 GHz Wireless LAN check box and click OK. 3 Click Start, point to All Programs, and click VAIO Wireless Utility. Turning off the WIRELESS or WIRELESS LAN switch. ! The WIRELESS LAN indicator lights up. See the instructions that accompanied the... information. 2 Turn on -screen instructions. * See the online Specifications to see whether your model supports the Bluetooth functionality. n 71 N Using Your VAIO Computer To connect to a wireless network (Models with the VAIO Wireless Utility software only) Use the VAIO Wireless Utility software to guide you...
...characters. Select the Enable 2.4 GHz Wireless LAN check box and click OK. 3 Click Start, point to All Programs, and click VAIO Wireless Utility. Turning off the WIRELESS or WIRELESS LAN switch. ! The WIRELESS LAN indicator lights up. See the instructions that accompanied the... information. 2 Turn on -screen instructions. * See the online Specifications to see whether your model supports the Bluetooth functionality. n 71 N Using Your VAIO Computer To connect to a wireless network (Models with the VAIO Wireless Utility software only) Use the VAIO Wireless Utility software to guide you...
User Guide
Page 84
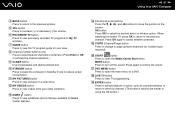
...the Setup Confirmation screen, make sure that OK is to configure the computer to prompt password entry when you turn it safe and private from Setup to Always. 6 Press the Esc key. 7 Use the < or , key to select Security on the computer. 2 Press the F2 key when the VAIO logo appears. ...Change Supervisor Password, and then press the Enter key. 4 On the password entry screen, enter the password twice and press the Enter key. To add the power-on password 1 Turn on the Boot menu to forget the password. n 84 N Customizing Your VAIO Computer Adding the Power-on or display the BIOS setup...
...the Setup Confirmation screen, make sure that OK is to configure the computer to prompt password entry when you turn it safe and private from Setup to Always. 6 Press the Esc key. 7 Use the < or , key to select Security on the computer. 2 Press the F2 key when the VAIO logo appears. ...Change Supervisor Password, and then press the Enter key. 4 On the password entry screen, enter the password twice and press the Enter key. To add the power-on password 1 Turn on the Boot menu to forget the password. n 84 N Customizing Your VAIO Computer Adding the Power-on or display the BIOS setup...
User Guide
Page 85
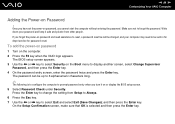
...To change or remove the power-on password 1 Turn on the computer. 2 Press the F2 key when the VAIO logo appears. 3 Enter the current password for Enter Current Password: The BIOS setup screen appears. 4 Use the < or , key to select Security on the Boot menu to select Exit and select...Press the Esc key. 7 Use the < or , key to display another screen, select Change Supervisor Password, and then press the Enter key. 5 On the password entry screen, enter a new password twice, and press the Enter key. On the Setup Confirmation screen, confirm that OK is selected and then press the Enter key.
...To change or remove the power-on password 1 Turn on the computer. 2 Press the F2 key when the VAIO logo appears. 3 Enter the current password for Enter Current Password: The BIOS setup screen appears. 4 Use the < or , key to select Security on the Boot menu to select Exit and select...Press the Esc key. 7 Use the < or , key to display another screen, select Change Supervisor Password, and then press the Enter key. 5 On the password entry screen, enter a new password twice, and press the Enter key. On the Setup Confirmation screen, confirm that OK is selected and then press the Enter key.

User Guide
Page 88
... can change the Standby mode settings. You will enter Standby mode. Standby mode uses more than four seconds, the computer will switch off the LCD screen and sets the hard disk and the CPU to Normal mode Press any unsaved data. ✍ When the computer is not used for more than... the computer in Standby mode, you press the power button for more power than out of Standby mode quicker than Hibernate mode. n 88 N Customizing Your VAIO Computer Using Standby Mode Standby mode turns off automatically.
... can change the Standby mode settings. You will enter Standby mode. Standby mode uses more than four seconds, the computer will switch off the LCD screen and sets the hard disk and the CPU to Normal mode Press any unsaved data. ✍ When the computer is not used for more than... the computer in Standby mode, you press the power button for more power than out of Standby mode quicker than Hibernate mode. n 88 N Customizing Your VAIO Computer Using Standby Mode Standby mode turns off automatically.

User Guide
Page 106
Use caution when placing the LCD screen face-down on a flat and stable surface, with the LCD screen facing down. ! The work surface must be free of dirt or debris that may damage the screen. n 106 N Upgrading Your VAIO Computer 3 Gently place the computer on a table or other flat surface.
Use caution when placing the LCD screen face-down on a flat and stable surface, with the LCD screen facing down. ! The work surface must be free of dirt or debris that may damage the screen. n 106 N Upgrading Your VAIO Computer 3 Gently place the computer on a table or other flat surface.

User Guide
Page 112
..., unformatted hard disk (Disk label identified with administrator rights. 2 Click Start and right-click My Computer. 3 Select Manage from the menu. n 112 N Upgrading Your VAIO Computer Identifying the Additional Hard Disk Space When you initialize the new hard disk, it must be configured as a user with red marking) and select... the process. The Computer Management window appears. 4 Under the file directory on the right, double-click Storage and then Disk Management. 5 Right-click on -screen instructions to Windows as an extended partition in Windows NT file system (NTFS) format.
..., unformatted hard disk (Disk label identified with administrator rights. 2 Click Start and right-click My Computer. 3 Select Manage from the menu. n 112 N Upgrading Your VAIO Computer Identifying the Additional Hard Disk Space When you initialize the new hard disk, it must be configured as a user with red marking) and select... the process. The Computer Management window appears. 4 Under the file directory on the right, double-click Storage and then Disk Management. 5 Right-click on -screen instructions to Windows as an extended partition in Windows NT file system (NTFS) format.

User Guide
Page 113
n 113 N Precautions Precautions This section describes safety guidelines and precautions to help you protect your computer from potential damage. ❑ On Handling the LCD Screen (page 114) ❑ On Using the Power Source (page 115) ❑ On Handling Your Computer (page 116) ❑ On Handling Floppy Disks (page 118) ❑ On Handling Discs (page 119) ❑ On Using Headphones (page 119) ❑ On Handling Memory Stick Media (page 120) ❑ On Handling the Hard Disk (page 121)
n 113 N Precautions Precautions This section describes safety guidelines and precautions to help you protect your computer from potential damage. ❑ On Handling the LCD Screen (page 114) ❑ On Using the Power Source (page 115) ❑ On Handling Your Computer (page 116) ❑ On Handling Floppy Disks (page 118) ❑ On Handling Discs (page 119) ❑ On Using Headphones (page 119) ❑ On Handling Memory Stick Media (page 120) ❑ On Handling the Hard Disk (page 121)

User Guide
Page 114
This is displayed for a lengthy period of the manufacturing process and does not indicate a malfunction. ❑ Avoid rubbing the LCD screen. You can use a screen saver to wipe the LCD screen. This could cause a malfunction. ❑ Using the computer in a while. You may, however, see tiny black points and/or ... and does not indicate a malfunction. ❑ The LCD is not a malfunction. Use a soft, dry cloth to prevent residual images. ❑ The screen becomes warm during operation. This could damage the LCD. When the computer returns to normal temperature, the...
This is displayed for a lengthy period of the manufacturing process and does not indicate a malfunction. ❑ Avoid rubbing the LCD screen. You can use a screen saver to wipe the LCD screen. This could cause a malfunction. ❑ Using the computer in a while. You may, however, see tiny black points and/or ... and does not indicate a malfunction. ❑ The LCD is not a malfunction. Use a soft, dry cloth to prevent residual images. ❑ The screen becomes warm during operation. This could damage the LCD. When the computer returns to normal temperature, the...
User Guide
Page 124
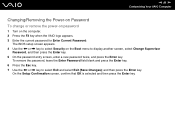
... , key to select the Exit menu. 3 Press the m key to setup" appears at the bottom of the screen 1 Press the F2 key when the VAIO logo appears. To find the nearest center or agent, visit the Sony online support Web site. n 124 N Troubleshooting What should I do if a BIOS error appears when my computer...
... , key to select the Exit menu. 3 Press the m key to setup" appears at the bottom of the screen 1 Press the F2 key when the VAIO logo appears. To find the nearest center or agent, visit the Sony online support Web site. n 124 N Troubleshooting What should I do if a BIOS error appears when my computer...
User Guide
Page 125
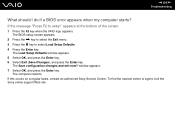
Then plug in the power cord and turn on my computer? Then turn on the computer again. 2 If nothing still appears on your screen after a while 1 Press the power button for about a minute. n 125 N Troubleshooting What should I do if the power indicator (Green) lights but my screen does not display anything when I turn on the computer again. If nothing still appears on your screen, unplug the power cord and leave the computer for more than four seconds to check that the power indicator goes out.
Then plug in the power cord and turn on my computer? Then turn on the computer again. 2 If nothing still appears on your screen after a while 1 Press the power button for about a minute. n 125 N Troubleshooting What should I do if the power indicator (Green) lights but my screen does not display anything when I turn on the computer again. If nothing still appears on your screen, unplug the power cord and leave the computer for more than four seconds to check that the power indicator goes out.


