
VGC-RBxx Series Hard Disk Drive Replacement Instructions
Page 1
... desktop computer.* ü Place your desktop computer on both sides of the cable connectors to initiate removal of the computer ...be different from the unit in damage to the computer's case. * ü Follow the ESD .... Rotate the unit so the panel with your Sony Limited Warranty continue to do so can result in...cables from the hard drive bracket. The terms of your computer or any loss of the arrow. Step 4. Failure ... drive. CAUTION! Proceed and disconnect these instructions. * Sony is turned off and disconnected from exposed circuitry when possible. PLEASE...
... desktop computer.* ü Place your desktop computer on both sides of the cable connectors to initiate removal of the computer ...be different from the unit in damage to the computer's case. * ü Follow the ESD .... Rotate the unit so the panel with your Sony Limited Warranty continue to do so can result in...cables from the hard drive bracket. The terms of your computer or any loss of the arrow. Step 4. Failure ... drive. CAUTION! Proceed and disconnect these instructions. * Sony is turned off and disconnected from exposed circuitry when possible. PLEASE...
VGC-RBxx Series Optical Disk Drive Lower Replacement Instructions
Page 1
... you begin work to avoid scratching the surface of your desktop computer.* ü Place your Sony Limited Wa rranty continue to the computer's case.* ü Follow the ESD (Electrostatic Discharge)...incorrect handling of your desktop computer on the inside of the front of the unit: Step [2B], as this example: the lower optical drive.) NOTE! Step 4. VGC-RBxx Series Optical Disk...Rev. The terms of the computer under these instructions. * Sony is facing you through the replacement process. ü To avoid electric shock please make sure product is turned off and disconnected from the...
... you begin work to avoid scratching the surface of your desktop computer.* ü Place your Sony Limited Wa rranty continue to the computer's case.* ü Follow the ESD (Electrostatic Discharge)...incorrect handling of your desktop computer on the inside of the front of the unit: Step [2B], as this example: the lower optical drive.) NOTE! Step 4. VGC-RBxx Series Optical Disk...Rev. The terms of the computer under these instructions. * Sony is facing you through the replacement process. ü To avoid electric shock please make sure product is turned off and disconnected from the...
VGC-RBxx Series Optical Disk Drive Upper Replacement Instructions
Page 1
... sure product is turned off and disconnected from the components shipped. Rotate the unit so the panel with your computer or any loss of data associated with the vents is not responsible for any damage caused by pulling down thet w o(2) black clips on the bottom of your desktop computer.* ü Place your Sony Limited Wa... are replacing. (In this promotes static build-up. ü The appearance of unit. Failure to do so can result in the direction of these procedures. VGC-RBxx Series Optical Disk Drive Upper Replacement Instructions IMPORTANT!
... sure product is turned off and disconnected from the components shipped. Rotate the unit so the panel with your computer or any loss of data associated with the vents is not responsible for any damage caused by pulling down thet w o(2) black clips on the bottom of your desktop computer.* ü Place your Sony Limited Wa... are replacing. (In this promotes static build-up. ü The appearance of unit. Failure to do so can result in the direction of these procedures. VGC-RBxx Series Optical Disk Drive Upper Replacement Instructions IMPORTANT!
Safety Information
Page 6
VAIO Computer Safety Information Regulatory Information If you have questions about this equipment. 6 This ...complies with Part 15 of the FCC rules. However, there is encouraged to try to Sony Customer Information Service Center at http://www.sony.com/pcsupport. If this equipment does cause harmful interference to radio or television reception, which... ❑ Connect the equipment into an outlet on the Sony Online Support Web site at 12451 Gateway Blvd., Ft. This equipment generates, uses, and can be determined by turning the equipment off and on, the user is no guarantee ...
VAIO Computer Safety Information Regulatory Information If you have questions about this equipment. 6 This ...complies with Part 15 of the FCC rules. However, there is encouraged to try to Sony Customer Information Service Center at http://www.sony.com/pcsupport. If this equipment does cause harmful interference to radio or television reception, which... ❑ Connect the equipment into an outlet on the Sony Online Support Web site at 12451 Gateway Blvd., Ft. This equipment generates, uses, and can be determined by turning the equipment off and on, the user is no guarantee ...
VAIO User Guide (Large File - 12.11 MB)
Page 1
.... Page 1 Follow the on-screen instructions to register your computer during the first session, you turn on your computer, click Start in the Windows® taskbar, click All Programs, and then click VAIO Control Center. Your new computer is designed to help you for purchasing a Sony VAIO® computer! The information provided here is a superb blend of high...
.... Page 1 Follow the on-screen instructions to register your computer during the first session, you turn on your computer, click Start in the Windows® taskbar, click All Programs, and then click VAIO Control Center. Your new computer is designed to help you for purchasing a Sony VAIO® computer! The information provided here is a superb blend of high...
VAIO User Guide (Large File - 12.11 MB)
Page 8
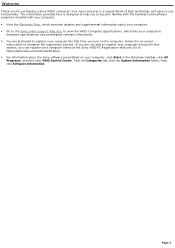
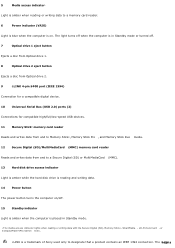
...from and to designate that a product contains an IEEE 1394 connection. i.LINK is a trademark of Sony used only to a Secure Digital (SD) or MultiMediaCard (MMC). 13 Hard disk drive access indicator... reading and writing data. 14 Power button The power button turns the computer on/off. 15 Standby indicator Light is amber when the computer is on. 5 Media access indicator1 Light is amber when ...reading or writing data to a memory card reader. 6 Power indicator (VAIO) Light is blue when the computer is placed in Standby mode. 1 T he media ac c es s indic ator lights...
...from and to designate that a product contains an IEEE 1394 connection. i.LINK is a trademark of Sony used only to a Secure Digital (SD) or MultiMediaCard (MMC). 13 Hard disk drive access indicator... reading and writing data. 14 Power button The power button turns the computer on/off. 15 Standby indicator Light is amber when the computer is on. 5 Media access indicator1 Light is amber when ...reading or writing data to a memory card reader. 6 Power indicator (VAIO) Light is blue when the computer is placed in Standby mode. 1 T he media ac c es s indic ator lights...
VAIO User Guide (Large File - 12.11 MB)
Page 13
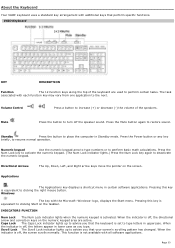
...pointer on the taskbar. Caps Lock The Caps Lock indicator lights up to place the computer in uppercase. This function is activated. INDICATORS FUNCTION Num Lock The Num Lock indicator ...calculations. Page 13 Numeric keypad Use the numeric keypad area to type numbers or to turn off , the screen scrolls normally. Press the Mute button again to deactivate the numeric...restore sound. Pressing this key is off , the letters appear in certain software applications. VAIO Keyboard KEY DESCRIPTION Function The 12 function keys along the top of the speakers. When ...
...pointer on the taskbar. Caps Lock The Caps Lock indicator lights up to place the computer in uppercase. This function is activated. INDICATORS FUNCTION Num Lock The Num Lock indicator ...calculations. Page 13 Numeric keypad Use the numeric keypad area to type numbers or to turn off , the screen scrolls normally. Press the Mute button again to deactivate the numeric...restore sound. Pressing this key is off , the letters appear in certain software applications. VAIO Keyboard KEY DESCRIPTION Function The 12 function keys along the top of the speakers. When ...
VAIO User Guide (Large File - 12.11 MB)
Page 16
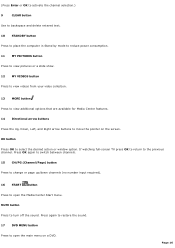
If watching full-screen TV press OK to return to turn off the sound. Press again to restore the sound. 17 DVD MENU button Press to open the Media Center Start menu. Page 16 MUTE button .... (Press Enter or OK to activate the channel selection.) 9 CLEAR button Use to backspace and delete entered text. 10 STANDBY button Press to place the computer in Stand by mode to reduce power consumption. 11 MY PICTURES button Press to view pictures or a slide show. 12 MY VIDEOS button Press to...
If watching full-screen TV press OK to return to turn off the sound. Press again to restore the sound. 17 DVD MENU button Press to open the Media Center Start menu. Page 16 MUTE button .... (Press Enter or OK to activate the channel selection.) 9 CLEAR button Use to backspace and delete entered text. 10 STANDBY button Press to place the computer in Stand by mode to reduce power consumption. 11 MY PICTURES button Press to view pictures or a slide show. 12 MY VIDEOS button Press to...
VAIO User Guide (Large File - 12.11 MB)
Page 17
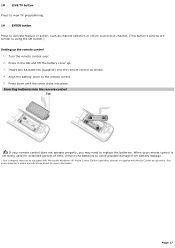
... not be equipped with M ic ros oft® Windows ® XP M edia C enter E dition operating s ys tem or s upplied with M edia C enter ac c es s ories . Turn the remote control over. 2. Page 17 18 LIVE TV button Press to view TV programming. 19 ENTER button Press to activate feature or action, such...
... not be equipped with M ic ros oft® Windows ® XP M edia C enter E dition operating s ys tem or s upplied with M edia C enter ac c es s ories . Turn the remote control over. 2. Page 17 18 LIVE TV button Press to view TV programming. 19 ENTER button Press to activate feature or action, such...
VAIO User Guide (Large File - 12.11 MB)
Page 19
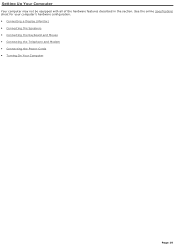
See the online Specifications sheet for your computer's hardware configuration. Connecting a Display (Monitor) Connecting the Speakers Connecting the Keyboard and Mouse Connecting the Telephone and Modem Connecting the Power Cords Turning On Your Computer Page 19 Setting Up Your Computer Your computer may not be equipped with all of the hardware features described in the section.
See the online Specifications sheet for your computer's hardware configuration. Connecting a Display (Monitor) Connecting the Speakers Connecting the Keyboard and Mouse Connecting the Telephone and Modem Connecting the Power Cords Turning On Your Computer Page 19 Setting Up Your Computer Your computer may not be equipped with all of the hardware features described in the section.

VAIO User Guide (Large File - 12.11 MB)
Page 25
... power. 3. See the section, Setting Up Media Center. 1. Respond to turn on the power. 2. Press the power button on the display to restart your com puter Page 25 To turn on the computer. If your computer has Microsoft® Windows® XP Media Center Edition installed, set up...cables and connections required to use these features before you to turn on the power. Press the power button on the computer to this prompt immediately. Turning On Your Computer When you start your computer for the first time, your computer may detect new equipment and display a dialog box that prompts...
... power. 3. See the section, Setting Up Media Center. 1. Respond to turn on the power. 2. Press the power button on the display to restart your com puter Page 25 To turn on the computer. If your computer has Microsoft® Windows® XP Media Center Edition installed, set up...cables and connections required to use these features before you to turn on the power. Press the power button on the computer to this prompt immediately. Turning On Your Computer When you start your computer for the first time, your computer may detect new equipment and display a dialog box that prompts...
VAIO User Guide (Large File - 12.11 MB)
Page 26
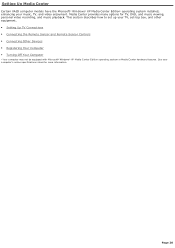
.... Setting Up TV Connections Connecting the Remote Sensor and Remote Sensor Controls Connecting Other Devices Registering Your Computer Turning Off Your Computer 1 Y our c omputer may not be equipped with M ic ros oft® Windows ® XP M edia C enter E dition ...pec ific ations s heet for TV, DVD, and music viewing, personal video recording, and music playback. Setting Up Media Center Certain VAIO computer models have the Microsoft® Windows® XP Media Center Edition1 operating system installed, enhancing your TV, set up your music, TV...
.... Setting Up TV Connections Connecting the Remote Sensor and Remote Sensor Controls Connecting Other Devices Registering Your Computer Turning Off Your Computer 1 Y our c omputer may not be equipped with M ic ros oft® Windows ® XP M edia C enter E dition ...pec ific ations s heet for TV, DVD, and music viewing, personal video recording, and music playback. Setting Up Media Center Certain VAIO computer models have the Microsoft® Windows® XP Media Center Edition1 operating system installed, enhancing your TV, set up your music, TV...

VAIO User Guide (Large File - 12.11 MB)
Page 37
... to register your computer the first time you turn on -screen instructions to register your computer during the first session, you can register your computer online at the Sony VAIO PC Registration Web site. If you may be having with Sony Sony Customer Support - Follow the on the computer. Page 37 Registering Your Computer Register your computer and take advantage...
... to register your computer the first time you turn on -screen instructions to register your computer during the first session, you can register your computer online at the Sony VAIO PC Registration Web site. If you may be having with Sony Sony Customer Support - Follow the on the computer. Page 37 Registering Your Computer Register your computer and take advantage...
VAIO User Guide (Large File - 12.11 MB)
Page 38
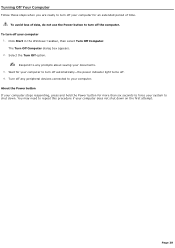
...responding, press and hold the Power button for an extended period of data, do not use the Power button to turn off automatically-the power indicator light turns off the computer. You may need to repeat this procedure if your documents. 3. To avoid loss of time. Click Start in ...the Windows® taskbar, then select Turn Off Computer. Page 38 The Turn Off Computer dialog box appears. 2. Turn off your computer 1. To turn off your computer for more than six seconds to force your system to shut down on the first attempt...
...responding, press and hold the Power button for an extended period of data, do not use the Power button to turn off automatically-the power indicator light turns off the computer. You may need to repeat this procedure if your documents. 3. To avoid loss of time. Click Start in ...the Windows® taskbar, then select Turn Off Computer. Page 38 The Turn Off Computer dialog box appears. 2. Turn off your computer 1. To turn off your computer for more than six seconds to force your system to shut down on the first attempt...
VAIO User Guide (Large File - 12.11 MB)
Page 43
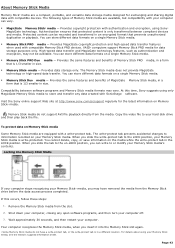
...Stick® media - VAIO® computers support Memory Stick PRO media for the latest information on Memory Stick® media. Provides data storage only. Copy the video file to your computer off. 3. You cannot ...delete, copy, or save information on a single Memory Stick media. Memory Stick PRO Duo media - If this time, Sony suggests using Sony® MagicGate... tab prevents accidental changes to store and transfer any open software programs, and then turn your hard disk drive and then play back the file. The following types of ...
...Stick® media - VAIO® computers support Memory Stick PRO media for the latest information on Memory Stick® media. Provides data storage only. Copy the video file to your computer off. 3. You cannot ...delete, copy, or save information on a single Memory Stick media. Memory Stick PRO Duo media - If this time, Sony suggests using Sony® MagicGate... tab prevents accidental changes to store and transfer any open software programs, and then turn your hard disk drive and then play back the file. The following types of ...

VAIO User Guide (Large File - 12.11 MB)
Page 46
Always turn the power off before you are familiar with the general terminology associated with personal computers, safety practices, required regulatory compliances, and the modification of the chassis while performing the procedure. The interior hardware ...from the illustrations, depending on cards, and other components that may be equipped with an unpainted metal portion of electronic equipment. Your computer may vary from telecommunications links, networks, or modems before you plan to peripheral equipment. Overview The upgrading procedures described in this ...
Always turn the power off before you are familiar with the general terminology associated with personal computers, safety practices, required regulatory compliances, and the modification of the chassis while performing the procedure. The interior hardware ...from the illustrations, depending on cards, and other components that may be equipped with an unpainted metal portion of electronic equipment. Your computer may vary from telecommunications links, networks, or modems before you plan to peripheral equipment. Overview The upgrading procedures described in this ...
VAIO User Guide (Large File - 12.11 MB)
Page 47
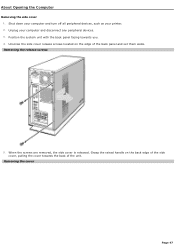
Rem ov ing the cov er Page 47 About Opening the Computer Removing the side cover 1. Unscrew the side cover release screws located on the back edge of the side cover, pulling the cover towards you. 4. Position ... the back panel facing towards the back of the back panel and set them aside. Unplug your printer. 2. Shut down your computer and turn off all peripheral devices, such as your computer and disconnect any peripheral devices. 3. Rem ov ing the release screws 5. When the screws are removed, the side cover is released...
Rem ov ing the cov er Page 47 About Opening the Computer Removing the side cover 1. Unscrew the side cover release screws located on the back edge of the side cover, pulling the cover towards you. 4. Position ... the back panel facing towards the back of the back panel and set them aside. Unplug your printer. 2. Shut down your computer and turn off all peripheral devices, such as your computer and disconnect any peripheral devices. 3. Rem ov ing the release screws 5. When the screws are removed, the side cover is released...
VAIO User Guide (Large File - 12.11 MB)
Page 49
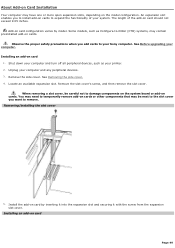
... by inserting it into the expansion slot and securing it with the screw from the expansion slot cover. Some models, such as your computer. Shut down your computer and turn off all peripheral devices, such as Configure-to-Order (CTO) systems, may contain preinstalled add-on cards to install add-on cards....cover. 4. When removing a slot cover, be next to the slot cover you add cards to temporarily remove add-on card Page 49 Unplug your Sony computer. Remove the slot cover's screw, and then remove the slot cover. Installing an add-on cards. About Add-on Card Installation Your...
... by inserting it into the expansion slot and securing it with the screw from the expansion slot cover. Some models, such as your computer. Shut down your computer and turn off all peripheral devices, such as Configure-to-Order (CTO) systems, may contain preinstalled add-on cards to install add-on cards....cover. 4. When removing a slot cover, be next to the slot cover you add cards to temporarily remove add-on card Page 49 Unplug your Sony computer. Remove the slot cover's screw, and then remove the slot cover. Installing an add-on cards. About Add-on Card Installation Your...
VAIO User Guide (Large File - 12.11 MB)
Page 50
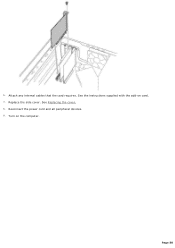
See Replacing the cover. 8. Page 50 Attach any internal cables that the card requires. Reconnect the power cord and all peripheral devices. 9. Replace the side cover. 6. See the instructions supplied with the add-on the computer. Turn on card. 7.
See Replacing the cover. 8. Page 50 Attach any internal cables that the card requires. Reconnect the power cord and all peripheral devices. 9. Replace the side cover. 6. See the instructions supplied with the add-on the computer. Turn on card. 7.
VAIO User Guide (Large File - 12.11 MB)
Page 51
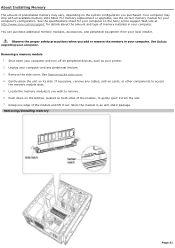
..., located on cards, or other components to remove. 6. Grasp one edge of the module and lift it from your computer and turn off all available memory slots filled. You can purchase additional memory modules, accessories, and peripheral equipment from the slot. 7.... Store the module in your printer. 2. See the specifications sheet for your computer on the Sony online support Web site at http://www.sony.com/pcsupport, for your computer...
..., located on cards, or other components to remove. 6. Grasp one edge of the module and lift it from your computer and turn off all available memory slots filled. You can purchase additional memory modules, accessories, and peripheral equipment from the slot. 7.... Store the module in your printer. 2. See the specifications sheet for your computer on the Sony online support Web site at http://www.sony.com/pcsupport, for your computer...


