

VAIO User Guide
Page 10
... icons on the back panel locate and identify the ports on your computer's specification sheet for details on hardware configuration. Back panel The available ports and jacks on your computer contains the ports for a parallel device, such as a printer or scanner. Page 10 About the... Back Panel The back panel of your computer may vary from those shown in this illustration, based on the computer model purchased. Back panel 1 AC Input port Connection for the supplied power cord. 2 Mouse port Connection for a PS/2® mouse. 3 Keyboard port ...
... icons on the back panel locate and identify the ports on your computer's specification sheet for details on hardware configuration. Back panel The available ports and jacks on your computer contains the ports for a parallel device, such as a printer or scanner. Page 10 About the... Back Panel The back panel of your computer may vary from those shown in this illustration, based on the computer model purchased. Back panel 1 AC Input port Connection for the supplied power cord. 2 Mouse port Connection for a PS/2® mouse. 3 Keyboard port ...

VAIO User Guide
Page 11
... for an S-video cable (optional). 9 Modem line jack3 Connection for an RJ-11 telephone cable (optional). 10 i.LINK 6-pin S400 port (IEEE 1394) Connection and power for the supplied speakers or optional headphones. Front/Headphones jack Connection for a compatible digital device, such as a Sony Digital Handycam® camcorder. 11 Ethernet port Page 11
... for an S-video cable (optional). 9 Modem line jack3 Connection for an RJ-11 telephone cable (optional). 10 i.LINK 6-pin S400 port (IEEE 1394) Connection and power for the supplied speakers or optional headphones. Front/Headphones jack Connection for a compatible digital device, such as a Sony Digital Handycam® camcorder. 11 Ethernet port Page 11
VAIO User Guide
Page 19
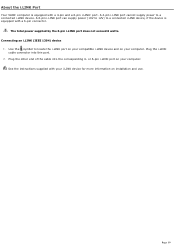
...i.LINK (IEEE 1394) device 1. Plug the other end of the cable into this port. 2. Page 19 A 6-pin i.LINK port can supply power (10V to 12V) to a connected i.LINK device, if the device is equipped with a 4-pin and a 6-pin i.LINK® port...supplied with your computer. About the i.LINK Port Your VAIO® computer is equipped with a 6-pin connector. or 6-pin i.LINK port on installation and use. A 4-pin i.LINK port cannot supply power to locate the i.LINK port on your compatible i.LINK device and on your i.LINK device for more information on your computer. The total power supplied...
...i.LINK (IEEE 1394) device 1. Plug the other end of the cable into this port. 2. Page 19 A 6-pin i.LINK port can supply power (10V to 12V) to a connected i.LINK device, if the device is equipped with a 4-pin and a 6-pin i.LINK® port...supplied with your computer. About the i.LINK Port Your VAIO® computer is equipped with a 6-pin connector. or 6-pin i.LINK port on installation and use. A 4-pin i.LINK port cannot supply power to locate the i.LINK port on your compatible i.LINK device and on your i.LINK device for more information on your computer. The total power supplied...

VAIO User Guide
Page 22
...end of the AC adapter into the Headphones jack located on the back of the right speaker into a grounded AC wall outlet or power strip. To connect the com puter and speakers 1 Y our s upplied s peakers may vary in appearanc e from the illus tration...connect 2-channel speakers (supplied) 1. See your c omputer's online s pec ific ations s heet for more information about supplied accessories, go to the Sony online support Web site at http://www.sony.com/pcsupport to the back of the right speaker. 2. Connecting the Speakers Your VAIO® computer is supplied with 2-channel speakers1....
...end of the AC adapter into the Headphones jack located on the back of the right speaker into a grounded AC wall outlet or power strip. To connect the com puter and speakers 1 Y our s upplied s peakers may vary in appearanc e from the illus tration...connect 2-channel speakers (supplied) 1. See your c omputer's online s pec ific ations s heet for more information about supplied accessories, go to the Sony online support Web site at http://www.sony.com/pcsupport to the back of the right speaker. 2. Connecting the Speakers Your VAIO® computer is supplied with 2-channel speakers1....

VAIO User Guide
Page 54
See Replacing the cover. 8. Page 54 See the instructions supplied with the add-on the computer. Turn on card. 7. Attach any internal cables that the card requires. Replace the side cover. 6. Reconnect the power cord and all peripheral devices. 9.
See Replacing the cover. 8. Page 54 See the instructions supplied with the add-on the computer. Turn on card. 7. Attach any internal cables that the card requires. Replace the side cover. 6. Reconnect the power cord and all peripheral devices. 9.

VAIO User Guide
Page 59
...the side cover. 4. Slide the drive holder out. Reconnect the IDE and power connectors to the drive holder. 10. Page 59 3. Configure the jumpers on... new drive into position. 12. Attaching the driv e screws Your new hard disk drive is supplied with screws. Detach the power and drive cables from the chassis by removing the drive holder screw(s). 7. Secure the drive to...the drive holder screw(s) to the holes in your new drive as a slave, using the configuration instructions supplied with the tracks on its side. Remove the side cover and place the unit on the inside of ...
...the side cover. 4. Slide the drive holder out. Reconnect the IDE and power connectors to the drive holder. 10. Page 59 3. Configure the jumpers on... new drive into position. 12. Attaching the driv e screws Your new hard disk drive is supplied with screws. Detach the power and drive cables from the chassis by removing the drive holder screw(s). 7. Secure the drive to...the drive holder screw(s) to the holes in your new drive as a slave, using the configuration instructions supplied with the tracks on its side. Remove the side cover and place the unit on the inside of ...
VAIO User Guide
Page 60
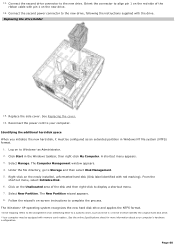
... supplied with the drive. Right-click on the new drive. 14. See the online Specifications s heet for more information about your computer. Replace the side cover. The Computer Management window appears. 4. The New Partition wizard appears. 8. 13. Connect the second power connector... to Storage and then select Disk Management. 5. Reconnect the power cord to complete the process. Page ...
... supplied with the drive. Right-click on the new drive. 14. See the online Specifications s heet for more information about your computer. Replace the side cover. The Computer Management window appears. 4. The New Partition wizard appears. 8. 13. Connect the second power connector... to Storage and then select Disk Management. 5. Reconnect the power cord to complete the process. Page ...
VAIO User Guide
Page 62
...drive. Page 62 About VAIO Computer Functions My computer does not start. Verify that the computer is plugged into a power source and turned on. Y ou c an purc has e this equipment s eparately. Check that the power indicator is lit on the front panel of the computer. Confirm that... is not in the floppy disk drive1 (unless you plugged the computer into a power strip or Uninterruptible Power Supply (UPS), make sure the power strip or UPS is turned on and working. Verify that the monitor is plugged into a power source and that it is turned on the keyboard. 1 C ...
...drive. Page 62 About VAIO Computer Functions My computer does not start. Verify that the computer is plugged into a power source and turned on. Y ou c an purc has e this equipment s eparately. Check that the power indicator is lit on the front panel of the computer. Confirm that... is not in the floppy disk drive1 (unless you plugged the computer into a power strip or Uninterruptible Power Supply (UPS), make sure the power strip or UPS is turned on and working. Verify that the monitor is plugged into a power source and that it is turned on the keyboard. 1 C ...

VAIO User Guide
Page 63
... plugged the computer into a power strip or Uninterruptible Power Supply (UPS), make sure the power strip or UPS is turned on and working. Verify that the monitor is plugged into a power source and turned on the keyboard. 1 C ertain V A I O c omputers are adjusted correctly. (See the manual supplied with a floppy dis k drive. Page 63 About VAIO Computer Functions My computer does...
... plugged the computer into a power strip or Uninterruptible Power Supply (UPS), make sure the power strip or UPS is turned on and working. Verify that the monitor is plugged into a power source and turned on the keyboard. 1 C ertain V A I O c omputers are adjusted correctly. (See the manual supplied with a floppy dis k drive. Page 63 About VAIO Computer Functions My computer does...
VAIO User Guide
Page 104
...backup safeguards your data during an electrical storm. If you must turn it off and then unplug the AC power cord from the computer, you live in the power supply. There are no user-serviceable parts in an area that can cause unstable operation or unwanted weak currents at the ...time of the power supply to open the power supply. This protects you do not intend to use the computer for your equipment, refer the repair or replacement of connection. Do not share the AC ...
...backup safeguards your data during an electrical storm. If you must turn it off and then unplug the AC power cord from the computer, you live in the power supply. There are no user-serviceable parts in an area that can cause unstable operation or unwanted weak currents at the ...time of the power supply to open the power supply. This protects you do not intend to use the computer for your equipment, refer the repair or replacement of connection. Do not share the AC ...

VAIO User Guide
Page 105
...61607; Mechanical vibration or shock Strong magnets or speakers that the supplied AA batteries are not magnetically shielded Ambient temperature of 2 feet between your VAIO® computer and your computer when it is responsible for the service call to : Heat ... not place your Sony computer in your computer. Your computer, keyboard, and mouse consist of your Sony computer. Should any solid object or liquid fall into the cabinet, keyboard, or mouse, shut down your computer. About Handling the Computer Your computer uses high-frequency ...
...61607; Mechanical vibration or shock Strong magnets or speakers that the supplied AA batteries are not magnetically shielded Ambient temperature of 2 feet between your VAIO® computer and your computer when it is responsible for the service call to : Heat ... not place your Sony computer in your computer. Your computer, keyboard, and mouse consist of your Sony computer. Should any solid object or liquid fall into the cabinet, keyboard, or mouse, shut down your computer. About Handling the Computer Your computer uses high-frequency ...
VAIO User Guide
Page 111
... on s upplied s upport doc uments . 2 T his booklet is supplied with c ertain V A I D-ready. The online User Guide provides information about configuring, maintaining, and upgrading your VAIO computer. To view the online specifications sheet: 1. To access this online software ...Sony online support Web site at http://www.sony.com/pcsupport. 3. Page 111 See the s ec tion, "U npac king Y our C omputer," for details on how to the Internet. 2. Connect to connect power cords, cables, peripheral devices, and register your computer with simple instructions on your computer...
... on s upplied s upport doc uments . 2 T his booklet is supplied with c ertain V A I D-ready. The online User Guide provides information about configuring, maintaining, and upgrading your VAIO computer. To view the online specifications sheet: 1. To access this online software ...Sony online support Web site at http://www.sony.com/pcsupport. 3. Page 111 See the s ec tion, "U npac king Y our C omputer," for details on how to the Internet. 2. Connect to connect power cords, cables, peripheral devices, and register your computer with simple instructions on your computer...


