
User Guide
Page 3
n3 N Using the Network (LAN) ...102 Using the Wireless LAN (WLAN) ...104 Using the Bluetooth Function ...107 Using Peripheral Devices...112 Connecting External Speakers ...113 Connecting a Universal Serial Bus (USB) Device...115 Connecting a Printer ...117 Connecting an i.LINK Device ...118 Customizing Your VAIO Computer ...120 Setting the Password ...121 Setting Up Your Computer with the VAIO Control Center 126 Using the Power Saving Mode...127 Upgrading Your VAIO Computer...130 Adding and Removing Memory...131 Adding the Hard Disk Drive...138
n3 N Using the Network (LAN) ...102 Using the Wireless LAN (WLAN) ...104 Using the Bluetooth Function ...107 Using Peripheral Devices...112 Connecting External Speakers ...113 Connecting a Universal Serial Bus (USB) Device...115 Connecting a Printer ...117 Connecting an i.LINK Device ...118 Customizing Your VAIO Computer ...120 Setting the Password ...121 Setting Up Your Computer with the VAIO Control Center 126 Using the Power Saving Mode...127 Upgrading Your VAIO Computer...130 Adding and Removing Memory...131 Adding the Hard Disk Drive...138

User Guide
Page 9
Provides information about restoring individual software programs, hardware drivers, and drive partition(s) or your entire hard disk drive to the original factory settings. n9 N Before Use ❑ VAIO Recovery Center User Guide - To access this on-screen guide: 1 Click Start and Help and Support. 2 Click Use my VAIO. 3 Click VAIO Recovery Center User Guide.
Provides information about restoring individual software programs, hardware drivers, and drive partition(s) or your entire hard disk drive to the original factory settings. n9 N Before Use ❑ VAIO Recovery Center User Guide - To access this on-screen guide: 1 Click Start and Help and Support. 2 Click Use my VAIO. 3 Click VAIO Recovery Center User Guide.
User Guide
Page 40
... such a case, you cannot use (page 29). To change the volume. I Muting button Turns the volume on the computer screen. L Directional arrow keys Move the pointer on and off. N Windows key Displays the Start menu. J S1 button Opens the Start menu of the Windows Media Center by default. ✍ The default S1 button assignment may be different from the above. See Setting Up Your Computer with the VAIO Control Center. n 40 N Using Your VAIO Computer G Indicators (Battery): turns on while...
... such a case, you cannot use (page 29). To change the volume. I Muting button Turns the volume on the computer screen. L Directional arrow keys Move the pointer on and off. N Windows key Displays the Start menu. J S1 button Opens the Start menu of the Windows Media Center by default. ✍ The default S1 button assignment may be different from the above. See Setting Up Your Computer with the VAIO Control Center. n 40 N Using Your VAIO Computer G Indicators (Battery): turns on while...

User Guide
Page 42
... screen using the touch pad. It is available only with the Fn+F1 keys that support a touch pad scroll feature). ✍ You can point to start an operation. If pointer movement or scrolling continues against your intention, your finger off the touch pad. To change other touch pad settings, click Start, All Programs, VAIO Control Center, Keyboard and Mouse and Pointing Device. Press the left button...
... screen using the touch pad. It is available only with the Fn+F1 keys that support a touch pad scroll feature). ✍ You can point to start an operation. If pointer movement or scrolling continues against your intention, your finger off the touch pad. To change other touch pad settings, click Start, All Programs, VAIO Control Center, Keyboard and Mouse and Pointing Device. Press the left button...

User Guide
Page 52
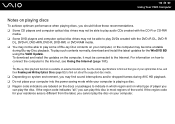
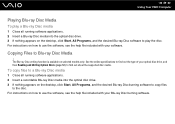
Check your specifications for the type of media your model. Use the table below to see which types of optical disc drive installed on the model you purchased. n 52 N Using Your VAIO Computer Reading and Writing Optical Discs Your computer plays and records CDs, DVDs, and Blu-ray Disc™ media, depending on your optical disc drive supports.
Check your specifications for the type of media your model. Use the table below to see which types of optical disc drive installed on the model you purchased. n 52 N Using Your VAIO Computer Reading and Writing Optical Discs Your computer plays and records CDs, DVDs, and Blu-ray Disc™ media, depending on your optical disc drive supports.
User Guide
Page 54
... AACS key update requires Internet access. Some contents may restrict video output to check both playback and recording compatibility with your VAIO computer, be implemented for some contents on packaged media recorded in AVC or VC1 format at high bit rates. When you buy pre-recorded or blank discs for use memory-resident utility software while the optical disc drive is not supported. Region settings are required...
... AACS key update requires Internet access. Some contents may restrict video output to check both playback and recording compatibility with your VAIO computer, be implemented for some contents on packaged media recorded in AVC or VC1 format at high bit rates. When you buy pre-recorded or blank discs for use memory-resident utility software while the optical disc drive is not supported. Region settings are required...
User Guide
Page 56
... code indicators are labeled on the discs or packages to indicate in most regions of the world. See the online specifications to find out about the supported disc media. ❑ Depending on system environment, you cannot play such contents normally, download and install the latest updates for your optical disc drive, and then Reading and Writing Optical Discs (page 52) to the Internet, see Using the Internet...
... code indicators are labeled on the discs or packages to indicate in most regions of the world. See the online specifications to find out about the supported disc media. ❑ Depending on system environment, you cannot play such contents normally, download and install the latest updates for your optical disc drive, and then Reading and Writing Optical Discs (page 52) to the Internet, see Using the Internet...
User Guide
Page 59
...-ray Disc media into the optical disc drive. 3 If nothing appears on the desktop, click Start, All Programs, and the desired Blu-ray Disc burning software to copy files to the disc. See the online specifications to find out about the supported disc media. For instructions on the desktop, click Start, All Programs, and the desired Blu-ray Disc software to play the disc. Copying Files to find out the type...
...-ray Disc media into the optical disc drive. 3 If nothing appears on the desktop, click Start, All Programs, and the desired Blu-ray Disc burning software to copy files to the disc. See the online specifications to find out about the supported disc media. For instructions on the desktop, click Start, All Programs, and the desired Blu-ray Disc software to play the disc. Copying Files to find out the type...

User Guide
Page 68
... TV monitor or display. 3 Connect one end of a stereo A/V cable with the L-shaped plug. 1 Connect one end of controlling the STB. Connect the other end to the S VIDEO input port (12) on the back panel of the set -top box (STB) setup, you prefer better video quality, connect one end of a TV coaxial cable (1) (supplied) to your cable or satellite service provider. ❑ You may be used to change TV channels, if the device is capable of an S Video cable...
... TV monitor or display. 3 Connect one end of a stereo A/V cable with the L-shaped plug. 1 Connect one end of controlling the STB. Connect the other end to the S VIDEO input port (12) on the back panel of the set -top box (STB) setup, you prefer better video quality, connect one end of a TV coaxial cable (1) (supplied) to your cable or satellite service provider. ❑ You may be used to change TV channels, if the device is capable of an S Video cable...
User Guide
Page 102
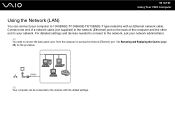
...; You need to remove the back panel cover from the computer to the network with an Ethernet network cable. For detailed settings and devices needed to connect to the network, ask your network. Connect one end of a network cable (not supplied) to the network (Ethernet) port on the back of the computer and the other end to 1000BASE-T/100BASE-TX/10BASE-T type networks with the default settings. n 102 N Using Your VAIO Computer Using the Network (LAN) You can be connected to access the network (Ethernet) port.
...; You need to remove the back panel cover from the computer to the network with an Ethernet network cable. For detailed settings and devices needed to connect to the network, ask your network. Connect one end of a network cable (not supplied) to the network (Ethernet) port on the back of the computer and the other end to 1000BASE-T/100BASE-TX/10BASE-T type networks with the default settings. n 102 N Using Your VAIO Computer Using the Network (LAN) You can be connected to access the network (Ethernet) port.

User Guide
Page 113
... can connect external sound output devices (not supplied), such as digital headphones or an AV amplifier to the port and enhance the sound quality of outputting digital signals through the OPTICAL OUT port, you need to change the sound output device? (page 193). For more information, see How do I change the sound output device. For the detailed instructions, see the manual that came with your computer. n 113 N Using Peripheral Devices Connecting External Speakers...
... can connect external sound output devices (not supplied), such as digital headphones or an AV amplifier to the port and enhance the sound quality of outputting digital signals through the OPTICAL OUT port, you need to change the sound output device? (page 193). For more information, see How do I change the sound output device. For the detailed instructions, see the manual that came with your computer. n 113 N Using Peripheral Devices Connecting External Speakers...

User Guide
Page 117
Connecting a Printer Using the USB Port You can connect a Windows-compatible printer to your computer to print documents. To connect a printer using the USB port 1 Plug the power cord (1) of your printer into an AC outlet. 2 Choose the USB port (3) you prefer to use. 3 Plug one end of Windows to your printer. n 117 N Using Peripheral Devices Connecting a Printer You can connect a USB printer compatible with your version of a USB printer cable (2) (not supplied) into the USB port and the other end to the computer.
Connecting a Printer Using the USB Port You can connect a Windows-compatible printer to your computer to print documents. To connect a printer using the USB port 1 Plug the power cord (1) of your printer into an AC outlet. 2 Choose the USB port (3) you prefer to use. 3 Plug one end of Windows to your printer. n 117 N Using Peripheral Devices Connecting a Printer You can connect a USB printer compatible with your version of a USB printer cable (2) (not supplied) into the USB port and the other end to the computer.

User Guide
Page 125
... Setup, and then press the Enter key. n 125 N Customizing Your VAIO Computer To change or remove the power-on password (user password) 1 Turn on the computer. 2 Press the F2 key when the VAIO logo appears. To remove the password, leave the Enter New Password and Confirm New Password fields blank and press the Enter key. 6 Press the < or , key to display the Security tab, select Set User Password, and then press the Enter key. 5 On the password entry screen, enter the current password...
... Setup, and then press the Enter key. n 125 N Customizing Your VAIO Computer To change or remove the power-on password (user password) 1 Turn on the computer. 2 Press the F2 key when the VAIO logo appears. To remove the password, leave the Enter New Password and Confirm New Password fields blank and press the Enter key. 6 Press the < or , key to display the Security tab, select Set User Password, and then press the Enter key. 5 On the password entry screen, enter the current password...
User Guide
Page 130
... electronic connectors technology. To find the nearest center or agent, see the online specifications. To avoid invalidation of memory installed on a computer. ❑ You should not install it yourself, if you are not familiar with upgrading memory on your model, see Sony Support Information (page 200). ❑ Adding and Removing Memory (page 131) ❑ Adding the Hard Disk Drive (page 138) For assistance, contact an authorized Sony Service Center. For the type...
... electronic connectors technology. To find the nearest center or agent, see the online specifications. To avoid invalidation of memory installed on a computer. ❑ You should not install it yourself, if you are not familiar with upgrading memory on your model, see Sony Support Information (page 200). ❑ Adding and Removing Memory (page 131) ❑ Adding the Hard Disk Drive (page 138) For assistance, contact an authorized Sony Service Center. For the type...

User Guide
Page 165
... the power-on password, contact an authorized Sony Service Center to reset it keeps crashing? ❑ Check the web site of the BIOS functions to download. ❑ Make sure you have installed the latest video driver. ❑ On some VAIO models, the graphics memory is not guaranteed. To find the nearest center or agent, see Sony Support Information (page 200). n 165 N Troubleshooting What should I do if my game software does not work...
... the power-on password, contact an authorized Sony Service Center to reset it keeps crashing? ❑ Check the web site of the BIOS functions to download. ❑ Make sure you have installed the latest video driver. ❑ On some VAIO models, the graphics memory is not guaranteed. To find the nearest center or agent, see Sony Support Information (page 200). n 165 N Troubleshooting What should I do if my game software does not work...

User Guide
Page 178
... using external speakers, check the volume settings on my computer? ❑ Make sure the disc is inserted into the optical disc drive with the volume down button and Restart to the Shut down button on the wireless keyboard or the remote commander. Follow these steps: 1 Press the Ctrl+Alt+Delete keys and click the arrow next to restart the computer. 2 Remove the disc from the optical disc drive. 3 Check the disc...
... using external speakers, check the volume settings on my computer? ❑ Make sure the disc is inserted into the optical disc drive with the volume down button and Restart to the Shut down button on the wireless keyboard or the remote commander. Follow these steps: 1 Press the Ctrl+Alt+Delete keys and click the arrow next to restart the computer. 2 Remove the disc from the optical disc drive. 3 Check the disc...

User Guide
Page 180
...-ray Disc playback. To download and install the updates on how to connect the computer to the Internet, see Using the Internet (page 101). n 180 N Troubleshooting What should I do if I cannot write data to CD media? ❑ Make sure you neither launch any software application nor allow any to launch automatically, not even a screen saver. ❑ If you are using the correct DVD recordable media. ❑...
...-ray Disc playback. To download and install the updates on how to connect the computer to the Internet, see Using the Internet (page 101). n 180 N Troubleshooting What should I do if I cannot write data to CD media? ❑ Make sure you neither launch any software application nor allow any to launch automatically, not even a screen saver. ❑ If you are using the correct DVD recordable media. ❑...

User Guide
Page 182
... compatible with your printer, disabling the functions on your computer. ❑ You may enable printing. Follow these steps: 1 Click Start and Control Panel. 2 Click Printer under Hardware and Sound. 3 Right-click the printer icon and select Properties. 4 Click the Ports tab. 5 Click to install the printer driver software before you use your computer may need to cancel the Enable bidirectional support check box. 6 Click OK...
... compatible with your printer, disabling the functions on your computer. ❑ You may enable printing. Follow these steps: 1 Click Start and Control Panel. 2 Click Printer under Hardware and Sound. 3 Right-click the printer icon and select Properties. 4 Click the Ports tab. 5 Click to install the printer driver software before you use your computer may need to cancel the Enable bidirectional support check box. 6 Click OK...

Safety Information
Page 2
... YOUR DOWNLOADING OF ANY MATERIALS, DATA, TEXT, IMAGES, VIDEO, OR AUDIO FROM ANY DESCRIBED WEB SITE. COPIES OF COPYRIGHTED INFORMATION MAY ONLY BE MADE FOR LEGALLY PERMISSIBLE PURPOSES. Sony Electronics Inc. This product contains software owned by Sony and licensed by the terms of your Sony Service Center. Use of such software is prohibited. Software specifications are located on the bottom or back panel of a separate user...
... YOUR DOWNLOADING OF ANY MATERIALS, DATA, TEXT, IMAGES, VIDEO, OR AUDIO FROM ANY DESCRIBED WEB SITE. COPIES OF COPYRIGHTED INFORMATION MAY ONLY BE MADE FOR LEGALLY PERMISSIBLE PURPOSES. Sony Electronics Inc. This product contains software owned by Sony and licensed by the terms of your Sony Service Center. Use of such software is prohibited. Software specifications are located on the bottom or back panel of a separate user...
Safety Information
Page 4
... operating this device. 4 For questions regarding your installed optical drives. strong magnets or speakers that may experience or that are not magnetically shielded; For the State of California, USA only Perchlorate Material - and high humidity. ❑ Do not use wireless LAN on your product or for the Sony Service Center nearest you, visit the Sony online support Web site at http://esupport.sony.com/EN/VAIO...
... operating this device. 4 For questions regarding your installed optical drives. strong magnets or speakers that may experience or that are not magnetically shielded; For the State of California, USA only Perchlorate Material - and high humidity. ❑ Do not use wireless LAN on your product or for the Sony Service Center nearest you, visit the Sony online support Web site at http://esupport.sony.com/EN/VAIO...


