
User Guide
Page 3
... Device ...110 Connecting to a Network (LAN) ...112 Customizing Your VAIO Computer ...114 Setting the Password ...115 Setting Up Your Computer with VAIO Control Center 120 Using the Power Saving Mode...121 Upgrading Your VAIO Computer...124 Adding and Removing Memory...125 Adding the Hard Disk Drive...132 Precautions ...138 Handling the LCD Screen ...139 Using...
... Device ...110 Connecting to a Network (LAN) ...112 Customizing Your VAIO Computer ...114 Setting the Password ...115 Setting Up Your Computer with VAIO Control Center 120 Using the Power Saving Mode...121 Upgrading Your VAIO Computer...124 Adding and Removing Memory...125 Adding the Hard Disk Drive...132 Precautions ...138 Handling the LCD Screen ...139 Using...

User Guide
Page 7
... Media Center. To access this on-screen guide: 1 Click Start and Help and Support. 2 Click Use My VAIO. 3 Click Media Center User Guide. See the online specifications to find out whether your entire hard disk drive to the original factory settings. To access this on-screen guide: 1 Click Start, All Programs, and SmartWi...
... Media Center. To access this on-screen guide: 1 Click Start and Help and Support. 2 Click Use My VAIO. 3 Click Media Center User Guide. See the online specifications to find out whether your entire hard disk drive to the original factory settings. To access this on-screen guide: 1 Click Start, All Programs, and SmartWi...

User Guide
Page 11
n 11 N Getting Started Getting Started This section describes how to start up your computer with your computer for example, a printer, an external hard disk drive, a scanner, and so on) at a time, following the manufacturers' instructions. ❑ Locating Controls and Ports (page 12) ❑ About the... Down Your Computer Safely (page 33) Be sure to get started using your system. Before starting your computer. Upon completion, connect one device (for the first time, do not connect any other hardware that did not originally come with only the supplied accessories connected and...
n 11 N Getting Started Getting Started This section describes how to start up your computer with your computer for example, a printer, an external hard disk drive, a scanner, and so on) at a time, following the manufacturers' instructions. ❑ Locating Controls and Ports (page 12) ❑ About the... Down Your Computer Safely (page 33) Be sure to get started using your system. Before starting your computer. Upon completion, connect one device (for the first time, do not connect any other hardware that did not originally come with only the supplied accessories connected and...

User Guide
Page 12
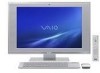
G SONY logo lamp (page 120) H LCD screen (page 139) I HDMI SELECT indicator* (page 17) J WIRELESS indicator (page 17) K DISPLAY OFF indicator (page 17) L Hard disk drive/Optical disc drive indicator (page 17) * On selected models only. It may be different from those illustrated in this sensor for operations. n 12 N Getting Started Locating Controls and ...
G SONY logo lamp (page 120) H LCD screen (page 139) I HDMI SELECT indicator* (page 17) J WIRELESS indicator (page 17) K DISPLAY OFF indicator (page 17) L Hard disk drive/Optical disc drive indicator (page 17) * On selected models only. It may be different from those illustrated in this sensor for operations. n 12 N Getting Started Locating Controls and ...

User Guide
Page 14
Be sure to wait until the computer cools down before you touch it. n 14 N Getting Started A Air exhaust vent (page 142) B HARD DISK DRIVE ACCESS BAY cover (page 133) C Memory module compartment cover (page 127) D AC In port (page 23) E CABLE/ANT DIGITAL input port* (page 63) F CABLE/ANT ...
Be sure to wait until the computer cools down before you touch it. n 14 N Getting Started A Air exhaust vent (page 142) B HARD DISK DRIVE ACCESS BAY cover (page 133) C Memory module compartment cover (page 127) D AC In port (page 23) E CABLE/ANT DIGITAL input port* (page 63) F CABLE/ANT ...

User Guide
Page 17
... mode, and turns off when the computer is in use . Illuminates in orange when the LCD backlight is lit. Illuminates when the drive is selected. Do not place the computer into Sleep mode or turn it off when this indicator is lit.) When the indicator is unlit...the memory card is equipped with the following indicator lights: Indicator Power 1 Built-in MOTION EYE camera Media Access HDMI SELECT* DISPLAY OFF Hard disk drive/Optical disc drive WIRELESS * On selected models only. n 17 N Getting Started About the Indicator Lights Your computer is not in use . Illuminates when data...
... mode, and turns off when the computer is in use . Illuminates in orange when the LCD backlight is lit. Illuminates when the drive is selected. Do not place the computer into Sleep mode or turn it off when this indicator is lit.) When the indicator is unlit...the memory card is equipped with the following indicator lights: Indicator Power 1 Built-in MOTION EYE camera Media Access HDMI SELECT* DISPLAY OFF Hard disk drive/Optical disc drive WIRELESS * On selected models only. n 17 N Getting Started About the Indicator Lights Your computer is not in use . Illuminates when data...

User Guide
Page 48
...the optical disc forcefully before it completely slides out. 1 Check that the Hard disk/Optical disc drive indicator light (1) is in Sleep mode. To do so, click Start and Computer, right-click the optical disc drive icon, and select Eject. If pressing either button does not slide the ...disc out of the drive, restart your computer is turned off. n 48 N Using Your VAIO Computer To remove a disc ! The drive eject button is disabled when your computer and...
...the optical disc forcefully before it completely slides out. 1 Check that the Hard disk/Optical disc drive indicator light (1) is in Sleep mode. To do so, click Start and Computer, right-click the optical disc drive icon, and select Eject. If pressing either button does not slide the ...disc out of the drive, restart your computer is turned off. n 48 N Using Your VAIO Computer To remove a disc ! The drive eject button is disabled when your computer and...

User Guide
Page 75
You cannot record the HDMI input, such as a hard disk drive recorder, to the computer. n 75 N Using Your VAIO Computer Using the HDMI Input Function Your computer may be equipped with an HDMI INPUT port that enables you can receive the highdefinition video and ...sound outputs from the connected device and you to connect a device with the HDMI output port, such as a TV...
You cannot record the HDMI input, such as a hard disk drive recorder, to the computer. n 75 N Using Your VAIO Computer Using the HDMI Input Function Your computer may be equipped with an HDMI INPUT port that enables you can receive the highdefinition video and ...sound outputs from the connected device and you to connect a device with the HDMI output port, such as a TV...
User Guide
Page 121
n 121 N Customizing Your VAIO Computer Using the Power Saving Mode In addition to the normal operating mode, which allows you can turn off a specific device such as the LCD screen or the hard disk drive. Using Normal Mode This is the normal state of the computer when it is lit in use. The green power indicator light is in this mode. To save power while not working, you to turn off specific devices, your computer has a distinct power saving mode called Sleep mode.
n 121 N Customizing Your VAIO Computer Using the Power Saving Mode In addition to the normal operating mode, which allows you can turn off a specific device such as the LCD screen or the hard disk drive. Using Normal Mode This is the normal state of the computer when it is lit in use. The green power indicator light is in this mode. To save power while not working, you to turn off specific devices, your computer has a distinct power saving mode called Sleep mode.

User Guide
Page 122
n 122 N Customizing Your VAIO Computer Using Sleep Mode Sleep mode turns off the LCD screen and places the hard disk drive and the CPU into Sleep mode. When your computer. ! You will turn off your computer if you press and hold the power button for more ...
n 122 N Customizing Your VAIO Computer Using Sleep Mode Sleep mode turns off the LCD screen and places the hard disk drive and the CPU into Sleep mode. When your computer. ! You will turn off your computer if you press and hold the power button for more ...
User Guide
Page 124
...a computer. ❑ You should not touch the connectors or open the memory module compartment cover. For assistance, contact an authorized Sony Service Center. For the type of module and the amount of the warranty during your product warranty period, we recommend that: ...❑ You should contact your model, see Sony Support Information (page 193). ❑ Adding and Removing Memory (page 125) ❑ Adding the Hard Disk Drive (page 132) n 124 N Upgrading Your VAIO Computer Upgrading Your VAIO Computer Your VAIO computer and memory modules use high precision components and ...
...a computer. ❑ You should not touch the connectors or open the memory module compartment cover. For assistance, contact an authorized Sony Service Center. For the type of module and the amount of the warranty during your product warranty period, we recommend that: ...❑ You should contact your model, see Sony Support Information (page 193). ❑ Adding and Removing Memory (page 125) ❑ Adding the Hard Disk Drive (page 132) n 124 N Upgrading Your VAIO Computer Upgrading Your VAIO Computer Your VAIO computer and memory modules use high precision components and ...

User Guide
Page 132
... 193). Make sure you need assistance to hold an additional 3.5-inch hard disk drive. Some hard disks are not compatible with the HARD DISK DRIVE ACCESS BAY to install a hard disk, contact an authorized Sony Service Center. Review the manufacturer's information provided with VAIO computers. If you unplug your hard disk for compatibility with your computer. n 132 N Upgrading Your...
... 193). Make sure you need assistance to hold an additional 3.5-inch hard disk drive. Some hard disks are not compatible with the HARD DISK DRIVE ACCESS BAY to install a hard disk, contact an authorized Sony Service Center. Review the manufacturer's information provided with VAIO computers. If you unplug your hard disk for compatibility with your computer. n 132 N Upgrading Your...

User Guide
Page 133
n 133 N Upgrading Your VAIO Computer Installing an Additional Hard Disk Drive To install an additional hard disk drive 1 Shut down . 5 Unscrew the four screws (1) and remove the HARD DISK DRIVE ACCESS BAY cover (2). See Removing and Replacing the Covers (page 18) for the procedure. 3 Disconnect the power cord and the rest of the peripheral devices. 4 Wait about an hour until the computer cools down the computer, turn off all peripheral devices, and disconnect peripheral devices from the accessible ports and jacks. 2 Remove the back panel cover from the computer.
n 133 N Upgrading Your VAIO Computer Installing an Additional Hard Disk Drive To install an additional hard disk drive 1 Shut down . 5 Unscrew the four screws (1) and remove the HARD DISK DRIVE ACCESS BAY cover (2). See Removing and Replacing the Covers (page 18) for the procedure. 3 Disconnect the power cord and the rest of the peripheral devices. 4 Wait about an hour until the computer cools down the computer, turn off all peripheral devices, and disconnect peripheral devices from the accessible ports and jacks. 2 Remove the back panel cover from the computer.

User Guide
Page 134
n 134 N Upgrading Your VAIO Computer 7 Pull out the drive holder (4) from the HARD DISK DRIVE ACCESS BAY and set it aside. 6 Unscrew the two screws (3) securing the drive holder.
n 134 N Upgrading Your VAIO Computer 7 Pull out the drive holder (4) from the HARD DISK DRIVE ACCESS BAY and set it aside. 6 Unscrew the two screws (3) securing the drive holder.

User Guide
Page 135
n 135 N Upgrading Your VAIO Computer 8 Place a new drive into place and secure it with the necessary screws. Do not overtighten these screws when securing the drive to the drive holder with screws, through the holes on each side of the drive holder. 9 Secure the drive to the drive holder. 10 Slide the drive holder into the drive bay until it clicks into the drive holder and align the holes on each side of the drive holder. ! A new hard disk drive comes with the screws.
n 135 N Upgrading Your VAIO Computer 8 Place a new drive into place and secure it with the necessary screws. Do not overtighten these screws when securing the drive to the drive holder with screws, through the holes on each side of the drive holder. 9 Secure the drive to the drive holder. 10 Slide the drive holder into the drive bay until it clicks into the drive holder and align the holes on each side of the drive holder. ! A new hard disk drive comes with the screws.

User Guide
Page 137
...right, click Disk Management under Storage. 4 Right-click on to complete the process. The Windows Vista operating system recognizes the new hard disk drive and applies the NTFS format to it must be configured as a user with red marking) and select Initialize Disk. 5 Click ...on the allocated area of the disk. 6 Right-click the area and select New Partition. n 137 N Upgrading Your VAIO Computer Identifying the Additional Hard Disk Space When you initialize the new hard...
...right, click Disk Management under Storage. 4 Right-click on to complete the process. The Windows Vista operating system recognizes the new hard disk drive and applies the NTFS format to it must be configured as a user with red marking) and select Initialize Disk. 5 Click ...on the allocated area of the disk. 6 Right-click the area and select New Partition. n 137 N Upgrading Your VAIO Computer Identifying the Additional Hard Disk Space When you initialize the new hard...

User Guide
Page 150
... or in an unstable position. ❑ Do not move your computer. However, it can be restored. n 150 N Precautions Handling the Hard Disk The hard disk drive has a high storage density and reads or writes data in a place subject to mechanical vibration, shock or dust, you should be careful ...data cannot be easily damaged by mechanical vibration, shock, or dust. Although the hard disk drive has the internal safety device to prevent losing data due to extreme changes in temperature. ✍ If the hard disk drive is on. ❑ Do not turn off the power or restart your computer ...
... or in an unstable position. ❑ Do not move your computer. However, it can be restored. n 150 N Precautions Handling the Hard Disk The hard disk drive has a high storage density and reads or writes data in a place subject to mechanical vibration, shock or dust, you should be careful ...data cannot be easily damaged by mechanical vibration, shock, or dust. Although the hard disk drive has the internal safety device to prevent losing data due to extreme changes in temperature. ✍ If the hard disk drive is on. ❑ Do not turn off the power or restart your computer ...

User Guide
Page 185
..., an operating system, and a compatible i.LINK device. Before connecting compatible i.LINK PC peripherals to cancel the Play Windows Startup sound check box. 5 Click OK. See the manual that ...the i.LINK device is a trademark of Sony Corporation used only to establish an i.LINK connection may not be securely plugged into the...devices under Sound. 4 On the Sounds tab, click to your system, such as a CD-RW or hard disk drive, confirm their operating system compatibility and required operating conditions. See Connecting an i.LINK Device (page 110) ...
..., an operating system, and a compatible i.LINK device. Before connecting compatible i.LINK PC peripherals to cancel the Play Windows Startup sound check box. 5 Click OK. See the manual that ...the i.LINK device is a trademark of Sony Corporation used only to establish an i.LINK connection may not be securely plugged into the...devices under Sound. 4 On the Sounds tab, click to your system, such as a CD-RW or hard disk drive, confirm their operating system compatibility and required operating conditions. See Connecting an i.LINK Device (page 110) ...
User Guide
Page 190
... Copyright protected music can 't I copy images from the Memory Stick onto your Memory Stick. Sony is off. Make sure the erasure prevention switch is not responsible for music files that cannot be... my Memory Stick? Yes, and you can 't I cannot use Memory Stick formatted on a VAIO computer on it. Formatting Memory Stick erases all data, including music data previously saved on other ...Stick-compatible digital cameras. You may need to reformat your hard disk drive to protect data from the copyright holders. Some versions of recorded music requires permission from ...
... Copyright protected music can 't I copy images from the Memory Stick onto your Memory Stick. Sony is off. Make sure the erasure prevention switch is not responsible for music files that cannot be... my Memory Stick? Yes, and you can 't I cannot use Memory Stick formatted on a VAIO computer on it. Formatting Memory Stick erases all data, including music data previously saved on other ...Stick-compatible digital cameras. You may need to reformat your hard disk drive to protect data from the copyright holders. Some versions of recorded music requires permission from ...

User Guide
Page 193
... stored on the hard disk drive as on commonly encountered problems. Type a description of the problem and the Knowledge Database searches for the corresponding solutions online. You can visit Microsoft customer support at the following sources for answers in Brazil 5 VAIO Update When your ... Options Sony Support Information See the following URLs: http://esupport.sony.com/EN/VAIO/ for customers in USA http://www.sony.ca/support/ for customers in Canada http://esupport.sony.com/ES/VAIO/ for customers in Spanish-speaking Latin American countries or areas http://esupport.sony.com/ES/VAIO/BR/...
... stored on the hard disk drive as on commonly encountered problems. Type a description of the problem and the Knowledge Database searches for the corresponding solutions online. You can visit Microsoft customer support at the following sources for answers in Brazil 5 VAIO Update When your ... Options Sony Support Information See the following URLs: http://esupport.sony.com/EN/VAIO/ for customers in USA http://www.sony.ca/support/ for customers in Canada http://esupport.sony.com/ES/VAIO/ for customers in Spanish-speaking Latin American countries or areas http://esupport.sony.com/ES/VAIO/BR/...


