User Guide
Page 4
n4 N Troubleshooting ...145 Computer ...147 System Security ...154 Built-in MOTION EYE Camera...155 Internet ...158 Networking ...160 Optical Discs ...163 Display ...168 Printing ...169 Microphone ...170 Mouse ...172 Speakers ...173 Keyboard...175 Floppy Disks ...176 PC Cards ...177 Audio/Video...179 Memory Stick Media ...182 Peripherals ...183 Support Options ...184 Sony Support Information ...185 Program Support Information...188 Trademarks ...199
n4 N Troubleshooting ...145 Computer ...147 System Security ...154 Built-in MOTION EYE Camera...155 Internet ...158 Networking ...160 Optical Discs ...163 Display ...168 Printing ...169 Microphone ...170 Mouse ...172 Speakers ...173 Keyboard...175 Floppy Disks ...176 PC Cards ...177 Audio/Video...179 Memory Stick Media ...182 Peripherals ...183 Support Options ...184 Sony Support Information ...185 Program Support Information...188 Trademarks ...199
User Guide
Page 11
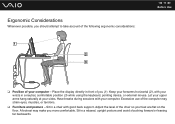
... chair so your sides. Keep your forearms horizontal (2), with good back support. A footrest may strain eyes, muscles, or tendons. ❑ Furniture and posture - Place the display directly in a neutral, comfortable position (3) while using the keyboard, pointing device, or external mouse.
... chair so your sides. Keep your forearms horizontal (2), with good back support. A footrest may strain eyes, muscles, or tendons. ❑ Furniture and posture - Place the display directly in a neutral, comfortable position (3) while using the keyboard, pointing device, or external mouse.
User Guide
Page 12
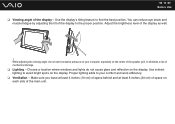
...the tilt of the display as well. ! Adjust the brightness level of the display to the proper position. Use the display's tilting feature to avoid bright spots on the display. While adjusting the viewing angle, do not cause glare and reflection on the display. Proper lighting adds ...to eliminate a risk of the display - Make sure you leave...
...the tilt of the display as well. ! Adjust the brightness level of the display to the proper position. Use the display's tilting feature to avoid bright spots on the display. While adjusting the viewing angle, do not cause glare and reflection on the display. Proper lighting adds ...to eliminate a risk of the display - Make sure you leave...
User Guide
Page 14
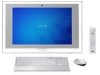
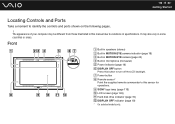
... identify the controls and ports shown on the following pages. ! The appearance of your computer may also vary in microphone (monaural) E Power indicator (page 19) F DISPLAY OFF button Press this sensor for operations. I SONY logo lamp (page 115) J LCD screen (page 133) K Hard disk drive indicator (page 19...
... identify the controls and ports shown on the following pages. ! The appearance of your computer may also vary in microphone (monaural) E Power indicator (page 19) F DISPLAY OFF button Press this sensor for operations. I SONY logo lamp (page 115) J LCD screen (page 133) K Hard disk drive indicator (page 19...
User Guide
Page 19
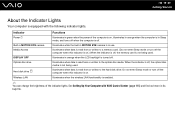
n 19 N Getting Started About the Indicator Lights Your computer is equipped with VAIO Control Center (page 115) and find out more in its help file. Media Access Illuminates when data is read from or written to a memory card. (... orange when the LCD backlight is turned off the computer when this indicator is on , illuminates in orange when the computer is not being used . DISPLAY OFF Illuminates in use.
n 19 N Getting Started About the Indicator Lights Your computer is equipped with VAIO Control Center (page 115) and find out more in its help file. Media Access Illuminates when data is read from or written to a memory card. (... orange when the LCD backlight is turned off the computer when this indicator is on , illuminates in orange when the computer is not being used . DISPLAY OFF Illuminates in use.
User Guide
Page 37
... that the keyboard is in place to perform basic math calculations. n 37 N Using Your VAIO Computer E Sleep button Provides for the wireless keyboard are sufficient and switches to batteries wear out. H Windows key Displays the Start menu. G Indicators (Battery): turns on while the AA batteries for the lower ...level of power consumption. I Applications key Displays a shortcut menu in the Scroll Lock state. (Connect): Turns on power management, see Using the Power Saving Mode (page 116). For ...
... that the keyboard is in place to perform basic math calculations. n 37 N Using Your VAIO Computer E Sleep button Provides for the wireless keyboard are sufficient and switches to batteries wear out. H Windows key Displays the Start menu. G Indicators (Battery): turns on while the AA batteries for the lower ...level of power consumption. I Applications key Displays a shortcut menu in the Scroll Lock state. (Connect): Turns on power management, see Using the Power Saving Mode (page 116). For ...
User Guide
Page 40
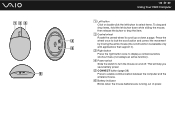
n 40 N Using Your VAIO Computer A Left button Click or double-click the left button to select items. To drag and drop items, hold the left button down a page. F Battery ... and control the movement by moving the entire mouse (the scroll function is available only with applications that support it). Press the wheel once to display a context-sensitive shortcut menu (not always an active function).
n 40 N Using Your VAIO Computer A Left button Click or double-click the left button to select items. To drag and drop items, hold the left button down a page. F Battery ... and control the movement by moving the entire mouse (the scroll function is available only with applications that support it). Press the wheel once to display a context-sensitive shortcut menu (not always an active function).
User Guide
Page 44
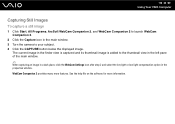
WebCam Companion 2 provides many more information. n 44 N Using Your VAIO Computer Capturing Still Images To capture a still image 1 Click Start, All Programs, ArcSoft WebCam Companion 2, and WebCam Companion 2 to launch WebCam Companion 2. 2 Click the Capture ... low light compensation option in the finder view is captured and its thumbnail image is added to your subject. 4 Click the CAPTURE button below the displayed image. See the help file on the software for more features. The current image in the properties window.
WebCam Companion 2 provides many more information. n 44 N Using Your VAIO Computer Capturing Still Images To capture a still image 1 Click Start, All Programs, ArcSoft WebCam Companion 2, and WebCam Companion 2 to launch WebCam Companion 2. 2 Click the Capture ... low light compensation option in the finder view is captured and its thumbnail image is added to your subject. 4 Click the CAPTURE button below the displayed image. See the help file on the software for more features. The current image in the properties window.
User Guide
Page 45
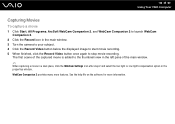
n 45 N Using Your VAIO Computer Capturing Movies To capture a movie 1 Click Start, All Programs, ArcSoft WebCam Companion 2, and WebCam Companion 2 to launch WebCam Companion 2. 2 Click the Record icon in the main window. 3 Turn the camera to your subject. 4 Click the Record Video button below the displayed image to start movie recording. 5 When finished...
n 45 N Using Your VAIO Computer Capturing Movies To capture a movie 1 Click Start, All Programs, ArcSoft WebCam Companion 2, and WebCam Companion 2 to launch WebCam Companion 2. 2 Click the Record icon in the main window. 3 Turn the camera to your subject. 4 Click the Record Video button below the displayed image to start movie recording. 5 When finished...

User Guide
Page 51
... other optical media devices, circumstances may limit compatibility or prevent Blu-ray Disc media playback. VAIO computers may restrict video output to update the AACS key. Unless your external display is not possible. As with the High-bandwidth Digital Content Protection (HDCP) standard, you need... to be implemented for some contents on packaged media recorded in AVC or VC1 format at all. n 51 N Using Your VAIO Computer ! Region settings are...
... other optical media devices, circumstances may limit compatibility or prevent Blu-ray Disc media playback. VAIO computers may restrict video output to update the AACS key. Unless your external display is not possible. As with the High-bandwidth Digital Content Protection (HDCP) standard, you need... to be implemented for some contents on packaged media recorded in AVC or VC1 format at all. n 51 N Using Your VAIO Computer ! Region settings are...
User Guide
Page 58
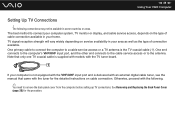
...port and is delivered with the tuner for the procedure. The following . ✍ You need to connect your computer system, TV monitor or display, and cable service access, depends on the type of cable connection available in your area as well as the type of connection ...available. Note that came with an external digital cable tuner, see the manual that only one TV coaxial cable is the TV coaxial cable (1). TV signal reception strength will vary widely depending on cable connection. n 58 N Using Your VAIO Computer Setting Up TV Connections ! If your home.
...port and is delivered with the tuner for the procedure. The following . ✍ You need to connect your computer system, TV monitor or display, and cable service access, depends on the type of cable connection available in your area as well as the type of connection ...available. Note that came with an external digital cable tuner, see the manual that only one TV coaxial cable is the TV coaxial cable (1). TV signal reception strength will vary widely depending on cable connection. n 58 N Using Your VAIO Computer Setting Up TV Connections ! If your home.
User Guide
Page 65
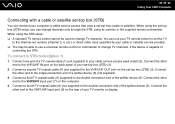
... (Option 1) 1 Connect one end of the splitter device (5). Connect the other end to the VHF/UHF IN port on the back panel of your set-top box (STB) (3). 2 Connect a second TV coaxial cable (4) (not ... rear of your cable or satellite service provider. ❑ You may be used to change TV channels. n 65 N Using Your VAIO Computer Connecting with a cable or satellite set-top box (STB) You can change channels only...(channel 3, 4, etc.) or direct video input specified by your TV monitor or display. When using the set the TV to the VHF/UHF input port (7) on the set-top box (STB) (3).
... (Option 1) 1 Connect one end of the splitter device (5). Connect the other end to the VHF/UHF IN port on the back panel of your set-top box (STB) (3). 2 Connect a second TV coaxial cable (4) (not ... rear of your cable or satellite service provider. ❑ You may be used to change TV channels. n 65 N Using Your VAIO Computer Connecting with a cable or satellite set-top box (STB) You can change channels only...(channel 3, 4, etc.) or direct video input specified by your TV monitor or display. When using the set the TV to the VHF/UHF input port (7) on the set-top box (STB) (3).

User Guide
Page 67
...the VHF/UHF IN port on the back panel of your set-top box (STB) (3). 2 Connect a second TV coaxial cable (4) (not supplied) to the VHF/UHF OUT port on the set-top box (STB) (3). Connect...not supplied) to the S VIDEO input port (12) on the computer. n 67 N Using Your VAIO Computer To connect in STB mode (Option 2) 1 Connect one end of a TV coaxial cable (1) (supplied) to the Composite Audio Out (L/R) jacks (7) and the Video Out jack (8)...back panel of a stereo A/V cable with triple RCA plugs (6) (not supplied) to your TV monitor or display. 3 Connect one end of the set-top box (STB) (3).
...the VHF/UHF IN port on the back panel of your set-top box (STB) (3). 2 Connect a second TV coaxial cable (4) (not supplied) to the VHF/UHF OUT port on the set-top box (STB) (3). Connect...not supplied) to the S VIDEO input port (12) on the computer. n 67 N Using Your VAIO Computer To connect in STB mode (Option 2) 1 Connect one end of a TV coaxial cable (1) (supplied) to the Composite Audio Out (L/R) jacks (7) and the Video Out jack (8)...back panel of a stereo A/V cable with triple RCA plugs (6) (not supplied) to your TV monitor or display. 3 Connect one end of the set-top box (STB) (3).
User Guide
Page 85
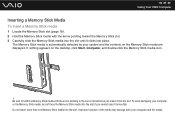
If nothing appears on the Memory Stick media are displayed. To avoid damaging your computer and the media. Be sure to hold the Memory...media into the slot until it clicks into the slot if you insert it smoothly. Do not insert more than one Memory Stick media into the slot. Improper insertion of the media may damage both your computer or the Memory ...Stick media, do not force the Memory Stick media into place. n 85 N Using Your VAIO Computer Inserting a Memory Stick Media To insert a Memory Stick media 1 Locate the Memory Stick slot (page 18). 2 ...
If nothing appears on the Memory Stick media are displayed. To avoid damaging your computer and the media. Be sure to hold the Memory...media into the slot until it clicks into the slot if you insert it smoothly. Do not insert more than one Memory Stick media into the slot. Improper insertion of the media may damage both your computer or the Memory ...Stick media, do not force the Memory Stick media into place. n 85 N Using Your VAIO Computer Inserting a Memory Stick Media To insert a Memory Stick media 1 Locate the Memory Stick slot (page 18). 2 ...

User Guide
Page 111
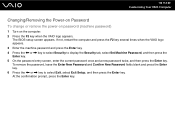
...password and need to be up to 32 alphanumeric characters (including spaces) long. 5 Select Password when Power On under Security. n 111 N Customizing Your VAIO Computer Adding the Power-on Password The power-on password is provided to protect your password and keep it , a password reset fee will be charged.... Once you have set the power-on password, you must first set the user password, you cannot start the computer. Make sure not to display the Security tab, select Set Machine Password, and then press the Enter key. 4 On the password entry screen, enter the password twice and ...
...password and need to be up to 32 alphanumeric characters (including spaces) long. 5 Select Password when Power On under Security. n 111 N Customizing Your VAIO Computer Adding the Power-on Password The power-on password is provided to protect your password and keep it , a password reset fee will be charged.... Once you have set the power-on password, you must first set the user password, you cannot start the computer. Make sure not to display the Security tab, select Set Machine Password, and then press the Enter key. 4 On the password entry screen, enter the password twice and ...
User Guide
Page 112
... password. 1 Turn on password (user password) ! The BIOS setup screen appears. If not, restart the computer and press the F2 key several times when the VAIO logo appears. 3 Enter the machine password and press the Enter key. 4 Press the < or , key to select Security to select Exit, select Exit Setup,... and then press the Enter key. The password can be up to 32 alphanumeric characters (including spaces) long. 6 Press the < or , key to display the Security tab, select Set User Password, and then press the Enter key. 5 On the password entry screen, enter the password twice and press the...
... password. 1 Turn on password (user password) ! The BIOS setup screen appears. If not, restart the computer and press the F2 key several times when the VAIO logo appears. 3 Enter the machine password and press the Enter key. 4 Press the < or , key to select Security to select Exit, select Exit Setup,... and then press the Enter key. The password can be up to 32 alphanumeric characters (including spaces) long. 6 Press the < or , key to display the Security tab, select Set User Password, and then press the Enter key. 5 On the password entry screen, enter the password twice and press the...
User Guide
Page 113
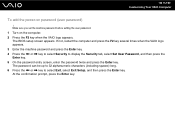
...remove the password, leave the Enter New Password and Confirm New Password fields blank and press the Enter key. 6 Press the < or , key to display the Security tab, select Set Machine Password, and then press the Enter key. 5 On the password entry screen, enter the current password once and a ...new password twice, and then press the Enter key. n 113 N Customizing Your VAIO Computer Changing/Removing the Power-on Password To change or remove the power-on password (machine password) 1 Turn on the computer. 2 Press the F2 key...
...remove the password, leave the Enter New Password and Confirm New Password fields blank and press the Enter key. 6 Press the < or , key to display the Security tab, select Set Machine Password, and then press the Enter key. 5 On the password entry screen, enter the current password once and a ...new password twice, and then press the Enter key. n 113 N Customizing Your VAIO Computer Changing/Removing the Power-on Password To change or remove the power-on password (machine password) 1 Turn on the computer. 2 Press the F2 key...

User Guide
Page 114
... confirmation prompt, press the Enter key. The BIOS setup screen appears. If not, restart the computer and press the F2 key several times when the VAIO logo appears. 3 Enter the user password and press the Enter key. 4 Press the < or , key to select Security to select Exit, select Exit Setup,...) 1 Turn on the computer. 2 Press the F2 key when the VAIO logo appears. To remove the password, leave the Enter New Password and Confirm New Password fields blank and press the Enter key. 6 Press the < or , key to display the Security tab, select Set User Password, and then press the Enter...
... confirmation prompt, press the Enter key. The BIOS setup screen appears. If not, restart the computer and press the F2 key several times when the VAIO logo appears. 3 Enter the user password and press the Enter key. 4 Press the < or , key to select Security to select Exit, select Exit Setup,...) 1 Turn on the computer. 2 Press the F2 key when the VAIO logo appears. To remove the password, leave the Enter New Password and Confirm New Password fields blank and press the Enter key. 6 Press the < or , key to display the Security tab, select Set User Password, and then press the Enter...
User Guide
Page 115
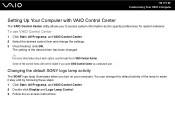
...VAIO Control Center. 2 Select the desired control item and change this default activity of the lamp to specify preferences for system behavior. You can change the settings. 3 Once finished, click OK. Changing the default SONY logo lamp activity The SONY... logo lamp illuminates when you turn on -screen instructions. n 115 N Customizing Your VAIO Computer Setting Up Your Computer with VAIO Control Center The VAIO Control Center utility allows you open VAIO... about each option, see the help file on VAIO Control Center. The setting of the control items will...
...VAIO Control Center. 2 Select the desired control item and change this default activity of the lamp to specify preferences for system behavior. You can change the settings. 3 Once finished, click OK. Changing the default SONY logo lamp activity The SONY... logo lamp illuminates when you turn on -screen instructions. n 115 N Customizing Your VAIO Computer Setting Up Your Computer with VAIO Control Center The VAIO Control Center utility allows you open VAIO... about each option, see the help file on VAIO Control Center. The setting of the control items will...
User Guide
Page 133
... residual image on the LCD screen if the same image is a normal result of the LCD screen or exert pressure on the LCD screen. Sony assumes no liabilities for any defects arising out of making the change options available for a long period of the LCD screen. ❑ Do not... LCD screen orientation setting in a while. Be careful when using high-precision technology. The residual image disappears in the Tablet PC Settings window even when there are change . This is displayed for selection, as it . Use a soft, dry cloth to prevent residual images. ❑ The LCD screen becomes warm...
... residual image on the LCD screen if the same image is a normal result of the LCD screen or exert pressure on the LCD screen. Sony assumes no liabilities for any defects arising out of making the change options available for a long period of the LCD screen. ❑ Do not... LCD screen orientation setting in a while. Be careful when using high-precision technology. The residual image disappears in the Tablet PC Settings window even when there are change . This is displayed for selection, as it . Use a soft, dry cloth to prevent residual images. ❑ The LCD screen becomes warm...

