
User Guide
Page 3
... Device ...103 Connecting to a Network (LAN) ...105 Customizing Your VAIO Computer ...107 Setting the Password ...108 Setting Up Your Computer with VAIO Control Center 111 Using the Power Saving Mode...112 Upgrading Your VAIO Computer...114 Adding and Removing Memory...115 Adding the Hard Disk Drive...121 Precautions ...127 On Handling the LCD Screen ...128 On... EYE Camera...132 On Handling Floppy Disks ...133 On Handling Discs ...134 On Using Headphones...136 On Handling Memory Stick Media...137 On Handling the Hard Disk ...138 On Updating Your Computer ...139
... Device ...103 Connecting to a Network (LAN) ...105 Customizing Your VAIO Computer ...107 Setting the Password ...108 Setting Up Your Computer with VAIO Control Center 111 Using the Power Saving Mode...112 Upgrading Your VAIO Computer...114 Adding and Removing Memory...115 Adding the Hard Disk Drive...121 Precautions ...127 On Handling the LCD Screen ...128 On... EYE Camera...132 On Handling Floppy Disks ...133 On Handling Discs ...134 On Using Headphones...136 On Handling Memory Stick Media...137 On Handling the Hard Disk ...138 On Updating Your Computer ...139

User Guide
Page 114
n 114 N Upgrading Your VAIO Computer Upgrading Your VAIO Computer Your VAIO computer and memory modules use high precision components and electronic connectors technology. To avoid invalidation of memory installed on a computer. ❑ You should not touch ... dealer to install a new memory module. ❑ You should not install it yourself, if you are not familiar with upgrading memory on your model, see Sony Support Information (page 180). ❑ Adding and Removing Memory (page 115) ❑ Adding the Hard Disk Drive (page 121) For assistance, contact an authorized...
n 114 N Upgrading Your VAIO Computer Upgrading Your VAIO Computer Your VAIO computer and memory modules use high precision components and electronic connectors technology. To avoid invalidation of memory installed on a computer. ❑ You should not touch ... dealer to install a new memory module. ❑ You should not install it yourself, if you are not familiar with upgrading memory on your model, see Sony Support Information (page 180). ❑ Adding and Removing Memory (page 115) ❑ Adding the Hard Disk Drive (page 121) For assistance, contact an authorized...

User Guide
Page 121
... sure you need assistance to install a hard disk, contact an authorized Sony Service Center. Installing or removing a hard disk while your computer is equipped with your computer. n 121 N Upgrading Your VAIO Computer Adding the Hard Disk Drive Your computer is plugged to its power source...as the hard disk. Review the manufacturer's information provided with VAIO computers. If you unplug your new hard disk drive before installing or removing a hard disk. To find the nearest center or agent, see Sony Support Information (page 180). Contact the manufacturer of your hard disk ...
... sure you need assistance to install a hard disk, contact an authorized Sony Service Center. Installing or removing a hard disk while your computer is equipped with your computer. n 121 N Upgrading Your VAIO Computer Adding the Hard Disk Drive Your computer is plugged to its power source...as the hard disk. Review the manufacturer's information provided with VAIO computers. If you unplug your new hard disk drive before installing or removing a hard disk. To find the nearest center or agent, see Sony Support Information (page 180). Contact the manufacturer of your hard disk ...
User Guide
Page 122
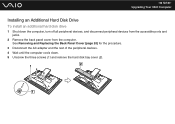
n 122 N Upgrading Your VAIO Computer Installing an Additional Hard Disk Drive To install an additional hard disk drive 1 Shut down . 5 Unscrew the three screws (1) and remove the hard disk bay cover (2). See Removing and Replacing the Back Panel Cover (page 20) for the procedure. 3 Disconnect the AC adapter and the rest of the peripheral devices. 4 Wait until the computer cools down the computer, turn off all peripheral devices, and disconnect peripheral devices from the accessible ports and jacks. 2 Remove the back panel cover from the computer.
n 122 N Upgrading Your VAIO Computer Installing an Additional Hard Disk Drive To install an additional hard disk drive 1 Shut down . 5 Unscrew the three screws (1) and remove the hard disk bay cover (2). See Removing and Replacing the Back Panel Cover (page 20) for the procedure. 3 Disconnect the AC adapter and the rest of the peripheral devices. 4 Wait until the computer cools down the computer, turn off all peripheral devices, and disconnect peripheral devices from the accessible ports and jacks. 2 Remove the back panel cover from the computer.


