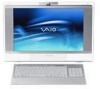
User Guide
Page 6
...configuration of your entire hard disk drive to the Sony online support Web site at: http://esupport.sony.com/EN/VAIO/ for customers in USA, http://www.sony.ca/support for customers in Canada, http://esupport.sony.com/ES/VAIO/ for customers in Spanish speaking Latin American countries or... areas, or http://esupport.sony.com/ES/VAIO/BR/ for customers in Brazil. ❑ VAIO Recovery Guide - It also includes information about using Windows Media Center. To view the online Specifications: 1 Connect to the Internet. 2 Go to the ...
...configuration of your entire hard disk drive to the Sony online support Web site at: http://esupport.sony.com/EN/VAIO/ for customers in USA, http://www.sony.ca/support for customers in Canada, http://esupport.sony.com/ES/VAIO/ for customers in Spanish speaking Latin American countries or... areas, or http://esupport.sony.com/ES/VAIO/BR/ for customers in Brazil. ❑ VAIO Recovery Guide - It also includes information about using Windows Media Center. To view the online Specifications: 1 Connect to the Internet. 2 Go to the ...

User Guide
Page 7
...might find the on how to back up and restore your operating system, system software, and your VAIO computer. Run utilities that include VAIO Media Setup and Windows Network and Sharing, and access to wireless tutorials. ❑ Security Keep your data safe and ...& Recovery Find information on -screen User Guide, warranty information, other Internet sites you need. Choose from Microsoft and Sony. ❑ VAIO Sites Contains links to other VAIO documents, and system and software information for your personal data. ❑ Wireless & Network Learn about wireless connections including...
...might find the on how to back up and restore your operating system, system software, and your VAIO computer. Run utilities that include VAIO Media Setup and Windows Network and Sharing, and access to wireless tutorials. ❑ Security Keep your data safe and ...& Recovery Find information on -screen User Guide, warranty information, other Internet sites you need. Choose from Microsoft and Sony. ❑ VAIO Sites Contains links to other VAIO documents, and system and software information for your personal data. ❑ Wireless & Network Learn about wireless connections including...

User Guide
Page 9
..., do not create glare and reflection on each side of the display as well. ! Adjust the brightness setting of the main unit. Choose a location where windows and lights do not exert excessive pressure on the display. You can reduce eye strain and muscle fatigue by adjusting the tilt of the display...
..., do not create glare and reflection on each side of the display as well. ! Adjust the brightness setting of the main unit. Choose a location where windows and lights do not exert excessive pressure on the display. You can reduce eye strain and muscle fatigue by adjusting the tilt of the display...

User Guide
Page 23
... models without a TV tuner. ✍ You can change these button assignments with VAIO Central (page 99) and find out more in the foreground Internet Explorer window. S3: Opens the Media Center Start menu on models with a TV tuner or launches Windows Mail on and off. Fn + F5: Decreases lightness intensity of the LCD...
... models without a TV tuner. ✍ You can change these button assignments with VAIO Central (page 99) and find out more in the foreground Internet Explorer window. S3: Opens the Media Center Start menu on models with a TV tuner or launches Windows Mail on and off. Fn + F5: Decreases lightness intensity of the LCD...
User Guide
Page 24
... keyboard is ready for use (page 27). G Indicators (Battery): turns on while the AA batteries for the lower level of power consumption. n 24 N Using Your VAIO Computer E Standby button Provides for the wireless keyboard are sufficient and switches to batteries wear out. For details on while connection between the computer and... software applications. I Applications key Displays a shortcut menu in the Scroll Lock state. (Connect): Turns on power management, see Using the Power Saving Modes (page 100). H Windows key Displays the Start menu.
... keyboard is ready for use (page 27). G Indicators (Battery): turns on while the AA batteries for the lower level of power consumption. n 24 N Using Your VAIO Computer E Standby button Provides for the wireless keyboard are sufficient and switches to batteries wear out. For details on while connection between the computer and... software applications. I Applications key Displays a shortcut menu in the Scroll Lock state. (Connect): Turns on power management, see Using the Power Saving Modes (page 100). H Windows key Displays the Start menu.
User Guide
Page 27
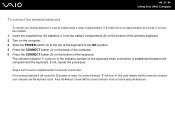
The connect indicator turns on in the indicator window on the keyboard when connection is left unused for 20 minutes or longer, the connect indicator will turn off. If the wireless keyboard is established ... of the keyboard to the ON position. 4 Press the CONNECT button (4) on the back of the keyboard. If not, repeat the procedure. ! n 27 N Using Your VAIO Computer To connect the wireless keyboard ! To connect your computer and the keyboard is lost.
The connect indicator turns on in the indicator window on the keyboard when connection is left unused for 20 minutes or longer, the connect indicator will turn off. If the wireless keyboard is established ... of the keyboard to the ON position. 4 Press the CONNECT button (4) on the back of the keyboard. If not, repeat the procedure. ! n 27 N Using Your VAIO Computer To connect the wireless keyboard ! To connect your computer and the keyboard is lost.
User Guide
Page 28
If the wireless keyboard is not being used for its battery power level. n 28 N Using Your VAIO Computer ✍ You can check the battery indicator ( or ) in a more 'ergonomic' position, flip open the keyboard feet. If the wireless keyboard does not operate properly, the batteries may need to avoid possible damage from battery leakage. If you want to put the wireless keyboard in the LCD window on the wireless keyboard for an extended period of time, remove the batteries to be replaced.
If the wireless keyboard is not being used for its battery power level. n 28 N Using Your VAIO Computer ✍ You can check the battery indicator ( or ) in a more 'ergonomic' position, flip open the keyboard feet. If the wireless keyboard does not operate properly, the batteries may need to avoid possible damage from battery leakage. If you want to put the wireless keyboard in the LCD window on the wireless keyboard for an extended period of time, remove the batteries to be replaced.

User Guide
Page 33
n 33 N Using Your VAIO Computer The Mouse Properties window appears. 3 Change the settings. Adjusting the Mouse Functions 1 Click Start and Control Panel. 2 Click Mouse under Hardware and Sound.
n 33 N Using Your VAIO Computer The Mouse Properties window appears. 3 Change the settings. Adjusting the Mouse Functions 1 Click Start and Control Panel. 2 Click Mouse under Hardware and Sound.

User Guide
Page 35
... show some noises, for example horizontal streaks, if you see the live feed in MOTION EYE camera with the Microsoft Windows MovieMaker software. You can change the capture angle of your computer. Push down or up the horizontal bar to adjust the angle upward or downward, ... adjuster (1) on the back of the built-in the desired angle. ! If another software application is normal and does not indicate a malfunction. n 35 N Using Your VAIO Computer ✍ The built-in MOTION EYE camera. This is using the camera, exit the application before using the built-in MOTION EYE camera cannot...
... show some noises, for example horizontal streaks, if you see the live feed in MOTION EYE camera with the Microsoft Windows MovieMaker software. You can change the capture angle of your computer. Push down or up the horizontal bar to adjust the angle upward or downward, ... adjuster (1) on the back of the built-in the desired angle. ! If another software application is normal and does not indicate a malfunction. n 35 N Using Your VAIO Computer ✍ The built-in MOTION EYE camera. This is using the camera, exit the application before using the built-in MOTION EYE camera cannot...

User Guide
Page 37
If you plan to launch or may display a window for selecting your preferred software program to use an external optical disc drive, connect the drive before you launch any preinstalled disc operation program. n 37 N Using Your VAIO Computer ✍ In Sleep mode, inserting a disc will automatically launch Windows and may automatically launch a preinstalled disc operation program.
If you plan to launch or may display a window for selecting your preferred software program to use an external optical disc drive, connect the drive before you launch any preinstalled disc operation program. n 37 N Using Your VAIO Computer ✍ In Sleep mode, inserting a disc will automatically launch Windows and may automatically launch a preinstalled disc operation program.

User Guide
Page 44
Copying Files to CDs To copy files to select an option. If the Audio CD window appears, click to a disc ! If the AutoPlay window appears, click Burn files to disc and follow the on the desktop, then click Start, All Programs, and the desired CD software to the empty ...disc folder. 3 Close the disc folder. n 44 N Using Your VAIO Computer Playing CDs To play the CD. Do not strike...
Copying Files to CDs To copy files to select an option. If the Audio CD window appears, click to a disc ! If the AutoPlay window appears, click Burn files to disc and follow the on the desktop, then click Start, All Programs, and the desired CD software to the empty ...disc folder. 3 Close the disc folder. n 44 N Using Your VAIO Computer Playing CDs To play the CD. Do not strike...
User Guide
Page 46
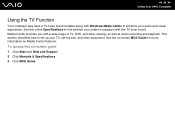
... Support. 2 Click Manuals & Specifications. 3 Click MCE Guide. To access this on Media Center features. n 46 N Using Your VAIO Computer Using the TV Function Your computer may have a TV tuner board installed along with Windows Media Center to set up your TV, set-top box, and other equipment. This section describes how to...
... Support. 2 Click Manuals & Specifications. 3 Click MCE Guide. To access this on Media Center features. n 46 N Using Your VAIO Computer Using the TV Function Your computer may have a TV tuner board installed along with Windows Media Center to set up your TV, set-top box, and other equipment. This section describes how to...

User Guide
Page 58
...Play N button Press to fast-forward media at three speeds. Stop x button Press to view previously recorded TV programs (In My TV window). Forward M button Press to begin recording. button Press to move media backward, for example, one audio track, one DVD chapter, and ...seven seconds of recorded TV or video. D Recorded TV button Press to stop media playback or TV recording session. n 58 N Using Your VAIO Computer A Pause X button Press to increase (+) or decrease (-) the volume. Skip B? C Volume buttons Press to pause media playback. Rewind m button Press ...
...Play N button Press to fast-forward media at three speeds. Stop x button Press to view previously recorded TV programs (In My TV window). Forward M button Press to begin recording. button Press to move media backward, for example, one audio track, one DVD chapter, and ...seven seconds of recorded TV or video. D Recorded TV button Press to stop media playback or TV recording session. n 58 N Using Your VAIO Computer A Pause X button Press to increase (+) or decrease (-) the volume. Skip B? C Volume buttons Press to pause media playback. Rewind m button Press ...

User Guide
Page 59
... your area. I APPLICATION CLOSE button Press to reduce power consumption. J Standby button Press to place the computer into Sleep mode to close the active application window. F Alphanumeric buttons Press to select specific channels or enter text. (Press ENTER or OK to activate the channel selection.) G CLEAR button Press to backspace and... delete entered text. This button works the same as the Alt+Tab keys. n 59 N Using Your VAIO Computer E Guide button Press to view the TV program guide for Media Center features.
... your area. I APPLICATION CLOSE button Press to reduce power consumption. J Standby button Press to place the computer into Sleep mode to close the active application window. F Alphanumeric buttons Press to select specific channels or enter text. (Press ENTER or OK to activate the channel selection.) G CLEAR button Press to backspace and... delete entered text. This button works the same as the Alt+Tab keys. n 59 N Using Your VAIO Computer E Guide button Press to view the TV program guide for Media Center features.
User Guide
Page 67
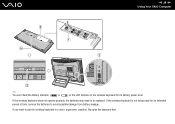
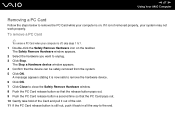
...second time so that the device can be safely removed from the system. 5 Click OK. The Safely Remove Hardware window appears. 2 Select the hardware you want to unplug. 3 Click Stop. To remove a PC Card ✍ To... remove a PC Card when your computer is on the taskbar. The Stop a Hardware device window appears. 4 Confirm that the PC Card pops out. 10 Gently take hold of the Card and pull it...may not work properly. If it back in all the way to the end. n 67 N Using Your VAIO Computer Removing a PC Card Follow the steps below to remove the PC Card while your computer is off, ...
...second time so that the device can be safely removed from the system. 5 Click OK. The Safely Remove Hardware window appears. 2 Select the hardware you want to unplug. 3 Click Stop. To remove a PC Card ✍ To... remove a PC Card when your computer is on the taskbar. The Stop a Hardware device window appears. 4 Confirm that the PC Card pops out. 10 Gently take hold of the Card and pull it...may not work properly. If it back in all the way to the end. n 67 N Using Your VAIO Computer Removing a PC Card Follow the steps below to remove the PC Card while your computer is off, ...

User Guide
Page 71
...Safely Remove Hardware window appears. 2 Select the hardware you want to 7. 1 Double-click the Safely Remove Hardware icon on . To remove an ExpressCard module ✍ To remove an ExpressCard module when your computer is off, skip steps 1 to unplug. 3 Click Stop. n 71 N Using Your VAIO Computer Removing ...an ExpressCard Module Follow the steps below to pop it out. 9 Gently take hold of the ExpressCard module and pull it out of the slot. The Stop a Hardware device window appears. 4 Confirm that the device can be safely removed...
...Safely Remove Hardware window appears. 2 Select the hardware you want to 7. 1 Double-click the Safely Remove Hardware icon on . To remove an ExpressCard module ✍ To remove an ExpressCard module when your computer is off, skip steps 1 to unplug. 3 Click Stop. n 71 N Using Your VAIO Computer Removing ...an ExpressCard Module Follow the steps below to pop it out. 9 Gently take hold of the ExpressCard module and pull it out of the slot. The Stop a Hardware device window appears. 4 Confirm that the device can be safely removed...
User Guide
Page 74
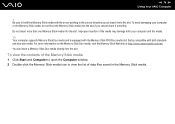
To view the contents of the Memory Stick media 1 Click Start and Computer to open the Computer window. 2 Double-click the Memory Stick media icon to hold the Memory Stick media with both your computer or the Memory Stick media, do not force ...the Memory Stick media into the slot if you insert it smoothly. n 74 N Using Your VAIO Computer ! Do not insert more information on the Memory Stick Duo media, visit the Memory Stick Web site at http://www.memorystick.com/en/. For...
To view the contents of the Memory Stick media 1 Click Start and Computer to open the Computer window. 2 Double-click the Memory Stick media icon to hold the Memory Stick media with both your computer or the Memory Stick media, do not force ...the Memory Stick media into the slot if you insert it smoothly. n 74 N Using Your VAIO Computer ! Do not insert more information on the Memory Stick Duo media, visit the Memory Stick Web site at http://www.memorystick.com/en/. For...
User Guide
Page 75
...into place. 2 Click Start and Computer to format the media and supports the Memory Stick media when formatting the media. n 75 N Using Your VAIO Computer To format a Memory Stick media The Memory Stick media has been formatted in Format options. 5 Click Start. Avoid accidental erasure of the ...allocation unit and file system may change. If you select Quick Format in the factory default setting and is designed to open the Computer window. 3 Right-click the Memory Stick media icon and select Format. 4 Click Restore device defaults. ! Do not remove the Memory Stick media ...
...into place. 2 Click Start and Computer to format the media and supports the Memory Stick media when formatting the media. n 75 N Using Your VAIO Computer To format a Memory Stick media The Memory Stick media has been formatted in Format options. 5 Click Start. Avoid accidental erasure of the ...allocation unit and file system may change. If you select Quick Format in the factory default setting and is designed to open the Computer window. 3 Right-click the Memory Stick media icon and select Format. 4 Click Restore device defaults. ! Do not remove the Memory Stick media ...

User Guide
Page 81
...the phone cable (1) into the wall jack (2). ✍ Your computer does not work with a telephone cable (not supplied). The Connect to the Internet window appears. 3 Click Dial-up. 4 Follow the on the computer. 2 Plug the other end into the modem port on -screen instructions. Once you have... connected to a coin-operated telephone, and may not work with multiple telephone lines or a private branch exchange (PBX). n 81 N Using Your VAIO Computer Using the Internet Setting Up a Dial-up Internet Connection Before you can connect to the Internet, you are ready to connect to the Internet....
...the phone cable (1) into the wall jack (2). ✍ Your computer does not work with a telephone cable (not supplied). The Connect to the Internet window appears. 3 Click Dial-up. 4 Follow the on the computer. 2 Plug the other end into the modem port on -screen instructions. Once you have... connected to a coin-operated telephone, and may not work with multiple telephone lines or a private branch exchange (PBX). n 81 N Using Your VAIO Computer Using the Internet Setting Up a Dial-up Internet Connection Before you can connect to the Internet, you are ready to connect to the Internet....

User Guide
Page 85
n 85 N Using Your VAIO Computer The Wireless LAN indicator lights up. 2 Click Start and Control Panel. 3 Click View network status and tasks under Network and Internet. 4 Click Set up a connection or network window appears. 5 Select an option to specify the ad-hoc network settings and click Next. 6 Follow the on-screen instructions. The Set up a connection or network on the WLAN switch. To communicate without an access point (ad-hoc) ! You cannot select the 5 GHz bandwidth, which is used for the IEEE 802.11a standard, on ad-hoc networks. 1 Turn on the left pane.
n 85 N Using Your VAIO Computer The Wireless LAN indicator lights up. 2 Click Start and Control Panel. 3 Click View network status and tasks under Network and Internet. 4 Click Set up a connection or network window appears. 5 Select an option to specify the ad-hoc network settings and click Next. 6 Follow the on-screen instructions. The Set up a connection or network on the WLAN switch. To communicate without an access point (ad-hoc) ! You cannot select the 5 GHz bandwidth, which is used for the IEEE 802.11a standard, on ad-hoc networks. 1 Turn on the left pane.


