Operating Instructions (primary manual)
Page 2
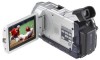
... of Conformity Trade Name: SONY Model No.: DCR-TRV50 Responsible Party: Sony Electronics Inc. For customers in the U.S.A. For customers in the U.S.A. DCR-TRV50 only Countries and areas where you . Regulatory Information Declaration of rechargeable batteries, call : Sony Customer Information Center 1-800-...again. Congratulations on your Handycam, you can capture life's precious moments with Part 15 of important operating and maintenance (servicing) instructions in this Sony Handycam. Notice If static electricity or electromagnetism causes data transfer to disassemble ...
... of Conformity Trade Name: SONY Model No.: DCR-TRV50 Responsible Party: Sony Electronics Inc. For customers in the U.S.A. For customers in the U.S.A. DCR-TRV50 only Countries and areas where you . Regulatory Information Declaration of rechargeable batteries, call : Sony Customer Information Center 1-800-...again. Congratulations on your Handycam, you can capture life's precious moments with Part 15 of important operating and maintenance (servicing) instructions in this Sony Handycam. Notice If static electricity or electromagnetism causes data transfer to disassemble ...
Operating Instructions (primary manual)
Page 7
... - For Windows users 177 Viewing images recorded on a tape on your computer - Customizing Your Camcorder Changing the default settings with your computer using the USB cable - Digital program editing (on "Memory Stick"s 151 Copying still images from an analog video unit on your... Reference Identifying parts and controls 236 Index 245 7 Getting Started Table of trouble and how to your computer - For Macintosh users 193 Viewing images recorded on a "Memory Stick" on "Memory Stick"s - Signal convert function 196 Using the Network function (DCR-TRV50 only) Accessing...
... - For Windows users 177 Viewing images recorded on a tape on your computer - Customizing Your Camcorder Changing the default settings with your computer using the USB cable - Digital program editing (on "Memory Stick"s 151 Copying still images from an analog video unit on your... Reference Identifying parts and controls 236 Index 245 7 Getting Started Table of trouble and how to your computer - For Macintosh users 193 Viewing images recorded on a "Memory Stick" on "Memory Stick"s - Signal convert function 196 Using the Network function (DCR-TRV50 only) Accessing...
Operating Instructions (primary manual)
Page 142
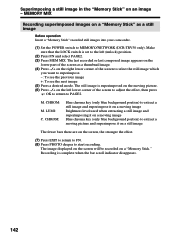
... of the screen as a still image Before operation Insert a "Memory Stick" recorded still images into your camcorder. (1) Set the POWER switch to start recording. MEMORY MIX Recording superimposed images on a "Memory Stick" as... the effect. (7) Press EXIT to return to FN. (8) Press PHOTO deeper to MEMORY/NETWORK (DCR-TRV50 only). LUMI: C. CHROM: M. Make sure that the LOCK switch is complete when the bar...still image and superimposing it on a still image The fewer bars there are on the lower part of the screen to adjust the effect, then press OK to return to superimpose. - :...
... of the screen as a still image Before operation Insert a "Memory Stick" recorded still images into your camcorder. (1) Set the POWER switch to start recording. MEMORY MIX Recording superimposed images on a "Memory Stick" as... the effect. (7) Press EXIT to return to FN. (8) Press PHOTO deeper to MEMORY/NETWORK (DCR-TRV50 only). LUMI: C. CHROM: M. Make sure that the LOCK switch is complete when the bar...still image and superimposing it on a still image The fewer bars there are on the lower part of the screen to adjust the effect, then press OK to return to superimpose. - :...
Operating Instructions (primary manual)
Page 160
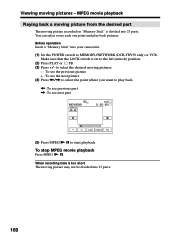
You can select every each one point and play back pictures. Viewing moving pictures. - : To see the previous picture + : To see the next picture (4) Press Before operation Insert a "Memory Stick" into 23 parts. Make sure that the LOCK switch is divided into your camcorder. (1) Set the POWER switch to the left (unlock) position. (2) Press PLAY or PB. (3) Press +/- MPEG movie playback Playing back a moving picture from the desired part The moving picture recorded on "Memory Stick" is set to MEMORY/NETWORK (DCR-TRV50 only) or VCR. to select the desired moving pictures -
You can select every each one point and play back pictures. Viewing moving pictures. - : To see the previous picture + : To see the next picture (4) Press Before operation Insert a "Memory Stick" into 23 parts. Make sure that the LOCK switch is divided into your camcorder. (1) Set the POWER switch to the left (unlock) position. (2) Press PLAY or PB. (3) Press +/- MPEG movie playback Playing back a moving picture from the desired part The moving picture recorded on "Memory Stick" is set to MEMORY/NETWORK (DCR-TRV50 only) or VCR. to select the desired moving pictures -
Operating Instructions (primary manual)
Page 164
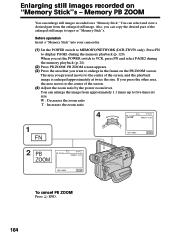
Before operation Insert a "Memory Stick" into your camcorder. (1) Set the POWER switch to five times its size. Press FN to tapes or "Memory Stick"s. The area you can enlarge the image from the enlarged still image. You can copy the desired part of the enlarged still image to display PAGE1 during the memory... the center of the screen, and the playback image is enlarged approximately at twice the size. Memory PB ZOOM You can select and view a desired part from approximately 1.1 times up to MEMORY/NETWORK (DCR-TRV50 only).
Before operation Insert a "Memory Stick" into your camcorder. (1) Set the POWER switch to five times its size. Press FN to tapes or "Memory Stick"s. The area you can enlarge the image from the enlarged still image. You can copy the desired part of the enlarged still image to display PAGE1 during the memory... the center of the screen, and the playback image is enlarged approximately at twice the size. Memory PB ZOOM You can select and view a desired part from approximately 1.1 times up to MEMORY/NETWORK (DCR-TRV50 only).
Operating Instructions (primary manual)
Page 237
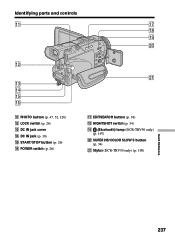
SUPER NS/COLOR SLOW S button (p. 34) wa Stylus (DCR-TRV50 only) (p. 198) Quick Reference 237 qs qd qf qg qh qa PHOTO button (p. 47, 52, 126) qs LOCK switch (p. 26) qd DC IN jack cover qf DC IN jack (p. 19) qg START/STOP button (p. 26) qh POWER switch (p. 26) wa qj EDITSEARCH button (p. 38) qk NIGHTSHOT switch (p. 34) ql (Bluetooth) lamp (DCR-TRV50 only) (p. 197) w; Identifying parts and controls qa qj qk ql w;
SUPER NS/COLOR SLOW S button (p. 34) wa Stylus (DCR-TRV50 only) (p. 198) Quick Reference 237 qs qd qf qg qh qa PHOTO button (p. 47, 52, 126) qs LOCK switch (p. 26) qd DC IN jack cover qf DC IN jack (p. 19) qg START/STOP button (p. 26) qh POWER switch (p. 26) wa qj EDITSEARCH button (p. 38) qk NIGHTSHOT switch (p. 34) ql (Bluetooth) lamp (DCR-TRV50 only) (p. 197) w; Identifying parts and controls qa qj qk ql w;
Operating Instructions (primary manual)
Page 240
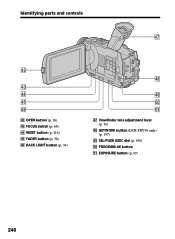
PROGRAM AE button ta EXPOSURE button (p. 67) 240 Identifying parts and controls rj rs rd rf rg rh rs OPEN button (p. 26) rd FOCUS switch (p. 69) rf RESET button (p. 216) rg FADER button (p. 58) rh BACK LIGHT button (p. 34) rk rl t; ta rj Viewfinder lens adjustment lever (p. 30) rk NETWORK button (DCR-TRV50 only) (p. 197) rl SEL/PUSH EXEC dial (p. 199) t;
PROGRAM AE button ta EXPOSURE button (p. 67) 240 Identifying parts and controls rj rs rd rf rg rh rs OPEN button (p. 26) rd FOCUS switch (p. 69) rf RESET button (p. 216) rg FADER button (p. 58) rh BACK LIGHT button (p. 34) rk rl t; ta rj Viewfinder lens adjustment lever (p. 30) rk NETWORK button (DCR-TRV50 only) (p. 197) rl SEL/PUSH EXEC dial (p. 199) t;
Operating Instructions (primary manual)
Page 241
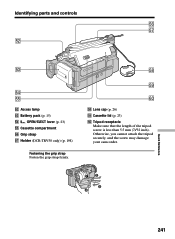
Otherwise, you cannot attach the tripod securely, and the screw may damage your camcorder. 12 3 4 Quick Reference 241 tk tl y; Identifying parts and controls th tj ts td tf tg ts Access lamp td Battery pack (p. 15) tf OPEN/EJECT lever (p. 23) tg Cassette compartment th Grip strap tj Holder (DCR-TRV50 only) (p. 198) Fastening the grip strap Fasten the grip strap firmly. tk Lens cap (p. 26) tl Cassette lid (p. 23) y; Tripod receptacle Make sure that the length of the tripod screw is less than 5.5 mm (7/32 inch).
Otherwise, you cannot attach the tripod securely, and the screw may damage your camcorder. 12 3 4 Quick Reference 241 tk tl y; Identifying parts and controls th tj ts td tf tg ts Access lamp td Battery pack (p. 15) tf OPEN/EJECT lever (p. 23) tg Cassette compartment th Grip strap tj Holder (DCR-TRV50 only) (p. 198) Fastening the grip strap Fasten the grip strap firmly. tk Lens cap (p. 26) tl Cassette lid (p. 23) y; Tripod receptacle Make sure that the length of the tripod screw is less than 5.5 mm (7/32 inch).


