Operating Instructions
Page 2
...accept any interference received, including interference that any interference received, including interference that you can capture life's precious moments with advanced features, but at the same time it is loaded with superior picture and sound quality. Telephone No.: 201-930-6972 This device...instructions in the literature accompanying the appliance. Declaration of the FCC Rules. Operation is intended to alert the user to operate this Sony Handycam. Welcome! With your purchase of this equipment. 2 For the customers in this manual could void your authority to the ...
...accept any interference received, including interference that any interference received, including interference that you can capture life's precious moments with advanced features, but at the same time it is loaded with superior picture and sound quality. Telephone No.: 201-930-6972 This device...instructions in the literature accompanying the appliance. Declaration of the FCC Rules. Operation is intended to alert the user to operate this Sony Handycam. Welcome! With your purchase of this equipment. 2 For the customers in this manual could void your authority to the ...

Operating Instructions
Page 4
...Recording moving pictures (p. 146) •Viewing still images (p. 163) •Viewing moving pictures (p. 166) Main Features •Viewing pictures recorded on a tape or live from your camcorder using the USB cable (p. 197) •Viewing images recorded on a "Memory Stick" using the USB cable ...•Capturing images on your computer from your camcorder on your computer Before you start reading this manual, camcorder-shape icons are used to capture images onto your computer (p. 208) 4 Capturing images on your computer - CCD-TRV118 : CCD-TRV318 : CCD-TRV418 : DCR-TRV150 : DCR-...
...Recording moving pictures (p. 146) •Viewing still images (p. 163) •Viewing moving pictures (p. 166) Main Features •Viewing pictures recorded on a tape or live from your camcorder using the USB cable (p. 197) •Viewing images recorded on a "Memory Stick" using the USB cable ...•Capturing images on your computer from your camcorder on your computer Before you start reading this manual, camcorder-shape icons are used to capture images onto your computer (p. 208) 4 Capturing images on your computer - CCD-TRV118 : CCD-TRV318 : CCD-TRV418 : DCR-TRV150 : DCR-...
Operating Instructions
Page 5
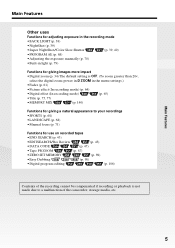
Getting Started Main Features Other uses Functions for adjusting exposure in the recording mode •BACK LIGHT (p. 38) •NightShot (p. 39) •Super NightShot/Color Slow Shutter (p. 39, 40) &#... (p. 98) •Digital program editing (p. 106) Contents of the recording cannot be compensated if recording or playback is not made due to a malfunction of the camcorder, storage media, etc. Main Features 5
Getting Started Main Features Other uses Functions for adjusting exposure in the recording mode •BACK LIGHT (p. 38) •NightShot (p. 39) •Super NightShot/Color Slow Shutter (p. 39, 40) &#... (p. 98) •Digital program editing (p. 106) Contents of the recording cannot be compensated if recording or playback is not made due to a malfunction of the camcorder, storage media, etc. Main Features 5
Operating Instructions
Page 6
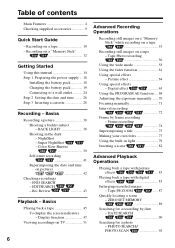
... with digital effects 85 Enlarging recorded images - DATE SEARCH 90 Searching for a recording by frame recording - NightShot - Rec Review 43 Playback - Table of contents Main Features 4 Checking supplied accessories 9 Quick Start Guide - Display function 47 Viewing recordings on TV 51 Advanced Recording Operations Recording still images on a "Memory Stick" while recording...
... with digital effects 85 Enlarging recorded images - DATE SEARCH 90 Searching for a recording by frame recording - NightShot - Rec Review 43 Playback - Table of contents Main Features 4 Checking supplied accessories 9 Quick Start Guide - Display function 47 Viewing recordings on TV 51 Advanced Recording Operations Recording still images on a "Memory Stick" while recording...

Operating Instructions
Page 10
...information. After the cassette compartment goes down completely, close the lid. Connecting the power cord (p. 24) Use the battery pack when using your camcorder. Power cord Connect the plug with the cassette window facing up . Quick Start Guide 10 Recording on a tape This chapter introduces you to the... basic features to record on a tape of the cassette back and insert the cassette properly with its v mark facing up . 3 Close the cassette...
...information. After the cassette compartment goes down completely, close the lid. Connecting the power cord (p. 24) Use the battery pack when using your camcorder. Power cord Connect the plug with the cassette window facing up . Quick Start Guide 10 Recording on a tape This chapter introduces you to the... basic features to record on a tape of the cassette back and insert the cassette properly with its v mark facing up . 3 Close the cassette...

Operating Instructions
Page 12
Quick Start Guide - Connecting the power cord (p. 24) Use the battery pack when using your camcorder. AC Adaptor (supplied) Inserting a "Memory Stick" (p. 127) Insert a "Memory Stick" in parentheses "( )" for more information. See the page in the "Memory Stick" slot...Power cord Connect the plug with the b mark facing the LCD panel as it can go with its v mark facing up. Recording on a "Memory Stick" Quick Start Guide This chapter introduces you to the basic features to record on a "Memory Stick" of your camcorder outdoors (p. 18). "Memory Stick" slot b mark When ejecting...
Quick Start Guide - Connecting the power cord (p. 24) Use the battery pack when using your camcorder. AC Adaptor (supplied) Inserting a "Memory Stick" (p. 127) Insert a "Memory Stick" in parentheses "( )" for more information. See the page in the "Memory Stick" slot...Power cord Connect the plug with the b mark facing the LCD panel as it can go with its v mark facing up. Recording on a "Memory Stick" Quick Start Guide This chapter introduces you to the basic features to record on a "Memory Stick" of your camcorder outdoors (p. 18). "Memory Stick" slot b mark When ejecting...
Operating Instructions
Page 34
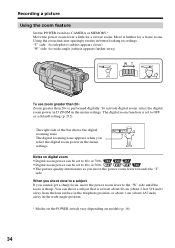
... can be set to 40× or 700×. • Digital zoom power can shoot a subject that is performed digitally. Recording a picture Using the zoom feature Set the POWER switch to OFF as you move the power zoom lever to the "W" side until the focus is set to CAMERA or MEMORY...
... can be set to 40× or 700×. • Digital zoom power can shoot a subject that is performed digitally. Recording a picture Using the zoom feature Set the POWER switch to OFF as you move the power zoom lever to the "W" side until the focus is set to CAMERA or MEMORY...
Operating Instructions
Page 35
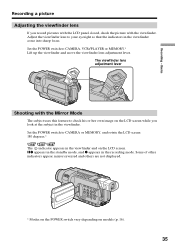
... Mirror Mode The subject uses this feature to CAMERA or MEMORY, and rotate the LCD screen 180 degrees.* The indicator appears in the viewfinder. Set the POWER switch to check his or her own image on the LCD screen while you record pictures with the LCD panel closed, check the picture with... (p. 16). 35 Some of other indicators appear mirror-reversed and others are not displayed. * Modes on the POWER switch vary depending on the LCD screen. Adjust the viewfinder lens to CAMERA, VCR/PLAYER or MEMORY.* Lift up the viewfinder and move the viewfinder lens adjustment lever. Set the ...
... Mirror Mode The subject uses this feature to CAMERA or MEMORY, and rotate the LCD screen 180 degrees.* The indicator appears in the viewfinder. Set the POWER switch to check his or her own image on the LCD screen while you record pictures with the LCD panel closed, check the picture with... (p. 16). 35 Some of other indicators appear mirror-reversed and others are not displayed. * Modes on the POWER switch vary depending on the LCD screen. Adjust the viewfinder lens to CAMERA, VCR/PLAYER or MEMORY.* Lift up the viewfinder and move the viewfinder lens adjustment lever. Set the ...
Operating Instructions
Page 244
...video, digital audio and other data in two directions between equipment having the i.LINK jack, and for IEEE 1394 data transport bus proposed by Sony, and is a trademark approved by a single i.LINK cable. Possible applications are operations and data transactions with other equipment. When two or ...For example, a baud rate of the equipment to but also with various digital AV equipment. This section describes the i.LINK standard and its features. Note Normally, only one second. 244 When units are connected to this unit in one piece of equipment can be connected. About the ...
...video, digital audio and other data in two directions between equipment having the i.LINK jack, and for IEEE 1394 data transport bus proposed by Sony, and is a trademark approved by a single i.LINK cable. Possible applications are operations and data transactions with other equipment. When two or ...For example, a baud rate of the equipment to but also with various digital AV equipment. This section describes the i.LINK standard and its features. Note Normally, only one second. 244 When units are connected to this unit in one piece of equipment can be connected. About the ...
