Operating Instructions
Page 26
... jack may be suppressed by the connected component. It is poor or the sound does not come out of a component connected via the receiver. Check the setup of the connected component if the image is not output from any other audio cords or digital connecting cords, then set "Audio Out"... to the operating instructions of the playback component. • Not every HDMI component supports all functions that you use a Sony HDMI cable. • We recommend that are defined by Sony) for details. 26US Notes on HDMI connections • An audio signal input to "TV+AMP" in the Input Option...
... jack may be suppressed by the connected component. It is poor or the sound does not come out of a component connected via the receiver. Check the setup of the connected component if the image is not output from any other audio cords or digital connecting cords, then set "Audio Out"... to the operating instructions of the playback component. • Not every HDMI component supports all functions that you use a Sony HDMI cable. • We recommend that are defined by Sony) for details. 26US Notes on HDMI connections • An audio signal input to "TV+AMP" in the Input Option...
Operating Instructions
Page 35
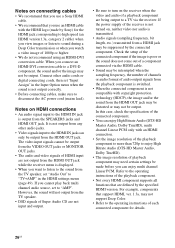
...used to return settings you have made to use the buttons on the receiver for this operation. 1,2 ON/STANDBY POWER SPEAKERS (OFF/A/B/A+B) TONE MODE TONE TUNING MODE TUNING PHONES VIDEO 2 IN/PORTABLE AV IN VIDEO L AUDIO R AUTO CAL MIC MULTI CHANNEL DECODING DISPLAY INPUT...the SPEAKERS terminals. • Connect the AC power cord (mains lead) firmly. appears. Performing initial setup operations Before using the receiver for a while, "CLEARED !" Getting Started 6: Preparing the receiver and the remote Connecting the AC power cord (mains lead) Connect the AC power cord (mains lead)...
...used to return settings you have made to use the buttons on the receiver for this operation. 1,2 ON/STANDBY POWER SPEAKERS (OFF/A/B/A+B) TONE MODE TONE TUNING MODE TUNING PHONES VIDEO 2 IN/PORTABLE AV IN VIDEO L AUDIO R AUTO CAL MIC MULTI CHANNEL DECODING DISPLAY INPUT...the SPEAKERS terminals. • Connect the AC power cord (mains lead) firmly. appears. Performing initial setup operations Before using the receiver for a while, "CLEARED !" Getting Started 6: Preparing the receiver and the remote Connecting the AC power cord (mains lead) Connect the AC power cord (mains lead)...
Operating Instructions
Page 40
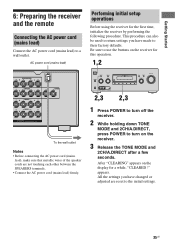
.... • Perform the measurement in a quiet environment to avoid the effect of the subwoofer you are using, the setup distance value may damage the receiver and the microphone. • During the measurement, the sound that the optimizer microphone remains at your ears. Remove any...Do not connect other microphones to this jack. ON/STANDBY POWER SPEAKERS (OFF/A/B/A+B) TONE MODE TONE TUNING MODE TUNING PHONES VIDEO 2 IN/PORTABLE AV IN VIDEO L AUDIO R AUTO CAL MIC MULTI CHANNEL DECODING DISPLAY INPUT MODE INPUT SELECTOR MEMORY/ ENTER DIMMER 2CH/ A.DIRECT A.F.D. Use a...
.... • Perform the measurement in a quiet environment to avoid the effect of the subwoofer you are using, the setup distance value may damage the receiver and the microphone. • During the measurement, the sound that the optimizer microphone remains at your ears. Remove any...Do not connect other microphones to this jack. ON/STANDBY POWER SPEAKERS (OFF/A/B/A+B) TONE MODE TONE TUNING MODE TUNING PHONES VIDEO 2 IN/PORTABLE AV IN VIDEO L AUDIO R AUTO CAL MIC MULTI CHANNEL DECODING DISPLAY INPUT MODE INPUT SELECTOR MEMORY/ ENTER DIMMER 2CH/ A.DIRECT A.F.D. Use a...
Operating Instructions
Page 50
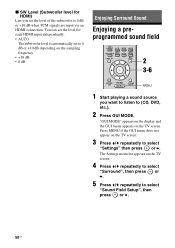
... press or b. 5 Press V/v repeatedly to select "Settings" then press or b. The Settings menu list appears on the TV screen. 3 Press V/v repeatedly to select "Sound Field Setup", then press or b. 50US MOVIE MUSIC INPUT NIGHT RESOLUTION MODE SLEEP MODE DISPLAY GUI MODE 2 3-6 O RETURN/ EXIT HOME MENU OPTIONS TOOLS MENU 1 Start playing a sound...
... press or b. 5 Press V/v repeatedly to select "Settings" then press or b. The Settings menu list appears on the TV screen. 3 Press V/v repeatedly to select "Sound Field Setup", then press or b. 50US MOVIE MUSIC INPUT NIGHT RESOLUTION MODE SLEEP MODE DISPLAY GUI MODE 2 3-6 O RETURN/ EXIT HOME MENU OPTIONS TOOLS MENU 1 Start playing a sound...
Operating Instructions
Page 51
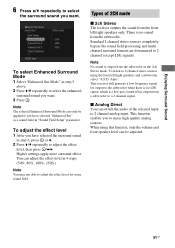
... level, then press /B/b. To adjust the effect level 1 After you have selected "Enhanced Sur" as a sound field in "Sound Field Setup" parameter. Standard 2 channel stereo sources completely bypass the sound field processing and multi channel surround formats are downmixed to 2 channel analog input.... Mode can adjust the effect level in step 6, press or b. 2 Press V/v repeatedly to enjoy high quality analog sources. Auto". This receiver will generate a low frequency signal for output to the subwoofer when there is no sound from a subwoofer to 2 channel stereo sources using ...
... level, then press /B/b. To adjust the effect level 1 After you have selected "Enhanced Sur" as a sound field in "Sound Field Setup" parameter. Standard 2 channel stereo sources completely bypass the sound field processing and multi channel surround formats are downmixed to 2 channel analog input.... Mode can adjust the effect level in step 6, press or b. 2 Press V/v repeatedly to enjoy high quality analog sources. Auto". This receiver will generate a low frequency signal for output to the subwoofer when there is no sound from a subwoofer to 2 channel stereo sources using ...
Operating Instructions
Page 56
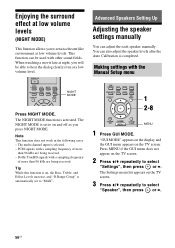
...after the Auto Calibration is set to select "Settings", then press or b. Making settings with a sampling frequency of more than 96 kHz are being received. CLEAR/>10 XM 2CH/ A.DIRECT A.F.D. The Settings menu list appears on the TV screen. 3 Press V/v repeatedly to on the TV screen.... RESOLUTION MODE SLEEP MODE DISPLAY GUI MODE 1 2-8 O RETURN/ EXIT HOME MENU OPTIONS TOOLS MENU 1 Press GUI MODE. PCM signals with the Manual Setup menu 2CH/ A.DIRECT A.F.D. When watching a movie late at night, you press NIGHT MODE. Note This function does not work in the following cases....
...after the Auto Calibration is set to select "Settings", then press or b. Making settings with a sampling frequency of more than 96 kHz are being received. CLEAR/>10 XM 2CH/ A.DIRECT A.F.D. The Settings menu list appears on the TV screen. 3 Press V/v repeatedly to on the TV screen.... RESOLUTION MODE SLEEP MODE DISPLAY GUI MODE 1 2-8 O RETURN/ EXIT HOME MENU OPTIONS TOOLS MENU 1 Press GUI MODE. PCM signals with the Manual Setup menu 2CH/ A.DIRECT A.F.D. When watching a movie late at night, you press NIGHT MODE. Note This function does not work in the following cases....
Operating Instructions
Page 57
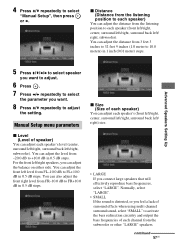
...10.0 dB in 0.5 dB steps. For the front left / right) size. • LARGE If you want. 8 Press V/v repeatedly to select "Manual Setup", then press or b. x Size (Size of each speaker) You can adjust each speaker's (front left/right, center, surround left/right, surround back left ...multi channel surround sound, select "SMALL" to FR+10.0 dB in 1 inch (0.01 meter) steps. 4 Press V/v repeatedly to adjust the setting. Manual Setup menu parameters x Level (Level of each speaker's level (center, surround left/right, surround back left / right, subwoofer). You can adjust the distance from...
...10.0 dB in 0.5 dB steps. For the front left / right) size. • LARGE If you want. 8 Press V/v repeatedly to select "Manual Setup", then press or b. x Size (Size of each speaker) You can adjust each speaker's (front left/right, center, surround left/right, surround back left ...multi channel surround sound, select "SMALL" to FR+10.0 dB in 1 inch (0.01 meter) steps. 4 Press V/v repeatedly to adjust the setting. Manual Setup menu parameters x Level (Level of each speaker's level (center, surround left/right, surround back left / right, subwoofer). You can adjust the distance from...
Operating Instructions
Page 110
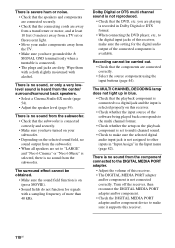
...DIGITAL MEDIA PORT adapter and/or component device to make sure it supports this receiver. • Check whether the input source of the software being played back corresponds to the multi channel format. • Check whether the setup on the playback component is set to "LARGE" and "Neo:6 Cinema" ... Assign" in blue. • Check that the playback component is connected to a digital jack and the input is selected properly on this receiver. 110US you have turned on your audio components away from the component connected to the DIGITAL MEDIA PORT adapter. • Adjust the volume of...
...DIGITAL MEDIA PORT adapter and/or component device to make sure it supports this receiver. • Check whether the input source of the software being played back corresponds to the multi channel format. • Check whether the setup on the playback component is set to "LARGE" and "Neo:6 Cinema" ... Assign" in blue. • Check that the playback component is connected to a digital jack and the input is selected properly on this receiver. 110US you have turned on your audio components away from the component connected to the DIGITAL MEDIA PORT adapter. • Adjust the volume of...

Operating Instructions
Page 115
... (430 × 157.5 × 378 mm) including projecting parts and controls Mass (Approx.) 26 lb 1 oz (11.8 kg) Supplied accessories Operating instructions (this manual) Quick Setup Guide (1) GUI Menu List (1) FM wire antenna (aerial) (1) AM loop antenna (aerial) (1) RM-AAP023 Remote commander (1) R6 (size-AA) batteries (2) Optimizer microphone (ECM-AC2) (1) For...
... (430 × 157.5 × 378 mm) including projecting parts and controls Mass (Approx.) 26 lb 1 oz (11.8 kg) Supplied accessories Operating instructions (this manual) Quick Setup Guide (1) GUI Menu List (1) FM wire antenna (aerial) (1) AM loop antenna (aerial) (1) RM-AAP023 Remote commander (1) R6 (size-AA) batteries (2) Optimizer microphone (ECM-AC2) (1) For...

