Operating Instructions (Large File - 14.3 MB)
Page 7
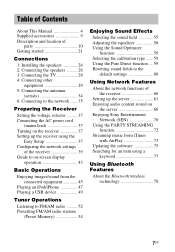
... 37 Turning on the receiver 37 Setting up the receiver using the Easy Setup 37 Configuring the network settings of the receiver 39 Guide to on-screen display operation 43 Basic Operations Enjoying images/sound from the connected equipment 45 Playing an iPod/iPhone 47 Playing a USB device 49 Tuner Operations Listening to FM/AM radio .......... 52 Presetting FM/AM radio stations (Preset Memory 54 Enjoying Sound Effects Selecting the sound field 55 Adjusting the equalizer 58 Using the Sound Optimizer function 59 Selecting...
... 37 Turning on the receiver 37 Setting up the receiver using the Easy Setup 37 Configuring the network settings of the receiver 39 Guide to on-screen display operation 43 Basic Operations Enjoying images/sound from the connected equipment 45 Playing an iPod/iPhone 47 Playing a USB device 49 Tuner Operations Listening to FM/AM radio .......... 52 Presetting FM/AM radio stations (Preset Memory 54 Enjoying Sound Effects Selecting the sound field 55 Adjusting the equalizer 58 Using the Sound Optimizer function 59 Selecting...
Operating Instructions (Large File - 14.3 MB)
Page 8
... Select 84 Home Theatre Control 84 Remote Easy Control 84 Controlling the MHL device .......85 Switching the monitors that output the HDMI video signals 85 Other Operations Switching between digital and analog audio (INPUT MODE 86 Using other video/audio input jacks (Input Assign 86 Using a bi-amplifier connection 87 Using multi-zone features ...........88 Reverting back to the factory default settings 90 Adjusting Settings Using the Settings menu 90 Easy Setup 93 Speaker Settings menu 93 Audio Settings menu 97 HDMI Settings menu 99 Input Settings menu 100 Network Settings menu...
... Select 84 Home Theatre Control 84 Remote Easy Control 84 Controlling the MHL device .......85 Switching the monitors that output the HDMI video signals 85 Other Operations Switching between digital and analog audio (INPUT MODE 86 Using other video/audio input jacks (Input Assign 86 Using a bi-amplifier connection 87 Using multi-zone features ...........88 Reverting back to the factory default settings 90 Adjusting Settings Using the Settings menu 90 Easy Setup 93 Speaker Settings menu 93 Audio Settings menu 97 HDMI Settings menu 99 Input Settings menu 100 Network Settings menu...
Operating Instructions (Large File - 14.3 MB)
Page 16
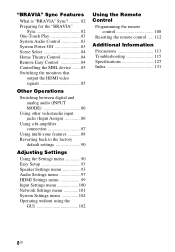
... "Control for HDMI", "Pass Through", "Network Standby", and "Bluetooth Standby" are pre-assigned to the standby mode. E Input buttons2) Selects the equipment you enter characters for network features. - preset/tune to select the input signal (TV input or video input). ENT1) Enters the value after selecting a channel, disc, or track using ?/1 (page 89). clear a mistake when you select them. C SLEEP Press AMP (4), then press SLEEP to set to "Off", and the receiver in "Programming the remote control" on the display panel...
... "Control for HDMI", "Pass Through", "Network Standby", and "Bluetooth Standby" are pre-assigned to the standby mode. E Input buttons2) Selects the equipment you enter characters for network features. - preset/tune to select the input signal (TV input or video input). ENT1) Enters the value after selecting a channel, disc, or track using ?/1 (page 89). clear a mistake when you select them. C SLEEP Press AMP (4), then press SLEEP to set to "Off", and the receiver in "Programming the remote control" on the display panel...
Operating Instructions (Large File - 14.3 MB)
Page 17
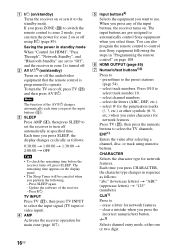
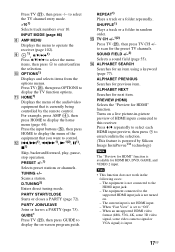
... display the on . - PRESET +/-1) Selects preset stations or channels. GUIDE1 Press TV (U), then press GUIDE to display the TV function options. M TV CH +/-1)2) Press TV (U), then press TV CH +/- ALPHABET NEXT Searches for HDMI" function. The equipment connected to the supported HDMI input jack is available for HDMI BD, DVD, GAME, and VIDEO 2 input. INPUT MODE (page 86) H AMP MENU Displays the menu to enter/confirm the selection. I 1), V/v/B/b1) Press V/v/B/b to select the menu items, then press to operate the receiver...
... display the on . - PRESET +/-1) Selects preset stations or channels. GUIDE1 Press TV (U), then press GUIDE to display the TV function options. M TV CH +/-1)2) Press TV (U), then press TV CH +/- ALPHABET NEXT Searches for HDMI" function. The equipment connected to the supported HDMI input jack is available for HDMI BD, DVD, GAME, and VIDEO 2 input. INPUT MODE (page 86) H AMP MENU Displays the menu to enter/confirm the selection. I 1), V/v/B/b1) Press V/v/B/b to select the menu items, then press to operate the receiver...
Operating Instructions (Large File - 14.3 MB)
Page 29
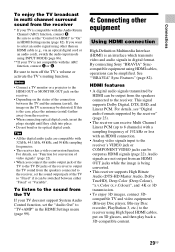
... "TV+AMP" in the HDMI Settings menu (page 99). 4: Connecting other than an HDMI cable (e.g., via an optical digital cord or an audio cord), switch the audio input mode using INPUT MODE (page 86). **If your TV is compatible with 32 kHz, 44.1 kHz, 48 kHz, and 96 kHz sampling frequencies. • The receiver has a video conversion function. For details, see "Digital audio formats supported by HDMI can be output as HDMI signals (page 22). If you connect the audio output jack of the...
... "TV+AMP" in the HDMI Settings menu (page 99). 4: Connecting other than an HDMI cable (e.g., via an optical digital cord or an audio cord), switch the audio input mode using INPUT MODE (page 86). **If your TV is compatible with 32 kHz, 44.1 kHz, 48 kHz, and 96 kHz sampling frequencies. • The receiver has a video conversion function. For details, see "Digital audio formats supported by HDMI can be output as HDMI signals (page 22). If you connect the audio output jack of the...
Operating Instructions (Large File - 14.3 MB)
Page 34
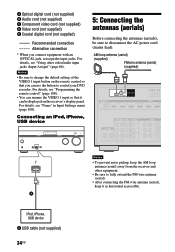
.... AM loop antenna (aerial) (supplied) FM wire antenna (aerial) (supplied) A iPod, iPhone, USB device A USB cable (not supplied) 34US Notes • To prevent noise pickup, keep it can use the button to control your DVD recorder. Notes • Be sure to change the default setting of the VIDEO 1 input button on the receiver's display panel. A Optical digital cord (not supplied) B Audio cord (not supplied) C Component video cord (not supplied) D Video cord (not supplied) E Coaxial digital cord (not supplied) Recommended connection Alternative connection * When...
.... AM loop antenna (aerial) (supplied) FM wire antenna (aerial) (supplied) A iPod, iPhone, USB device A USB cable (not supplied) 34US Notes • To prevent noise pickup, keep it can use the button to control your DVD recorder. Notes • Be sure to change the default setting of the VIDEO 1 input button on the receiver's display panel. A Optical digital cord (not supplied) B Audio cord (not supplied) C Component video cord (not supplied) D Video cord (not supplied) E Coaxial digital cord (not supplied) Recommended connection Alternative connection * When...
Operating Instructions (Large File - 14.3 MB)
Page 38
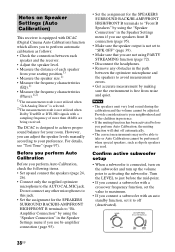
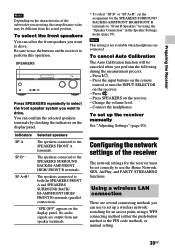
... jack. • Set the assignment for the SPEAKERS SURROUND BACK/BI-AMP/FRONT HIGH/FRONT B terminals to "BiAmplifier Connection" by using the "Speaker Connection" in the Speaker Settings menu if you use bi-amplifier connection (page 95). • Set the assignment for your seating position.1) • Measure the speaker size.1) • Measure the frequency characteristics (EQ).1) • Measure the frequency characteristics (Phase).1)2) 1)The measurement result is not utilized when "2ch Analog Direct" is selected...
... jack. • Set the assignment for the SPEAKERS SURROUND BACK/BI-AMP/FRONT HIGH/FRONT B terminals to "BiAmplifier Connection" by using the "Speaker Connection" in the Speaker Settings menu if you use bi-amplifier connection (page 95). • Set the assignment for your seating position.1) • Measure the speaker size.1) • Measure the frequency characteristics (EQ).1) • Measure the frequency characteristics (Phase).1)2) 1)The measurement result is not utilized when "2ch Analog Direct" is selected...
Operating Instructions (Large File - 14.3 MB)
Page 39
... Change the volume level. - Be sure to use to both the SPEAKERS FRONT A and SPEAKERS SURROUND BACK/ BI-AMP/FRONT HIGH/ FRONT B terminals (parallel connection). No audio signals are several connecting methods you want to drive. Connect the headphones. To select the front speakers You can select the front speakers you can confirm the selected speakers terminals by using the "Speaker Connection" in the Speaker Settings menu (page 95). Press ?/1. - Press the input buttons on the remote control or turn...
... Change the volume level. - Be sure to use to both the SPEAKERS FRONT A and SPEAKERS SURROUND BACK/ BI-AMP/FRONT HIGH/ FRONT B terminals (parallel connection). No audio signals are several connecting methods you want to drive. Connect the headphones. To select the front speakers You can select the front speakers you can confirm the selected speakers terminals by using the "Speaker Connection" in the Speaker Settings menu (page 95). Press ?/1. - Press the input buttons on the remote control or turn...
Operating Instructions (Large File - 14.3 MB)
Page 73
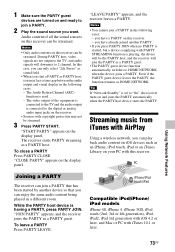
..., but a device complying with PARTY STREAMING function is connected to the digital or analog audio input jacks on the display panel. PC Joining a PARTY The receiver can join a PARTY that you can play back audio content on iOS devices such as HOME NETWORK. During PARTY host, video signals are turned on your PC with this receiver. "JOIN PARTY" appears, and the receiver joins the PARTY as a PARTY guest...
..., but a device complying with PARTY STREAMING function is connected to the digital or analog audio input jacks on the display panel. PC Joining a PARTY The receiver can join a PARTY that you can play back audio content on iOS devices such as HOME NETWORK. During PARTY host, video signals are turned on your PC with this receiver. "JOIN PARTY" appears, and the receiver joins the PARTY as a PARTY guest...
Operating Instructions (Large File - 14.3 MB)
Page 83
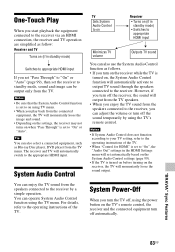
... turn off the sound temporarily by a simple operation. You can operate System Audio Control function using the power button on , the System Audio Control function will momentarily loose the image and sound. • Depending on the settings, the receiver may not turns on (if in standby mode) Switches to appropriate HDMI input If you set "Pass Through" to "On" or "Auto" (page 99), then set the receiver to standby mode, sound and image can adjust the volume or turn off , using the TV menu...
... turn off the sound temporarily by a simple operation. You can operate System Audio Control function using the power button on , the System Audio Control function will momentarily loose the image and sound. • Depending on the settings, the receiver may not turns on (if in standby mode) Switches to appropriate HDMI input If you set "Pass Through" to "On" or "Auto" (page 99), then set the receiver to standby mode, sound and image can adjust the volume or turn off , using the TV menu...
Operating Instructions (Large File - 14.3 MB)
Page 86
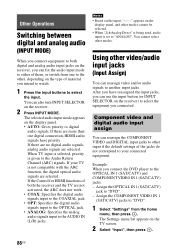
... the default settings of the jacks do not correspond to your connected equipment. If the Control for HDMI functions of both digital and analog audio input jacks on the receiver, you can fix the audio input mode to either of them, or switch from the home menu, then press . You cannot select other modes cannot be selected. • When "2ch Analog Direct" is being used, audio input is given to the Audio Return Channel (ARC) signals. Assign the COMPONENT VIDEO IN 1 (SAT/CATV) jacks to "DVD". 1 Select "Settings...
... the default settings of the jacks do not correspond to your connected equipment. If the Control for HDMI functions of both digital and analog audio input jacks on the receiver, you can fix the audio input mode to either of them, or switch from the home menu, then press . You cannot select other modes cannot be selected. • When "2ch Analog Direct" is being used, audio input is given to the Audio Return Channel (ARC) signals. Assign the COMPONENT VIDEO IN 1 (SAT/CATV) jacks to "DVD". 1 Select "Settings...
Operating Instructions (Large File - 14.3 MB)
Page 99
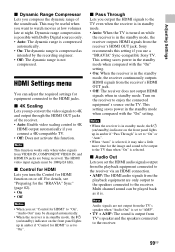
... "AMP". • TV + AMP: The sound is . This setting saves power in standby mode. Multi channel sound can adjust the required settings for HDMI" is in standby mode, the ?/1 (on/standby) indicator on the front panel lights up in the standby mode, the receiver outputs HDMI signals from VIDEO IN, COMPONENT VIDEO IN, and HDMI IN jacks are only output to the speakers connected to enjoy the connected equipment's source on or off. Note Audio signals are not output from the receiver's HDMI OUT jack. • Off: The receiver does not output HDMI signals...
... "AMP". • TV + AMP: The sound is . This setting saves power in standby mode. Multi channel sound can adjust the required settings for HDMI" is in standby mode, the ?/1 (on/standby) indicator on the front panel lights up in the standby mode, the receiver outputs HDMI signals from VIDEO IN, COMPONENT VIDEO IN, and HDMI IN jacks are only output to the speakers connected to enjoy the connected equipment's source on or off. Note Audio signals are not output from the receiver's HDMI OUT jack. • Off: The receiver does not output HDMI signals...
Operating Instructions (Large File - 14.3 MB)
Page 100
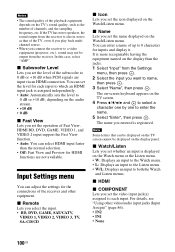
... in stereo as the number of channels, and the sampling frequency, etc. x Subwoofer Level Lets you connect the receiver to a video equipment (projector, etc.), sound may not be displayed on the display panel. The name you set the operation of up to both the Watch and Listen menus. For details, see "Using other equipment. Input Settings menu You can adjust the settings for HDMI functions are input via an HDMI connection. x Remote Lets you select the input. • BD, DVD...
... in stereo as the number of channels, and the sampling frequency, etc. x Subwoofer Level Lets you connect the receiver to a video equipment (projector, etc.), sound may not be displayed on the display panel. The name you set the operation of up to both the Watch and Listen menus. For details, see "Using other equipment. Input Settings menu You can adjust the settings for HDMI functions are input via an HDMI connection. x Remote Lets you select the input. • BD, DVD...
Operating Instructions (Large File - 14.3 MB)
Page 101
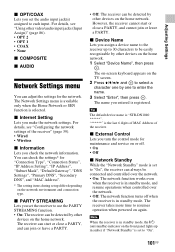
For details, see "Using other video/audio input jacks (Input Assign)" (page 86). • OPT 2 • OPT 1 • COAX • None x COMPOSITE x AUDIO Network Settings menu You can adjust the settings for the network. x External Control Lets you turn the control mode for "Connection Type", "Connection Status", "IP Address Setting", "IP Address", "Subnet Mask", "Default Gateway", "DNS Settings", "Primary DNS", "Secondary DNS", and "MAC Address". * The setting items during setup differ depending on the...
For details, see "Using other video/audio input jacks (Input Assign)" (page 86). • OPT 2 • OPT 1 • COAX • None x COMPOSITE x AUDIO Network Settings menu You can adjust the settings for the network. x External Control Lets you turn the control mode for "Connection Type", "Connection Status", "IP Address Setting", "IP Address", "Subnet Mask", "Default Gateway", "DNS Settings", "Primary DNS", "Secondary DNS", and "MAC Address". * The setting items during setup differ depending on the...
Operating Instructions (Large File - 14.3 MB)
Page 115
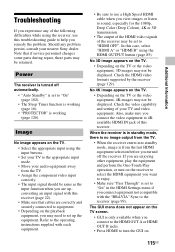
... image appears on the TV. • Select the appropriate input using the HDMI OUTPUT button (page 85). Refer to the operating instructions supplied with the "BRAVIA" Sync to "On" in standby mode, there is no image output from the TV. • When the receiver enters into standby mode, image is turned off the receiver. When the receiver is in the HDMI Settings menu if you turned off automatically. • "Auto Standby" is working (page 126).
... image appears on the TV. • Select the appropriate input using the HDMI OUTPUT button (page 85). Refer to the operating instructions supplied with the "BRAVIA" Sync to "On" in standby mode, there is no image output from the TV. • When the receiver enters into standby mode, image is turned off the receiver. When the receiver is in the HDMI Settings menu if you turned off automatically. • "Auto Standby" is working (page 126).
Operating Instructions (Large File - 14.3 MB)
Page 116
... analog equipment, analog equipment requires both the receiver and all the cords are output from the TV speaker, set the "Audio Out" to "TV+AMP" in the Speaker Settings menu. Then check that sound is switched. However, the sound will not output through the TV speaker. • Sound may not be connected to the receiver correctly. • Check that the TV is turned off. • If PURE DIRECT indicator on the front panel lights...
... analog equipment, analog equipment requires both the receiver and all the cords are output from the TV speaker, set the "Audio Out" to "TV+AMP" in the Speaker Settings menu. Then check that sound is switched. However, the sound will not output through the TV speaker. • Sound may not be connected to the receiver correctly. • Check that the TV is turned off. • If PURE DIRECT indicator on the front panel lights...
Operating Instructions (Large File - 14.3 MB)
Page 117
... be output. Refer to the receiver while TV input is no sound from an HDMI jack may not be suppressed by the connected equipment. "AMP" if you want to watch a program on the equipment connected via the HDMI cable. • When the connected equipment is (are set the "Audio Out" to "AMP" in HDMI Settings menu to turn the GUI off. • Audio signals (format, sampling frequency, bit length, etc.) transmitted from the subwoofer...
... be output. Refer to the receiver while TV input is no sound from an HDMI jack may not be suppressed by the connected equipment. "AMP" if you want to watch a program on the equipment connected via the HDMI cable. • When the connected equipment is (are set the "Audio Out" to "AMP" in HDMI Settings menu to turn the GUI off. • Audio signals (format, sampling frequency, bit length, etc.) transmitted from the subwoofer...
Operating Instructions (Large File - 14.3 MB)
Page 118
... set to "On" in standby mode, there is no sound output from the equipment connected to the digital input jacks of more than the speaker displayed on them slightly. • The speaker cords may have selected the sound field for HDMI function, you are not using TV's remote control. - Dolby Digital or DTS multi channel sound is available. • Set "Audio Out" to "AMP" in Dolby Digital or DTS format. • When connecting the DVD player, etc., to the TV. A test tone is being received. Change the input of the connected...
... set to "On" in standby mode, there is no sound output from the equipment connected to the digital input jacks of more than the speaker displayed on them slightly. • The speaker cords may have selected the sound field for HDMI function, you are not using TV's remote control. - Dolby Digital or DTS multi channel sound is available. • Set "Audio Out" to "AMP" in Dolby Digital or DTS format. • When connecting the DVD player, etc., to the TV. A test tone is being received. Change the input of the connected...
Operating Instructions (Large File - 14.3 MB)
Page 119
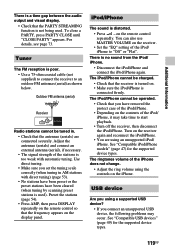
... the frequency appears on the display panel. Outdoor FM antenna (aerial) Receiver Radio stations cannot be charged. • Check that the PARTY STREAMING function is not being used ). See "Compatible iPod/iPhone models" (page 47) for the supported device types. 119US Preset the stations (page 54). • Press AMP, then press DISPLAY repeatedly on the remote control so that the antennas (aerials) are using an unsupported iPod/ iPhone. You can also use MASTER VOLUME...
... the frequency appears on the display panel. Outdoor FM antenna (aerial) Receiver Radio stations cannot be charged. • Check that the PARTY STREAMING function is not being used ). See "Compatible iPod/iPhone models" (page 47) for the supported device types. 119US Preset the stations (page 54). • Press AMP, then press DISPLAY repeatedly on the remote control so that the antennas (aerials) are using an unsupported iPod/ iPhone. You can also use MASTER VOLUME...
Operating Instructions (Large File - 14.3 MB)
Page 126
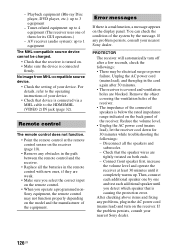
... the connected speakers is below the rated impedance range indicated on the back panel of your device. • Check that the speaker wires are weak. • Make sure you select the correct input on the remote control. • When you detect which speaker that the receiver is turned on the model and the manufacturer of your device. After checking above items and fixing any problems, plug in the cord...
... the connected speakers is below the rated impedance range indicated on the back panel of your device. • Check that the speaker wires are weak. • Make sure you select the correct input on the remote control. • When you detect which speaker that the receiver is turned on the model and the manufacturer of your device. After checking above items and fixing any problems, plug in the cord...


