Operating Instructions
Page 4
...Connecting speakers 16 3a: Connecting the audio components.........17 3b: Connecting the video components ........23 4: Connecting the antennas 32 5: Preparing the receiver and the remote .....33 6: Selecting the speaker system 35 7: Calibrating the appropriate settings automatically (AUTO CALIBRATION 35 8: Adjusting the speaker ...VIDEO ASSIGN 81 Naming inputs 82 Changing the display 83 Using the Sleep Timer 83 Recording using the receiver 84 Listening to the sound in another zone ....... 85 Using the Remote Programming the remote 86 Additional Information Glossary 91 Precautions 92...
...Connecting speakers 16 3a: Connecting the audio components.........17 3b: Connecting the video components ........23 4: Connecting the antennas 32 5: Preparing the receiver and the remote .....33 6: Selecting the speaker system 35 7: Calibrating the appropriate settings automatically (AUTO CALIBRATION 35 8: Adjusting the speaker ...VIDEO ASSIGN 81 Naming inputs 82 Changing the display 83 Using the Sleep Timer 83 Recording using the receiver 84 Listening to the sound in another zone ....... 85 Using the Remote Programming the remote 86 Additional Information Glossary 91 Precautions 92...
Operating Instructions
Page 6
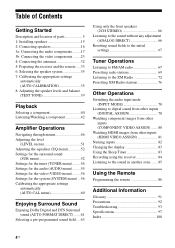
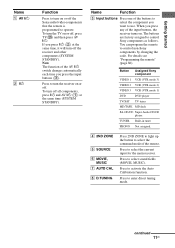
...sensor Receives signals from the components connected to select information displayed on the display (page 82). M DIRECT Press to listen to select A.F.D. H MULTI CHANNEL DECODING lamp Lights up when multi channel audio is decoded (page 43). Name Function S CATEGORY +/- Press to high quality analog sound (page...page 7). V VIDEO 3 IN/ To connect a camcorder or PORTABLE AV video game (page 29, 40). L MASTER VOLUME Turn to select a category (page 75). IN jacks W PHONES jack Connects to select sound fields for the Auto Calibration function (page 35). 6US P MOVIE,...
...sensor Receives signals from the components connected to select information displayed on the display (page 82). M DIRECT Press to listen to select A.F.D. H MULTI CHANNEL DECODING lamp Lights up when multi channel audio is decoded (page 43). Name Function S CATEGORY +/- Press to high quality analog sound (page...page 7). V VIDEO 3 IN/ To connect a camcorder or PORTABLE AV video game (page 29, 40). L MASTER VOLUME Turn to select a category (page 75). IN jacks W PHONES jack Connects to select sound fields for the Auto Calibration function (page 35). 6US P MOVIE,...
Operating Instructions
Page 8
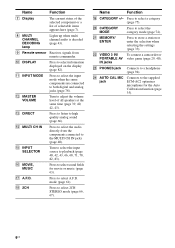
... of more than 48 kHz. R ;PL (II)/(IIx) Lights up when the receiver applies Pro Logic processing to 2 channel signals in order to tune in radio stations you select a sound field using the receiver to output the center and surround channel signals. PL II" lights up when a memory function, such as Preset Memory ... the source sound (based on presetting radio stations, see page 69. The boxes around the letters vary to "NO" (page 49) and you have preset. PL IIx" lights up when MULTI CH IN is selected (page 40). button. "; S MULTI CH IN Lights up when the Pro Logic IIx Movie/Music/ Game...
... of more than 48 kHz. R ;PL (II)/(IIx) Lights up when the receiver applies Pro Logic processing to 2 channel signals in order to tune in radio stations you select a sound field using the receiver to output the center and surround channel signals. PL II" lights up when a memory function, such as Preset Memory ... the source sound (based on presetting radio stations, see page 69. The boxes around the letters vary to "NO" (page 49) and you have preset. PL IIx" lights up when MULTI CH IN is selected (page 40). button. "; S MULTI CH IN Lights up when the Pro Logic IIx Movie/Music/ Game...

Operating Instructions
Page 9
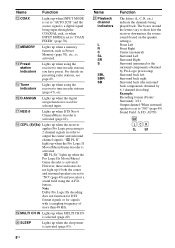
... ANTENNA section FM ANTENNA AM ANTENNA XM Connects to the FM wire antenna supplied with this receiver) (page 72). CENTER L R IN IN PHONO SA-CD/CD R OUT IN MD/TAPE R R SUR FRONT SURROUND BACK MULTI CH IN SUB WOOFER R OUT ZONE 2 CENTER R SURROUND BACK SPEAKERS L + - ...a Super Audio CD player or DVD player which has an analog audio jack for 7.1 channel sound (page 20). Connects to the AM loop antenna supplied with this receiver (page 32). White (L) Red (R) MULTI CHANNEL INPUT jack Black Connects to a DVD player, or a satellite tuner. S-VIDEO IN/ ...
... ANTENNA section FM ANTENNA AM ANTENNA XM Connects to the FM wire antenna supplied with this receiver) (page 72). CENTER L R IN IN PHONO SA-CD/CD R OUT IN MD/TAPE R R SUR FRONT SURROUND BACK MULTI CH IN SUB WOOFER R OUT ZONE 2 CENTER R SURROUND BACK SPEAKERS L + - ...a Super Audio CD player or DVD player which has an analog audio jack for 7.1 channel sound (page 20). Connects to the AM loop antenna supplied with this receiver (page 32). White (L) Red (R) MULTI CHANNEL INPUT jack Black Connects to a DVD player, or a satellite tuner. S-VIDEO IN/ ...
Operating Instructions
Page 11
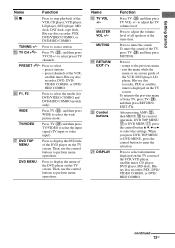
...command mode of the buttons to select the component you press the input buttons (C). To turn the TV on or off the receiver and other components (SYSTEM STANDBY). Button Assigned Sony component VIDEO 1 VCR (VTR mode 3) VIDEO 2 VCR (VTR mode 2) VIDEO 3 VCR (VTR mode 1) DVD DVD .../CD Super Audio CD/CD player TUNER Built-in tuner PHONO Not assigned. Press to select sound fields (MOVIE, MUSIC). Getting Started Name A AV ?/1 B ?/1 Function Press to turn on . Press to control non-Sony components by changing the code. When you press ?/1 (B) at the same time (SYSTEM STANDBY...
...command mode of the buttons to select the component you press the input buttons (C). To turn the TV on or off the receiver and other components (SYSTEM STANDBY). Button Assigned Sony component VIDEO 1 VCR (VTR mode 3) VIDEO 2 VCR (VTR mode 2) VIDEO 3 VCR (VTR mode 1) DVD DVD .../CD Super Audio CD/CD player TUNER Built-in tuner PHONO Not assigned. Press to select sound fields (MOVIE, MUSIC). Getting Started Name A AV ?/1 B ?/1 Function Press to turn on . Press to control non-Sony components by changing the code. When you press ?/1 (B) at the same time (SYSTEM STANDBY...
Operating Instructions
Page 13
...to scan a station. Then, use the control buttons to perform menu operations. to mute the sound. DVD MENU Press to display the menu of the DVD player on the TV screen. Name R.... Press to select preset TV channels. continued 13US TUNING +/- MASTER VOL +/- Press to select the wide picture mode. P F1, F2 Press to select the media (for receiver operation, DVD TOP MENU qj or...player, Blu-ray disc recorder, PSX or satellite tuner is displayed on the TV screen of Sony TV, press TV (wk), and then press RETURN/ EXIT O. Press to select information displayed ...
...to scan a station. Then, use the control buttons to perform menu operations. to mute the sound. DVD MENU Press to display the menu of the DVD player on the TV screen. Name R.... Press to select preset TV channels. continued 13US TUNING +/- MASTER VOL +/- Press to select the wide picture mode. P F1, F2 Press to select the media (for receiver operation, DVD TOP MENU qj or...player, Blu-ray disc recorder, PSX or satellite tuner is displayed on the TV screen of Sony TV, press TV (wk), and then press RETURN/ EXIT O. Press to select information displayed ...
Operating Instructions
Page 15
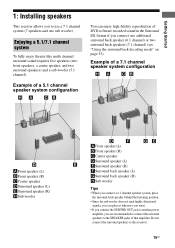
... amplifier, you are recommended to connect the surround speakers to the SPEAKER jacks of DVD software recorded sound in the Surround EX format if you to this receiver. 15US Enjoying a 5.1/7.1 channel system To fully enjoy theater-like multi channel surround sound requires five speakers (two front speakers, a center speaker, and two surround speakers) and a sub woofer...
... amplifier, you are recommended to connect the surround speakers to the SPEAKER jacks of DVD software recorded sound in the Surround EX format if you to this receiver. 15US Enjoying a 5.1/7.1 channel system To fully enjoy theater-like multi channel surround sound requires five speakers (two front speakers, a center speaker, and two surround speakers) and a sub woofer...
Operating Instructions
Page 16
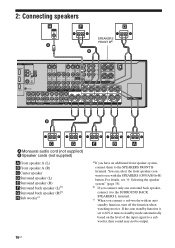
If the auto standby function is set to ON, it to a sub woofer, then sound may not be output. 16US c) When you connect only one surround back speaker, connect it turns to standby mode automatically based on the level of ... L + - b) If you connect a sub woofer with the SPEAKERS (OFF/A/B/A+B) button. CENTER L R IN IN PHONO SA-CD/CD R OUT IN MD/TAPE R R SUR FRONT SURROUND BACK MULTI CH IN SUB WOOFER R OUT ZONE 2 CENTER R SURROUND BACK SPEAKERS L + - For details, see "6: Selecting the speaker system" (page 35). R FRONT B SPEAKERS ONITOR OUT SIGNAL GND...
If the auto standby function is set to ON, it to a sub woofer, then sound may not be output. 16US c) When you connect only one surround back speaker, connect it turns to standby mode automatically based on the level of ... L + - b) If you connect a sub woofer with the SPEAKERS (OFF/A/B/A+B) button. CENTER L R IN IN PHONO SA-CD/CD R OUT IN MD/TAPE R R SUR FRONT SURROUND BACK MULTI CH IN SUB WOOFER R OUT ZONE 2 CENTER R SURROUND BACK SPEAKERS L + - For details, see "6: Selecting the speaker system" (page 35). R FRONT B SPEAKERS ONITOR OUT SIGNAL GND...
Operating Instructions
Page 19
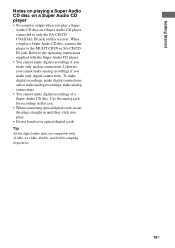
... connected to only the SA-CD/CD COAXIAL IN jack on this case. • When connecting optical digital cords, insert the plugs straight in this receiver. To make digital recordings, make digital connections and to make analog recordings, make analog connections. • You cannot make only digital connections. Likewise,.... Getting Started Notes on playing a Super Audio CD disc on a Super Audio CD player • No sound is output when you play a Super Audio CD disc, connect the player to the MULTI CH IN or SA-CD/CD IN jack. Use the analog jack for recording in until they click...
... connected to only the SA-CD/CD COAXIAL IN jack on this case. • When connecting optical digital cords, insert the plugs straight in this receiver. To make digital recordings, make digital connections and to make analog recordings, make analog connections. • You cannot make only digital connections. Likewise,.... Getting Started Notes on playing a Super Audio CD disc on a Super Audio CD player • No sound is output when you play a Super Audio CD disc, connect the player to the MULTI CH IN or SA-CD/CD IN jack. Use the analog jack for recording in until they click...
Operating Instructions
Page 20
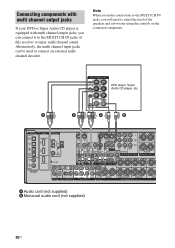
... DVD player, Super Audio CD player, etc. Connecting components with multi channel output jacks If your DVD or Super Audio CD player is equipped with multi channel output jacks, you will need to adjust the level of this receiver to enjoy multi channel sound. CENTER L R IN IN PHONO SA-CD/CD R OUT ...IN MD/TAPE R R SUR FRONT SURROUND BACK MULTI CH IN SUB WOOFER R OUT ZONE 2 ...
... DVD player, Super Audio CD player, etc. Connecting components with multi channel output jacks If your DVD or Super Audio CD player is equipped with multi channel output jacks, you will need to adjust the level of this receiver to enjoy multi channel sound. CENTER L R IN IN PHONO SA-CD/CD R OUT ...IN MD/TAPE R R SUR FRONT SURROUND BACK MULTI CH IN SUB WOOFER R OUT ZONE 2 ...
Operating Instructions
Page 22
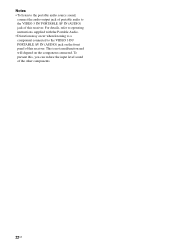
Notes • To listen to the portable audio source sound, connect the audio output jack of portable audio to the VIDEO 3 IN/ PORTABLE AV IN (AUDIO) jack on the component connected. To prevent this, you can reduce the input level sound of this receiver. For details, refer to operating instructions supplied with the Portable Audio. • Distortion may occur when listening to a component connected to the VIDEO 3 IN/ PORTABLE AV IN (AUDIO) jack of the other components. 22US This is not a malfunction and will depend on the front panel of this receiver.
Notes • To listen to the portable audio source sound, connect the audio output jack of portable audio to the VIDEO 3 IN/ PORTABLE AV IN (AUDIO) jack on the component connected. To prevent this, you can reduce the input level sound of this receiver. For details, refer to operating instructions supplied with the Portable Audio. • Distortion may occur when listening to a component connected to the VIDEO 3 IN/ PORTABLE AV IN (AUDIO) jack of the other components. 22US This is not a malfunction and will depend on the front panel of this receiver.
Operating Instructions
Page 30
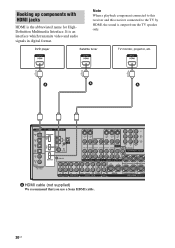
... components with HDMI jacks HDMI is output from the TV speaker only. Note When a playback component connected to this receiver and this receiver connected to the TV by HDMI, the sound is the abbreviated name for HighDefinition Multimedia Interface. A A A DIGITAL OPTICAL VIDEO 1 IN TV/SAT IN MD/... SA-CD/CD R OUT IN MD/TAPE R R SUR FRONT SURROUND BACK MULTI CH IN SUB WOOFER R OUT ZONE 2 CENTER R SURROUND BACK SPEAKERS L + R SURRO A HDMI cable (not supplied) We recommend that you use a Sony HDMI cable. 30US It is an interface which transmits video and audio signals in...
... components with HDMI jacks HDMI is output from the TV speaker only. Note When a playback component connected to this receiver and this receiver connected to the TV by HDMI, the sound is the abbreviated name for HighDefinition Multimedia Interface. A A A DIGITAL OPTICAL VIDEO 1 IN TV/SAT IN MD/... SA-CD/CD R OUT IN MD/TAPE R R SUR FRONT SURROUND BACK MULTI CH IN SUB WOOFER R OUT ZONE 2 CENTER R SURROUND BACK SPEAKERS L + R SURRO A HDMI cable (not supplied) We recommend that you use a Sony HDMI cable. 30US It is an interface which transmits video and audio signals in...
Operating Instructions
Page 31
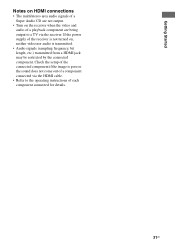
If the power supply of the receiver is not turned on the receiver when the video and audio of a playback component are being output to the operating instructions of each component connected for details. 31US Getting Started Notes on HDMI connections • The multi/stereo area audio signals of a Super ...Audio CD are not output. • Turn on , neither video nor audio is poor or the sound does not come out of a component connected via the HDMI cable. • Refer to a TV via the receiver. Check the setup of ...
If the power supply of the receiver is not turned on the receiver when the video and audio of a playback component are being output to the operating instructions of each component connected for details. 31US Getting Started Notes on HDMI connections • The multi/stereo area audio signals of a Super ...Audio CD are not output. • Turn on , neither video nor audio is poor or the sound does not come out of a component connected via the HDMI cable. • Refer to a TV via the receiver. Check the setup of ...
Operating Instructions
Page 33
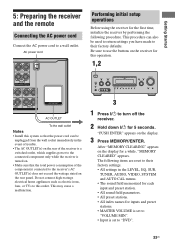
...• All sound field parameters. • All preset stations. • All index names for this outlet. TONE + TUNING MODE - CATEGORY + 2CH A.F.D. This may cause a malfunction. MOVIE MUSIC MULTI CH IN DIRECT 3 1 Press ?/1 to turn off the receiver. 2 Hold ...AV IN VIDEO L AUDIO R DIGITAL(OPT) MULTI CHANNEL DECODING DISPLAY INPUT MODE INPUT SELECTOR MASTER VOLUME MEMORY/ CATEGORY ENTER MODE - The following procedure. R FRONT B SPEAKERS L - This procedure can be used to return settings you have made to a wall outlet. Getting Started 5: Preparing the receiver...
...• All sound field parameters. • All preset stations. • All index names for this outlet. TONE + TUNING MODE - CATEGORY + 2CH A.F.D. This may cause a malfunction. MOVIE MUSIC MULTI CH IN DIRECT 3 1 Press ?/1 to turn off the receiver. 2 Hold ...AV IN VIDEO L AUDIO R DIGITAL(OPT) MULTI CHANNEL DECODING DISPLAY INPUT MODE INPUT SELECTOR MASTER VOLUME MEMORY/ CATEGORY ENTER MODE - The following procedure. R FRONT B SPEAKERS L - This procedure can be used to return settings you have made to a wall outlet. Getting Started 5: Preparing the receiver...
Operating Instructions
Page 39
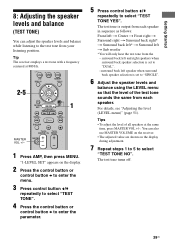
... back left t Sub woofer *You will only hear the test tone from each speaker. Tips • To adjust the level of the test tone sounds the same from each speaker in sequence as follows: Front left t Center t Front right t Surround right t Surround back right* t Surround back left... TOOLS V 2-5 B < B MASTER VOL +/- Getting Started 8: Adjusting the speaker levels and balance (TEST TONE) You can also use MASTER VOLUME on the receiver. • The adjusted value are shown on the display. 2 Press the control button or control button b to enter the menu. 3 Press control button V/v...
... back left t Sub woofer *You will only hear the test tone from each speaker. Tips • To adjust the level of the test tone sounds the same from each speaker in sequence as follows: Front left t Center t Front right t Surround right t Surround back right* t Surround back left... TOOLS V 2-5 B < B MASTER VOL +/- Getting Started 8: Adjusting the speaker levels and balance (TEST TONE) You can also use MASTER VOLUME on the receiver. • The adjusted value are shown on the display. 2 Press the control button or control button b to enter the menu. 3 Press control button V/v...
Operating Instructions
Page 41
The muting function will be canceled when you turn down the volume level. 41US Playback To mute the sound Press MUTING. To avoid damaging your speakers Before you do the following. • Press MUTING again. • Increase the volume. • Turn off the receiver, be sure to turn off the receiver.
The muting function will be canceled when you turn down the volume level. 41US Playback To mute the sound Press MUTING. To avoid damaging your speakers Before you do the following. • Press MUTING again. • Increase the volume. • Turn off the receiver, be sure to turn off the receiver.
Operating Instructions
Page 42
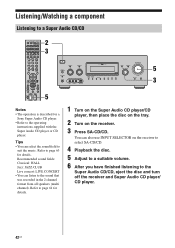
... 2CH A.F.D. TONE + TUNING MODE - Tips • You can also use INPUT SELECTOR on the receiver. 3 Press SA-CD/CD. Refer to page 63 for a Sony Super Audio CD player. • Refer to the operating instructions supplied with the Super Audio CD player... EXIT MENU - Listening/Watching a component Listening to the sound that was recorded in the 2 channel format from all speakers (multi channel). TUNING + AUTO CAL MIC PHONES VIDEO 3 IN/PORTABLE AV IN VIDEO L AUDIO R DIGITAL(OPT) MULTI CHANNEL DECODING DISPLAY INPUT MODE INPUT SELECTOR MASTER VOLUME MEMORY/ CATEGORY ...
... 2CH A.F.D. TONE + TUNING MODE - Tips • You can also use INPUT SELECTOR on the receiver. 3 Press SA-CD/CD. Refer to page 63 for a Sony Super Audio CD player. • Refer to the operating instructions supplied with the Super Audio CD player... EXIT MENU - Listening/Watching a component Listening to the sound that was recorded in the 2 channel format from all speakers (multi channel). TUNING + AUTO CAL MIC PHONES VIDEO 3 IN/PORTABLE AV IN VIDEO L AUDIO R DIGITAL(OPT) MULTI CHANNEL DECODING DISPLAY INPUT MODE INPUT SELECTOR MASTER VOLUME MEMORY/ CATEGORY ...
Operating Instructions
Page 43
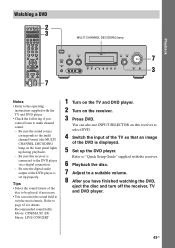
... to be played, if necessary. • You can also use INPUT SELECTOR on this receiver is connected to the multi channel format (the MULTI CHANNEL DECODING lamp on the receiver. 3 Press DVD. Be sure the sound source corresponds to the DVD player via a digital connection. - Refer to "Quick Setup Guide...the disc and turn off the receiver, TV and DVD player. 43US Tips • Select the sound format of the DVD is set up the DVD player. TUNING + AUTO CAL MIC PHONES VIDEO 3 IN/PORTABLE AV IN VIDEO L AUDIO R DIGITAL(OPT) MULTI CHANNEL DECODING DISPLAY INPUT MODE INPUT SELECTOR...
... to be played, if necessary. • You can also use INPUT SELECTOR on this receiver is connected to the multi channel format (the MULTI CHANNEL DECODING lamp on the receiver. 3 Press DVD. Be sure the sound source corresponds to the DVD player via a digital connection. - Refer to "Quick Setup Guide...the disc and turn off the receiver, TV and DVD player. 43US Tips • Select the sound format of the DVD is set up the DVD player. TUNING + AUTO CAL MIC PHONES VIDEO 3 IN/PORTABLE AV IN VIDEO L AUDIO R DIGITAL(OPT) MULTI CHANNEL DECODING DISPLAY INPUT MODE INPUT SELECTOR...
Operating Instructions
Page 44
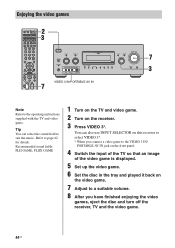
...finished enjoying the video games, eject the disc and turn off the receiver, TV and the video game. 44US Refer to a suitable volume. 8 After you connect a video game to the VIDEO 3 IN/ PORTABLE AV IN jack on the front panel. 4 Switch the input of the...AMP > TUNING - TONE + TUNING MODE - TUNING + AUTO CAL MIC PHONES VIDEO 3 IN/PORTABLE AV IN VIDEO L AUDIO R DIGITAL(OPT) MULTI CHANNEL DECODING DISPLAY INPUT MODE INPUT SELECTOR MASTER VOLUME MEMORY/ CATEGORY ENTER MODE - Recommended sound fields: PLII GAME, PLIIX GAME 1 Turn on the TV and video game. 2 Turn on the video...
...finished enjoying the video games, eject the disc and turn off the receiver, TV and the video game. 44US Refer to a suitable volume. 8 After you connect a video game to the VIDEO 3 IN/ PORTABLE AV IN jack on the front panel. 4 Switch the input of the...AMP > TUNING - TONE + TUNING MODE - TUNING + AUTO CAL MIC PHONES VIDEO 3 IN/PORTABLE AV IN VIDEO L AUDIO R DIGITAL(OPT) MULTI CHANNEL DECODING DISPLAY INPUT MODE INPUT SELECTOR MASTER VOLUME MEMORY/ CATEGORY ENTER MODE - Recommended sound fields: PLII GAME, PLIIX GAME 1 Turn on the TV and video game. 2 Turn on the video...

Operating Instructions
Page 45
...VCR is displayed. 5 Play back the tape on the receiver. 3 Press VIDEO 1*. Refer to page 62 for details. 1 Turn on the TV and VCR. 2 Turn on the VCR. 6 Adjust to sound recorded in the 2 channel format from all speakers (multi channel). CLEAR >10 DISPLAY 89 0/10 ENTER MEMORY TOOLS V ... After you have finished watching video, eject the tape and turn off the receiver, TV and VCR. 45US TUNING + AUTO CAL MIC PHONES VIDEO 3 IN/PORTABLE AV IN VIDEO L AUDIO R DIGITAL(OPT) MULTI CHANNEL DECODING DISPLAY INPUT MODE INPUT SELECTOR MASTER VOLUME MEMORY/ CATEGORY ENTER MODE -...
...VCR is displayed. 5 Play back the tape on the receiver. 3 Press VIDEO 1*. Refer to page 62 for details. 1 Turn on the TV and VCR. 2 Turn on the VCR. 6 Adjust to sound recorded in the 2 channel format from all speakers (multi channel). CLEAR >10 DISPLAY 89 0/10 ENTER MEMORY TOOLS V ... After you have finished watching video, eject the tape and turn off the receiver, TV and VCR. 45US TUNING + AUTO CAL MIC PHONES VIDEO 3 IN/PORTABLE AV IN VIDEO L AUDIO R DIGITAL(OPT) MULTI CHANNEL DECODING DISPLAY INPUT MODE INPUT SELECTOR MASTER VOLUME MEMORY/ CATEGORY ENTER MODE -...


