Operating Instructions
Page 4
...menus 54 Adjusting the level (Level Settings menu 58 Adjusting the equalizer (EQ Settings menu 59 Settings for the surround sound (Sur Settings menu 61 Settings for the tuner (Tuner Settings menu 63 Settings for the audio (Audio Settings menu...receiver and the remote ....37 6: Setting the speakers 39 7: Calibrating the appropriate settings automatically (AUTO CALIBRATION 41 Playback Selecting a component 48 Listening to digital sound from other inputs (DIGITAL ASSIGN 92 Watching HDMI images from other inputs (HDMI VIDEO ASSIGN 93 Watching component images from other inputs (COMPONENT ...
...menus 54 Adjusting the level (Level Settings menu 58 Adjusting the equalizer (EQ Settings menu 59 Settings for the surround sound (Sur Settings menu 61 Settings for the tuner (Tuner Settings menu 63 Settings for the audio (Audio Settings menu...receiver and the remote ....37 6: Setting the speakers 39 7: Calibrating the appropriate settings automatically (AUTO CALIBRATION 41 Playback Selecting a component 48 Listening to digital sound from other inputs (DIGITAL ASSIGN 92 Watching HDMI images from other inputs (HDMI VIDEO ASSIGN 93 Watching component images from other inputs (COMPONENT ...

Operating Instructions
Page 7
...Receives signals from the component connected to select A, B (OFF/A/B/A+B) A+B, OFF of all speakers at the same time (page 48, 50, 51, 52, 53). 7GB TUNING F CATEGORY MODE Used when listening to enable operations in zone 2. M SPEAKERS Press to the MULTI CHANNEL INPUT jack (page 48). O MULTI CHANNEL...sound field (page 72). Getting Started Name Function C TONE MODE TONE Adjusts FRONT BASS and FRONT TREBLE. Press to a portable PORTABLE AV audio/video component... MODE 80, 85). Name Function K HDMI Press to select input source from the component connected to play back (page 48, ...
...Receives signals from the component connected to select A, B (OFF/A/B/A+B) A+B, OFF of all speakers at the same time (page 48, 50, 51, 52, 53). 7GB TUNING F CATEGORY MODE Used when listening to enable operations in zone 2. M SPEAKERS Press to the MULTI CHANNEL INPUT jack (page 48). O MULTI CHANNEL...sound field (page 72). Getting Started Name Function C TONE MODE TONE Adjusts FRONT BASS and FRONT TREBLE. Press to a portable PORTABLE AV audio/video component... MODE 80, 85). Name Function K HDMI Press to select input source from the component connected to play back (page 48, ...

Operating Instructions
Page 9
... up when the receiver recognizes a component connected via an HDMI IN jack (page 25). When playing a DTS format disc, be sure that you have made digital connections and that INPUT MODE is a digital signal being used (page 91). Lights up when surround back sound decoding is decoding ...page 91). Getting Started Name Function C ;DIGITAL Lights up when the receiver (EX) is activated (page 59). When the receiver is decoding DTS signals. G DTS (-ES) Lights up when the receiver is decoding Dolby Digital Surround EX signals, ";DIGITAL EX" also lights up. H 96/24 Lights...
... up when the receiver recognizes a component connected via an HDMI IN jack (page 25). When playing a DTS format disc, be sure that you have made digital connections and that INPUT MODE is a digital signal being used (page 91). Lights up when surround back sound decoding is decoding ...page 91). Getting Started Name Function C ;DIGITAL Lights up when the receiver (EX) is activated (page 59). When the receiver is decoding DTS signals. G DTS (-ES) Lights up when the receiver is decoding Dolby Digital Surround EX signals, ";DIGITAL EX" also lights up. H 96/24 Lights...

Operating Instructions
Page 11
... this receiver (page 36). OUTPUT jacks* continued 11GB Rear panel Getting Started A AUDIO INPUT/OUTPUT section L AUDIO IN/ Connects to a DVD VIDEO (Y, PB/ player, TV, or a CB, PR/CR) satellite tuner. (page INPUT/ 27, 29, 31). D COMPONENT VIDEO INPUT/ OUTPUT section COMPONENT Connects... player with an analog audio jack for 7.1 channel or 5.1 channel sound (page 19, 22). The COAXIAL jack provides a better quality sound (page 19, 20, 29). XM ANTENNA jack Connects to a DVD jacks player, or a satellite tuner. HDMI IN/OUT Connects to the XM connect-and-Play...
... this receiver (page 36). OUTPUT jacks* continued 11GB Rear panel Getting Started A AUDIO INPUT/OUTPUT section L AUDIO IN/ Connects to a DVD VIDEO (Y, PB/ player, TV, or a CB, PR/CR) satellite tuner. (page INPUT/ 27, 29, 31). D COMPONENT VIDEO INPUT/ OUTPUT section COMPONENT Connects... player with an analog audio jack for 7.1 channel or 5.1 channel sound (page 19, 22). The COAXIAL jack provides a better quality sound (page 19, 20, 29). XM ANTENNA jack Connects to a DVD jacks player, or a satellite tuner. HDMI IN/OUT Connects to the XM connect-and-Play...

Operating Instructions
Page 24
... monitor DVD player, DVD recorder Satellite tuner With HDMI jack VCR Camcorder, video game, etc. Refer to connect each component. Select the connection according to this receiver. 3b: Connecting the video components How to hook up your components This section describes how to hook up all your components. Component to be connected" below for the pages which...
... monitor DVD player, DVD recorder Satellite tuner With HDMI jack VCR Camcorder, video game, etc. Refer to connect each component. Select the connection according to this receiver. 3b: Connecting the video components How to hook up your components This section describes how to hook up all your components. Component to be connected" below for the pages which...

Operating Instructions
Page 25
... jacks on this receiver. This signal supports Dolby Digital, DTS, and linear PCM. • Analog video signals input to the VIDEO jack, S VIDEO jacks, or COMPONENT VIDEO jacks can be output as HDMI signals. Audio/video signals A A A A HDMI cable (not supplied) We recommend that you use a Sony HDMI cable. Getting Started Connecting components with HDMI jacks HDMI is converted...
... jacks on this receiver. This signal supports Dolby Digital, DTS, and linear PCM. • Analog video signals input to the VIDEO jack, S VIDEO jacks, or COMPONENT VIDEO jacks can be output as HDMI signals. Audio/video signals A A A A HDMI cable (not supplied) We recommend that you use a Sony HDMI cable. Getting Started Connecting components with HDMI jacks HDMI is converted...
Operating Instructions
Page 26
... receiver when video and audio signals of a playback component are being output to a TV through this case, check the specification of the connected component. • Set the resolution of the image of the playback component to 720p or 1080i when you output 96 kHz multi-channel sound over an HDMI connection... signals (sampling frequency, bit length, etc.) transmitted from an HDMI jack may be suppressed by Sony). • Check the setup of the connected component if an image is poor or the sound does not come out of each component connected for details. • We do not recommend using an...
... receiver when video and audio signals of a playback component are being output to a TV through this case, check the specification of the connected component. • Set the resolution of the image of the playback component to 720p or 1080i when you output 96 kHz multi-channel sound over an HDMI connection... signals (sampling frequency, bit length, etc.) transmitted from an HDMI jack may be suppressed by Sony). • Check the setup of the connected component if an image is poor or the sound does not come out of each component connected for details. • We do not recommend using an...

Operating Instructions
Page 33
... MONITOR OUT jack as shown in the Video Settings menu. Getting Started Function for conversion of the receiver Input Signals Output Signals B C D B C D A B C D OUTPUT jack INPUT jack HDMI IN 1/2 A COMPONENT VIDEO IN B HDMI OUT f a S VIDEO IN C a VIDEO IN D a COMPONENT VIDEO MONITOR OUT S VIDEO MONITOR OUT VIDEO MONITOR OUT X X X a a f (Supports input signals (Supports input signals less than...
... MONITOR OUT jack as shown in the Video Settings menu. Getting Started Function for conversion of the receiver Input Signals Output Signals B C D B C D A B C D OUTPUT jack INPUT jack HDMI IN 1/2 A COMPONENT VIDEO IN B HDMI OUT f a S VIDEO IN C a VIDEO IN D a COMPONENT VIDEO MONITOR OUT S VIDEO MONITOR OUT VIDEO MONITOR OUT X X X a a f (Supports input signals (Supports input signals less than...

Operating Instructions
Page 34
In this receiver and then output to your TV, depending on the status of images may be output. • HDMI video signals cannot be converted to off. To connect a recording component When recording, connect the recording component to the VIDEO OUT jacks or S VIDEO OUT jacks of jack, as TBC, the ...OUT jacks. An aspect ratio of the video signal output, the image on converting video signals • You can convert only 480i component video signals into HDMI signals, S video signals, or video signals. Notes on the TV screen may appear distorted horizontally or no image may not be ...
In this receiver and then output to your TV, depending on the status of images may be output. • HDMI video signals cannot be converted to off. To connect a recording component When recording, connect the recording component to the VIDEO OUT jacks or S VIDEO OUT jacks of jack, as TBC, the ...OUT jacks. An aspect ratio of the video signal output, the image on converting video signals • You can convert only 480i component video signals into HDMI signals, S video signals, or video signals. Notes on the TV screen may appear distorted horizontally or no image may not be ...

Operating Instructions
Page 35
... input/output conversion table classified by "VIDEO CONVERT" and "PROGRESSIVE OUT" in the Video Settings menu are shown in the display S video X X Component video X f (480i) X f f X X X Component video X f (Other than 480i) X X VIDEO CONVERT: OFF / Video X X PROGRESSIVE OUT: Dimmed in the chart below. f : The... will be output. Video signals are not output. 35GB Menu setting MONITOR OUT jacks Input signal HDMI OUT COMPONENT VIDEO MONITOR OUT S VIDEO MONITOR OUT VIDEO MONITOR OUT VIDEO CONVERT: ON / Video/S video a a (480i) a a PROGRESSIVE OUT: ...
... input/output conversion table classified by "VIDEO CONVERT" and "PROGRESSIVE OUT" in the Video Settings menu are shown in the display S video X X Component video X f (480i) X f f X X X Component video X f (Other than 480i) X X VIDEO CONVERT: OFF / Video X X PROGRESSIVE OUT: Dimmed in the chart below. f : The... will be output. Video signals are not output. 35GB Menu setting MONITOR OUT jacks Input signal HDMI OUT COMPONENT VIDEO MONITOR OUT S VIDEO MONITOR OUT VIDEO MONITOR OUT VIDEO CONVERT: ON / Video/S video a a (480i) a a PROGRESSIVE OUT: ...

Operating Instructions
Page 48
...select a component connected to adjust the volume. Selected input Components that can also use INPUT SELECTOR on the component and start playback. 3 Press MASTER VOL +/- HDMI 1, 2 HDMI components connected to the HDMI jack 2 Turn on the receiver. The selected input appears on the receiver. to the HDMI IN1/2 jack, press the HDMI button .../CD jack TUNER Built-in radio tuner PHONO Turntable, etc., connected to the PHONO jack MULTI IN Component connected to the MULTI CHANNEL INPUT jack, press MULTI CH IN button. The initial volume level is lit.). When you want to select...
...select a component connected to adjust the volume. Selected input Components that can also use INPUT SELECTOR on the component and start playback. 3 Press MASTER VOL +/- HDMI 1, 2 HDMI components connected to the HDMI jack 2 Turn on the receiver. The selected input appears on the receiver. to the HDMI IN1/2 jack, press the HDMI button .../CD jack TUNER Built-in radio tuner PHONO Turntable, etc., connected to the PHONO jack MULTI IN Component connected to the MULTI CHANNEL INPUT jack, press MULTI CH IN button. The initial volume level is lit.). When you want to select...

Operating Instructions
Page 56
... A/V SYNC [xxxms] 0ms to SUR +3 PANORAMA MODE [xxx] OFF, ON SCREEN DEPTH [xxx] ON, OFF VIR. HDMI AUDIO [xxxxxx] AMP, TV+AMP HDMI POWER [xxxxxxx] AUTO, EVER ON VIDEO CONVERT [xxx] ON, OFF PROGRESSIVE OUT [xxx] ON, OFF NAME IN ? ... 0ms AMP AUTO page 92 page 90 page 94 page 93 page 65 ON OFF page 90 56GB NAME IN ? [xxx] COMPONENT V. HDMI VIDEO ASSIGN ? SPEAKERS [xxx] ON, OFF FM MODE [xxxxxx] MONO, STEREO NAME IN? [xxx] DEC. SB DECODING...[xxxxxxx] FRONT +3 to 150ms/300ms (10 ms step) DIGITAL ASSIGN ? ASSIGN ? Menu Item Parameter 3-Sur Settings SOUND FIELD SELECT ?
... A/V SYNC [xxxms] 0ms to SUR +3 PANORAMA MODE [xxx] OFF, ON SCREEN DEPTH [xxx] ON, OFF VIR. HDMI AUDIO [xxxxxx] AMP, TV+AMP HDMI POWER [xxxxxxx] AUTO, EVER ON VIDEO CONVERT [xxx] ON, OFF PROGRESSIVE OUT [xxx] ON, OFF NAME IN ? ... 0ms AMP AUTO page 92 page 90 page 94 page 93 page 65 ON OFF page 90 56GB NAME IN ? [xxx] COMPONENT V. HDMI VIDEO ASSIGN ? SPEAKERS [xxx] ON, OFF FM MODE [xxxxxx] MONO, STEREO NAME IN? [xxx] DEC. SB DECODING...[xxxxxxx] FRONT +3 to 150ms/300ms (10 ms step) DIGITAL ASSIGN ? ASSIGN ? Menu Item Parameter 3-Sur Settings SOUND FIELD SELECT ?

Operating Instructions
Page 65
... you play multi-channel software. • When you reassign the component video input to another input and to name inputs. When set the HDMI audio output from the playback component connected to the receiver via an HDMI connection. • TV+AMP The sound is only output to..." setting. Note Only 480i component video input signals are not output from the receiver. Notes • The sound quality of the HDMI circuits. continued 65GB Amplifier Operations ASSIGN? (Component Video Assign) Lets you connect the receiver to a video component (projector, etc.), sound may be played back as ...
... you play multi-channel software. • When you reassign the component video input to another input and to name inputs. When set the HDMI audio output from the playback component connected to the receiver via an HDMI connection. • TV+AMP The sound is only output to..." setting. Note Only 480i component video input signals are not output from the receiver. Notes • The sound quality of the HDMI circuits. continued 65GB Amplifier Operations ASSIGN? (Component Video Assign) Lets you connect the receiver to a video component (projector, etc.), sound may be played back as ...

Operating Instructions
Page 90
...made a mistake Press B/b until a blank space appears on the display. The selected input appears on the receiver. To select a component connected to enter the name. To enter a blank space Press B/b without inputting a character. You can ...HDMI button repeatedly. 2 Press RECEIVER. or "A.CAL NAME?," then press to enter the selected character. The cursor flashes and you want to change flashes, then turn +/- Press V/v to select a character, press B/b to select the position in which to enter. The entered name is enabled. 3 Press MENU. The list of the connected components...
...made a mistake Press B/b until a blank space appears on the display. The selected input appears on the receiver. To select a component connected to enter the name. To enter a blank space Press B/b without inputting a character. You can ...HDMI button repeatedly. 2 Press RECEIVER. or "A.CAL NAME?," then press to enter the selected character. The cursor flashes and you want to change flashes, then turn +/- Press V/v to select a character, press B/b to select the position in which to enter. The entered name is enabled. 3 Press MENU. The list of the connected components...

Operating Instructions
Page 91
...select other modes. Switching between digital and analog audio (INPUT MODE) When you connect components to both digital and analog connections. Audio input modes • AUTO Gives priority to select the audio input mode. Receiver operation is selected, "------" appears on the display. Notes • You cannot select ... can also use INPUT SELECTOR on the receiver. 91GB The selected audio input mode appears on the display, and you intend to "ANALOG." You can fix the audio input mode to either HDMI input or XM Radio is enabled. 3 Press INPUT MODE repeatedly to digital audio signals ...
...select other modes. Switching between digital and analog audio (INPUT MODE) When you connect components to both digital and analog connections. Audio input modes • AUTO Gives priority to select the audio input mode. Receiver operation is selected, "------" appears on the display. Notes • You cannot select ... can also use INPUT SELECTOR on the receiver. 91GB The selected audio input mode appears on the display, and you intend to "ANALOG." You can fix the audio input mode to either HDMI input or XM Radio is enabled. 3 Press INPUT MODE repeatedly to digital audio signals ...

Operating Instructions
Page 94
..., SA-CD/CD NONE, VIDEO 1, VIDEO 2, VIDEO 3, DVD, TV/SAT, TAPE/CD-R, MD/DAT, SA-CD/CD Note You cannot reassign more than one HDMI input to select "COMPONENT V. Receiver operation is marked with an underscore. The list of setting menus appears. 3 Press V/v repeatedly to select "Video Settings," then press . 4 Press V/v repeatedly to...
..., SA-CD/CD NONE, VIDEO 1, VIDEO 2, VIDEO 3, DVD, TV/SAT, TAPE/CD-R, MD/DAT, SA-CD/CD Note You cannot reassign more than one HDMI input to select "COMPONENT V. Receiver operation is marked with an underscore. The list of setting menus appears. 3 Press V/v repeatedly to select "Video Settings," then press . 4 Press V/v repeatedly to...

Operating Instructions
Page 113
... recorded audio for 6.1 channels playback. It compresses audio less than Dolby Digital, delivering a higher quality sound reproduction. Along with a frequency between each 1/60 second. The HDMI connection carries standard to high definition video signals and multi-channel audio signals to output multi-channel audio such as 5.1 channels, encoded into surround left and surround right channels. Additional Information continued 113GB...
... recorded audio for 6.1 channels playback. It compresses audio less than Dolby Digital, delivering a higher quality sound reproduction. Along with a frequency between each 1/60 second. The HDMI connection carries standard to high definition video signals and multi-channel audio signals to output multi-channel audio such as 5.1 channels, encoded into surround left and surround right channels. Additional Information continued 113GB...

Operating Instructions
Page 116
... R jack. There is no sound from one channel is output from the headphones, the component may not be connected to the receiver correctly. Check that component. • The sound is not output when you have connected both the receiver and the component. The source sound input from the HDMI jack is not set to the receiver correctly. There is severe hum...
... R jack. There is no sound from one channel is output from the headphones, the component may not be connected to the receiver correctly. Check that component. • The sound is not output when you have connected both the receiver and the component. The source sound input from the HDMI jack is not set to the receiver correctly. There is severe hum...

Operating Instructions
Page 118
... corrupted. • When the signals are output from the COMPONENT VIDEO OUT jack, input signals other than 480p component are not received when signals are output from the S VIDEO jack or the VIDEO jack. The source image input from the HDMI jack is too weak (when tuning in AM stations with... automatic tuning). Refer to be carried out. • Check that the frequency appears on the receiver. •...
... corrupted. • When the signals are output from the COMPONENT VIDEO OUT jack, input signals other than 480p component are not received when signals are output from the S VIDEO jack or the VIDEO jack. The source image input from the HDMI jack is too weak (when tuning in AM stations with... automatic tuning). Refer to be carried out. • Check that the frequency appears on the receiver. •...

Marketing Specifications
Page 1
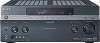
.... STR-DG1000 7.1 Channel Surround Sound A/V Receiver NEW Key Features Optimized for Blu-ray Disc and other room in a single wire. Superior video switching and audio performance ensure seamless compatibility with the Sony® BDP-S1 Blu-ray Disc™ Player. Simply place the included microphone in your living room, the receiver's two additional amplifier channels can be converted to HDMI...
.... STR-DG1000 7.1 Channel Surround Sound A/V Receiver NEW Key Features Optimized for Blu-ray Disc and other room in a single wire. Superior video switching and audio performance ensure seamless compatibility with the Sony® BDP-S1 Blu-ray Disc™ Player. Simply place the included microphone in your living room, the receiver's two additional amplifier channels can be converted to HDMI...


