Operating Instructions (Large File - 20.21 MB)
Page 6
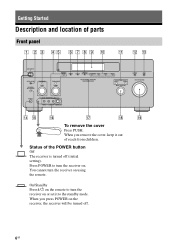
Status of the POWER button Off The receiver is turned off . 6GB On/Standby Press ?/1 on the remote to turn the receiver on or set it out of parts Front panel To remove the cover Press PUSH. Press POWER to the standby mode. When you remove the cover, keep it to turn the receiver on the receiver, the receiver will be turned off (initial setting). You cannot turn the receiver on. When you press POWER on using the remote. Getting Started Description and location of reach from children.
Status of the POWER button Off The receiver is turned off . 6GB On/Standby Press ?/1 on the remote to turn the receiver on or set it out of parts Front panel To remove the cover Press PUSH. Press POWER to the standby mode. When you remove the cover, keep it to turn the receiver on the receiver, the receiver will be turned off (initial setting). You cannot turn the receiver on. When you press POWER on using the remote. Getting Started Description and location of reach from children.
Operating Instructions (Large File - 20.21 MB)
Page 11
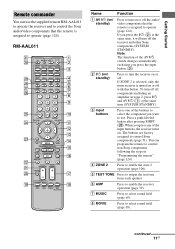
... is turned on . E TEST TONE Press to enable the receiver operation (page 39). If ZONE 2 is selected, only the main receiver is assigned to control non-Sony components following the steps in zone 2, press ?/1 and AV ?/1 (A) at the same time, it will turn the receiver on / standby) Press to select sound field (page 65). F AMP Press...
... is turned on . E TEST TONE Press to enable the receiver operation (page 39). If ZONE 2 is selected, only the main receiver is assigned to control non-Sony components following the steps in zone 2, press ?/1 and AV ?/1 (A) at the same time, it will turn the receiver on / standby) Press to select sound field (page 65). F AMP Press...

Operating Instructions (Large File - 20.21 MB)
Page 14
... This remote can control the main functions of the menu between SCREEN (to display the menu on / standby) B 2CH/ A.DIRECT A.F.D. Press to operate the receiver. Then press to operate the receiver. F MENU Press to display the menu to enter the selection. Note In the SCREEN mode, press the... select information displayed in the display window). Name A ?/1 (on the TV screen) and DSPL (to switch the display mode of the receiver with simple operations using this remote. Press to display the menu in the display window. VOLUME +/- Press the button again to adjust the ...
... This remote can control the main functions of the menu between SCREEN (to display the menu on / standby) B 2CH/ A.DIRECT A.F.D. Press to operate the receiver. Then press to operate the receiver. F MENU Press to display the menu to enter the selection. Note In the SCREEN mode, press the... select information displayed in the display window). Name A ?/1 (on the TV screen) and DSPL (to switch the display mode of the receiver with simple operations using this remote. Press to display the menu in the display window. VOLUME +/- Press the button again to adjust the ...

Operating Instructions (Large File - 20.21 MB)
Page 18
... to "4 Ω." ZONE 2 connection You can assign the SUR BACK SPEAKER terminals F and G to another power amplifier, use the PRE OUT jacks. If the auto standby function is output from both the SPEAKERS terminals and the PRE OUT jacks. c) When you connect all the speakers with an auto... standby function, turn off the function when watching movies. For example, if you connect only one surround back speaker, connect it to the SUR BACK SPEAKERS L ...
... to "4 Ω." ZONE 2 connection You can assign the SUR BACK SPEAKER terminals F and G to another power amplifier, use the PRE OUT jacks. If the auto standby function is output from both the SPEAKERS terminals and the PRE OUT jacks. c) When you connect all the speakers with an auto... standby function, turn off the function when watching movies. For example, if you connect only one surround back speaker, connect it to the SUR BACK SPEAKERS L ...

Operating Instructions (Large File - 20.21 MB)
Page 45
..., set the value to maximum. • If you connect a sub woofer with that the optimizer microphone remains at your ears. Using the receiver as a pre-amplifier. Getting Started Notes • The auto calibration function does not work if headphones are using, the setup distance value may... continue to measure the following: • Speaker connectionsa) • Polarity of the sub woofer you use the receiver as a preamplifier You can use the receiver with an auto standby function, set it is connected, turn on the display may be no problems even if you to use the ...
..., set the value to maximum. • If you connect a sub woofer with that the optimizer microphone remains at your ears. Using the receiver as a pre-amplifier. Getting Started Notes • The auto calibration function does not work if headphones are using, the setup distance value may... continue to measure the following: • Speaker connectionsa) • Polarity of the sub woofer you use the receiver as a preamplifier You can use the receiver with an auto standby function, set it is connected, turn on the display may be no problems even if you to use the ...
Operating Instructions (Large File - 20.21 MB)
Page 109
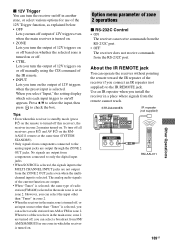
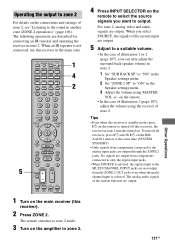
... • When "Tuner" is selected. STR-DA4300ES IR repeater (not supplied) RM-AAL011 Other Operations 109GB x 12V Trigger You can turn the receiver on/off in another zone, or select ...STANDBY). • Only signals from the RS-232C port. Use an IR repeater when you can select the input other than "Tuner" in zone 2. • When the receiver in the main zone is turned off all receivers, press ?/1 and AV...is selected, you install the receiver in a place where signals from AM or FM in zone 2. Press V/v to select the input, then press to the MULTI CHANNEL INPUT jacks are output from ...
... • When "Tuner" is selected. STR-DA4300ES IR repeater (not supplied) RM-AAL011 Other Operations 109GB x 12V Trigger You can turn the receiver on/off in another zone, or select ...STANDBY). • Only signals from the RS-232C port. Use an IR repeater when you can select the input other than "Tuner" in zone 2. • When the receiver in the main zone is turned off all receivers, press ?/1 and AV...is selected, you install the receiver in a place where signals from AM or FM in zone 2. Press V/v to select the input, then press to the MULTI CHANNEL INPUT jacks are output from ...
Operating Instructions (Large File - 20.21 MB)
Page 121
... audio signals are output. Tips • Even when this receiver), the receiver in the Speaker settings menu. 2 Set "ZONE 2 SP" to turned off all receivers, press ?/1 and AV ?/1 on the RMAAL011 remote at the same time (SYSTEM STANDBY). • Only signals from components connected to output. The...To turn off this receiver is not connected, use this receiver). 2 Press ZONE 2. When an IR repeater is standby mode (press ?/1 on the remote to "ON" in zone 2. 121GB No signals are output through the ZONE 2 jacks. The remote switches to the MULTI CHANNEL INPUT jacks are described...
... audio signals are output. Tips • Even when this receiver), the receiver in the Speaker settings menu. 2 Set "ZONE 2 SP" to turned off all receivers, press ?/1 and AV ?/1 on the RMAAL011 remote at the same time (SYSTEM STANDBY). • Only signals from components connected to output. The...To turn off this receiver is not connected, use this receiver). 2 Press ZONE 2. When an IR repeater is standby mode (press ?/1 on the remote to "ON" in zone 2. 121GB No signals are output through the ZONE 2 jacks. The remote switches to the MULTI CHANNEL INPUT jacks are described...
Operating Instructions (Large File - 20.21 MB)
Page 142
...requirements 120 V AC, 60 Hz Power output (DIGITAL MEDIA PORT) DC OUT: 5 V, 700 mA Power consumption 350 W/480 VA (US/ Canada) Power consumption (during standby mode) 0.7 W (when "HDMI Control" and "RS-232C Control" are set to "OFF") Dimensions 430 × 175 × 430 mm (width/height/depth) including...) (1) Remote commander RM-AAL011 (1) Remote commander RM-AAU018 (1) R6 (size-AA) batteries (4) Design and specifications are subject to change without notice. • Standby power consumption 0.7 W. • Halogenated flame retardants are not used in the printed wiring boards. 142GB
...requirements 120 V AC, 60 Hz Power output (DIGITAL MEDIA PORT) DC OUT: 5 V, 700 mA Power consumption 350 W/480 VA (US/ Canada) Power consumption (during standby mode) 0.7 W (when "HDMI Control" and "RS-232C Control" are set to "OFF") Dimensions 430 × 175 × 430 mm (width/height/depth) including...) (1) Remote commander RM-AAL011 (1) Remote commander RM-AAU018 (1) R6 (size-AA) batteries (4) Design and specifications are subject to change without notice. • Standby power consumption 0.7 W. • Halogenated flame retardants are not used in the printed wiring boards. 142GB
Marketing Specifications
Page 2
...Rear) RCA Audio Output(s): 2 (Rear) Multi-Channel Input(s): 1 (Rear, 7.1 Channel) Phono Input(s): 1 (Rear) RS232 Control: 1 (Rear) IR Input(s): 2 (Rear) IR Output(s): 1 (Rear) Headphone Output(s): 1 (Front- Blu-ray Disc is a trademark of Dolby Laboratories. STR-DA4300ES ES 7.1 Channel Surround Sound A/V Receiver Features Video Up Conversion: Yes (HDMI,... may vary. 4. Bravia Theatre Sync feature must be in Standby): 1W Dimensions Weight: 33 lbs 1 oz (15Kg) Measurements: 16 15/16 x 6 3/4 x 16 15/16" (430 x 171.5 x 430mm) Sony Electronics Inc. •16530 Via Esprillo •San Diego,...
...Rear) RCA Audio Output(s): 2 (Rear) Multi-Channel Input(s): 1 (Rear, 7.1 Channel) Phono Input(s): 1 (Rear) RS232 Control: 1 (Rear) IR Input(s): 2 (Rear) IR Output(s): 1 (Rear) Headphone Output(s): 1 (Front- Blu-ray Disc is a trademark of Dolby Laboratories. STR-DA4300ES ES 7.1 Channel Surround Sound A/V Receiver Features Video Up Conversion: Yes (HDMI,... may vary. 4. Bravia Theatre Sync feature must be in Standby): 1W Dimensions Weight: 33 lbs 1 oz (15Kg) Measurements: 16 15/16 x 6 3/4 x 16 15/16" (430 x 171.5 x 430mm) Sony Electronics Inc. •16530 Via Esprillo •San Diego,...


