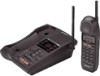
Operating Instructions
Page 4
... a remote risk of this equipment is experienced with this equipment (SPP-A972), for this happens the telephone company will notify you can make changes in its facilities, equipment, operations or procedures that you believe it is corrosive and may cause damage to party lines or coin lines. 10.This equipment is used for repair or warranty information, please contact Sony Direct Response Center: Tel...
... a remote risk of this equipment is experienced with this equipment (SPP-A972), for this happens the telephone company will notify you can make changes in its facilities, equipment, operations or procedures that you believe it is corrosive and may cause damage to party lines or coin lines. 10.This equipment is used for repair or warranty information, please contact Sony Direct Response Center: Tel...
Operating Instructions
Page 6
... Switching conference from the base unit to the handset 46 To join on the base unit while the handset is talking on one line 46 To join on the handset while the base unit is talking on one line 46 To join three-way conference (four-way conference) Answering Machine Features 47 Setting up the answering machine 47 Setting the time and day of the week 48 Recording the greeting 50 Setting the number of rings...
... Switching conference from the base unit to the handset 46 To join on the base unit while the handset is talking on one line 46 To join on the handset while the base unit is talking on one line 46 To join three-way conference (four-way conference) Answering Machine Features 47 Setting up the answering machine 47 Setting the time and day of the week 48 Recording the greeting 50 Setting the number of rings...
Operating Instructions
Page 7
... list 65 Using the Caller ID list 65 Calling back a number from the Caller ID list 66 Storing a number of the Caller ID list into the Phone Directory 67 To change the number of digits of the phone number 69 Using "Caller ID with call waiting" service Additional Information 70 Mounting the base unit on a wall 71 Carrying the handset by the belt clip 72 Notes on power sources 73 Maintenance 74 Troubleshooting 78 Specifications 79 Index...
... list 65 Using the Caller ID list 65 Calling back a number from the Caller ID list 66 Storing a number of the Caller ID list into the Phone Directory 67 To change the number of digits of the phone number 69 Using "Caller ID with call waiting" service Additional Information 70 Mounting the base unit on a wall 71 Carrying the handset by the belt clip 72 Notes on power sources 73 Maintenance 74 Troubleshooting 78 Specifications 79 Index...
Operating Instructions
Page 13
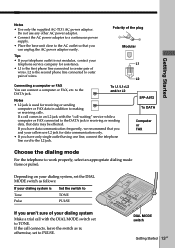
..., contact your dialing system Make a trial call waiting" service while a computer or FAX connected to the DATA jack is used for receiving or sending computer or FAX data in on your dialing system, set the DIAL MODE switch as is Tone Pulse Set the switch to TONE PULSE If you and your telephone outlet is the second phone line connected to TONE. If you have only single outlet having one line, connect the telephone line cord to the...
..., contact your dialing system Make a trial call waiting" service while a computer or FAX connected to the DATA jack is used for receiving or sending computer or FAX data in on your dialing system, set the DIAL MODE switch as is Tone Pulse Set the switch to TONE PULSE If you and your telephone outlet is the second phone line connected to TONE. If you have only single outlet having one line, connect the telephone line cord to the...

Operating Instructions
Page 18
... phone number will be entered in step 6. • To check the current home area code, perform steps 1 to erase the current home area code. 3 Enter a new home area code using the dialing keys. 6 Press (PGM). To enter the local area code (For 10 digits phone numbers users) If a call does not match one local area code. (Up to five local area codes can be registered with 10 digits in the Caller ID list (1 + area code + number). If a call...
... phone number will be entered in step 6. • To check the current home area code, perform steps 1 to erase the current home area code. 3 Enter a new home area code using the dialing keys. 6 Press (PGM). To enter the local area code (For 10 digits phone numbers users) If a call does not match one local area code. (Up to five local area codes can be registered with 10 digits in the Caller ID list (1 + area code + number). If a call...

Operating Instructions
Page 22
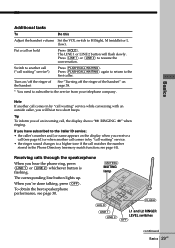
... tone dialing. 9 CONF (conference) button (p. 44) Lets you talk with two parties at the same time. Display window (p. 24, 61) qa OFF button (p. 24) Allows you make or receive a call. 5 INTERCOM button (p. 40) Lets you talk by using the base unit and handset. 6 HOLD button (p. 25) Puts a call . qs FLASH/CALL WAITING button (p. 29, 69) Switches to a second call if you have "call waiting" service, or lets you to disconnect the call on hold. 7 Battery compartment (p. 14) 8 TONE button...
... tone dialing. 9 CONF (conference) button (p. 44) Lets you talk with two parties at the same time. Display window (p. 24, 61) qa OFF button (p. 24) Allows you make or receive a call. 5 INTERCOM button (p. 40) Lets you talk by using the base unit and handset. 6 HOLD button (p. 25) Puts a call . qs FLASH/CALL WAITING button (p. 29, 69) Switches to a second call if you have "call waiting" service, or lets you to disconnect the call on hold. 7 Battery compartment (p. 14) 8 TONE button...
Operating Instructions
Page 24
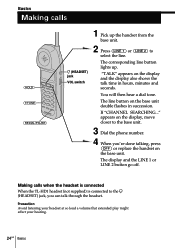
The line button on the base unit double flashes in hours, minutes and seconds. Making calls when the headset is connected When the TL-HD1 headset (not supplied) is connected to the I (HEADSET) jack VOL switch 1 Pick up . The corresponding line button lights up the handset from the base unit. 2 Press (LINE 1) or (LINE 2) to the base unit. 3 Dial the phone number. 4 When you can talk through the headset. The display and the LINE 1 or LINE 2 button go off. Precaution Avoid...
The line button on the base unit double flashes in hours, minutes and seconds. Making calls when the headset is connected When the TL-HD1 headset (not supplied) is connected to the I (HEADSET) jack VOL switch 1 Pick up . The corresponding line button lights up the handset from the base unit. 2 Press (LINE 1) or (LINE 2) to the base unit. 3 Dial the phone number. 4 When you can talk through the headset. The display and the LINE 1 or LINE 2 button go off. Precaution Avoid...
Operating Instructions
Page 25
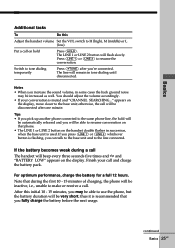
... pick up another phone connected to make or receive a call and charge the battery pack. Finish your conversation is used. The LINE 1 or LINE 2 button will remain in tone dialing until disconnected. You should adjust the volume accordingly. • If your call . The line will flash slowly. otherwise, the call will be inactive, i.e., unable to the same phone line, the hold Press (HOLD). After this Adjust the handset volume Set the VOL switch...
... pick up another phone connected to make or receive a call and charge the battery pack. Finish your conversation is used. The LINE 1 or LINE 2 button will remain in tone dialing until disconnected. You should adjust the volume accordingly. • If your call . The line will flash slowly. otherwise, the call will be inactive, i.e., unable to the same phone line, the hold Press (HOLD). After this Adjust the handset volume Set the VOL switch...
Operating Instructions
Page 28
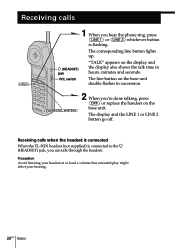
... hear the phone ring, press (LINE 1) or (LINE 2) whichever button is flashing. The line button on the base unit double flashes in succession. (FLASH/CALL WAITING) 2 When you're done talking, press (OFF) or replace the handset on the display and the display also shows the talk time in hours, minutes and seconds. The display and the LINE 1 or LINE 2 button go off. Precaution Avoid listening your headset at so loud a volume that extended play...
... hear the phone ring, press (LINE 1) or (LINE 2) whichever button is flashing. The line button on the base unit double flashes in succession. (FLASH/CALL WAITING) 2 When you're done talking, press (OFF) or replace the handset on the display and the display also shows the talk time in hours, minutes and seconds. The display and the LINE 1 or LINE 2 button go off. Precaution Avoid listening your headset at so loud a volume that extended play...
Operating Instructions
Page 29
... changes to a higher tone if the call matches the number stored in by "call waiting" service while conversing with an outside caller, you receive a call (see page 61) or when another call ("call on hold Press (HOLD). see page 30. (MUTING) MUTING lamp (HOLD) (FLASH) (LINE 1) L1 and L2 RINGER (LINE 2) LEVEL switches (OFF) continued Basics 29US To obtain the best speakerphone performance, see page 61). The LINE 1 or LINE 2 button...
... changes to a higher tone if the call matches the number stored in by "call waiting" service while conversing with an outside caller, you receive a call (see page 61) or when another call ("call on hold Press (HOLD). see page 30. (MUTING) MUTING lamp (HOLD) (FLASH) (LINE 1) L1 and L2 RINGER (LINE 2) LEVEL switches (OFF) continued Basics 29US To obtain the best speakerphone performance, see page 61). The LINE 1 or LINE 2 button...
Operating Instructions
Page 30
... base unit to OFF. • If there is an incoming call on the base unit to a wall, you may not be able to disable the microphone. Set the L1 or L2 RINGER LEVEL switch on hold Press (HOLD). The MUTING lamp lights up. Press (FLASH) again to return to the first caller. * You need to subscribe to resume the conversation. Therefore, use the speakerphone in the telephone...
... base unit to OFF. • If there is an incoming call on the base unit to a wall, you may not be able to disable the microphone. Set the L1 or L2 RINGER LEVEL switch on hold Press (HOLD). The MUTING lamp lights up. Press (FLASH) again to return to the first caller. * You need to subscribe to resume the conversation. Therefore, use the speakerphone in the telephone...

Operating Instructions
Page 42
... the display of the handset and the INTERCOM lamp on the base unit lights up. The call . You can receive an intercom call on the handset even when "RINGER" is set to "RINGER OFF". • If you have accidentally pressed (HOLD) in step 1, just press (INTERCOM) and you will get the same result as by pressing (INTERCOM) only. 42US Telephone Features If no one answers the phone Press...
... the display of the handset and the INTERCOM lamp on the base unit lights up. The call . You can receive an intercom call on the handset even when "RINGER" is set to "RINGER OFF". • If you have accidentally pressed (HOLD) in step 1, just press (INTERCOM) and you will get the same result as by pressing (INTERCOM) only. 42US Telephone Features If no one answers the phone Press...

Operating Instructions
Page 57
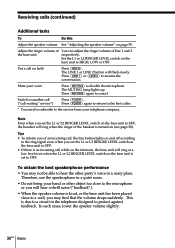
... the base unit. The message will be able to hear incoming calls. • The answering machine will stop , press either to continue recording or to mute the message (see page 54). When a call Press (LINE 1) or (LINE 2) whichever button lights up . Notes • Press (VOLUME)(+) or (-) to exit the menu setup mode. If the speaker volume is set the screening calls function on the base unit. Answering Machine Features 57US Answering Machine Features Screening calls You can screen calls by pressing (LINE 1) or (LINE 2) which is flashing...
... the base unit. The message will be able to hear incoming calls. • The answering machine will stop , press either to continue recording or to mute the message (see page 54). When a call Press (LINE 1) or (LINE 2) whichever button lights up . Notes • Press (VOLUME)(+) or (-) to exit the menu setup mode. If the speaker volume is set the screening calls function on the base unit. Answering Machine Features 57US Answering Machine Features Screening calls You can screen calls by pressing (LINE 1) or (LINE 2) which is flashing...
Operating Instructions
Page 59
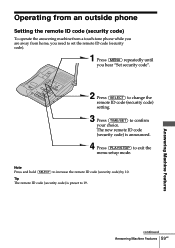
Operating from an outside phone Setting the remote ID code (security code) To operate the answering machine from a touch-tone phone while you are away from home, you need to set the remote ID code (security code). 1 Press (MENU) repeatedly until you hear "Set security code". 2 Press (SELECT) to change the remote ID code (security code) setting. 3 Press (TIME/SET) to exit the menu setup mode. continued Answering Machine Features 59US Answering Machine Features The new remote ID code (security code) is preset to increase the remote ID code (security code) by 10. Note Press...
Operating from an outside phone Setting the remote ID code (security code) To operate the answering machine from a touch-tone phone while you are away from home, you need to set the remote ID code (security code). 1 Press (MENU) repeatedly until you hear "Set security code". 2 Press (SELECT) to change the remote ID code (security code) setting. 3 Press (TIME/SET) to exit the menu setup mode. continued Answering Machine Features 59US Answering Machine Features The new remote ID code (security code) is preset to increase the remote ID code (security code) by 10. Note Press...

Operating Instructions
Page 60
... to operate from an outside phone (continued) Picking up new messages 1 Call your telephone number from a touch-tone phone. 2 When you to see how to skip forward. The number of new messages will be announced. 3 Press the keys in MAILBOX 3 Repeat/skip backward Get help Stop operation Skip forward Record greeting Check greeting Record a memo Erase individual messages Turn answering machine on/off the Remote Control Card and carry it with you hear the greeting, press (#) and enter your security code" is...
... to operate from an outside phone (continued) Picking up new messages 1 Call your telephone number from a touch-tone phone. 2 When you to see how to skip forward. The number of new messages will be announced. 3 Press the keys in MAILBOX 3 Repeat/skip backward Get help Stop operation Skip forward Record greeting Check greeting Record a memo Erase individual messages Turn answering machine on/off the Remote Control Card and carry it with you hear the greeting, press (#) and enter your security code" is...
Operating Instructions
Page 74
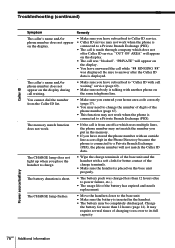
..., checking the redial operations again. The handset does not ring. • Make sure the ringer is weak. LOW" appear on the display. You hear no dial tone. • Make sure the telephone line cord is fully charged (page 14). appears on the base unit to HIGH or LOW. • Make sure the telephone line cord is securely connected to redial. (including the tone and pause digits if used). • The number you dial is set up the base unit correctly beeps...
..., checking the redial operations again. The handset does not ring. • Make sure the ringer is weak. LOW" appear on the display. You hear no dial tone. • Make sure the telephone line cord is fully charged (page 14). appears on the base unit to HIGH or LOW. • Make sure the telephone line cord is securely connected to redial. (including the tone and pause digits if used). • The number you dial is set up the base unit correctly beeps...

Operating Instructions
Page 75
...; Make sure the remote ID code (security code) is incorrect. • Store the correct number (pages 32). Message is not recorded. • The remaining recording time is being used . The line is incorrect. • There was a power interruption. buttons LINE 1 and 2 Phone Directory Intercom Symptom LINE 1 or 2 button flashes when not in use the intercom from the speaker of silence. Remedy • Either the handset or the base unit is less than two seconds in length. Charge...
...; Make sure the remote ID code (security code) is incorrect. • Store the correct number (pages 32). Message is not recorded. • The remaining recording time is being used . The line is incorrect. • There was a power interruption. buttons LINE 1 and 2 Phone Directory Intercom Symptom LINE 1 or 2 button flashes when not in use the intercom from the speaker of silence. Remedy • Either the handset or the base unit is less than two seconds in length. Charge...
Operating Instructions
Page 76
... phone number with another phone on the same telephone line. Charge the battery for better contact of charging to recover to a Private Branch Exchange (PBX). • The call waiting" service (page 69). • Make sure nobody is talking with an outside line access digit in the Phone Directory because the phone is connected to the base unit. • Make sure the battery is inserted in the handset. • The battery may be completely discharged. Power...
... phone number with another phone on the same telephone line. Charge the battery for better contact of charging to recover to a Private Branch Exchange (PBX). • The call waiting" service (page 69). • Make sure nobody is talking with an outside line access digit in the Phone Directory because the phone is connected to the base unit. • Make sure the battery is inserted in the handset. • The battery may be completely discharged. Power...

Operating Instructions
Page 79
... ringer type 37 turning on/off 38 S Screening calls 57 turning on/off the screening calls function 57 Setting up answering machine 47 base unit 10 handset 14 Spare battery 16 Speakerphone 29 Stamping messages with day and time 47, 54 Storing Caller ID data in Phone Directory 66 Switching phones during a call 39 T, U Talking between the phones 40 Three-way conference 44 Toll saver 50 Tone dialing dialing mode 13 switching to 25 Transferring a call 42 Troubleshooting 74 V, W, X, Y, Z Volume handset...
... ringer type 37 turning on/off 38 S Screening calls 57 turning on/off the screening calls function 57 Setting up answering machine 47 base unit 10 handset 14 Spare battery 16 Speakerphone 29 Stamping messages with day and time 47, 54 Storing Caller ID data in Phone Directory 66 Switching phones during a call 39 T, U Talking between the phones 40 Three-way conference 44 Toll saver 50 Tone dialing dialing mode 13 switching to 25 Transferring a call 42 Troubleshooting 74 V, W, X, Y, Z Volume handset...
Warranty Card
Page 1
... Sony service center. ACCESSORIES: Parts and labor for all parts costs. 3. PARTS: In addition, Sony will repair or replace the Product, at no charge, or pay the labor charges to you. Proof of purchase in the form of a bill of the Product, including the antenna. This warranty is invalid if the factory applied serial number has been altered or removed from your authorized dealer, call : Sony Direct...
... Sony service center. ACCESSORIES: Parts and labor for all parts costs. 3. PARTS: In addition, Sony will repair or replace the Product, at no charge, or pay the labor charges to you. Proof of purchase in the form of a bill of the Product, including the antenna. This warranty is invalid if the factory applied serial number has been altered or removed from your authorized dealer, call : Sony Direct...

