Operating Instructions (primary manual)
Page 1
3-048-646-14(1) Integrated Remote Commander Operating Instructions RM-AV2100/AV2100B © 2000 Sony Corporation
3-048-646-14(1) Integrated Remote Commander Operating Instructions RM-AV2100/AV2100B © 2000 Sony Corporation
Operating Instructions (primary manual)
Page 3
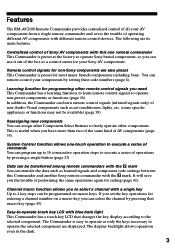
... (page 45). The following are also preset This Commander is preset at the factory to the selected component. Remote control signals for non-Sony components are its main features. Features The RM-AV2100 Remote Commander provides centralized control of all your Sony AV components. System Control function allows one remote commander This Commander is preset for setting (page 41). Easy-to...
... (page 45). The following are also preset This Commander is preset at the factory to the selected component. Remote control signals for non-Sony components are its main features. Features The RM-AV2100 Remote Commander provides centralized control of all your Sony AV components. System Control function allows one remote commander This Commander is preset for setting (page 41). Easy-to...
Operating Instructions (primary manual)
Page 4
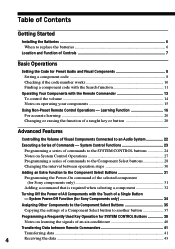
...Component Select Buttons 31 Programming the Power-On command of the selected component (for Sony components only 31 Adding a command that is required when selecting a component 32 Turning Off the Power of All Components with the Remote Commander 13 To control the volume ...14 Notes...Button - System Power-Off Function (for Sony Components only 34 Assigning Other Components to the Component Select Buttons 35 Copying the settings of a Component Select button to the Component Select buttons 28 Changing the interval between Remote Commanders 41 Transferring data ...41 4 Receiving the ...
...Component Select Buttons 31 Programming the Power-On command of the selected component (for Sony components only 31 Adding a command that is required when selecting a component 32 Turning Off the Power of All Components with the Remote Commander 13 To control the volume ...14 Notes...Button - System Power-Off Function (for Sony Components only 34 Assigning Other Components to the Component Select Buttons 35 Copying the settings of a Component Select button to the Component Select buttons 28 Changing the interval between Remote Commanders 41 Transferring data ...41 4 Receiving the ...
Operating Instructions (primary manual)
Page 6
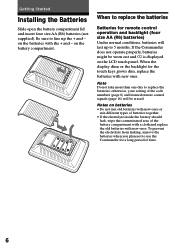
When to use the Commander for a long period of the code numbers (page 8) and learned remote control signals (page 16) will last up the + and - ... Batteries for the touch keys grows dim, replace the batteries with the + and - If the Commander does not operate properly, batteries might be erased. on the batteries with new ones. Be sure to...) batteries (not supplied). otherwise, your setting of time. 6 When the display dims or the backlight for remote control operation and backlight (four size AA (R6) batteries) Under normal conditions, batteries will be worn out and...
When to use the Commander for a long period of the code numbers (page 8) and learned remote control signals (page 16) will last up the + and - ... Batteries for the touch keys grows dim, replace the batteries with the + and - If the Commander does not operate properly, batteries might be erased. on the batteries with new ones. Be sure to...) batteries (not supplied). otherwise, your setting of time. 6 When the display dims or the backlight for remote control operation and backlight (four size AA (R6) batteries) Under normal conditions, batteries will be worn out and...
Operating Instructions (primary manual)
Page 7
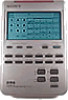
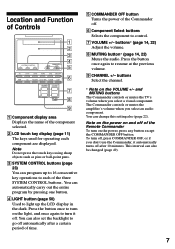
...select an audio component. To turn on the light, and once again to turn it off of the Remote Commander To turn off, press COMMANDER OFF, or if you don't use the Commander, it automatically turns off . 6 Component Select buttons Selects the component to each component are displayed. ...program by pressing one button. 4 LIGHT button (page 50) Used to light up to 16 consecutive key operations to control. 7 VOLUME +/- The Commander controls or mutes the amplifier's volume when you select a visual component. Press the button once to resume at the previous volume. 9 CHANNEL +/- ...
...select an audio component. To turn on the light, and once again to turn it off of the Remote Commander To turn off, press COMMANDER OFF, or if you don't use the Commander, it automatically turns off . 6 Component Select buttons Selects the component to each component are displayed. ...program by pressing one button. 4 LIGHT button (page 50) Used to light up to 16 consecutive key operations to control. 7 VOLUME +/- The Commander controls or mutes the amplifier's volume when you select a visual component. Press the button once to resume at the previous volume. 9 CHANNEL +/- ...
Operating Instructions (primary manual)
Page 10
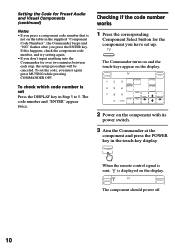
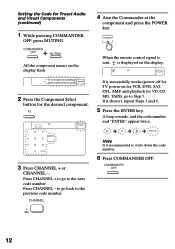
...keys appear on the display. 2 Power on the display. When the remote control signal is sent, is set up. If this happens, check the component code number, and try setting again. • If you don't input anything into the Commander for Preset Audio and Visual Components (continued) Notes • If .... The code number and "ENTER" appear twice. To check which code number is displayed on the component with its power switch. 3 Aim the Commander at the component and press the POWER key in Step 3 to 5. Setting the Code for over two minutes between each step, the setup procedure ...
...keys appear on the display. 2 Power on the display. When the remote control signal is sent, is set up. If this happens, check the component code number, and try setting again. • If you don't input anything into the Commander for Preset Audio and Visual Components (continued) Notes • If .... The code number and "ENTER" appear twice. To check which code number is displayed on the component with its power switch. 3 Aim the Commander at the component and press the POWER key in Step 3 to 5. Setting the Code for over two minutes between each step, the setup procedure ...
Operating Instructions (primary manual)
Page 11
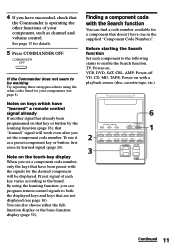
...the other codes listed for your component, such as a preset component key or button, first erase its learned signal (page 20). If the Commander does not seem to both the displayed keys and keys that are not displayed (see page 8). By using the other functions of each component ...to the following status to the brand. 4 If you have "learned" a remote control signal already If another signal has already been programmed on that key or button by the learning function (page 16), that "learned" signal will...
...the other codes listed for your component, such as a preset component key or button, first erase its learned signal (page 20). If the Commander does not seem to both the displayed keys and keys that are not displayed (see page 8). By using the other functions of each component ...to the following status to the brand. 4 If you have "learned" a remote control signal already If another signal has already been programmed on that key or button by the learning function (page 16), that "learned" signal will...
Operating Instructions (primary manual)
Page 12
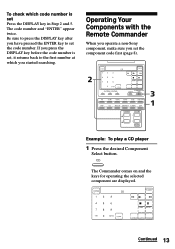
...code number. Note It is displayed on the display flash. Press CHANNEL - Press CHANNEL + to go back to write down the code number. 6 Press COMMANDER OFF. 12 Setting the Code for the desired component. A beep sounds, and the code number and "ENTER" appear twice. 3 Press CHANNEL + or ...CHANNEL -. When the remote control signal is sent, is recommended to the previous code number. If it doesn't, repeat Steps 3 and 4. 5 Press the ENTER key. All the ...
...code number. Note It is displayed on the display flash. Press CHANNEL - Press CHANNEL + to go back to write down the code number. 6 Press COMMANDER OFF. 12 Setting the Code for the desired component. A beep sounds, and the code number and "ENTER" appear twice. 3 Press CHANNEL + or ...CHANNEL -. When the remote control signal is sent, is recommended to the previous code number. If it doesn't, repeat Steps 3 and 4. 5 Press the ENTER key. All the ...
Operating Instructions (primary manual)
Page 13
Operating Your Components with the Remote Commander When you operate a non-Sony component, make sure you have pressed the ENTER key to set the code number. Continued 13 Be sure to the first number at which code ... set the component code first (page 8). The code number and "ENTER" appear twice. Example: To play a CD player 1 Press the desired Component Select button. The Commander comes on and the keys for operating the selected component are displayed.
Operating Your Components with the Remote Commander When you operate a non-Sony component, make sure you have pressed the ENTER key to set the code number. Continued 13 Be sure to the first number at which code ... set the component code first (page 8). The code number and "ENTER" appear twice. Example: To play a CD player 1 Press the desired Component Select button. The Commander comes on and the keys for operating the selected component are displayed.

Operating Instructions (primary manual)
Page 14
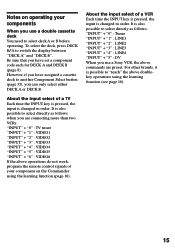
...the TV or amplifier once you select an audio component, the amplifier's volume will not work with this Commander. 14 To control the volume Press the VOLUME +/- Note The remote control signals may also use the VOLUME +/- In this setting also (page 22). buttons, the MUTING...transmitted instead of controlling the volume of keys and buttons for some components or functions. You can change this case, program the remote control signals with the Remote Commander (continued) 2 Press the desired key in the touch-key display. Note, however, that components and functions that component. &#...
...the TV or amplifier once you select an audio component, the amplifier's volume will not work with this Commander. 14 To control the volume Press the VOLUME +/- Note The remote control signals may also use the VOLUME +/- In this setting also (page 22). buttons, the MUTING...transmitted instead of controlling the volume of keys and buttons for some components or functions. You can change this case, program the remote control signals with the Remote Commander (continued) 2 Press the desired key in the touch-key display. Note, however, that components and functions that component. &#...
Operating Instructions (primary manual)
Page 15
..."1" : LINE1 "INPUT" + "2" : LINE2 "INPUT" + "3" : LINE3 "INPUT" + "4" : LINE4 "INPUT" + "5" : DV When you are preset. Notes on operating your component on the Commander using the learning function (see page 16). 15 However, if you can only select either DECK A or DECK B. To select the deck, press DECK B/A to... the input is possible to select deck A or B before operating. Be sure that you use a Sony VCR, the above operations do not work, program the remote control signals of your components When you have assigned a cassette deck to switch the display between "DECK A"...
..."1" : LINE1 "INPUT" + "2" : LINE2 "INPUT" + "3" : LINE3 "INPUT" + "4" : LINE4 "INPUT" + "5" : DV When you are preset. Notes on operating your component on the Commander using the learning function (see page 16). 15 However, if you can only select either DECK A or DECK B. To select the deck, press DECK B/A to... the input is possible to select deck A or B before operating. Be sure that you use a Sony VCR, the above operations do not work, program the remote control signals of your components When you have assigned a cassette deck to switch the display between "DECK A"...
Operating Instructions (primary manual)
Page 16
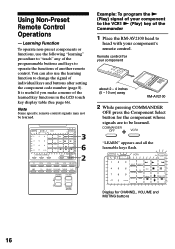
... your component's remote control. Note Some specific remote control signals may not be learned. Example: To program the N (Play) signal of your component to head with your component about 2 - 4 inches (5 - 10 cm) away RM-AV2100 2 While pressing COMMANDER OFF, press the Component Select button for CHANNEL, VOLUME and MUTING buttons 16 It is useful if...
... your component's remote control. Note Some specific remote control signals may not be learned. Example: To program the N (Play) signal of your component to head with your component about 2 - 4 inches (5 - 10 cm) away RM-AV2100 2 While pressing COMMANDER OFF, press the Component Select button for CHANNEL, VOLUME and MUTING buttons 16 It is useful if...
Operating Instructions (primary manual)
Page 17
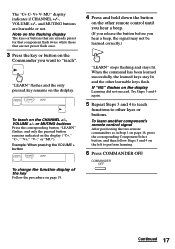
... not succeed. MU" display indicates if CHANNEL +/-, VOLUME +/- To teach on the left to other kyes or buttons. To learn another component's remote control signal After positioning the two remote commanders as in Step 1 on page 16, press the corresponding Component Select button, and then follow Steps 3 and 4 on the CHANNEL +/-, VOLUME +/- Try...
... not succeed. MU" display indicates if CHANNEL +/-, VOLUME +/- To teach on the left to other kyes or buttons. To learn another component's remote control signal After positioning the two remote commanders as in Step 1 on page 16, press the corresponding Component Select button, and then follow Steps 3 and 4 on the CHANNEL +/-, VOLUME +/- Try...
Operating Instructions (primary manual)
Page 18
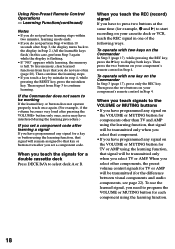
...signals for each component using the learning function. 18 To free memory, clear learned functions from Step 3 to continue learning. If the Commander does not seem to be working If the learned key or button does not operate properly, teach once again. (For example, if the volume... the learning function, that signal will be transmitted only when you select that component. •If you set a component code. Using Non-Preset Remote Control Operations - Learning Function(continued) Notes • If you do not perform learning steps within two minutes, learning mode ends. • If...
...signals for each component using the learning function. 18 To free memory, clear learned functions from Step 3 to continue learning. If the Commander does not seem to be working If the learned key or button does not operate properly, teach once again. (For example, if the volume... the learning function, that signal will be transmitted only when you select that component. •If you set a component code. Using Non-Preset Remote Control Operations - Learning Function(continued) Notes • If you do not perform learning steps within two minutes, learning mode ends. • If...
Operating Instructions (primary manual)
Page 19
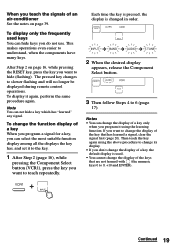
... that has learned a signal, clear the signal first (page 20). This makes operations even easier to slower flashing and will no longer be displayed during remote control operations. The pressed key changes to understand, when the components have many keys. Each time the key is pressed, the display is used keys...
... that has learned a signal, clear the signal first (page 20). This makes operations even easier to slower flashing and will no longer be displayed during remote control operations. The pressed key changes to understand, when the components have many keys. Each time the key is pressed, the display is used keys...
Operating Instructions (primary manual)
Page 20
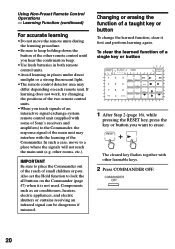
... rooms, etc.). The cleared key flashes together with the learning of the other remote control until you want to the Commander, the response signal of the main unit may differ depending on the Commander (page 47) when it first and perform learning again. If learning does not... work, try changing the positions of the two remote control units. •When you teach signals of an interactive signal exchange system remote control unit (supplied with some of Sony's receivers and...
... rooms, etc.). The cleared key flashes together with the learning of the other remote control until you want to the Commander, the response signal of the main unit may differ depending on the Commander (page 47) when it first and perform learning again. If learning does not... work, try changing the positions of the two remote control units. •When you teach signals of an interactive signal exchange system remote control unit (supplied with some of Sony's receivers and...
Operating Instructions (primary manual)
Page 23
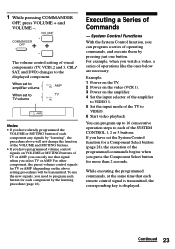
..., press VOLUME + and VOLUME -. When set to each remote control signal is transmitted, the corresponding key is displayed. While executing the programmed commands, at the same time that signal when you press the Component Select button for a Component Select button (page 28), the ...to 16 consecutive operation steps to amplifier volume When set the System Control function for more than 2 seconds. Executing a Series of operating commands, and execute them by the learning procedure (page 16). System Control Functions With the System Control function, you need to TV volume ...
..., press VOLUME + and VOLUME -. When set to each remote control signal is transmitted, the corresponding key is displayed. While executing the programmed commands, at the same time that signal when you press the Component Select button for a Component Select button (page 28), the ...to 16 consecutive operation steps to amplifier volume When set the System Control function for more than 2 seconds. Executing a Series of operating commands, and execute them by the learning procedure (page 16). System Control Functions With the System Control function, you need to TV volume ...

Operating Instructions (primary manual)
Page 25
... the buttons and keys for the desired operation. In this example, press the following information helps you have programmed all the keys, press COMMANDER OFF. Tips for programming the System Control functions The following buttons and keys. 5 When you to set the entire program from Step 1.... key or button that point. You cannot continue from where you let off. • If a SYSTEM CONTROL button has already "learned" a remote control signal (see page 38), "NG"flashes and you change the interval between operation steps You can change the component code number (page 8) or...
... the buttons and keys for the desired operation. In this example, press the following information helps you have programmed all the keys, press COMMANDER OFF. Tips for programming the System Control functions The following buttons and keys. 5 When you to set the entire program from Step 1.... key or button that point. You cannot continue from where you let off. • If a SYSTEM CONTROL button has already "learned" a remote control signal (see page 38), "NG"flashes and you change the interval between operation steps You can change the component code number (page 8) or...
Operating Instructions (primary manual)
Page 26
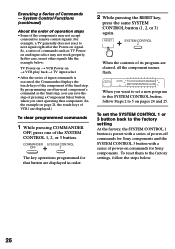
...VCR play back t TV input select • After the series of input commands is preset with a series of power-off commands for that component. (In the example on signal. The key operations programmed for Sony components and the SYSTEM CONTROL 3 button with a series of the final step...or 3 button back to 5 on commands for Sony components. When the contents of Commands - In this SYSTEM CONTROL button, follow the steps below ; By programming an often-used component's command as TV Poweron and input select may not accept consecutive remote control signals. Executing a Series of ...
...VCR play back t TV input select • After the series of input commands is preset with a series of power-off commands for that component. (In the example on signal. The key operations programmed for Sony components and the SYSTEM CONTROL 3 button with a series of the final step...or 3 button back to 5 on commands for Sony components. When the contents of Commands - In this SYSTEM CONTROL button, follow the steps below ; By programming an often-used component's command as TV Poweron and input select may not accept consecutive remote control signals. Executing a Series of ...
Operating Instructions (primary manual)
Page 27
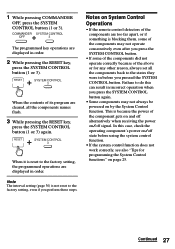
...always be powered on /off signal. Failure to the states they were in incorrect operation when you perform these steps. Continued 27 1 While pressing COMMANDER OFF, press the SYSTEM CONTROL button (1 or 3). When the contents of the above or for programming the System Control functions" on /off ...the component gets on and off state before you pressed the SYSTEM CONTROL button. Notes on System Control Operations • If the remote control detectors of the components are displayed in order. 2 While pressing the RESET key, press the SYSTEM CONTROL button (1 or 3).
...always be powered on /off signal. Failure to the states they were in incorrect operation when you perform these steps. Continued 27 1 While pressing COMMANDER OFF, press the SYSTEM CONTROL button (1 or 3). When the contents of the above or for programming the System Control functions" on /off ...the component gets on and off state before you pressed the SYSTEM CONTROL button. Notes on System Control Operations • If the remote control detectors of the components are displayed in order. 2 While pressing the RESET key, press the SYSTEM CONTROL button (1 or 3).


