Operating Instructions (primary manual)
Page 3
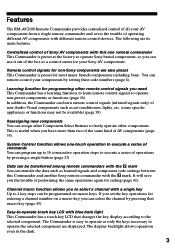
...). Remote control signals for most major brands components including Sony. Reassigning new components You can program up to 16 consecutive operation steps to select a channel with the mark. Data can be transferred among remote commanders with the mark You can transfer the data such as learned signals and component code settings between this one -touch operation to execute a series of commands You can assign other Component Select Buttons to operate non-preset components or functions...
...). Remote control signals for most major brands components including Sony. Reassigning new components You can program up to 16 consecutive operation steps to select a channel with the mark. Data can be transferred among remote commanders with the mark You can transfer the data such as learned signals and component code settings between this one -touch operation to execute a series of commands You can assign other Component Select Buttons to operate non-preset components or functions...
Operating Instructions (primary manual)
Page 4
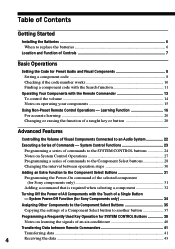
... Sony Components only 34 Assigning Other Components to the Component Select Buttons 35 Copying the settings of a Component Select button to another button 37 Programming a Frequently Used Key Operation for SYSTEM CONTROL Buttons 38 Notes on learning the signals of an air-conditioner 40 Transferring Data between operation steps 30 Adding an Extra Function to the Component Select Buttons 31 Programming the Power-On command of the selected component (for Preset Audio and Visual Components 8 Setting a component code 8 Checking if the code number works...
... Sony Components only 34 Assigning Other Components to the Component Select Buttons 35 Copying the settings of a Component Select button to another button 37 Programming a Frequently Used Key Operation for SYSTEM CONTROL Buttons 38 Notes on learning the signals of an air-conditioner 40 Transferring Data between operation steps 30 Adding an Extra Function to the Component Select Buttons 31 Programming the Power-On command of the selected component (for Preset Audio and Visual Components 8 Setting a component code 8 Checking if the code number works...
Operating Instructions (primary manual)
Page 5
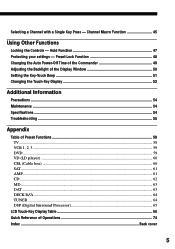
... ...54 Specifications ...54 Troubleshooting ...55 Appendix Table of Preset Functions ...58 TV...58 VCR 1, 2, 3...59 DVD ...59 VD (LD player) ...60 CBL (Cable box) ...60 SAT ...61 AMP ...61 CD ...62 MD ...63 DAT ...63 DECK B/A ...64 TUNER ...64 DSP (Digital Surround Processor 65 LCD Touch-Key Display Table 66 Quick Reference of Operations 74 Index ...Back cover 5 Hold Function 47 Protecting your settings - Channel Macro Function 45 Using Other Functions Locking the Controls -
... ...54 Specifications ...54 Troubleshooting ...55 Appendix Table of Preset Functions ...58 TV...58 VCR 1, 2, 3...59 DVD ...59 VD (LD player) ...60 CBL (Cable box) ...60 SAT ...61 AMP ...61 CD ...62 MD ...63 DAT ...63 DECK B/A ...64 TUNER ...64 DSP (Digital Surround Processor 65 LCD Touch-Key Display Table 66 Quick Reference of Operations 74 Index ...Back cover 5 Hold Function 47 Protecting your settings - Channel Macro Function 45 Using Other Functions Locking the Controls -
Operating Instructions (primary manual)
Page 7
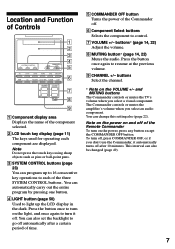
... . 6 Component Select buttons Selects the component to control. 7 VOLUME +/- buttons Select the channel. * Note on the light, and once again to turn on the VOLUME +/- Location and Function of Controls 1 Component display area Displays the name of the component selected. 2 LCD touch key display (page 11) The keys used for operating each of the Commander off . buttons* (page 14, 22) Adjust the volume. 8 MUTING button* (page 14, 22) Mutes the audio. and MUTING buttons The Commander controls or mutes the TV's volume...
... . 6 Component Select buttons Selects the component to control. 7 VOLUME +/- buttons Select the channel. * Note on the light, and once again to turn on the VOLUME +/- Location and Function of Controls 1 Component display area Displays the name of the component selected. 2 LCD touch key display (page 11) The keys used for operating each of the Commander off . buttons* (page 14, 22) Adjust the volume. 8 MUTING button* (page 14, 22) Mutes the audio. and MUTING buttons The Commander controls or mutes the TV's volume...
Operating Instructions (primary manual)
Page 9
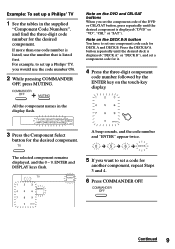
... code number and "ENTER" appear twice. The selected component remains displayed, and the 0 - 9, ENTER and DISPLAY keys flash. 5 If you want to set up a Philips' TV 1 See the tables in the display flash. 3 Press the Component Select button for the desired component. Note on the DVD and CBL/SAT buttons When you set the component code of the DVD or CBL/SAT button, press repeatedly until the desired deck is listed, use the code number 056. 2 While pressing COMMANDER...
... code number and "ENTER" appear twice. The selected component remains displayed, and the 0 - 9, ENTER and DISPLAY keys flash. 5 If you want to set up a Philips' TV 1 See the tables in the display flash. 3 Press the Component Select button for the desired component. Note on the DVD and CBL/SAT buttons When you set the component code of the DVD or CBL/SAT button, press repeatedly until the desired deck is listed, use the code number 056. 2 While pressing COMMANDER...
Operating Instructions (primary manual)
Page 10
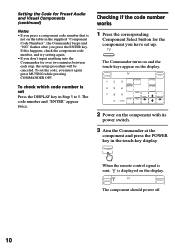
... ENTER key. To set the code, you have set Press the DISPLAY key in the touch-key display. Checking if the code number works 1 Press the corresponding Component Select button for over two minutes between each step, the setup procedure will be canceled. The Commander turns on and the touch-keys appear on the display. 2 Power on the display. To check which code number is displayed on the component with its power switch. 3 Aim the Commander at the component...
... ENTER key. To set the code, you have set Press the DISPLAY key in the touch-key display. Checking if the code number works 1 Press the corresponding Component Select button for over two minutes between each step, the setup procedure will be canceled. The Commander turns on and the touch-keys appear on the display. 2 Power on the display. To check which code number is displayed on the component with its power switch. 3 Aim the Commander at the component...
Operating Instructions (primary manual)
Page 11
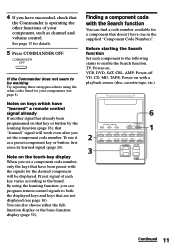
... component will work even after you set a component code number, only the keys that have been preset with a playback source (disc, cassette tape, etc.) Continued 11 TV: Power-on VCR, DVD, SAT, CBL, AMP: Power-off VD, CD, MD, TAPE: Power-on that key or button by the learning function (page 16), that "learned" signal will be working Try repeating these setup procedures using the learning function, you can program remote control signals to the brand. You can find a code number...
... component will work even after you set a component code number, only the keys that have been preset with a playback source (disc, cassette tape, etc.) Continued 11 TV: Power-on VCR, DVD, SAT, CBL, AMP: Power-off VD, CD, MD, TAPE: Power-on that key or button by the learning function (page 16), that "learned" signal will be working Try repeating these setup procedures using the learning function, you can program remote control signals to the brand. You can find a code number...
Operating Instructions (primary manual)
Page 12
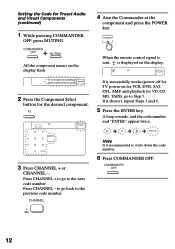
.... 3 Press CHANNEL + or CHANNEL -. Press CHANNEL - If it successfully works (power-off for TV, power-on for VCR, DVD, SAT, CBL, AMP, and playback for VD, CD, MD, TAPE), go to the previous code number. If it doesn't, repeat Steps 3 and 4. 5 Press the ENTER key. Press CHANNEL + to go back to Step 5. All the component names on the display. 2 Press the Component Select button for Preset Audio and Visual Components (continued) 1 While pressing COMMANDER OFF...
.... 3 Press CHANNEL + or CHANNEL -. Press CHANNEL - If it successfully works (power-off for TV, power-on for VCR, DVD, SAT, CBL, AMP, and playback for VD, CD, MD, TAPE), go to the previous code number. If it doesn't, repeat Steps 3 and 4. 5 Press the ENTER key. Press CHANNEL + to go back to Step 5. All the component names on the display. 2 Press the Component Select button for Preset Audio and Visual Components (continued) 1 While pressing COMMANDER OFF...

Operating Instructions (primary manual)
Page 14
... done using the learning function, that component. • If you have programmed any component using the learning function (page 16), that signal will not work with the learning function (see page 16). You can change this Commander. 14 Operating Your Components with the Remote Commander (continued) 2 Press the desired key in the touch-key display. buttons if necessary. Notes • If you have assigned another components, the preset volume control signals for the functions of the TV or...
... done using the learning function, that component. • If you have programmed any component using the learning function (page 16), that signal will not work with the learning function (see page 16). You can change this Commander. 14 Operating Your Components with the Remote Commander (continued) 2 Press the desired key in the touch-key display. buttons if necessary. Notes • If you have assigned another components, the preset volume control signals for the functions of the TV or...
Operating Instructions (primary manual)
Page 15
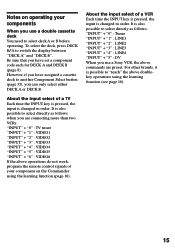
... Component Select button (page 35), you have set a component code each for DECK A and DECK B (page 8). However, if you have assigned a cassette deck to "teach" the above commands are connecting more than two VCRs. "INPUT" + "0" : TV tuner "INPUT" + "1" : VIDEO1 "INPUT" + "2" : VIDEO2 "INPUT" + "3" : VIDEO3 "INPUT" + "4" : VIDEO4 "INPUT" + "5" : VIDEO5 "INPUT" + "6" : VIDEO6 If the above operations do not work, program the remote control signals of your component on operating your components When you use a Sony VCR, the above doublekey operations using the learning function...
... Component Select button (page 35), you have set a component code each for DECK A and DECK B (page 8). However, if you have assigned a cassette deck to "teach" the above commands are connecting more than two VCRs. "INPUT" + "0" : TV tuner "INPUT" + "1" : VIDEO1 "INPUT" + "2" : VIDEO2 "INPUT" + "3" : VIDEO3 "INPUT" + "4" : VIDEO4 "INPUT" + "5" : VIDEO5 "INPUT" + "6" : VIDEO6 If the above operations do not work, program the remote control signals of your component on operating your components When you use a Sony VCR, the above doublekey operations using the learning function...
Operating Instructions (primary manual)
Page 16
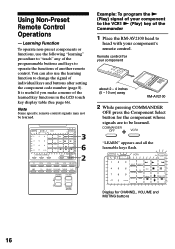
... component about 2 - 4 inches (5 - 10 cm) away RM-AV2100 2 While pressing COMMANDER OFF, press the Component Select button for CHANNEL, VOLUME and MUTING buttons 16 Note Some specific remote control signals may not be learned. Remote control for your component's remote control. Using Non-Preset Remote Control Operations - You can also use the following "learning" procedure to "teach" any of the programmable buttons and keys to be learned. Display for the component whose signals are to operate the functions of individual keys and buttons after setting the component code number...
... component about 2 - 4 inches (5 - 10 cm) away RM-AV2100 2 While pressing COMMANDER OFF, press the Component Select button for CHANNEL, VOLUME and MUTING buttons 16 Note Some specific remote control signals may not be learned. Remote control for your component's remote control. Using Non-Preset Remote Control Operations - You can also use the following "learning" procedure to "teach" any of the programmable buttons and keys to be learned. Display for the component whose signals are to operate the functions of individual keys and buttons after setting the component code number...
Operating Instructions (primary manual)
Page 18
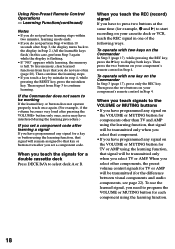
... Commander does not seem to the display in step 4, while pressing the RESET key, press the mistaken key. When you set a component code after Step 3, the display turns back to be transmitted (for TV or AMP will be transmitted only when you select that key or button even after you select other than TV and AMP using the learning function, that signal will be working If the learned key or button does not operate...
... Commander does not seem to the display in step 4, while pressing the RESET key, press the mistaken key. When you set a component code after Step 3, the display turns back to be transmitted (for TV or AMP will be transmitted only when you select that key or button even after you select other than TV and AMP using the learning function, that signal will be working If the learned key or button does not operate...
Operating Instructions (primary manual)
Page 23
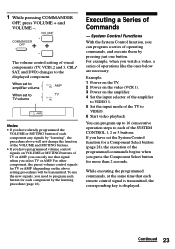
.... Example: 1 Power on the TV. 2 Power on the video (VCR 1). 3 Power on VOLUME or MUTING buttons of operating commands, and execute them by pressing just one button. Continued 23 For other component, the preset volume control signals for more than 2 seconds. System Control Functions With the System Control function, you need to program each button for each remote control signal is transmitted, the corresponding key is displayed. When set to each component any signals by the learning procedure (page...
.... Example: 1 Power on the TV. 2 Power on the video (VCR 1). 3 Power on VOLUME or MUTING buttons of operating commands, and execute them by pressing just one button. Continued 23 For other component, the preset volume control signals for more than 2 seconds. System Control Functions With the System Control function, you need to program each button for each remote control signal is transmitted, the corresponding key is displayed. When set to each component any signals by the learning procedure (page...

Operating Instructions (primary manual)
Page 25
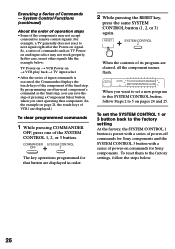
... Control functions The following information helps you interrupt the procedure at any point for over two minutes, the setting mode ends and the series of commands will be programmed to program a consecutive operation steps. About the interval between operation steps You can change the component code number (page 8) or program a new signal by mistake, start again from Step 1 to power on the TV, press the POWER (or POWER ON) key. 4 Repeat Steps 2 and 3 and program the buttons...
... Control functions The following information helps you interrupt the procedure at any point for over two minutes, the setting mode ends and the series of commands will be programmed to program a consecutive operation steps. About the interval between operation steps You can change the component code number (page 8) or program a new signal by mistake, start again from Step 1 to power on the TV, press the POWER (or POWER ON) key. 4 Repeat Steps 2 and 3 and program the buttons...
Operating Instructions (primary manual)
Page 26
... operating that button are displayed in order. 2 While pressing the RESET key, press the same SYSTEM CONTROL button (1, 2, or 3) again. TV Power-on t VCR Power-on t VCR play back t TV input select • After the series of input commands is preset with a series of power-off commands for Sony components and the SYSTEM CONTROL 3 button with a series of the components may not work properly. When the contents of the final step. In this SYSTEM CONTROL button, follow the steps...
... operating that button are displayed in order. 2 While pressing the RESET key, press the same SYSTEM CONTROL button (1, 2, or 3) again. TV Power-on t VCR Power-on t VCR play back t TV input select • After the series of input commands is preset with a series of power-off commands for Sony components and the SYSTEM CONTROL 3 button with a series of the components may not work properly. When the contents of the final step. In this SYSTEM CONTROL button, follow the steps...
Operating Instructions (primary manual)
Page 32
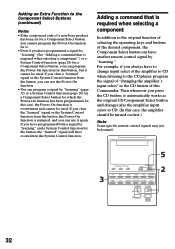
... works as the original CD Component Select button and changes also the amplifier input select to CD. (In this Commander. Then whenever you have programmed both a signal by "learning" and a System Control function for which the Power-On function has been programmed. Adding an Extra Function to the Component Select Buttons (continued) Notes • If the component code of a non-Sony product has been set for a Component Select button, you cannot program the Power...
... works as the original CD Component Select button and changes also the amplifier input select to CD. (In this Commander. Then whenever you have programmed both a signal by "learning" and a System Control function for which the Power-On function has been programmed. Adding an Extra Function to the Component Select Buttons (continued) Notes • If the component code of a non-Sony product has been set for a Component Select button, you cannot program the Power...
Operating Instructions (primary manual)
Page 43
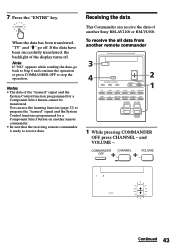
... transferred, "TV" and "M" go back to Step 6 and continue the operation or press COMMANDER OFF to program the "learned" signal and the System Control functions programmed for a Component Select button cannot be transferred. Note If "NG" appears while sending the data, go off . To receive the all data from another Sony RM-AV2100 or RM-VL900. Receiving the data This Commander can use the learning function (page 32) to stop the operation. Continued...
... transferred, "TV" and "M" go back to Step 6 and continue the operation or press COMMANDER OFF to program the "learned" signal and the System Control functions programmed for a Component Select button cannot be transferred. Note If "NG" appears while sending the data, go off . To receive the all data from another Sony RM-AV2100 or RM-VL900. Receiving the data This Commander can use the learning function (page 32) to stop the operation. Continued...
Operating Instructions (primary manual)
Page 55
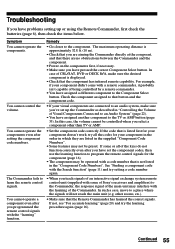
... some of Sony's receivers and amplifiers) to the Commander, the response signal of the main unit may interfere with the learning of the Commander. You cannot control the volume. See "Finding a component code with the Search function" (page 11) and try the learning procedure again (page 16). In case of CBL/SAT, DVD or DECK B/A, make sure you've set the component codes, then use the learning function to program the remote control signals...
... some of Sony's receivers and amplifiers) to the Commander, the response signal of the main unit may interfere with the learning of the Commander. You cannot control the volume. See "Finding a component code with the Search function" (page 11) and try the learning procedure again (page 16). In case of CBL/SAT, DVD or DECK B/A, make sure you've set the component codes, then use the learning function to program the remote control signals...
Operating Instructions (primary manual)
Page 76
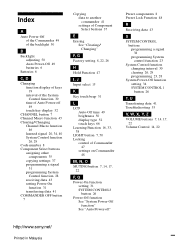
... H Hold Function 47 I, J Input select 15 K Key touch beep 51 L LCD Auto-Off time 49 brightness 50 display type 52 touch keys 66 Learning Function 16, 33, 38 LIGHT button 7, 50 Locking control of Commander 47 settings on Commander 48 M, N, O MUTING button 7, 14, 17, 22 P, Q Power-On function setting 31 SYSTEM CONTROL3 button 26 Power-Off function See "System Power-Off function" See "Auto Power-off" Preset components 8 Preset Lock Function 48 R Receiving data 43 S SYSTEM CONTROL buttons programming a signal 38 programming System control function 23 System Control function changing interval...
... H Hold Function 47 I, J Input select 15 K Key touch beep 51 L LCD Auto-Off time 49 brightness 50 display type 52 touch keys 66 Learning Function 16, 33, 38 LIGHT button 7, 50 Locking control of Commander 47 settings on Commander 48 M, N, O MUTING button 7, 14, 17, 22 P, Q Power-On function setting 31 SYSTEM CONTROL3 button 26 Power-Off function See "System Power-Off function" See "Auto Power-off" Preset components 8 Preset Lock Function 48 R Receiving data 43 S SYSTEM CONTROL buttons programming a signal 38 programming System control function 23 System Control function changing interval...
Warranty Card
Page 1
..., including the antenna. This warranty does not cover customer instruction, installation, set up adjustments or signal reception problems. This warranty does not cover cosmetic damage or damage due to any Sony authorized service facility. ACCESSORIES: Parts and labor for all accessories are for all parts costs. 3. This warranty gives you specific legal rights, and you may not apply to any...
..., including the antenna. This warranty does not cover customer instruction, installation, set up adjustments or signal reception problems. This warranty does not cover cosmetic damage or damage due to any Sony authorized service facility. ACCESSORIES: Parts and labor for all accessories are for all parts costs. 3. This warranty gives you specific legal rights, and you may not apply to any...


