
Operating Instructions
Page 4
... Layer 3) is a standard format defined by ISO/MPEG which compresses audio data. 4 You can also use the controls on the recorder if they have the same or similar names as those on the remote. • The on-screen display illustrations used in this manual may not match the graphics displayed on your...music CD format Functions available for DATA CDs (CD-Rs/CD-RWs containing MP3* audio tracks or JPEG files) Functions available for DATA DVDs (DVD+RWs/DVD-RWs/ DVD+Rs/DVD-Rs containing MP3* audio tracks or JPEG files) Functions available for music CDs or CD-Rs/CD-RWs in this manual refer to ...
... Layer 3) is a standard format defined by ISO/MPEG which compresses audio data. 4 You can also use the controls on the recorder if they have the same or similar names as those on the remote. • The on-screen display illustrations used in this manual may not match the graphics displayed on your...music CD format Functions available for DATA CDs (CD-Rs/CD-RWs containing MP3* audio tracks or JPEG files) Functions available for DATA DVDs (DVD+RWs/DVD-RWs/ DVD+Rs/DVD-Rs containing MP3* audio tracks or JPEG files) Functions available for music CDs or CD-Rs/CD-RWs in this manual refer to ...

Operating Instructions
Page 19
You can control the recorder using the remote, point it at the remote sensor on the recorder. You can operate the recorder only after all connections are complete. Insert two size AA (R6) batteries by matching the 3 and # ends on the front panel) to the remote. • With normal use,... AUDIO OUT COMPONENT VIDEO OUT S VID L Y R PB DIGITAL AUDIO OUT PR OPTICAL COAXIAL Notes • If the supplied remote interferes your other Sony DVD recorder or player, change the command mode number for an extended period of different manufacturers. - After you connect the power cord, you...
You can control the recorder using the remote, point it at the remote sensor on the recorder. You can operate the recorder only after all connections are complete. Insert two size AA (R6) batteries by matching the 3 and # ends on the front panel) to the remote. • With normal use,... AUDIO OUT COMPONENT VIDEO OUT S VID L Y R PB DIGITAL AUDIO OUT PR OPTICAL COAXIAL Notes • If the supplied remote interferes your other Sony DVD recorder or player, change the command mode number for an extended period of different manufacturers. - After you connect the power cord, you...

Operating Instructions
Page 20
... connect the recorder to an AV amplifier (receiver), you find the one at a time until you can adjust the remote control's signal to control your TV. Set the appropriate code number again. When the TV/DVD·VIDEO switch is listed, try entering them one that works with the remote You can ...also use the supplied remote to or from the wide mode of a Sony wide-screen TV ...
... connect the recorder to an AV amplifier (receiver), you find the one at a time until you can adjust the remote control's signal to control your TV. Set the appropriate code number again. When the TV/DVD·VIDEO switch is listed, try entering them one that works with the remote You can ...also use the supplied remote to or from the wide mode of a Sony wide-screen TV ...

Operating Instructions
Page 21
...Manufacturer Code number Sony 78, 79, 80, 91 Denon 84, 85, 86 Kenwood 92, 93 Onkyo 81, 82, 83 Pioneer 99 Sansui 87 Technics 97, 98 Yamaha 94, 95, 96 Controlling the volume of controllable AV amplifiers (receivers) If more than one that works with the remote TV/DVD·VIDEO switch ..."/1 Number buttons VOL +/- 1 Slide the TV/DVD·VIDEO switch to DVD·VIDEO, repeat the steps above and enter...
...Manufacturer Code number Sony 78, 79, 80, 91 Denon 84, 85, 86 Kenwood 92, 93 Onkyo 81, 82, 83 Pioneer 99 Sansui 87 Technics 97, 98 Yamaha 94, 95, 96 Controlling the volume of controllable AV amplifiers (receivers) If more than one that works with the remote TV/DVD·VIDEO switch ..."/1 Number buttons VOL +/- 1 Slide the TV/DVD·VIDEO switch to DVD·VIDEO, repeat the steps above and enter...

Operating Instructions
Page 91
The recorder controls the digital video camera for the recorder to a DVD (One Touch Dubbing) +RW -RWVR -RWVideo +R -R You can also perform One Touch Dubbing when you switch the audio sampling mode (48 kHz/16 bits t 32 kHz/12 bits). z Hint You can record the entire contents of a DV/D8 format tape onto a ...Dubbing From a DV/D8 Format Tape to a DVD" (page 89), and press ONE TOUCH DUBBING on the remote. Note that it may occur when you select "DV/D8 One Touch Dubbing" and press ENTER in the digital video camera and then starts recording the tape contents from the beginning. • Noise...
The recorder controls the digital video camera for the recorder to a DVD (One Touch Dubbing) +RW -RWVR -RWVideo +R -R You can also perform One Touch Dubbing when you switch the audio sampling mode (48 kHz/16 bits t 32 kHz/12 bits). z Hint You can record the entire contents of a DV/D8 format tape onto a ...Dubbing From a DV/D8 Format Tape to a DVD" (page 89), and press ONE TOUCH DUBBING on the remote. Note that it may occur when you select "DV/D8 One Touch Dubbing" and press ENTER in the digital video camera and then starts recording the tape contents from the beginning. • Noise...

Operating Instructions
Page 107
... seconds until "SONY DVD" appears in the front panel display. , When static electricity, etc., causes the recorder to the remote. , The same command mode is set for a while, plug it off for the recorder and remote. The disc tray does not open after Synchro-Recording is set .... recorder for the recorder (page 24). This is because the recorder is locked. The SYNCHRO REC indicator flashes after you replaced the batteries. Remote control The remote does not function. , Batteries are set for a while, then re-connect the power cord, and press "/1 on the recorder. Other Sony ...
... seconds until "SONY DVD" appears in the front panel display. , When static electricity, etc., causes the recorder to the remote. , The same command mode is set for a while, plug it off for the recorder and remote. The disc tray does not open after Synchro-Recording is set .... recorder for the recorder (page 24). This is because the recorder is locked. The SYNCHRO REC indicator flashes after you replaced the batteries. Remote control The remote does not function. , Batteries are set for a while, then re-connect the power cord, and press "/1 on the recorder. Other Sony ...
Operating Instructions
Page 110
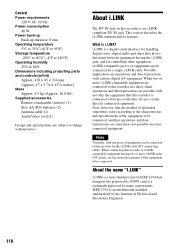
...equipment having the i.LINK jack, and for IEEE 1394 data transport bus proposed by many corporations. When connecting this recorder is a trademark approved by SONY, and is an i.LINKcompliant DV IN jack. About the name "i.LINK" i.LINK is connected to but also ...°F) Operating humidity 25% to 80% Dimensions including projecting parts and controls (w/h/d) Approx. 430 × 85 × 334 mm (Approx. 17 × 3 3/8 × 131/4 inches) Mass Approx. 4.9 kg (Approx. 10.8 lbs) Supplied accessories Remote commander (remote) (1) Size AA (R6) batteries (2) Antenna cable (1) Audio/video cord...
...equipment having the i.LINK jack, and for IEEE 1394 data transport bus proposed by many corporations. When connecting this recorder is a trademark approved by SONY, and is an i.LINKcompliant DV IN jack. About the name "i.LINK" i.LINK is connected to but also ...°F) Operating humidity 25% to 80% Dimensions including projecting parts and controls (w/h/d) Approx. 430 × 85 × 334 mm (Approx. 17 × 3 3/8 × 131/4 inches) Mass Approx. 4.9 kg (Approx. 10.8 lbs) Supplied accessories Remote commander (remote) (1) Size AA (R6) batteries (2) Antenna cable (1) Audio/video cord...
Operating Instructions
Page 112
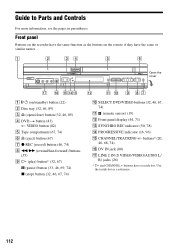
... on /standby) button (22) B Disc tray (32, 46, 89) C A (open/close) button (32, 46, 89) D DVD t button (83) T VIDEO button (82) E Tape compartment (67, 74) F A (eject) button (67) G z REC (record) button (46, 74) H m/M (rewind/fast-forward) buttons (35) I H (play) button* (32, 67) X (pause)...stop) button (32, 46, 67, 74) J SELECT DVD/VIDEO buttons (32, 46, 67, 74) K (remote sensor) (19) L Front panel display (44, 71) M SYNCHRO REC indicator (50, 78) N PROGRESSIVE indicator (16, 96) O CHANNEL/TRACKING +/- Guide to Parts and Controls For more information, see the pages in parentheses. buttons* ...
... on /standby) button (22) B Disc tray (32, 46, 89) C A (open/close) button (32, 46, 89) D DVD t button (83) T VIDEO button (82) E Tape compartment (67, 74) F A (eject) button (67) G z REC (record) button (46, 74) H m/M (rewind/fast-forward) buttons (35) I H (play) button* (32, 67) X (pause)...stop) button (32, 46, 67, 74) J SELECT DVD/VIDEO buttons (32, 46, 67, 74) K (remote sensor) (19) L Front panel display (44, 71) M SYNCHRO REC indicator (50, 78) N PROGRESSIVE indicator (16, 96) O CHANNEL/TRACKING +/- Guide to Parts and Controls For more information, see the pages in parentheses. buttons* ...

Operating Instructions
Page 120
...Connecting the antenna cable 12 to your AV/amplifier (receiver) 17 to your TV 15 Controlling TVs with the remote 20 Copy protection 46, 117 Copy-Free 46 Copy-Never 46 Copy-Once 46 Counter ... One Touch Dubbing" 91 "DV/D8 Simple Dubbing" 90 "DVD Auto Chapter" 99 DVD Editing 55 DVD VIDEO 30, 117 DVD+R 28, 117 DVD+R DL 28 DVD+RW 28, 117 DVD-R 28, 117 DVD-RW 28, 117 E Easy Setup 102 "Edit" 52, ... F "Factory Setting" 102 Fast forward 34, 69 Fast reverse 34, 69 Feature settings 99 Finalizing 86 "Format DVD" 100 "Front Display" 101 Front panel 112 Front panel display 116 H Handling discs 108 I i.LINK 88,...
...Connecting the antenna cable 12 to your AV/amplifier (receiver) 17 to your TV 15 Controlling TVs with the remote 20 Copy protection 46, 117 Copy-Free 46 Copy-Never 46 Copy-Once 46 Counter ... One Touch Dubbing" 91 "DV/D8 Simple Dubbing" 90 "DVD Auto Chapter" 99 DVD Editing 55 DVD VIDEO 30, 117 DVD+R 28, 117 DVD+R DL 28 DVD+RW 28, 117 DVD-R 28, 117 DVD-RW 28, 117 E Easy Setup 102 "Edit" 52, ... F "Factory Setting" 102 Fast forward 34, 69 Fast reverse 34, 69 Feature settings 99 Finalizing 86 "Format DVD" 100 "Front Display" 101 Front panel 112 Front panel display 116 H Handling discs 108 I i.LINK 88,...
Operating Instructions
Page 121
... 56 "OSD" language 22, 100 P "Parental" 101 Parental Control 36 Parts and controls 112 PAUSE 34, 47, 69, 74 PBC 36 "Picture control" 96 PLAY 32, 67 Playable discs 30 Playback 32, 67 ... 47, 74 Recording 45, 73 recordable discs 28 recording format 28 recording mode 45 tape speed 73 while watching another program 47, 74 Recording mode 45 Recording time 45, 48 Region code 31 Remaining time 75 Remote 19, 113 REPEAT...Preset 23 Tuner Preset settings 93 "TV Type" 95 TV/DVD·VIDEO 20 TV/VIDEO 47, 74 U "Unfinalize" 87 Unrecordable pictures 46 V "VCR Function" 100 VIDEO CD 30 Video mode 28 Video settings...
... 56 "OSD" language 22, 100 P "Parental" 101 Parental Control 36 Parts and controls 112 PAUSE 34, 47, 69, 74 PBC 36 "Picture control" 96 PLAY 32, 67 Playable discs 30 Playback 32, 67 ... 47, 74 Recording 45, 73 recordable discs 28 recording format 28 recording mode 45 tape speed 73 while watching another program 47, 74 Recording mode 45 Recording time 45, 48 Region code 31 Remaining time 75 Remote 19, 113 REPEAT...Preset 23 Tuner Preset settings 93 "TV Type" 95 TV/DVD·VIDEO 20 TV/VIDEO 47, 74 U "Unfinalize" 87 Unrecordable pictures 46 V "VCR Function" 100 VIDEO CD 30 Video mode 28 Video settings...

Quick Start Guide
Page 2
...57699;/ to select a channel. Playback the Recorded VHS Tape 1 Press VIDEO to control the VCR. 2 Press / to find the point you want to operate the VCR. 2 Insert a tape with each successive mode, but with the VCR-DVD recorder, try the functions below to select "Auto"...the remote does not work while "LOAD" is finished. Easy Setup DTS On Off 10:10 AM Move ENTER Enter Return SYSTEM MENU Exit 12 When "Finish" appears, press ENTER to record a current TV program. See "Quick Guide to select the recording mode. When recording to a DVD disc...
...57699;/ to select a channel. Playback the Recorded VHS Tape 1 Press VIDEO to control the VCR. 2 Press / to find the point you want to operate the VCR. 2 Insert a tape with each successive mode, but with the VCR-DVD recorder, try the functions below to select "Auto"...the remote does not work while "LOAD" is finished. Easy Setup DTS On Off 10:10 AM Move ENTER Enter Return SYSTEM MENU Exit 12 When "Finish" appears, press ENTER to record a current TV program. See "Quick Guide to select the recording mode. When recording to a DVD disc...

Marketing Specifications
Page 2
RDR-VX515 DVD Recorder & VHS Combo Player Features Key Features One Touch Dubbing One Touch Recording Using i.LINK® Interface for DV & Digital 8® Camcorders DV & Digital 8® Camcorder Control for Editing via i.LINK® Interface 4 Video Head Stereo VHS with 19 Micron Heads Easy to Use Graphic User Interface VCR Plus+® Timer Recording Built In Television Tuner Parental...
RDR-VX515 DVD Recorder & VHS Combo Player Features Key Features One Touch Dubbing One Touch Recording Using i.LINK® Interface for DV & Digital 8® Camcorders DV & Digital 8® Camcorder Control for Editing via i.LINK® Interface 4 Video Head Stereo VHS with 19 Micron Heads Easy to Use Graphic User Interface VCR Plus+® Timer Recording Built In Television Tuner Parental...


