Operating Instructions
Page 2
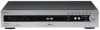
...only. Refer to persons. These limits are designed to mechanical vibrations or in this DVD recorder is intended to alert the user to disassemble the cabinet. Reorient or relocate the ... on a circuit different from Gemstar-TV Guide International, Inc. Record the serial number in a particular installation. RDR-HX900 Serial No CAUTION You are located at a qualified service shop only...with adequate ventilation to change or modifications not expressly approved in this manual could void your Sony dealer regarding this equipment does cause harmful interference to radio or television...
...only. Refer to persons. These limits are designed to mechanical vibrations or in this DVD recorder is intended to alert the user to disassemble the cabinet. Reorient or relocate the ... on a circuit different from Gemstar-TV Guide International, Inc. Record the serial number in a particular installation. RDR-HX900 Serial No CAUTION You are located at a qualified service shop only...with adequate ventilation to change or modifications not expressly approved in this manual could void your Sony dealer regarding this equipment does cause harmful interference to radio or television...
Operating Instructions
Page 4
Table of Contents WARNING 2 Precautions 2 Ways to Use Your DVD Recorder 6 Quick Guide to Disc Types 8 Hookups and Settings 12 Hooking Up the Recorder 12 Step 1: Unpacking 12 Step 2: Connecting the Antenna Cable and Set Top Box Controller 12 Step 3: Connecting the Video...Checking the Play Information and Playing Time 41 How to Enter Characters 43 Recording 45 Before Recording 45 Timer Recording (TV GUIDE/Manual/VCR Plus 46 Checking/Changing/Canceling Timer Settings 49 Recording Without the Timer 50 Recording From a VCR or Similar Device 53 Playback 54 Playing 54 Chasing Playback...
Table of Contents WARNING 2 Precautions 2 Ways to Use Your DVD Recorder 6 Quick Guide to Disc Types 8 Hookups and Settings 12 Hooking Up the Recorder 12 Step 1: Unpacking 12 Step 2: Connecting the Antenna Cable and Set Top Box Controller 12 Step 3: Connecting the Video...Checking the Play Information and Playing Time 41 How to Enter Characters 43 Recording 45 Before Recording 45 Timer Recording (TV GUIDE/Manual/VCR Plus 46 Checking/Changing/Canceling Timer Settings 49 Recording Without the Timer 50 Recording From a VCR or Similar Device 53 Playback 54 Playing 54 Chasing Playback...
Operating Instructions
Page 5
... CDs unless otherwise specified by the text or illustrations. • Instructions in this manual refer to discs created on this recorder. DV/Digital8 Dubbing (DV t HDD/DVD 77 Before DV/Digital8 Dubbing 77 Recording an Entire DV/Digital8 Format Tape (One Touch Dubbing 79 Program Edit 80 Settings and Adjustments 83 Using the Setup...
... CDs unless otherwise specified by the text or illustrations. • Instructions in this manual refer to discs created on this recorder. DV/Digital8 Dubbing (DV t HDD/DVD 77 Before DV/Digital8 Dubbing 77 Recording an Entire DV/Digital8 Format Tape (One Touch Dubbing 79 Program Edit 80 Settings and Adjustments 83 Using the Setup...
Operating Instructions
Page 8
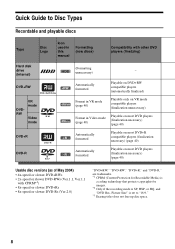
... titles does not free up disc space. 8 Picture Size" is set to Disc Types Recordable and playable discs Type Disc Logo Hard disk drive (internal) DVD+RW DVDRW VR mode Video mode DVD+R DVD-R Icon used in this manual Formatting (new discs) Compatibility with other DVD players (finalizing) (Formatting HDD unnecessary) - +RW Automatically formatted Playable on...
... titles does not free up disc space. 8 Picture Size" is set to Disc Types Recordable and playable discs Type Disc Logo Hard disk drive (internal) DVD+RW DVDRW VR mode Video mode DVD+R DVD-R Icon used in this manual Formatting (new discs) Compatibility with other DVD players (finalizing) (Formatting HDD unnecessary) - +RW Automatically formatted Playable on...

Operating Instructions
Page 9
... Features Rewrite (page 45) Auto Chapter (page 91) Manual Chapter (page 68) Record Change Delete 16:9 sizes title name title (page 51) (page 65) (page 66) A-B Erase Playlist (page 66) (page 68) Yes Yes Yes Yes Yes Yes ... Yes No No No Yes No No Yes Yes *3 No No No Yes No Yes *2 Yes Yes *3 No No Discs that cannot be recorded on • 4x-speed compatible DVD-RWs (Ver. 1.2/4x) • DVD-RWs (Ver. 1.0) • DVD+RWs that are not 2.4x-speed compatible • Dual layer discs • 8 cm discs ,continued 9
... Features Rewrite (page 45) Auto Chapter (page 91) Manual Chapter (page 68) Record Change Delete 16:9 sizes title name title (page 51) (page 65) (page 66) A-B Erase Playlist (page 66) (page 68) Yes Yes Yes Yes Yes Yes ... Yes No No No Yes No No Yes Yes *3 No No No Yes No Yes *2 Yes Yes *3 No No Discs that cannot be recorded on • 4x-speed compatible DVD-RWs (Ver. 1.2/4x) • DVD-RWs (Ver. 1.0) • DVD+RWs that are not 2.4x-speed compatible • Dual layer discs • 8 cm discs ,continued 9
Operating Instructions
Page 10
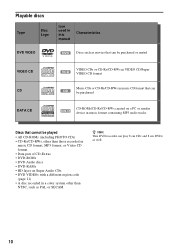
Playable discs Type Disc Logo Icon used in this manual Characteristics DVD VIDEO DVD Discs such as movies that can be purchased or rented VIDEO CD CD VCD VIDEO CDs or CD-Rs/CD-RWs in VIDEO CD/Super ... format • Data part of CD-Extras • DVD-ROMs • DVD Audio discs • DVD-RAMs • HD layer on Super Audio CDs • DVD VIDEOs with a different region code (page 11) • A disc recorded in a color system other than NTSC, such as PAL or SECAM z Hint This DVD recorder can play 8 cm CDs and 8 cm...
Playable discs Type Disc Logo Icon used in this manual Characteristics DVD VIDEO DVD Discs such as movies that can be purchased or rented VIDEO CD CD VCD VIDEO CDs or CD-Rs/CD-RWs in VIDEO CD/Super ... format • Data part of CD-Extras • DVD-ROMs • DVD Audio discs • DVD-RAMs • HD layer on Super Audio CDs • DVD VIDEOs with a different region code (page 11) • A disc recorded in a color system other than NTSC, such as PAL or SECAM z Hint This DVD recorder can play 8 cm CDs and 8 cm...
Operating Instructions
Page 25
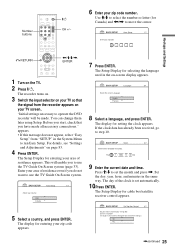
Use M/m to select the number or letter (for Canada) and Number buttons 123 456 789 0 "/1 CH +/- 6 Enter your zip code number.
Use M/m to select the number or letter (for Canada) and Number buttons 123 456 789 0 "/1 CH +/- 6 Enter your zip code number.
Operating Instructions
Page 29
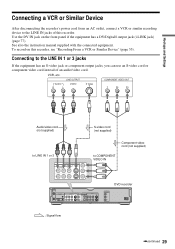
...Y PCM/DTS/DOLBY DIGITAL LINE OUT COAXIAL 1 R AUDIO L VIDEO PB 2 PR OPTICAL S VIDEO DVD recorder COMPONENT VIDEO OUT Y PB PR ~ AC IN : Signal flow ,continued 29 Use the DV IN jack on this recorder. VCR, etc. To record on the front panel if the equipment has a DV/Digital8 output jack (i.LINK jack) (page... If the equipment has an S-video jack or component output jacks, you can use an S-video cord or component video cord instead of this recorder, see "Recording From a VCR or Similar Device" (page 53). See also the instruction manual supplied with the connected equipment.
...Y PCM/DTS/DOLBY DIGITAL LINE OUT COAXIAL 1 R AUDIO L VIDEO PB 2 PR OPTICAL S VIDEO DVD recorder COMPONENT VIDEO OUT Y PB PR ~ AC IN : Signal flow ,continued 29 Use the DV IN jack on this recorder. VCR, etc. To record on the front panel if the equipment has a DV/Digital8 output jack (i.LINK jack) (page... If the equipment has an S-video jack or component output jacks, you can use an S-video cord or component video cord instead of this recorder, see "Recording From a VCR or Similar Device" (page 53). See also the instruction manual supplied with the connected equipment.
Operating Instructions
Page 46
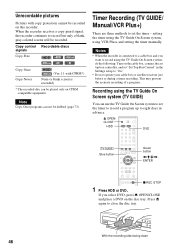
...OPEN/ CLOSE HDD 123 456 789 0 DVD [TV GUIDE] Blue button Green button Unrecordable pictures Pictures with CPRM*) None (a blank screen is connected to a cable box and you want to record using VCR Plus+ and setting the timer manually. Copy control signals Copy-Free Recordable discs HDD +RW -RWVideo +R -... CPRM compatible equipment. Notes • When the recorder is recorded) * The recorded disc can be recorded on the cable box, connect the set top box controller, and set "Set Top Box Control" in advance. Timer Recording (TV GUIDE/ Manual/VCR Plus+) There are three methods to set ...
...OPEN/ CLOSE HDD 123 456 789 0 DVD [TV GUIDE] Blue button Green button Unrecordable pictures Pictures with CPRM*) None (a blank screen is connected to a cable box and you want to record using VCR Plus+ and setting the timer manually. Copy control signals Copy-Free Recordable discs HDD +RW -RWVideo +R -... CPRM compatible equipment. Notes • When the recorder is recorded) * The recorded disc can be recorded on the cable box, connect the set top box controller, and set "Set Top Box Control" in advance. Timer Recording (TV GUIDE/ Manual/VCR Plus+) There are three methods to set ...
Operating Instructions
Page 48
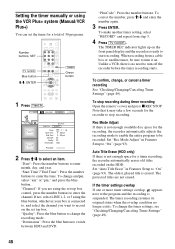
...settings overlap, appears next to switch between HDD and DVD. If not, select LINE 1, 2, or 3 using the set top box control, press the number buttons to "On" (page 93). Rec Mode Adjust If there is suspended. The timer recording resumes its original status when the overlap condition no ... Setup to enter the time. Unlike a VCR, there is erased. Setting the timer manually or using the VCR Plus+ system (Manual/VCR Plus+) You can set the timer for a timer recording, the recorder automatically erases old titles recorded on the HDD. "Date": Press the number buttons to turn it on. "Start ...
...settings overlap, appears next to switch between HDD and DVD. If not, select LINE 1, 2, or 3 using the set top box control, press the number buttons to "On" (page 93). Rec Mode Adjust If there is suspended. The timer recording resumes its original status when the overlap condition no ... Setup to enter the time. Unlike a VCR, there is erased. Setting the timer manually or using the VCR Plus+ system (Manual/VCR Plus+) You can set the timer for a timer recording, the recorder automatically erases old titles recorded on the HDD. "Date": Press the number buttons to turn it on. "Start ...
Operating Instructions
Page 52
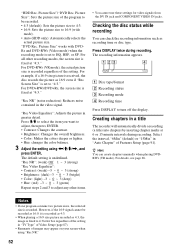
... Rec. Picture Size": Sets the picture size of the setting. For all other recording modes, the screen size is fixed at "4:3." For DVD-RWs (VR mode), the actual picture size is recorded regardless of the program to be recorded. • 4:3 (default): Sets the picture size to 4:3. • 16:9:...: Makes the colors deeper or lighter. • Hue: changes the color balance. 3 Adjust the setting using "DVD Rec. Picture Size" works with DVDRs and DVD-RWs (Video mode) when the recording mode is set to 16:9 (wide mode). • Auto (HDD only): Automatically selects the actual picture size....
... Rec. Picture Size": Sets the picture size of the setting. For all other recording modes, the screen size is fixed at "4:3." For DVD-RWs (VR mode), the actual picture size is recorded regardless of the program to be recorded. • 4:3 (default): Sets the picture size to 4:3. • 16:9:...: Makes the colors deeper or lighter. • Hue: changes the color balance. 3 Adjust the setting using "DVD Rec. Picture Size" works with DVDRs and DVD-RWs (Video mode) when the recording mode is set to 16:9 (wide mode). • Auto (HDD only): Automatically selects the actual picture size....
Operating Instructions
Page 68
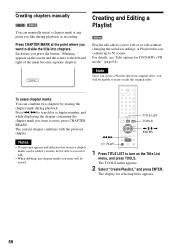
... title into chapters. Press CHAPTER MARK at any chapter marks you may not be able to erase, press CHAPTER ERASE. Press ./> to search for DVD-RWs (VR mode)" (page 64). Notes • If a message appears and indicates that no more chapter marks can be added, you enter...original titles. Creating and Editing a Playlist -RWVR Playlist edit allows you like during playback. Creating chapters manually HDD -RWVR You can manually insert a chapter mark at the point where you want to record or edit. • When dubbing, any point you to edit or re-edit without changing the ...
... title into chapters. Press CHAPTER MARK at any chapter marks you may not be able to erase, press CHAPTER ERASE. Press ./> to search for DVD-RWs (VR mode)" (page 64). Notes • If a message appears and indicates that no more chapter marks can be added, you enter...original titles. Creating and Editing a Playlist -RWVR Playlist edit allows you like during playback. Creating chapters manually HDD -RWVR You can manually insert a chapter mark at the point where you want to record or edit. • When dubbing, any point you to edit or re-edit without changing the ...
Operating Instructions
Page 74
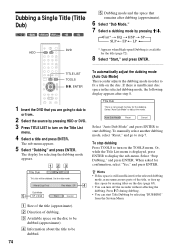
...Title Dub There is insufficient disc space in order to fit a title on the Title List menu. 4 Select a title and press ENTER. To manually select another dubbing mode, select "Reset," and go to display the sub-menu. B Direction of the title (approximate). Press "/1 during dubbing. ... selected dubbing mode, the following display appears after step 8. 1 Insert the DVD that remains after dubbing (approximate). 6 Select "Dub Mode." 7 Select a dubbing mode by pressing HDD or DVD. 3 Press TITLE LIST to turn off the recorder without affecting the dubbing. The display for the title (page 72). 8...
...Title Dub There is insufficient disc space in order to fit a title on the Title List menu. 4 Select a title and press ENTER. To manually select another dubbing mode, select "Reset," and go to display the sub-menu. B Direction of the title (approximate). Press "/1 during dubbing. ... selected dubbing mode, the following display appears after step 8. 1 Insert the DVD that remains after dubbing (approximate). 6 Select "Dub Mode." 7 Select a dubbing mode by pressing HDD or DVD. 3 Press TITLE LIST to turn off the recorder without affecting the dubbing. The display for the title (page 72). 8...

Operating Instructions
Page 77
... It will fast forward and rewind the tape for recording using the DV IN jack You can connect any other DVD equipment, finalize the disc (page 40). Operation is not in "Preparing for input only. See the instruction manual supplied with a digital video camera via the DV IN...IN jacks, see "About i.LINK" (page 103). the input signal is straightforward because the recorder will not output signals. • You cannot use the DV IN jack and record on the front panel. Hookups DVD recorder To DV IN i.LINK cable (not supplied) DV output Digital video camera : Signal flow ...
... It will fast forward and rewind the tape for recording using the DV IN jack You can connect any other DVD equipment, finalize the disc (page 40). Operation is not in "Preparing for input only. See the instruction manual supplied with a digital video camera via the DV IN...IN jacks, see "About i.LINK" (page 103). the input signal is straightforward because the recorder will not output signals. • You cannot use the DV IN jack and record on the front panel. Hookups DVD recorder To DV IN i.LINK cable (not supplied) DV output Digital video camera : Signal flow ...
Operating Instructions
Page 93
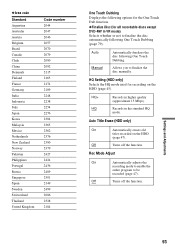
Off Turns off the function. HQ Setting (HDD only) Selects the HQ mode used for all recordable discs except DVD-RW in VR mode) Selects whether or not to finalize the disc automatically following One Touch Dubbing. ◆Area code Standard Argentina ... options for the One Touch Dub function. ◆Finalize Disc (for recording on the HDD (page 47). HQ+ Records in the standard HQ mode. Off Turns off the function. HQ Records in higher quality (approximate 15 Mbps). Auto Manual Automatically finalizes the disc following One Touch Dubbing (page 79). Auto Title...
Off Turns off the function. HQ Setting (HDD only) Selects the HQ mode used for all recordable discs except DVD-RW in VR mode) Selects whether or not to finalize the disc automatically following One Touch Dubbing. ◆Area code Standard Argentina ... options for the One Touch Dub function. ◆Finalize Disc (for recording on the HDD (page 47). HQ+ Records in the standard HQ mode. Off Turns off the function. HQ Records in higher quality (approximate 15 Mbps). Auto Manual Automatically finalizes the disc following One Touch Dubbing (page 79). Auto Title...
Operating Instructions
Page 96
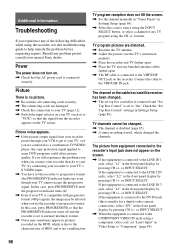
... the picture (see the TV's instruction manual). , Place the recorder and TV farther apart. , Place the TV and any of the following difficulties while using the recorder, use this case, press PROGRESSIVE so ... and is connected to progressive format (the PROGRESSIVE indicator lights up) even though your nearest Sony dealer. Picture There is usually for a digital video camera connection), select "DV" in... to some DVD programs could affect picture quality. buttons. Check the "Set Top Box Control" settings in pictures recorded on . , Check that the signal from your recorder passes through ...
... the picture (see the TV's instruction manual). , Place the recorder and TV farther apart. , Place the TV and any of the following difficulties while using the recorder, use this case, press PROGRESSIVE so ... and is connected to progressive format (the PROGRESSIVE indicator lights up) even though your nearest Sony dealer. Picture There is usually for a digital video camera connection), select "DV" in... to some DVD programs could affect picture quality. buttons. Check the "Set Top Box Control" settings in pictures recorded on . , Check that the signal from your recorder passes through ...

Operating Instructions
Page 98
...connected an AV amplifier to the DIGITAL OUT (OPTICAL or COAXIAL) jack and want to "TV." 98 The recorder starts playing the disc automatically. , The DVD VIDEO features an auto playback function. Some functions such as Stop, Search, or Slowmotion Play cannot be changed ...for the sound track. , Try changing the language using the DVD VIDEO's menu. See the instruction manual supplied with the labeled side facing up. , The disc is first inserted. Recording/Timer recording/Editing The channel cannot be performed. , Depending on another...
...connected an AV amplifier to the DIGITAL OUT (OPTICAL or COAXIAL) jack and want to "TV." 98 The recorder starts playing the disc automatically. , The DVD VIDEO features an auto playback function. Some functions such as Stop, Search, or Slowmotion Play cannot be changed ...for the sound track. , Try changing the language using the DVD VIDEO's menu. See the instruction manual supplied with the labeled side facing up. , The disc is first inserted. Recording/Timer recording/Editing The channel cannot be performed. , Depending on another...
Operating Instructions
Page 118
... Audio Input" 53 LINE IN 1 29 LINE IN 3 29 "Line1 Input" 89 "Line3 Input" 89 "LISTINGS" 34 118 M "Main/Sub" 53 Manual Clock Set 86 MENU 54 Menu DVD's Menu 54 Top menu 54 "MESSAGES" 35 "Mix" 78 "Mode for SET button" 87 "Move" 69, 81 "Move Title" 70 MP3 audio...PAUSE 51 "Rec Settings" 51 REC STOP 51, 79 "Rec Video Equalizer" 52 Recording 45, 91 picture adjustment 51 recordable discs 8 recording format 8 while watching another program 51 Recording mode 42, 45, 52 Recording picture quality 51 Recording picture size 51 Recording time 45, 52 RECOVERY 100 Region code 11 Remaining time 42 Remote 21, 106...
... Audio Input" 53 LINE IN 1 29 LINE IN 3 29 "Line1 Input" 89 "Line3 Input" 89 "LISTINGS" 34 118 M "Main/Sub" 53 Manual Clock Set 86 MENU 54 Menu DVD's Menu 54 Top menu 54 "MESSAGES" 35 "Mix" 78 "Mode for SET button" 87 "Move" 69, 81 "Move Title" 70 MP3 audio...PAUSE 51 "Rec Settings" 51 REC STOP 51, 79 "Rec Video Equalizer" 52 Recording 45, 91 picture adjustment 51 recordable discs 8 recording format 8 while watching another program 51 Recording mode 42, 45, 52 Recording picture quality 51 Recording picture size 51 Recording time 45, 52 RECOVERY 100 Region code 11 Remaining time 42 Remote 21, 106...

Quick Start Guide
Page 2
.... 3 Press the input selector on your TV so that you turn on your recorder for the first time. USA Canada 6 Press If you make the minimum number of basic adjustments to operate the DVD recorder will be made . Before you start, check that the signal from "SETUP" ...in the System Menu. 4 Press the ENTER button. 5 Press M/m to operate the DVD recorder will be made . does not appear on your TV screen, select...
.... 3 Press the input selector on your TV so that you turn on your recorder for the first time. USA Canada 6 Press If you make the minimum number of basic adjustments to operate the DVD recorder will be made . Before you start, check that the signal from "SETUP" ...in the System Menu. 4 Press the ENTER button. 5 Press M/m to operate the DVD recorder will be made . does not appear on your TV screen, select...

Marketing Specifications
Page 2
...8482; and SmoothSlow Modes General • 160 GB ****; RDR-HX900 DVD Recorder Sony Electronics Inc. 16765 West Bernardo Drive San Diego, CA 92127 For more information: http://www.sony.com Features Convenience • Easy to Use Graphic User Interface • Easy timer recording on the on DVD:1H(HQ)/1.5H(HSP)/2H(SP)/3H (LP)/4H(... (1) • Power Cord (1) • 75 ohm Coaxial Cable • Set Top Box Controller • Remote Commander Remote Control • AA Batteries (2) • Instruction Manual Weights & Measures • Aprox. 17.64 Pounds • Aprox. 17" x 3.5" x 13.58"
...8482; and SmoothSlow Modes General • 160 GB ****; RDR-HX900 DVD Recorder Sony Electronics Inc. 16765 West Bernardo Drive San Diego, CA 92127 For more information: http://www.sony.com Features Convenience • Easy to Use Graphic User Interface • Easy timer recording on the on DVD:1H(HQ)/1.5H(HSP)/2H(SP)/3H (LP)/4H(... (1) • Power Cord (1) • 75 ohm Coaxial Cable • Set Top Box Controller • Remote Commander Remote Control • AA Batteries (2) • Instruction Manual Weights & Measures • Aprox. 17.64 Pounds • Aprox. 17" x 3.5" x 13.58"


