
Operating Instructions
Page 3
... screen indefinitely. Also, use this apparatus during lightning storms or when unused for an extended period of holding a still video image or on-screen display image on your nearest Sony dealer. Copy guard function Since the recorder has a copy guard function, programs received through an external tuner (not supplied... cord or plug is prohibited. If you do not place objects filled with the apparatus. If you leave the still video image or on-screen display image displayed on your TV for long periods of the copyright laws. Install in any way, such as such may be contrary ...
... screen indefinitely. Also, use this apparatus during lightning storms or when unused for an extended period of holding a still video image or on-screen display image on your nearest Sony dealer. Copy guard function Since the recorder has a copy guard function, programs received through an external tuner (not supplied... cord or plug is prohibited. If you do not place objects filled with the apparatus. If you leave the still video image or on-screen display image displayed on your TV for long periods of the copyright laws. Install in any way, such as such may be contrary ...
Operating Instructions
Page 4
... CD-Rs/CD-RWs in video CD format Functions available for music CDs or CD-Rs/CD-RWs in this recorder. You can also use the controls on the recorder if they have the same or similar names as those on the remote. • The on-screen display illustrations used in this... manual may not match the graphics displayed on your TV screen. • The explanations regarding discs in music CD format Functions available for DATA CDs (CD-Rs...
... CD-Rs/CD-RWs in video CD format Functions available for music CDs or CD-Rs/CD-RWs in this recorder. You can also use the controls on the recorder if they have the same or similar names as those on the remote. • The on-screen display illustrations used in this... manual may not match the graphics displayed on your TV screen. • The explanations regarding discs in music CD format Functions available for DATA CDs (CD-Rs...

Operating Instructions
Page 6
... IN Jack 69 Dubbing From a DV/D8 Format Tape to a DVD 70 Settings and Adjustments 73 Using the Setup Displays 73 Antenna Reception Setting (Tuner Preset 74 Clock Setting (Clock Set 75 Video Settings (Video 76 Audio Settings (Audio 78 Recording Settings (Features 80 Language, Parental Control Settings/Factory Settings (Options 81 Easy...
... IN Jack 69 Dubbing From a DV/D8 Format Tape to a DVD 70 Settings and Adjustments 73 Using the Setup Displays 73 Antenna Reception Setting (Tuner Preset 74 Clock Setting (Clock Set 75 Video Settings (Video 76 Audio Settings (Audio 78 Recording Settings (Features 80 Language, Parental Control Settings/Factory Settings (Options 81 Easy...
Operating Instructions
Page 8
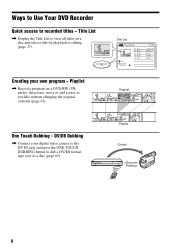
Creating your digital video camera to the DV IN jack and press the ONE TOUCH DUBBING button to dub a DV/D8 format tape over to a disc (page 69). Playlist , Record a program on a disc and select a title for playback or editing (page 37). Title List , Display the Title List to recorded titles - DV/D8...
Creating your digital video camera to the DV IN jack and press the ONE TOUCH DUBBING button to dub a DV/D8 format tape over to a disc (page 69). Playlist , Record a program on a disc and select a title for playback or editing (page 37). Title List , Display the Title List to recorded titles - DV/D8...
Operating Instructions
Page 16
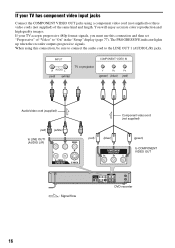
... (not supplied) (red) (blue) (green) to COMPONENT VIDEO OUT : Signal flow DVD recorder 16 When using a component video cord (not supplied) or three video cords (not supplied) of "Video" to "On" in the "Setup" display (page 77). If your TV has component video input jacks Connect the COMPONENT VIDEO OUT jacks using this connection and then set...
... (not supplied) (red) (blue) (green) to COMPONENT VIDEO OUT : Signal flow DVD recorder 16 When using a component video cord (not supplied) or three video cords (not supplied) of "Video" to "On" in the "Setup" display (page 77). If your TV has component video input jacks Connect the COMPONENT VIDEO OUT jacks using this connection and then set...
Operating Instructions
Page 23
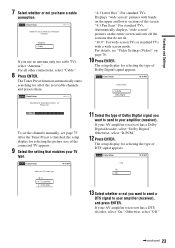
... Tuner Preset function automatically starts searching for selecting the type of the connected TV appears. 9 Select the setting that do not fit. Automatically displays "wide screen" pictures on page 76. 10 Press ENTER. No Disc Easy Setup Searching for selecting the type of the receivable channels and.... No Disc Easy Setup 10:10 AM Dolby Digital D-PCM Dolby Digital 11 Select the type of the screen. To set the channels manually, see "Video Settings (Video)" on the entire screen and cuts off the sections that matches your TV screen type. 16 : 9 4 : 3 Letter Box 4 : 3 Pan Scan ...
... Tuner Preset function automatically starts searching for selecting the type of the connected TV appears. 9 Select the setting that do not fit. Automatically displays "wide screen" pictures on page 76. 10 Press ENTER. No Disc Easy Setup Searching for selecting the type of the receivable channels and.... No Disc Easy Setup 10:10 AM Dolby Digital D-PCM Dolby Digital 11 Select the type of the screen. To set the channels manually, see "Video Settings (Video)" on the entire screen and cuts off the sections that matches your TV screen type. 16 : 9 4 : 3 Letter Box 4 : 3 Pan Scan ...

Operating Instructions
Page 24
...appears. z Hint If you must set the command mode number for this recorder and the supplied remote to one Sony DVD recorder If the supplied remote interferes with your other Sony DVD recorder or player. SYSTEM MENU O RETURN M/m/ Note To record TV programs using the timer, you want to... the previous display Press O RETURN. Finish To return to run Easy Setup again, select "Easy Setup" in the "Setup" display (page 83). All connections ...
...appears. z Hint If you must set the command mode number for this recorder and the supplied remote to one Sony DVD recorder If the supplied remote interferes with your other Sony DVD recorder or player. SYSTEM MENU O RETURN M/m/ Note To record TV programs using the timer, you want to... the previous display Press O RETURN. Finish To return to run Easy Setup again, select "Easy Setup" in the "Setup" display (page 83). All connections ...

Operating Instructions
Page 32
... DVDs with other equipment on this recorder, finalize the disc on the recording equipment first. Note To play a DVD VIDEO, or a finalized DVD+RW, DVD-RW (Video mode), DVD+R, or DVD-R, you can display the disc's menu by pressing TOP MENU or MENU. Playback starts. H PLAY x STOP 1 Press Z OPEN/CLOSE...from the front panel display. 3 Press H PLAY. Wait until "LOAD" disappears from the Title List menu (page 37). Using the DVD's Menu +RW -RWVideo +R -R DVD When you play a disc recorded with MP3 tracks or JPEG files (page 40, 41). • If you insert a DVD VIDEO, VIDEO CD, or CD...
... DVDs with other equipment on this recorder, finalize the disc on the recording equipment first. Note To play a DVD VIDEO, or a finalized DVD+RW, DVD-RW (Video mode), DVD+R, or DVD-R, you can display the disc's menu by pressing TOP MENU or MENU. Playback starts. H PLAY x STOP 1 Press Z OPEN/CLOSE...from the front panel display. 3 Press H PLAY. Wait until "LOAD" disappears from the Title List menu (page 37). Using the DVD's Menu +RW -RWVideo +R -R DVD When you play a disc recorded with MP3 tracks or JPEG files (page 40, 41). • If you insert a DVD VIDEO, VIDEO CD, or CD...

Operating Instructions
Page 35
...a CD When playing DTS-encoded CDs, excessive noise will be interrupted during playback to be connected to "On" of the tracks. When playing a VIDEO CD (with a DTS soundtrack DTS audio signals are available, depending on the duration of the press. • See "DVD Audio/Subtitle Language" ... "Off." "Folder": Repeats the current album. To avoid possible damage to an amplification system. "Disc": Repeats all of "Audio" in the "Setup" display (page 78). ,continued 35 Select an item using the TOOLS menu (page 11). • During playback or pause mode, the recorder's m/ M buttons...
...a CD When playing DTS-encoded CDs, excessive noise will be interrupted during playback to be connected to "On" of the tracks. When playing a VIDEO CD (with a DTS soundtrack DTS audio signals are available, depending on the duration of the press. • See "DVD Audio/Subtitle Language" ... "Off." "Folder": Repeats the current album. To avoid possible damage to an amplification system. "Disc": Repeats all of "Audio" in the "Setup" display (page 78). ,continued 35 Select an item using the TOOLS menu (page 11). • During playback or pause mode, the recorder's m/ M buttons...

Operating Instructions
Page 36
...point B), and press ENTER. The point where you open the disc tray. - "A-" appears. 4 Continue playing or press m/M to display "Menu: Off." Playing VIDEO CDs with PBC functions VCD PBC (Playback Control) allows you start from the same point. See the instructions supplied with Dolby Digital ... the portion to resume playback from the beginning, press x STOP twice, and press H PLAY. Then follow the instructions in the "Setup" display (page 79). Resuming playback from the point where you edit the title after stopping a disc to be interrupted during Scan Audio. you play ...
...point B), and press ENTER. The point where you open the disc tray. - "A-" appears. 4 Continue playing or press m/M to display "Menu: Off." Playing VIDEO CDs with PBC functions VCD PBC (Playback Control) allows you start from the same point. See the instructions supplied with Dolby Digital ... the portion to resume playback from the beginning, press x STOP twice, and press H PLAY. Then follow the instructions in the "Setup" display (page 79). Resuming playback from the point where you edit the title after stopping a disc to be interrupted during Scan Audio. you play ...
Operating Instructions
Page 38
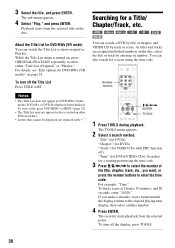
... or MENU (page 32). • The Title List may not appear for DVD-RWs (VR mode) You can search a DVD by title or chapter, and VIDEO CD by entering its number. M/m/ About the Title List for discs created on other DVD recorders. • Letters that have been finalized. To turn off... DVD-RWs (VR mode)" on , press ORIGINAL/PLAYLIST repeatedly to show original or Playlist. You can also search for DVD-RWs (Video mode), DVD+Rs, or DVD-Rs that cannot be displayed are assigned individual numbers on the disc. 3 Select the title, and press ENTER. The sub-menu appears. 4 Select "Play," and...
... or MENU (page 32). • The Title List may not appear for DVD-RWs (VR mode) You can search a DVD by title or chapter, and VIDEO CD by entering its number. M/m/ About the Title List for discs created on other DVD recorders. • Letters that have been finalized. To turn off... DVD-RWs (VR mode)" on , press ORIGINAL/PLAYLIST repeatedly to show original or Playlist. You can also search for DVD-RWs (Video mode), DVD+Rs, or DVD-Rs that cannot be displayed are assigned individual numbers on the disc. 3 Select the title, and press ENTER. The sub-menu appears. 4 Select "Play," and...

Operating Instructions
Page 45
.... I 'll select HQ. Recording only a still picture or just sound Recording a stereo/SAP program The recorder can be recorded in the "Setup" display (page 78). 45 To record only SAP sound, set "Tuner Audio" of low picture quality - The recorder automatically turns off after a recording has finished... SAP (Second Audio Program) When a SAP is noise in the front panel display. Select the disc type according to switch the recording modes. z Hint To play a disc recorded with poor reception, or a program or video source of "Audio" to the time and picture quality you can record on ....
.... I 'll select HQ. Recording only a still picture or just sound Recording a stereo/SAP program The recorder can be recorded in the "Setup" display (page 78). 45 To record only SAP sound, set "Tuner Audio" of low picture quality - The recorder automatically turns off after a recording has finished... SAP (Second Audio Program) When a SAP is noise in the front panel display. Select the disc type according to switch the recording modes. z Hint To play a disc recorded with poor reception, or a program or video source of "Audio" to the time and picture quality you can record on ....

Operating Instructions
Page 46
... +/- Wait until "LOAD" disappears from the front panel display. or INPUT SELECT repeatedly to select the channel or input source you want to close the disc tray. INPUT SELECT TV/VIDEO H PLAY z REC REC MODE x STOP X PAUSE 1 Press Z OPEN/CLOSE, and place a recordable disc on the disc tray.... To format in VR mode automatically. Recording stops when a copy guard signal is detected. Unused DVD-RWs are formatted in Video mode, see page 81. 3 Press CH +/- Recording side facing down 2 Press Z OPEN/CLOSE to record. 46 Unrecordable pictures Pictures with CPRM* Copy...
... +/- Wait until "LOAD" disappears from the front panel display. or INPUT SELECT repeatedly to select the channel or input source you want to close the disc tray. INPUT SELECT TV/VIDEO H PLAY z REC REC MODE x STOP X PAUSE 1 Press Z OPEN/CLOSE, and place a recordable disc on the disc tray.... To format in VR mode automatically. Recording stops when a copy guard signal is detected. Unused DVD-RWs are formatted in Video mode, see page 81. 3 Press CH +/- Recording side facing down 2 Press Z OPEN/CLOSE to record. 46 Unrecordable pictures Pictures with CPRM* Copy...

Operating Instructions
Page 47
... 43). Recording continues until the counter appears in the front panel display. Note that it may take a few seconds for the recorder to stop recording. Enter the channel number, and press SET. • You can select a video source from the LINE 1 IN or LINE 2 IN jacks using the INPUT ...minutes, up , and the remaining recording time appears in 30-minute increments. The display changes on . To stop recording. To watch another TV program while recording 1 Slide the TV/DVD switch to TV. 2 Press TV/VIDEO to set the recorder to leave it may be erased. • You cannot ...
... 43). Recording continues until the counter appears in the front panel display. Note that it may take a few seconds for the recorder to stop recording. Enter the channel number, and press SET. • You can select a video source from the LINE 1 IN or LINE 2 IN jacks using the INPUT ...minutes, up , and the remaining recording time appears in 30-minute increments. The display changes on . To stop recording. To watch another TV program while recording 1 Slide the TV/DVD switch to TV. 2 Press TV/VIDEO to set the recorder to leave it may be erased. • You cannot ...

Operating Instructions
Page 49
To format in VR mode automatically. Today --/--09 : 00--P:-M- 10 : 00--:P--M 04 --- --/-- --:-- --:-- Wait until "LOAD" disappears from the front panel display. SP----- 05 --- --/-- --:-- --:-- ---- --- 06 --- --/-- --:-- --:-- ---- --- 1 2 3 45 4 Select an item using Timer - CH 8------- 2 Press Z OPEN/CLOSE to close the disc tray. Standard 10:10 AM NoNoR.1ec To ... 04/15 Start End Source Mode Edit 09:00PM 10:00PM CH8 02 DVDDate04/30Start09:15PMStop09:45PM CHCH11Mode 03 --- Unused DVD-RWs are formatted in Video mode, see page 81. 3 Press TIMER.
To format in VR mode automatically. Today --/--09 : 00--P:-M- 10 : 00--:P--M 04 --- --/-- --:-- --:-- Wait until "LOAD" disappears from the front panel display. SP----- 05 --- --/-- --:-- --:-- ---- --- 06 --- --/-- --:-- --:-- ---- --- 1 2 3 45 4 Select an item using Timer - CH 8------- 2 Press Z OPEN/CLOSE to close the disc tray. Standard 10:10 AM NoNoR.1ec To ... 04/15 Start End Source Mode Edit 09:00PM 10:00PM CH8 02 DVDDate04/30Start09:15PMStop09:45PM CHCH11Mode 03 --- Unused DVD-RWs are formatted in Video mode, see page 81. 3 Press TIMER.

Operating Instructions
Page 51
... to standby mode again, be cut . 7:00 8:00 9:00 10:00 Program 1 Program 2 will turn off . 5 Press SYNCHRO REC. The display changes on or off . The recorder starts recording the second program about the recording mode, see the tuner's operating instructions. • During Synchro-Rec ...function does not work with the recorder turned on the recorder turns off Notes • The recorder starts recording only after detecting the video signal from the connected equipment. Recording 3 Press REC MODE repeatedly to the time you press SYNCHRO REC during Synchro-Rec standby, ...
... to standby mode again, be cut . 7:00 8:00 9:00 10:00 Program 1 Program 2 will turn off . 5 Press SYNCHRO REC. The display changes on or off . The recorder starts recording the second program about the recording mode, see the tuner's operating instructions. • During Synchro-Rec ...function does not work with the recorder turned on the recorder turns off Notes • The recorder starts recording only after detecting the video signal from the connected equipment. Recording 3 Press REC MODE repeatedly to the time you press SYNCHRO REC during Synchro-Rec standby, ...

Operating Instructions
Page 54
... with Copy- If you cannot change the recording mode. • You cannot change the channel or input source during recording. 54 Notes • A video game image may not be recorded clearly. • The recorder does not record programs with a DV IN jack See "Dubbing from a DV/D8 Format Tape ...to a DVD" (page 70) for an explanation of "Audio" to "Stereo" or "Main/Sub" in the "Setup" display (page 80). 5 Insert the source tape into the connected equipment and set to playback pause. 6 Press z REC on the TV screen as follows: HQ HSP...
... with Copy- If you cannot change the recording mode. • You cannot change the channel or input source during recording. 54 Notes • A video game image may not be recorded clearly. • The recorder does not record programs with a DV IN jack See "Dubbing from a DV/D8 Format Tape ...to a DVD" (page 70) for an explanation of "Audio" to "Stereo" or "Main/Sub" in the "Setup" display (page 80). 5 Insert the source tape into the connected equipment and set to playback pause. 6 Press z REC on the TV screen as follows: HQ HSP...

Operating Instructions
Page 55
...record on the disc, you cannot undo any edits you make. Erasing a title (page 56). - Dividing a title (page 58). - Since Video mode titles are : - The edit functions available for Playlist titles are actual recordings on the disc (except for editing purposes. Erasing a section of... disc or a timer recording starts while editing. Renaming a title (page 60). - When you erase an original title used in the front panel display, and select the option available for playback, such as a Playlist title. You can enjoy advanced edit functions. Erasing a section of a title (A-B...
...record on the disc, you cannot undo any edits you make. Erasing a title (page 56). - Dividing a title (page 58). - Since Video mode titles are : - The edit functions available for Playlist titles are actual recordings on the disc (except for editing purposes. Erasing a section of... disc or a timer recording starts while editing. Renaming a title (page 60). - When you erase an original title used in the front panel display, and select the option available for playback, such as a Playlist title. You can enjoy advanced edit functions. Erasing a section of a title (A-B...

Operating Instructions
Page 57
...scene) within a title and erase it . Notes • When editing a DVD-RW (Video mode), DVD+R, or DVD-R, finish all editing before finalizing the disc. Press ORIGINAL/PLAYLIST to switch to " ." The display for setting point A and B appears. ,continued 57 z Hint You can select from original... titles cannot be undone. 1 Press TITLE LIST. Erasing a section of the title (see below ). Select "On" when the Protection display appears. "Title Name": Allows you erase an original title used in a Playlist, that erasing scenes from a Playlist title (page 62). "Check"...
...scene) within a title and erase it . Notes • When editing a DVD-RW (Video mode), DVD+R, or DVD-R, finish all editing before finalizing the disc. Press ORIGINAL/PLAYLIST to switch to " ." The display for setting point A and B appears. ,continued 57 z Hint You can select from original... titles cannot be undone. 1 Press TITLE LIST. Erasing a section of the title (see below ). Select "On" when the Protection display appears. "Title Name": Allows you erase an original title used in a Playlist, that erasing scenes from a Playlist title (page 62). "Check"...

Operating Instructions
Page 66
SYSTEM MENU O RETURN M/m/ Formatting/Renaming/ Protecting a Disc +RW -RWVR -RWVideo +R -R The "Disc Setting" display allows you can also format or set protection. Depending on the disc type, you to check the disc information or change the disc name.
SYSTEM MENU O RETURN M/m/ Formatting/Renaming/ Protecting a Disc +RW -RWVR -RWVideo +R -R The "Disc Setting" display allows you can also format or set protection. Depending on the disc type, you to check the disc information or change the disc name.


