
Intellisync Lite Quick Start Guide
Page 11
... synchronization by providing configuration information and a synchronization procedure. Once you want to make a change. Note: For simplicity, this quick start guides you enter in these instructions apply to synchronize through the information you through the process of the operation in the selection of configuring and running a synchronization. The only difference between...
... synchronization by providing configuration information and a synchronization procedure. Once you want to make a change. Note: For simplicity, this quick start guides you enter in these instructions apply to synchronize through the information you through the process of the operation in the selection of configuring and running a synchronization. The only difference between...

Intellisync User Guide
Page 9
... does Intellisync know what to importing and exporting as well. That information is basically a one -way data transfers, see "Importing and Exporting Data" in these instructions apply to synchronize? Synchronizing Data Synchronizing the data stored in your Palm OS® handheld with data on all the Intellisync settings and processes that...
... does Intellisync know what to importing and exporting as well. That information is basically a one -way data transfers, see "Importing and Exporting Data" in these instructions apply to synchronize? Synchronizing Data Synchronizing the data stored in your Palm OS® handheld with data on all the Intellisync settings and processes that...

Intellisync User Guide
Page 10
... these steps to display the Choose Translator dialog box. Click on the Intellisync Configure shortcut, or the Intellisync Configure icon in the Choose Translator dialog instructs the HotSync Manager to synchronize. See "The HotSync Manager" in Chapter 1 for more information on the handheld application you want to perform a Palm Desktop operation...
... these steps to display the Choose Translator dialog box. Click on the Intellisync Configure shortcut, or the Intellisync Configure icon in the Choose Translator dialog instructs the HotSync Manager to synchronize. See "The HotSync Manager" in Chapter 1 for more information on the handheld application you want to perform a Palm Desktop operation...

Intellisync User Guide
Page 18
... be synchronized with Palm Desktop when you have configured a handheld and PC application for synchronization, and the applications are selected in Chapter 2 for more specific instructions. For example, Palm Desktop Imports and Exports delete data in Chapter 4. Intellisync Imports and Exports merge source and target records. • For information on Intellisync...
... be synchronized with Palm Desktop when you have configured a handheld and PC application for synchronization, and the applications are selected in Chapter 2 for more specific instructions. For example, Palm Desktop Imports and Exports delete data in Chapter 4. Intellisync Imports and Exports merge source and target records. • For information on Intellisync...
Intellisync User Guide
Page 30
User names can configure an operation for a second (or third, etc.) handheld, a User name for that User name. Instructions for adding User names are normally not prompted for each time you added. 6. Click the New button in Palm Desktop Software. After you can only ...
User names can configure an operation for a second (or third, etc.) handheld, a User name for that User name. Instructions for adding User names are normally not prompted for each time you added. 6. Click the New button in Palm Desktop Software. After you can only ...
Intellisync User Guide
Page 34
... your office. See the Data Transfer Requirements section of the Supported Systems topic for remote synchronization. Consult your Palm OS® handheld-compatible manuals for instructions on . To Prepare Your PC In order to run a remote synchronization, your Palm modem for the PC application you are synchronizing may have requirements for...
... your office. See the Data Transfer Requirements section of the Supported Systems topic for remote synchronization. Consult your Palm OS® handheld-compatible manuals for instructions on . To Prepare Your PC In order to run a remote synchronization, your Palm modem for the PC application you are synchronizing may have requirements for...

Intellisync User Guide
Page 43
... synchronizations, it may need to hang, execute a soft-reset. Refer to start a synchronization. Press the HotSync button on the cradle to your handheld manual for instructions.) Note: You may only be necessary the first time you synchronize your data.
... synchronizations, it may need to hang, execute a soft-reset. Refer to start a synchronization. Press the HotSync button on the cradle to your handheld manual for instructions.) Note: You may only be necessary the first time you synchronize your data.
Add-on Application Guide
Page 6
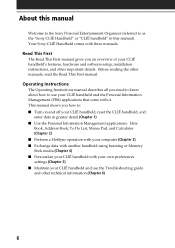
About this manual Welcome to the Sony Personal Entertainment Organizer (referred to as the "Sony CLIÉ Handheld" or "CLIÉ handheld" in greater detail (Chapter 1) I Use the Personal Information Management applications: Date Book, Address Book, To Do List, Memo Pad, and Calculator (Chapter 2) ...and software setup, installation instructions, and other important details. Operating Instructions The Operating Instructions manual describes all you need to know about how to : I Maintain your CLIÉ handheld and use your CLIÉ handheld and the Personal Information Management (PIM) ...
About this manual Welcome to the Sony Personal Entertainment Organizer (referred to as the "Sony CLIÉ Handheld" or "CLIÉ handheld" in greater detail (Chapter 1) I Use the Personal Information Management applications: Date Book, Address Book, To Do List, Memo Pad, and Calculator (Chapter 2) ...and software setup, installation instructions, and other important details. Operating Instructions The Operating Instructions manual describes all you need to know about how to : I Maintain your CLIÉ handheld and use your CLIÉ handheld and the Personal Information Management (PIM) ...

Add-on Application Guide
Page 10
... a picture album application for your CLIÉ handheld. For details, refer to other CLIÉ handheld users. You cannot beam image files to the Operating Instructions manual. 10 You can also use your CLIÉ handheld to exchange image files easily with a digital camera. Use IR (Infrared) communication to display the...
... a picture album application for your CLIÉ handheld. For details, refer to other CLIÉ handheld users. You cannot beam image files to the Operating Instructions manual. 10 You can also use your CLIÉ handheld to exchange image files easily with a digital camera. Use IR (Infrared) communication to display the...

Add-on Application Guide
Page 11
... or movies with your computer using the PictureGear 4.4Lite software. The PictureGear 4.4Lite software installation starts. Follow the onscreen instructions to install the PictureGear 4.4Lite software. The installation launcher window appears. 2 Select the model of the PictureGear 4.4Lite ... and PictureGear 4.4Lite. This section describes how to finish installation. 5 Click Exit. For details on your CLIÉ handheld (PEG-T615C or PEG-T415). 3 Click Install CLIÉ Utilities. 4 Click Install PictureGear Lite. Chapter 1 PictureGear Pocket Installing You do not have ...
... or movies with your computer using the PictureGear 4.4Lite software. The PictureGear 4.4Lite software installation starts. Follow the onscreen instructions to install the PictureGear 4.4Lite software. The installation launcher window appears. 2 Select the model of the PictureGear 4.4Lite ... and PictureGear 4.4Lite. This section describes how to finish installation. 5 Click Exit. For details on your CLIÉ handheld (PEG-T615C or PEG-T415). 3 Click Install CLIÉ Utilities. 4 Click Install PictureGear Lite. Chapter 1 PictureGear Pocket Installing You do not have ...
Add-on Application Guide
Page 12
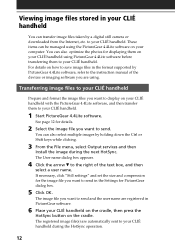
... the next HotSync. Viewing image files stored in your CLIÉ handheld You can transfer image files taken by PictureGear 4.4Lite software, refer to the instruction manual of the text box, and then select a user name. You can be managed using the PictureGear 4.4Lite software on your CLIÉ handheld with...
... the next HotSync. Viewing image files stored in your CLIÉ handheld You can transfer image files taken by PictureGear 4.4Lite software, refer to the instruction manual of the text box, and then select a user name. You can be managed using the PictureGear 4.4Lite software on your CLIÉ handheld with...

Add-on Application Guide
Page 43
Chapter 3 gMovie player Installing You do not have to the instructions on your CLIÉ handheld The gMovie player is factory pre-installed. Install PictureGear 4.4Lite software on your computer Install PictureGear 4.4Lite software on your computer according to install gMovie player on page 11. 43
Chapter 3 gMovie player Installing You do not have to the instructions on your CLIÉ handheld The gMovie player is factory pre-installed. Install PictureGear 4.4Lite software on your computer Install PictureGear 4.4Lite software on your computer according to install gMovie player on page 11. 43

Add-on Application Guide
Page 50
gMovie menu items The following items appear when you want to play continuously. For details about beaming, see the Operating Instructions manual supplied with the CLIÉ handheld. Preferences Displays the available options for movie playback: • Loop movie playback: If you tap the MENU icon ...
gMovie menu items The following items appear when you want to play continuously. For details about beaming, see the Operating Instructions manual supplied with the CLIÉ handheld. Preferences Displays the available options for movie playback: • Loop movie playback: If you tap the MENU icon ...

Add-on Application Guide
Page 54
... to select WA Clock and then press the Jog Dial navigator. For details, refer to daylight saving time (the color or shade of the Operating Instructions manual. 54 Or, tap the WA Clock icon on page 55.) Daylight Saving Time icon: Tap to change the indicated time to Chapter 5 of the...
... to select WA Clock and then press the Jog Dial navigator. For details, refer to daylight saving time (the color or shade of the Operating Instructions manual. 54 Or, tap the WA Clock icon on page 55.) Daylight Saving Time icon: Tap to change the indicated time to Chapter 5 of the...

Add-on Application Guide
Page 55
... Alarm Clock Selecting other time zones to be displayed You can select up to preview the future time for all time zones in the Operating Instructions manual for other than your present location. Setting the clock alarm You can set an alarm for details. 1 On the clock screen, tap the Set...
... Alarm Clock Selecting other time zones to be displayed You can select up to preview the future time for all time zones in the Operating Instructions manual for other than your present location. Setting the clock alarm You can set an alarm for details. 1 On the clock screen, tap the Set...

Add-on Application Guide
Page 72
...; RMC Shows the version information of the CLIÉ Remote Commander application. 72 For the Edit menu, see "Using the edit menu" in the Operating Instructions manual. You can assign operations to the CLIÉ Remote Commander application. Key Assignment The Key Assign screen appears. CLIÉ Remote Commander menu items...
...; RMC Shows the version information of the CLIÉ Remote Commander application. 72 For the Edit menu, see "Using the edit menu" in the Operating Instructions manual. You can assign operations to the CLIÉ Remote Commander application. Key Assignment The Key Assign screen appears. CLIÉ Remote Commander menu items...

Add-on Application Guide
Page 76
... details on your computer using the supplied Installation CD-ROM. 1 Insert the Installation CD-ROM to your CLIÉ handheld (PEG-T615C or PEG-T415). 3 Click Install CLIÉ Utilities. Follow the onscreen instructions to use the Sound Converter software, see the Help files of your computer's CD-ROM drive. The installation launcher window...
... details on your computer using the supplied Installation CD-ROM. 1 Insert the Installation CD-ROM to your CLIÉ handheld (PEG-T615C or PEG-T415). 3 Click Install CLIÉ Utilities. Follow the onscreen instructions to use the Sound Converter software, see the Help files of your computer's CD-ROM drive. The installation launcher window...

Add-on Application Guide
Page 78
Imported sound data are automatically registered in the alarm sounds list in this guide (page 55). Date book World Alarm Clock 78 For details on how to change the alarm sound, see "Using the Date Book menus" in the Operating Instructions and "Setting the clock alarm" in addition to the default sounds. Storing sound data in your CLIÉ handheld Setting an imported sound data as an alarm sound You can set your favorite sound as an alarm sound with the Date Book and the World Alarm Clock applications.
Imported sound data are automatically registered in the alarm sounds list in this guide (page 55). Date book World Alarm Clock 78 For details on how to change the alarm sound, see "Using the Date Book menus" in the Operating Instructions and "Setting the clock alarm" in addition to the default sounds. Storing sound data in your CLIÉ handheld Setting an imported sound data as an alarm sound You can set your favorite sound as an alarm sound with the Date Book and the World Alarm Clock applications.

Add-on Application Guide
Page 80
.... • The tone of the original sound data, then transfer the data to your CLIÉ handheld again. 1 Delete the sound data (see the Operating Instructions manual provided in your CLIÉ handheld. 1 From the Sound Utility window, tap the desired sound data in the data list, then tap Delete. Notes...
.... • The tone of the original sound data, then transfer the data to your CLIÉ handheld again. 1 Delete the sound data (see the Operating Instructions manual provided in your CLIÉ handheld. 1 From the Sound Utility window, tap the desired sound data in the data list, then tap Delete. Notes...

Add-on Application Guide
Page 83
Chapter 7 Setting the Memory Stick automatic start function on your CLIÉ handheld. If you want to start an application in the Memory Stick media from the Application Launcher screen, refer to set the Memory Stick automatic start function (MS Autorun) This chapter describes how to the Operating Instructions manual. Chapter 7
Chapter 7 Setting the Memory Stick automatic start function on your CLIÉ handheld. If you want to start an application in the Memory Stick media from the Application Launcher screen, refer to set the Memory Stick automatic start function (MS Autorun) This chapter describes how to the Operating Instructions manual. Chapter 7

