Operating Instructions
Page 2
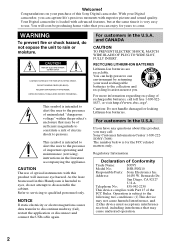
.... RECYCLING LITHIUM-ION BATTERIES Lithium-Ion batteries are recyclable. For more information regarding recycling of Conformity Trade Name: SONY Model No.: DSR-PDX10 Responsible Party: Sony Electronics Inc. Telephone No.: 858-942-2230 This device complies with superior picture and sound quality. NOTICE If ...questions about this product, you may call toll free 1-800-8228837, or visit http://www.rbrc.org/. As the laser beam used rechargeable batteries to the presence of the FCC Rules. Refer to servicing to disassemble the cabinet. This symbol is intended to ...
.... RECYCLING LITHIUM-ION BATTERIES Lithium-Ion batteries are recyclable. For more information regarding recycling of Conformity Trade Name: SONY Model No.: DSR-PDX10 Responsible Party: Sony Electronics Inc. Telephone No.: 858-942-2230 This device complies with superior picture and sound quality. NOTICE If ...questions about this product, you may call toll free 1-800-8228837, or visit http://www.rbrc.org/. As the laser beam used rechargeable batteries to the presence of the FCC Rules. Refer to servicing to disassemble the cabinet. This symbol is intended to ...

Operating Instructions
Page 3
...These limits are cautioned that any interference received, including interference that to which can radiate radio frequency energy and, if not installed and used with the equipment in accordance with Canadian ICES-003. However, there is connected. - Reorient or relocate the receiving antenna. - Increase ...for help. Disposal of the FCC Rules. For disposal or recycling information, please contact your authority to operate this product may be used in order to comply with the limits for a Class B digital device, pursuant to correct the interference by turning the equipment off...
...These limits are cautioned that any interference received, including interference that to which can radiate radio frequency energy and, if not installed and used with the equipment in accordance with Canadian ICES-003. However, there is connected. - Reorient or relocate the receiving antenna. - Increase ...for help. Disposal of the FCC Rules. For disposal or recycling information, please contact your authority to operate this product may be used in order to comply with the limits for a Class B digital device, pursuant to correct the interference by turning the equipment off...

Operating Instructions
Page 4
... a "Memory Stick" (p. 175) Main Features •Viewing images recorded on a "Memory Stick" using the USB cable (p. 206, 210) •Viewing moving pictures recorded on tapes using the USB cable (p. 201) •Capturing images on your computer from your camcorder using the USB cable (p. 203) •Converting an analog signal to digital to capture...
... a "Memory Stick" (p. 175) Main Features •Viewing images recorded on a "Memory Stick" using the USB cable (p. 206, 210) •Viewing moving pictures recorded on tapes using the USB cable (p. 201) •Capturing images on your computer from your camcorder using the USB cable (p. 203) •Converting an analog signal to digital to capture...

Operating Instructions
Page 5
Getting Started Main Features Main Features Other uses Functions for adjusting the exposure in the recording mode •BACK LIGHT (p. 36) • SPOT LIGHT (p. 37) •PROGRAM AE (p. 66) •Adjusting the exposure ...) Functions for giving a natural appearance to your recordings •Sports lesson (p. 66) •Landscape (p. 66) •Manual focus (p. 75) •Spot Focus (p. 77) Functions for use with recorded tapes •END SEARCH/EDITSEARCH/Rec Review (p. 39) •DATA CODE (p. 43) • Tape PB ZOOM (p. 96) •TITLE SEARCH (p. 89) •Digital...
Getting Started Main Features Main Features Other uses Functions for adjusting the exposure in the recording mode •BACK LIGHT (p. 36) • SPOT LIGHT (p. 37) •PROGRAM AE (p. 66) •Adjusting the exposure ...) Functions for giving a natural appearance to your recordings •Sports lesson (p. 66) •Landscape (p. 66) •Manual focus (p. 75) •Spot Focus (p. 77) Functions for use with recorded tapes •END SEARCH/EDITSEARCH/Rec Review (p. 39) •DATA CODE (p. 43) • Tape PB ZOOM (p. 96) •TITLE SEARCH (p. 89) •Digital...

Operating Instructions
Page 6
... SPOT LIGHT 37 Self-timer recording 38 Checking recordings - Tape Photo recording 51 Using the wide mode 53 Using the fader 55 Using special effects - Recording on a "Memory Stick" ...... 10 Getting Started Using this manual 12 Checking supplied accessories 14 Step 1 Preparing the power supply ... 15...19 Step 2 Setting the date and time ........ 20 Step 3 Inserting a cassette 22 Step 4 Using the touch panel 23 Recording - Flexible Spot Meter 74 Focusing manually 75 Using the spot focus - DATE SEARCH 90 Searching for picture quality - INDEX SEARCH 87 Searching the ...
... SPOT LIGHT 37 Self-timer recording 38 Checking recordings - Tape Photo recording 51 Using the wide mode 53 Using the fader 55 Using special effects - Recording on a "Memory Stick" ...... 10 Getting Started Using this manual 12 Checking supplied accessories 14 Step 1 Preparing the power supply ... 15...19 Step 2 Setting the date and time ........ 20 Step 3 Inserting a cassette 22 Step 4 Using the touch panel 23 Recording - Flexible Spot Meter 74 Focusing manually 75 Using the spot focus - DATE SEARCH 90 Searching for picture quality - INDEX SEARCH 87 Searching the ...

Operating Instructions
Page 7
Table of DVCAM and DV formats 234 Usable cassettes 236 About the "InfoLITHIUM" battery pack 239 About i.LINK 241 Using your camcorder abroad .......... 243 Maintenance information and precautions 244 Specifications 250 Quick Reference Identifying parts and controls 252 Index 262...182 Preventing accidental erasure - For Windows users 201 Viewing images recorded on a "Memory Stick" on a "Memory Stick" to your computer using the USB cable - Signal convert function 211 Customizing Your Camcorder Changing the default settings with the menu 212 Troubleshooting Types of trouble and ...
Table of DVCAM and DV formats 234 Usable cassettes 236 About the "InfoLITHIUM" battery pack 239 About i.LINK 241 Using your camcorder abroad .......... 243 Maintenance information and precautions 244 Specifications 250 Quick Reference Identifying parts and controls 252 Index 262...182 Preventing accidental erasure - For Windows users 201 Viewing images recorded on a "Memory Stick" on a "Memory Stick" to your computer using the USB cable - Signal convert function 211 Customizing Your Camcorder Changing the default settings with the menu 212 Troubleshooting Types of trouble and ...

Operating Instructions
Page 8
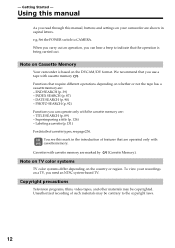
... lid. 2 Insert the cassette straight as far as possible into the cassette compartment with its v mark facing up. Connecting the power cord (p. 19) Use the battery pack when using your camcorder. Write-protect tab 3 Close the cassette compartment by pressing on tapes of the arrow to recorded pictures on the cassette compartment...
... lid. 2 Insert the cassette straight as far as possible into the cassette compartment with its v mark facing up. Connecting the power cord (p. 19) Use the battery pack when using your camcorder. Write-protect tab 3 Close the cassette compartment by pressing on tapes of the arrow to recorded pictures on the cassette compartment...

Operating Instructions
Page 9
..., the LCD panel, the battery pack or the microphone. 9 PLAY Quick Start Guide NOTE Do not pick up your camcorder, the clock setting is closed, use the viewfinder with your eyesight (p. 29). The picture appears on the LCD screen (p. 41) 1 Set the POWER switch VCR POWER OFF (CHG) to VCR while...
..., the LCD panel, the battery pack or the microphone. 9 PLAY Quick Start Guide NOTE Do not pick up your camcorder, the clock setting is closed, use the viewfinder with your eyesight (p. 29). The picture appears on the LCD screen (p. 41) 1 Set the POWER switch VCR POWER OFF (CHG) to VCR while...

Operating Instructions
Page 10
Connecting the power cord (p. 19) Use the battery pack when using your camcorder. Quick Start Guide - Recording on a "Memory Stick" of the arrow to open the "Memory Stick" slot. 2 Insert a "Memory Stick" in parentheses "( )" for more ...
Connecting the power cord (p. 19) Use the battery pack when using your camcorder. Quick Start Guide - Recording on a "Memory Stick" of the arrow to open the "Memory Stick" slot. 2 Insert a "Memory Stick" in parentheses "( )" for more ...

Operating Instructions
Page 11
up your camcorder, the clock setting is closed, use the viewfinder with your eyesight (p. 29). PLAY or PB 11 Adjust the viewfinder lens to off. If you purchase your camcorder by holding the viewfinder, ...
up your camcorder, the clock setting is closed, use the viewfinder with your eyesight (p. 29). PLAY or PB 11 Adjust the viewfinder lens to off. If you purchase your camcorder by holding the viewfinder, ...
Operating Instructions
Page 12
... TV, you can hear a beep to CAMERA. Functions that you use a tape with cassette memory. INDEX SEARCH (p. 87) - Superimposing a title (p. 126) - Note on TV color systems TV color systems differ depending on the DVCAM/DV format. Copyright precautions Television programs, films, video tapes, and other...Getting Started - Labeling a cassette (p. 131) For details of features that the operation is based on the country or region. - Using this manual As you can operate only with cassette memory are : - PHOTO SEARCH (p. 92) Functions you need an NTSC system-based TV.
... TV, you can hear a beep to CAMERA. Functions that you use a tape with cassette memory. INDEX SEARCH (p. 87) - Superimposing a title (p. 126) - Note on TV color systems TV color systems differ depending on the DVCAM/DV format. Copyright precautions Television programs, films, video tapes, and other...Getting Started - Labeling a cassette (p. 131) For details of features that the operation is based on the country or region. - Using this manual As you can operate only with cassette memory are : - PHOTO SEARCH (p. 92) Functions you need an NTSC system-based TV.

Operating Instructions
Page 13
...malfunction. Take pictures of the pixels are operational for long periods may cause malfunctions [c]. •Do not directly shoot the sun. Getting Started Using this malfunction cannot be some tiny black points and/or bright points (white, red, blue or green in color) that constantly appear on ...outdoors. Sometimes this manual Precautions on camcorder care Lens and LCD screen/finder (on the LCD screen and the finder. These points are manufactured using extremely high-precision technology, so over 99.99% of the sun in low light conditions such as in a car parked in any way....
...malfunction. Take pictures of the pixels are operational for long periods may cause malfunctions [c]. •Do not directly shoot the sun. Getting Started Using this malfunction cannot be some tiny black points and/or bright points (white, red, blue or green in color) that constantly appear on ...outdoors. Sometimes this manual Precautions on camcorder care Lens and LCD screen/finder (on the LCD screen and the finder. These points are manufactured using extremely high-precision technology, so over 99.99% of the sun in low light conditions such as in a car parked in any way....

Operating Instructions
Page 15
Getting Started Step 1 Preparing the power supply Installing the battery pack (1) Lift up the viewfinder. (2) Slide the battery pack down until it clicks. 1 2 To remove the battery pack (1) Lift up the viewfinder. (2) Slide the battery pack out in the direction of the arrow while pressing BATT down. 1 2 2 BATT release button If you use the large capacity battery pack If you install the NP-FM70/QM71/FM90/FM91/QM91 battery pack on your camcorder, extend its viewfinder. 15
Getting Started Step 1 Preparing the power supply Installing the battery pack (1) Lift up the viewfinder. (2) Slide the battery pack down until it clicks. 1 2 To remove the battery pack (1) Lift up the viewfinder. (2) Slide the battery pack out in the direction of the arrow while pressing BATT down. 1 2 2 BATT release button If you use the large capacity battery pack If you install the NP-FM70/QM71/FM90/FM91/QM91 battery pack on your camcorder, extend its viewfinder. 15

Operating Instructions
Page 16
... cord to the wall outlet. (4) Set the POWER switch to OFF (CHG). See page 239 for your camcorder. Fully charging the battery allows you to use the battery longer than usual. 2 14 POWER VCR OFF (CHG) MEMORY CAMERA After charging the battery pack Disconnect the AC power adaptor from the DC... IN jack on the display window. Step 1 Preparing the power supply Charging the battery pack Use the battery pack after normal charge is indicated in the display window.
... cord to the wall outlet. (4) Set the POWER switch to OFF (CHG). See page 239 for your camcorder. Fully charging the battery allows you to use the battery longer than usual. 2 14 POWER VCR OFF (CHG) MEMORY CAMERA After charging the battery pack Disconnect the AC power adaptor from the DC... IN jack on the display window. Step 1 Preparing the power supply Charging the battery pack Use the battery pack after normal charge is indicated in the display window.

Operating Instructions
Page 17
... If any trouble occurs with the LCD screen Continuous Typical* 70 40 155 90 180 105 235 140 275 165 Approximate minutes when you use a fully charged battery and the XLR adaptor is extremely high or low because of the AC power adaptor. Charging time Battery pack NP-FM50...(90) 240 (180) 260 (200) 330 (270) 360 (300) Approximateminutesat25 °C(77 °F)tochargeanemptybatterypack The charging time may be shorter. 17 When you use the AC power adaptor Place the AC power adaptor near a wall outlet. Recording time Battery pack NP-FM50 (supplied) NP-FM70 NP-QM71 NP-FM90...
... If any trouble occurs with the LCD screen Continuous Typical* 70 40 155 90 180 105 235 140 275 165 Approximate minutes when you use a fully charged battery and the XLR adaptor is extremely high or low because of the AC power adaptor. Charging time Battery pack NP-FM50...(90) 240 (180) 260 (200) 330 (270) 360 (300) Approximateminutesat25 °C(77 °F)tochargeanemptybatterypack The charging time may be shorter. 17 When you use the AC power adaptor Place the AC power adaptor near a wall outlet. Recording time Battery pack NP-FM50 (supplied) NP-FM70 NP-QM71 NP-FM90...

Operating Instructions
Page 18
... the indication on LCD screen 110 230 270 355 410 Approximate minutes when you use a fully charged battery Note Approximate recording time and playing time at 25 shorter if you use your camcorder in an ambient temperature of Sony Corporation. 18 This unit is compatible with compatible electronic equipment. "InfoLITHIUM" M series battery packs...
... the indication on LCD screen 110 230 270 355 410 Approximate minutes when you use a fully charged battery Note Approximate recording time and playing time at 25 shorter if you use your camcorder in an ambient temperature of Sony Corporation. 18 This unit is compatible with compatible electronic equipment. "InfoLITHIUM" M series battery packs...

Operating Instructions
Page 19
... power cord is not disconnected from the AC power supply (house current) as long as it from a wall outlet using the AC power adaptor. (1) Open the DC IN jack cover. Using a car battery Use Sony Car Battery Adaptor (optional). Notes • TheACpoweradaptorcansupplypowerevenifthebatterypackisattachedtoyour camcorder. • TheDCINjackhas"sourcepriority."Thismeansthatthebatterypackcannotsupply any power if the power cord is...
... power cord is not disconnected from the AC power supply (house current) as long as it from a wall outlet using the AC power adaptor. (1) Open the DC IN jack cover. Using a car battery Use Sony Car Battery Adaptor (optional). Notes • TheACpoweradaptorcansupplypowerevenifthebatterypackisattachedtoyour camcorder. • TheDCINjackhas"sourcepriority."Thismeansthatthebatterypackcannotsupply any power if the power cord is...

Operating Instructions
Page 20
"CLOCK SET" will have been discharged (p. 247). If you do not use your camcorder for about four month,sthedateandtimemaybe cleared from memory (bars may appear) because the built-in rechargeable battery installed in that you set the ... SEL/PUSH EXEC dial and pressing the dial by the time signal. Step 2 Setting the date and time Set the date and time when you use your camcorder for the first time.
"CLOCK SET" will have been discharged (p. 247). If you do not use your camcorder for about four month,sthedateandtimemaybe cleared from memory (bars may appear) because the built-in rechargeable battery installed in that you set the ... SEL/PUSH EXEC dial and pressing the dial by the time signal. Step 2 Setting the date and time Set the date and time when you use your camcorder for the first time.
Operating Instructions
Page 22
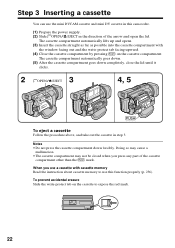
... with the window facing out and the write-protect tab facing upward. (4) Close the cassette compartment by pressing on the cassette to use the mini DVCAM cassette and mini DV cassette in this function properly (p. 236). The cassette compartment automatically lifts up and opens. (3) Insert the cassette straight as far as ...
... with the window facing out and the write-protect tab facing upward. (4) Close the cassette compartment by pressing on the cassette to use the mini DVCAM cassette and mini DV cassette in this function properly (p. 236). The cassette compartment automatically lifts up and opens. (3) Insert the cassette straight as far as ...

Operating Instructions
Page 23
... a tape. (1) Prepare the power supply. (p. 15 to 19) (2) Press OPEN to open the LCD panel. (3) Set the POWER switch to PAGE1/PAGE2. Getting Started Step 4 Using the touch panel Your camcorder has operation buttons on the LCD screen. (6) Press a desired operation item. Operation buttons appear on the LCD screen. The display...
... a tape. (1) Prepare the power supply. (p. 15 to 19) (2) Press OPEN to open the LCD panel. (3) Set the POWER switch to PAGE1/PAGE2. Getting Started Step 4 Using the touch panel Your camcorder has operation buttons on the LCD screen. (6) Press a desired operation item. Operation buttons appear on the LCD screen. The display...


