
Quick Start Guide
Page 14
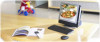
... program to recover your computer, go to the Sony Online Support Web site at http://www.sony.com/pcsupport, to view the online specifications sheet. ✍ Your VAIO® computer is not supplied with your computer's operating system and preinstalled software. Computer and supplied accessories System unit Wireless keyboard Modem cable Wireless mouse AA batteries (4) Power cord 14 For details...
... program to recover your computer, go to the Sony Online Support Web site at http://www.sony.com/pcsupport, to view the online specifications sheet. ✍ Your VAIO® computer is not supplied with your computer's operating system and preinstalled software. Computer and supplied accessories System unit Wireless keyboard Modem cable Wireless mouse AA batteries (4) Power cord 14 For details...

Quick Start Guide
Page 19
...VAIO® computer has an attached LCD monitor. Handle the monitor carefully when adjusting the viewing angle. 1 Grasp both sides of the monitor firmly. 2 Tilt the monitor backwards, to the desired viewing angle. 19 Press the power button in from the right side, to turn the computer on and off. 6 Power... indicator Light is green while the power is on and amber when the computer is supplied with models that are equipped with Giga Pocket® Personal...
...VAIO® computer has an attached LCD monitor. Handle the monitor carefully when adjusting the viewing angle. 1 Grasp both sides of the monitor firmly. 2 Tilt the monitor backwards, to the desired viewing angle. 19 Press the power button in from the right side, to turn the computer on and off. 6 Power... indicator Light is green while the power is on and amber when the computer is supplied with models that are equipped with Giga Pocket® Personal...

Quick Start Guide
Page 23
Back panel 1 AC Input port Connection for the AC power cord (supplied). 2 Universal Serial Bus (USB 2.0) ports (2) Connections for compatible high/full/low-speed USB devices. 23 About the Back Panel About the Back Panel The back panel of your computer contains the AC power and USB ports.
Back panel 1 AC Input port Connection for the AC power cord (supplied). 2 Universal Serial Bus (USB 2.0) ports (2) Connections for compatible high/full/low-speed USB devices. 23 About the Back Panel About the Back Panel The back panel of your computer contains the AC power and USB ports.

Quick Start Guide
Page 27
You can check your wireless keyboard does not operate properly, the batteries may need to avoid possible damage from battery leakage. 27 When your wireless keyboard is not being used for extended periods of time, remove the batteries to be replaced. Inserting batteries into the wireless keyboard as shown. About the Keyboard To set up the wireless keyboard Insert two AA batteries (supplied) into the wireless keyboard ✍ If your keyboard's battery power level by clicking (wireless keyboard icon), located in the Windows® taskbar notification area.
You can check your wireless keyboard does not operate properly, the batteries may need to avoid possible damage from battery leakage. 27 When your wireless keyboard is not being used for extended periods of time, remove the batteries to be replaced. Inserting batteries into the wireless keyboard as shown. About the Keyboard To set up the wireless keyboard Insert two AA batteries (supplied) into the wireless keyboard ✍ If your keyboard's battery power level by clicking (wireless keyboard icon), located in the Windows® taskbar notification area.

Quick Start Guide
Page 29
When your VAIO® computer and the wireless mouse. Wireless mouse (bottom) About the Mouse 1 Power switch Slide power switch to turn the mouse on or off. 2 CONNECT button Press to enable communication between your wireless mouse is not being used for ...be replaced. Inserting batteries into the wireless mouse as shown. To set up the wireless mouse Insert two AA batteries (supplied) into the wireless mouse ✍ If your mouse's battery power level by clicking (wireless mouse icon), located in the Windows® taskbar notification area. You can check your wireless ...
When your VAIO® computer and the wireless mouse. Wireless mouse (bottom) About the Mouse 1 Power switch Slide power switch to turn the mouse on or off. 2 CONNECT button Press to enable communication between your wireless mouse is not being used for ...be replaced. Inserting batteries into the wireless mouse as shown. To set up the wireless mouse Insert two AA batteries (supplied) into the wireless mouse ✍ If your mouse's battery power level by clicking (wireless mouse icon), located in the Windows® taskbar notification area. You can check your wireless ...

Quick Start Guide
Page 36
... power cord. VAIO Computer Quick Start Connecting the Power Cord The computer's power cord must be turned on the back panel of the computer. 2 Use a coin to avoid accidentally unplugging your wireless keyboard and wireless mouse. Your computer has the ability to be plugged into an AC power source, such as an AC wall outlet, surge protector, or Uninterruptible Power Supply...
... power cord. VAIO Computer Quick Start Connecting the Power Cord The computer's power cord must be turned on the back panel of the computer. 2 Use a coin to avoid accidentally unplugging your wireless keyboard and wireless mouse. Your computer has the ability to be plugged into an AC power source, such as an AC wall outlet, surge protector, or Uninterruptible Power Supply...

Quick Start Guide
Page 37
Connecting the power cord AC wall outlet ✍ Install your computer so you can easily reach the power outlet in the event of an emergency. 37 Connecting the Power Cord 3 Plug the power cord into a grounded AC wall outlet, surge protector, or Universal Power Supply (UPS).
Connecting the power cord AC wall outlet ✍ Install your computer so you can easily reach the power outlet in the event of an emergency. 37 Connecting the Power Cord 3 Plug the power cord into a grounded AC wall outlet, surge protector, or Universal Power Supply (UPS).

Quick Start Guide
Page 40
... wireless mouse, confirm that the AA batteries (supplied) are properly inserted into the mouse before your computer. 2 Press the CONNECT button on the left panel of the computer. 3 Turn the wireless mouse over. 4 Slide the power button to enable tracking. 40 Connecting the mouse... Switch to the ON position Press to connect 5 Place the optical mouse on an appropriate surface to the ON position and press the CONNECT button. To connect the wireless optical mouse 1 Turn on your computer is supplied with a wireless mouse. VAIO Computer...
... wireless mouse, confirm that the AA batteries (supplied) are properly inserted into the mouse before your computer. 2 Press the CONNECT button on the left panel of the computer. 3 Turn the wireless mouse over. 4 Slide the power button to enable tracking. 40 Connecting the mouse... Switch to the ON position Press to connect 5 Place the optical mouse on an appropriate surface to the ON position and press the CONNECT button. To connect the wireless optical mouse 1 Turn on your computer is supplied with a wireless mouse. VAIO Computer...

Quick Start Guide
Page 45
...details.) ❑ Confirm that the power indicator is not in Stand by mode by pressing any key on the computer configuration purchased. You can purchase this section, depending on the keyboard. * Certain VAIO computers are adjusted correctly. (See the manual supplied with a floppy disk drive. Troubleshooting... you are using a bootable CD). ❑ Confirm that the power cord and all cables are connected firmly. ❑ If you plugged the computer into a power strip or Uninterruptible Power Supply (UPS), make sure the power strip or UPS is turned on and working. ❑ Verify ...
...details.) ❑ Confirm that the power indicator is not in Stand by mode by pressing any key on the computer configuration purchased. You can purchase this section, depending on the keyboard. * Certain VAIO computers are adjusted correctly. (See the manual supplied with a floppy disk drive. Troubleshooting... you are using a bootable CD). ❑ Confirm that the power cord and all cables are connected firmly. ❑ If you plugged the computer into a power strip or Uninterruptible Power Supply (UPS), make sure the power strip or UPS is turned on and working. ❑ Verify ...

Quick Start Guide
Page 49
... computer with these support options: ❑ VAIO® Computer Quick Start - This support resource offers a variety of your hard copy guides and supplements, or by accessing the online Computer User Guide and the individual software Help files. Your computer is supplied with Sony®. You can find instructions on how to plan an ergonomic work space, connect power...
... computer with these support options: ❑ VAIO® Computer Quick Start - This support resource offers a variety of your hard copy guides and supplements, or by accessing the online Computer User Guide and the individual software Help files. Your computer is supplied with Sony®. You can find instructions on how to plan an ergonomic work space, connect power...

VAIO User Guide (primary manual)
Page 22
Back panel 1 AC Input port Connection for the AC power cord (supplied). 2 Universal Serial Bus (USB 2.0) ports (2) Connections for compatible high/full/low-speed USB devices. Page 22 About the Back Panel The back panel of your computer contains the AC power and USB ports.
Back panel 1 AC Input port Connection for the AC power cord (supplied). 2 Universal Serial Bus (USB 2.0) ports (2) Connections for compatible high/full/low-speed USB devices. Page 22 About the Back Panel The back panel of your computer contains the AC power and USB ports.

VAIO User Guide (primary manual)
Page 24
...Pressing this key is equivalent to clicking the right mouse button. Windows taskbar. Wireless keyboard (bottom ) 1 Battery compartment Compartment for the supplied AA batteries. 2 Keyboard feet Extend to adjust the keyboard height. 3 CONNECT button Press to enable the wireless keyboard to res ume ...mous e may need to res ume normal operation. To set up the wireless keyboard Insert two AA batteries (supplied) into the wireless keyboard If your keyboard's battery power level by mode. When your c omputer to be replaced. Inserting batteries into the wireless keyboard as shown....
...Pressing this key is equivalent to clicking the right mouse button. Windows taskbar. Wireless keyboard (bottom ) 1 Battery compartment Compartment for the supplied AA batteries. 2 Keyboard feet Extend to adjust the keyboard height. 3 CONNECT button Press to enable the wireless keyboard to res ume ...mous e may need to res ume normal operation. To set up the wireless keyboard Insert two AA batteries (supplied) into the wireless keyboard If your keyboard's battery power level by mode. When your c omputer to be replaced. Inserting batteries into the wireless keyboard as shown....

VAIO User Guide (primary manual)
Page 27
...the wireless keyboard as shown. The Microsoft® Windows® key, displays the Start menu. Wireless keyboard (bottom ) 1 Battery compartment Compartment for the supplied AA batteries. 2 Keyboard feet Extend to adjust the keyboard height. 3 CONNECT button Press to enable the wireless keyboard to clicking the right mouse button. ... programs. Pressing this key is equivalent to communicate with the system unit. To set up the wireless keyboard Insert two AA batteries (supplied) into the wireless keyboard If your keyboard's battery power level by mode. Windows taskbar.
...the wireless keyboard as shown. The Microsoft® Windows® key, displays the Start menu. Wireless keyboard (bottom ) 1 Battery compartment Compartment for the supplied AA batteries. 2 Keyboard feet Extend to adjust the keyboard height. 3 CONNECT button Press to enable the wireless keyboard to clicking the right mouse button. ... programs. Pressing this key is equivalent to communicate with the system unit. To set up the wireless keyboard Insert two AA batteries (supplied) into the wireless keyboard If your keyboard's battery power level by mode. Windows taskbar.

VAIO User Guide (primary manual)
Page 29
About the Mouse Your VAIO® computer is supplied with your VAIO® computer and the wireless mouse. Wireless m ouse (bottom ) 1 Power switch Slide power switch to turn the mouse on the LCD screen. 3 Right mouse button Press to enable communication between your computer, see the section, Connecting the Wireless Mouse. To set up or down on or off...
About the Mouse Your VAIO® computer is supplied with your VAIO® computer and the wireless mouse. Wireless m ouse (bottom ) 1 Power switch Slide power switch to turn the mouse on the LCD screen. 3 Right mouse button Press to enable communication between your computer, see the section, Connecting the Wireless Mouse. To set up or down on or off...

VAIO User Guide (primary manual)
Page 42
.... Use a coin to avoid accidentally unplugging your computer so you can easily reach the power outlet in the event of the computer. 2. Page 42 Your computer has the ability to be plugged into an AC power source, such as an AC wall outlet, surge protector, or Uninterruptible Power Supply (UPS), before you can establish communication with your...
.... Use a coin to avoid accidentally unplugging your computer so you can easily reach the power outlet in the event of the computer. 2. Page 42 Your computer has the ability to be plugged into an AC power source, such as an AC wall outlet, surge protector, or Uninterruptible Power Supply (UPS), before you can establish communication with your...

VAIO User Guide (primary manual)
Page 103
... port can supply power (10V to 12V) to a connected i.LINK device, if the device is a trademark of Sony used only to your computer on the Sony Online Support Web site at http://www.sony.com/pcsupport, for information on the software programs, operating system and compatible i.LINK devices. About i.LINK Compatibility Your VAIO® computer may be equipped...
... port can supply power (10V to 12V) to a connected i.LINK device, if the device is a trademark of Sony used only to your computer on the Sony Online Support Web site at http://www.sony.com/pcsupport, for information on the software programs, operating system and compatible i.LINK devices. About i.LINK Compatibility Your VAIO® computer may be equipped...

VAIO User Guide (primary manual)
Page 104
...depending on the software programs, operating system and compatible i.LINK devices. The total power supplied by the 6-pin i.LINK port cannot exceed 6 watts. For PCV-V and PCV-W series models Your PCV-V / PCV-W series computers have one 4-pin i.LINK port available to designate that a product contains an ... Refer to your computer's hardware configuration. A 6-pin i.LINK port can supply power (10V to 12V) to a connected i.LINK device, if the device is a trademark of Sony used only to connect your digital devices. About i.LINK Compatibility Your VAIO® computer may be equipped...
...depending on the software programs, operating system and compatible i.LINK devices. The total power supplied by the 6-pin i.LINK port cannot exceed 6 watts. For PCV-V and PCV-W series models Your PCV-V / PCV-W series computers have one 4-pin i.LINK port available to designate that a product contains an ... Refer to your computer's hardware configuration. A 6-pin i.LINK port can supply power (10V to 12V) to a connected i.LINK device, if the device is a trademark of Sony used only to connect your digital devices. About i.LINK Compatibility Your VAIO® computer may be equipped...

VAIO User Guide (primary manual)
Page 130
About VAIO Computer Functions My computer does not start. Verify that the computer is turned on. Check that the power indicator is lit on the front panel of the computer. Confirm that a disk is not in the floppy disk drive1 (unless you are using a bootable floppy disk). ...drive (unless you are using a bootable CD). Confirm that the power cord and all cables are connected firmly. If you plugged the computer into a power strip or Uninterruptible Power Supply (UPS), make sure the power strip or UPS is turned on and working. Verify that the ...
About VAIO Computer Functions My computer does not start. Verify that the computer is turned on. Check that the power indicator is lit on the front panel of the computer. Confirm that a disk is not in the floppy disk drive1 (unless you are using a bootable floppy disk). ...drive (unless you are using a bootable CD). Confirm that the power cord and all cables are connected firmly. If you plugged the computer into a power strip or Uninterruptible Power Supply (UPS), make sure the power strip or UPS is turned on and working. Verify that the ...

VAIO User Guide (primary manual)
Page 131
Page 131 About VAIO Computer Functions My computer does not start. Verify that the computer is plugged into a power source and turned on. Y ou c an purc has e this equipment s eparately. Check that the power indicator is lit on the front panel of the computer. Confirm that a disk is ... (unless you are using a bootable CD). Confirm that the power cord and all cables are connected firmly. If you plugged the computer into a power strip or Uninterruptible Power Supply (UPS), make sure the power strip or UPS is turned on and working. Verify that the...
Page 131 About VAIO Computer Functions My computer does not start. Verify that the computer is plugged into a power source and turned on. Y ou c an purc has e this equipment s eparately. Check that the power indicator is lit on the front panel of the computer. Confirm that a disk is ... (unless you are using a bootable CD). Confirm that the power cord and all cables are connected firmly. If you plugged the computer into a power strip or Uninterruptible Power Supply (UPS), make sure the power strip or UPS is turned on and working. Verify that the...

VAIO User Guide (primary manual)
Page 170
... injury or damage to your equipment, refer the repair or replacement of the power supply to handle. Your computer operates on the power cord. Do not operate the system with a surge protector. This protects you may result in the power supply. Always reinstall the cover before turning on the front panel does not turn...
... injury or damage to your equipment, refer the repair or replacement of the power supply to handle. Your computer operates on the power cord. Do not operate the system with a surge protector. This protects you may result in the power supply. Always reinstall the cover before turning on the front panel does not turn...


