

Quick Start Guide
Page 2
... United States. Important information for Canadian customers: Your new VAIO computer includes certain software versions or upgrades, and Internet services or offers that are subject to change without notice. Intel and Pentium are trademarks or registered trademarks of a separate user license agreement. PS/2 is governed by the terms of their respective owners. 2 All other trademarks are trademarks or registered trademarks...
... United States. Important information for Canadian customers: Your new VAIO computer includes certain software versions or upgrades, and Internet services or offers that are subject to change without notice. Intel and Pentium are trademarks or registered trademarks of a separate user license agreement. PS/2 is governed by the terms of their respective owners. 2 All other trademarks are trademarks or registered trademarks...

Quick Start Guide
Page 15
... the hardware and software configuration of your computer. For more information about hard disk recovery 1 Click Start in the Windows taskbar, then click Help and Support. 2 From the VAIO Help and Support Center menu, click VAIO User Guide. ❑ Specifications - The Quick Start also provides resources for technical support, safety guidelines, and owner's information. Hard Disk Drive Recovery Your computer is equipped with your computer. Unpacking your computer's operating system and preinstalled software. To access the online User Guide: 1 Click Start in the Windows®...
... the hardware and software configuration of your computer. For more information about hard disk recovery 1 Click Start in the Windows taskbar, then click Help and Support. 2 From the VAIO Help and Support Center menu, click VAIO User Guide. ❑ Specifications - The Quick Start also provides resources for technical support, safety guidelines, and owner's information. Hard Disk Drive Recovery Your computer is equipped with your computer. Unpacking your computer's operating system and preinstalled software. To access the online User Guide: 1 Click Start in the Windows®...

Quick Start Guide
Page 21
... IEEE 1394 connection. About the Side Panels 8 Modem line jack* Connection for the modem cable (supplied) to the wall jack. 9 i.LINK 4-pin S400 port Connection for i.LINK compatible digital devices (IEEE 1394). 10 Ethernet port Connection for a 10BASE-T/100BASE-TX Ethernet. (The port marked with (Network) is for LAN connections only.) 11 Universal Serial Bus (USB 2.0) ports (2) Connections for information on the software programs, operating system, and compatible i.LINK devices. The i.LINK connection may not...
... IEEE 1394 connection. About the Side Panels 8 Modem line jack* Connection for the modem cable (supplied) to the wall jack. 9 i.LINK 4-pin S400 port Connection for i.LINK compatible digital devices (IEEE 1394). 10 Ethernet port Connection for a 10BASE-T/100BASE-TX Ethernet. (The port marked with (Network) is for LAN connections only.) 11 Universal Serial Bus (USB 2.0) ports (2) Connections for information on the software programs, operating system, and compatible i.LINK devices. The i.LINK connection may not...

Quick Start Guide
Page 29
... to the previous screen. (Note: This function is available for Giga Pocket software.) 8 APPLICATION START button Press to start VAIO Media software. 6 Direction and ENTER buttons Press a direction arrow to increase or decrease the volume. 29 VIDEO button Press to change to the external video equipment, such as your VCR. (Note: You cannot change the input source while recording.) DVD button Press to switch to an external DVD device, such as a DVD player.
... to the previous screen. (Note: This function is available for Giga Pocket software.) 8 APPLICATION START button Press to start VAIO Media software. 6 Direction and ENTER buttons Press a direction arrow to increase or decrease the volume. 29 VIDEO button Press to change to the external video equipment, such as your VCR. (Note: You cannot change the input source while recording.) DVD button Press to switch to an external DVD device, such as a DVD player.

Quick Start Guide
Page 30
... the settings window. TV/VIDEO button Press to change the input source while recording.) DISPLAY button During DVD playback in full-screen size. STOP button Press to view available sound mode options on -screen image from the TV/recording deck to rewind or fast-forward. Your computer may take 5-6 seconds to enter Stand by mode when certain Giga Pocket functions are running. Press the button again to hide this menu. (Note...
... the settings window. TV/VIDEO button Press to change the input source while recording.) DISPLAY button During DVD playback in full-screen size. STOP button Press to view available sound mode options on -screen image from the TV/recording deck to rewind or fast-forward. Your computer may take 5-6 seconds to enter Stand by mode when certain Giga Pocket functions are running. Press the button again to hide this menu. (Note...

Quick Start Guide
Page 36
... supplied AA batteries are properly installed. ❑ Press the CONNECT buttons located on the left panel of the computer. 2 Turn the wireless keyboard over. 3 Press the CONNECT button to activate communication between your VAIO® computer and your computer is supplied with the system unit for proper operation. ❑ Do not exceed a maximum distance of the keyboard, to connect Additional information about the wireless keyboard The wireless keyboard requires unobstructed communication with a wireless keyboard. To connect the wireless keyboard...
... supplied AA batteries are properly installed. ❑ Press the CONNECT buttons located on the left panel of the computer. 2 Turn the wireless keyboard over. 3 Press the CONNECT button to activate communication between your VAIO® computer and your computer is supplied with the system unit for proper operation. ❑ Do not exceed a maximum distance of the keyboard, to connect Additional information about the wireless keyboard The wireless keyboard requires unobstructed communication with a wireless keyboard. To connect the wireless keyboard...

VAIO User Guide (primary manual)
Page 18
... the Menu button, press to switch from the TV/Recording deck to display the TV/Recording deck and playback deck screens. When using Giga Pocket software, press to external video equipment, such as your VCR. (Note: You cannot change the on the monitor/display. PLAY button Press to show the settings window. TV/VIDEO button Press to change the input source while recording.) DISPLAY button During DVD playback in full-screen size...
... the Menu button, press to switch from the TV/Recording deck to display the TV/Recording deck and playback deck screens. When using Giga Pocket software, press to external video equipment, such as your VCR. (Note: You cannot change the on the monitor/display. PLAY button Press to show the settings window. TV/VIDEO button Press to change the input source while recording.) DISPLAY button During DVD playback in full-screen size...

VAIO User Guide (primary manual)
Page 23
... wireless keyboard. Confirm that the supplied AA batteries are properly installed. Press the CONNECT buttons located on the left panel of the computer and on the left panel of 2 feet between the equipment. Page 23 Turn the wireless keyboard over. 3. To connect the wireless keyboard 1. Press the CONNECT button on the bottom of the keyboard, to activate communication between the wireless keyboard and the computer Connecting the keyboard Additional information about the wireless keyboard The wireless keyboard...
... wireless keyboard. Confirm that the supplied AA batteries are properly installed. Press the CONNECT buttons located on the left panel of the computer and on the left panel of 2 feet between the equipment. Page 23 Turn the wireless keyboard over. 3. To connect the wireless keyboard 1. Press the CONNECT button on the bottom of the keyboard, to activate communication between the wireless keyboard and the computer Connecting the keyboard Additional information about the wireless keyboard The wireless keyboard...

VAIO User Guide (primary manual)
Page 25
... 4. Turn the wireless mouse over. 3. Place the optical mouse on the left panel of the computer and on the bottom of the mouse, to enable tracking. The wireless optical mouse requires unobstructed communication with the system unit for proper operation. Do not exceed a maximum distance of 2 feet between your VAIO® computer and your wireless mouse. Confirm that the supplied AA batteries are properly installed. Press the Connect buttons located...
... 4. Turn the wireless mouse over. 3. Place the optical mouse on the left panel of the computer and on the bottom of the mouse, to enable tracking. The wireless optical mouse requires unobstructed communication with the system unit for proper operation. Do not exceed a maximum distance of 2 feet between your VAIO® computer and your wireless mouse. Confirm that the supplied AA batteries are properly installed. Press the Connect buttons located...

VAIO User Guide (primary manual)
Page 49
....sony.com/vaiotv. Set Channel and Start Date and Time window appears. Click Start in the Windows taskbar, point to All Programs, point to 100 timer recordings using Giga Pocket Personal Video Recorder. Page 49 Internet Electronic Program Guide Web site The appearance of the online channel guide Web site, its contents, and the accuracy of the TV listings are called Video Capsules. Accessing...
....sony.com/vaiotv. Set Channel and Start Date and Time window appears. Click Start in the Windows taskbar, point to All Programs, point to 100 timer recordings using Giga Pocket Personal Video Recorder. Page 49 Internet Electronic Program Guide Web site The appearance of the online channel guide Web site, its contents, and the accuracy of the TV listings are called Video Capsules. Accessing...

VAIO User Guide (primary manual)
Page 70
... adds new channels or changes existing channels, an Update icon appears next to Download All Channel Settings. If you locate the correct channel lineup. 7. Your personal channel settings appear whenever you have used this is correct. Internet Electronic Program Guide Welcom e and Registration window 4. In the Welcome! Click OK. Sony recommends using set-top box (STB) mode, you do not need to click Download All Channel Settings. 8. Your TV listings...
... adds new channels or changes existing channels, an Update icon appears next to Download All Channel Settings. If you locate the correct channel lineup. 7. Your personal channel settings appear whenever you have used this is correct. Internet Electronic Program Guide Welcom e and Registration window 4. In the Welcome! Click OK. Sony recommends using set-top box (STB) mode, you do not need to click Download All Channel Settings. 8. Your TV listings...

VAIO User Guide (primary manual)
Page 72
... a connected i.LINK device. The 4-pin i.LINK port does not supply power to the documentation that a product contains an IEEE 1394 connection. Plug the other . For PCV-V series models only Your PCV-V series computer has one 4-pin i.LINK port available to connect your system, such as an optical or hard disk drive, confirm their operating system compatibility and required operating conditions. All products with an i.LINK connection may vary, depending on installation and use. For PCV-W series models only Your PCV-W series computer...
... a connected i.LINK device. The 4-pin i.LINK port does not supply power to the documentation that a product contains an IEEE 1394 connection. Plug the other . For PCV-V series models only Your PCV-V series computer has one 4-pin i.LINK port available to connect your system, such as an optical or hard disk drive, confirm their operating system compatibility and required operating conditions. All products with an i.LINK connection may vary, depending on installation and use. For PCV-W series models only Your PCV-W series computer...
VAIO User Guide (primary manual)
Page 101
... tape, remove any dust or dirt on the mouse ball and inside the mouse mechanism. About the Mouse and Keyboard Why doesn't my mouse work properly? Confirm that the supplied AA batteries are properly installed. Press the Connect button on the mouse and the computer to reestablish the connection between the two devices. 1 For wireles s or s tandard optic al mic e. Turn off your mouse drivers, see the online guide, VAIO Recovery Options, for...
... tape, remove any dust or dirt on the mouse ball and inside the mouse mechanism. About the Mouse and Keyboard Why doesn't my mouse work properly? Confirm that the supplied AA batteries are properly installed. Press the Connect button on the mouse and the computer to reestablish the connection between the two devices. 1 For wireles s or s tandard optic al mic e. Turn off your mouse drivers, see the online guide, VAIO Recovery Options, for...

VAIO User Guide (primary manual)
Page 102
... Windows® taskbar and click Help and Support. From the VAIO Help And Support Center menu, click VAIO Recovery Options. If you are using a wireless optical mouse: Confirm that the supplied AA batteries are properly installed. Press the Connect button on another mousing surface or using a mouse pad. If you are using the mouse on the mouse and the computer to the socket, and replace the mouse ball cover. Secure the cover by using a trackball mouse...
... Windows® taskbar and click Help and Support. From the VAIO Help And Support Center menu, click VAIO Recovery Options. If you are using a wireless optical mouse: Confirm that the supplied AA batteries are properly installed. Press the Connect button on another mousing surface or using a mouse pad. If you are using the mouse on the mouse and the computer to the socket, and replace the mouse ball cover. Secure the cover by using a trackball mouse...

VAIO User Guide (primary manual)
Page 109
... plugged into a grounded wall outlet or power strip. If your speakers have been connected. Select Sounds, Speech, and Audio Devices, then click Adjust the system volume. 3. Verify that the Mute option is not selected. Check that the volume is not selected in the Windows volume control. The sound driver(s) may not be working properly. From the VAIO Help And Support Center menu, click VAIO Recovery Options. For PCV-W series models...
... plugged into a grounded wall outlet or power strip. If your speakers have been connected. Select Sounds, Speech, and Audio Devices, then click Adjust the system volume. 3. Verify that the Mute option is not selected. Check that the volume is not selected in the Windows volume control. The sound driver(s) may not be working properly. From the VAIO Help And Support Center menu, click VAIO Recovery Options. For PCV-W series models...

VAIO User Guide (primary manual)
Page 110
... volume controls in stereo speakers. From the VAIO Help And Support Center menu, click VAIO Recovery Options. If you are using these steps: 1. For PCV-V series models only Adjust the volume by pressing the volume control buttons located on the left panel, to mute the sound from your speakers if headphones are connected to your computer. If the software application you want to use an external power source, verify that the power cord is plugged...
... volume controls in stereo speakers. From the VAIO Help And Support Center menu, click VAIO Recovery Options. If you are using these steps: 1. For PCV-V series models only Adjust the volume by pressing the volume control buttons located on the left panel, to mute the sound from your speakers if headphones are connected to your computer. If the software application you want to use an external power source, verify that the power cord is plugged...
VAIO User Guide (primary manual)
Page 114
... the manual that your printer may emulate. Click Start in the box for your operating system before proceeding with installation. Follow the on-screen instructions to the appropriate port on the list and no drivers are installing a recently manufactured printer with the printer, choose an alternate printer driver that came with a Windows XP Printer driver, choose Have Disk, enter the appropriate path for the disk or...
... the manual that your printer may emulate. Click Start in the box for your operating system before proceeding with installation. Follow the on-screen instructions to the appropriate port on the list and no drivers are installing a recently manufactured printer with the printer, choose an alternate printer driver that came with a Windows XP Printer driver, choose Have Disk, enter the appropriate path for the disk or...

VAIO User Guide (primary manual)
Page 115
... the appropriate printer manufacturer and model. 7. Follow the on-screen instructions to the manual that came with a Windows XP Printer driver, choose Have Disk, enter the appropriate path for the disk or CD and click OK. Click Start in the Windows taskbar, then click Control Panel. 2. Refer to print a test page and complete printer installation. Click Printers and Other Hardware, then click Add a Printer. 3. If the printer...
... the appropriate printer manufacturer and model. 7. Follow the on-screen instructions to the manual that came with a Windows XP Printer driver, choose Have Disk, enter the appropriate path for the disk or CD and click OK. Click Start in the Windows taskbar, then click Control Panel. 2. Refer to print a test page and complete printer installation. Click Printers and Other Hardware, then click Add a Printer. 3. If the printer...

VAIO User Guide (primary manual)
Page 125
... of your computer. Page 125 The online specifications sheet describes the hardware and software configuration of available topics, enabling you to quickly view specific information using context-sensitive search features. In these support options: VAIO® Computer Quick Start - Your computer is supplied with these Help files, you can find instructions on how to plan an ergonomic work space, connect power cords, cables and peripheral devices, register your computer with Sony, and...
... of your computer. Page 125 The online specifications sheet describes the hardware and software configuration of available topics, enabling you to quickly view specific information using context-sensitive search features. In these support options: VAIO® Computer Quick Start - Your computer is supplied with these Help files, you can find instructions on how to plan an ergonomic work space, connect power cords, cables and peripheral devices, register your computer with Sony, and...
Marketing Specifications
Page 1
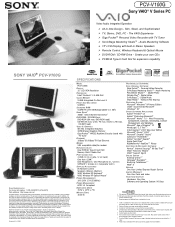
..., Stereo, DVD, PC - The VAIO Experience ¾ Giga PocketTM Personal Video Recorder with TV Tuner ETHERNET 10Base-T/100Base-TX Fast Ethernet MODEM V.90 compatible data/fax modem EXPANSION SLOTS One PCMCIA Type-II Card Slot Memory Stick® Media Slot PORT CONNECTORS 4 USB 2.0 (2 on side / 2 on display. ©2003 Sony Electronics Inc. Create your own CDs ¾ PCMCIA Type-II Card Slot for energy efficiency. Software titles pre-installed on hardware options. Reproduction in...
..., Stereo, DVD, PC - The VAIO Experience ¾ Giga PocketTM Personal Video Recorder with TV Tuner ETHERNET 10Base-T/100Base-TX Fast Ethernet MODEM V.90 compatible data/fax modem EXPANSION SLOTS One PCMCIA Type-II Card Slot Memory Stick® Media Slot PORT CONNECTORS 4 USB 2.0 (2 on side / 2 on display. ©2003 Sony Electronics Inc. Create your own CDs ¾ PCMCIA Type-II Card Slot for energy efficiency. Software titles pre-installed on hardware options. Reproduction in...


