
Online Help Center (VAIO User Guide)
Page 3
... view this Sony computer. Application Recovery CD(s) - From the VAIO Help and Support Center menu, click VAIO User Guide. 3. Unpacking Your Computer Your computer may not be used to use the basic features of the latest Windows operating system. Click Start in the right-side frame. 4. The Quick Start also provides software, support, safety and legal information. VAIO® Com puter User Guide - This online specification sheet describes the hardware and software configuration of this...
... view this Sony computer. Application Recovery CD(s) - From the VAIO Help and Support Center menu, click VAIO User Guide. 3. Unpacking Your Computer Your computer may not be used to use the basic features of the latest Windows operating system. Click Start in the right-side frame. 4. The Quick Start also provides software, support, safety and legal information. VAIO® Com puter User Guide - This online specification sheet describes the hardware and software configuration of this...

Online Help Center (VAIO User Guide)
Page 7
... computer is on the back. The indicator light is blue while the power is in Stand by mode. 8 i.LINK 4-pin port (IEEE 1394) Connection for a compatible digital device. 9 Optical drive 1 eject button Ejects a disc from Optical drive 1. 10 Optical drive 2 eject button Ejects a disc from Optical drive 2. 11 Memory Stick® media slot Reads and writes data from and to a Memory Stick® media. 12 Floppy disk eject button Ejects a floppy disk. 13 Universal Serial Bus 2.0 (USB) ports (2) High-speed connections for compatible USB devices...
... computer is on the back. The indicator light is blue while the power is in Stand by mode. 8 i.LINK 4-pin port (IEEE 1394) Connection for a compatible digital device. 9 Optical drive 1 eject button Ejects a disc from Optical drive 1. 10 Optical drive 2 eject button Ejects a disc from Optical drive 2. 11 Memory Stick® media slot Reads and writes data from and to a Memory Stick® media. 12 Floppy disk eject button Ejects a floppy disk. 13 Universal Serial Bus 2.0 (USB) ports (2) High-speed connections for compatible USB devices...

Online Help Center (VAIO User Guide)
Page 8
... panel locate and identify the ports and jacks on the configuration you purchased. Your system may vary between models) Connection for a display. 5 i.LINK 6-pin port (IEEE 1394) Connection for supplied and optional accessories. Back panel 1 Mouse port Connection for a PS/2® mouse. 2 Keyboard port Connection for a PS/2 keyboard. 3 Printer port Connection for a parallel device, such as a printer or scanner. 4 Monitor port (The monitor port location may vary based on your computer contains the ports for a compatible digital device. Page 8 About the back panel...
... panel locate and identify the ports and jacks on the configuration you purchased. Your system may vary between models) Connection for a display. 5 i.LINK 6-pin port (IEEE 1394) Connection for supplied and optional accessories. Back panel 1 Mouse port Connection for a PS/2® mouse. 2 Keyboard port Connection for a PS/2 keyboard. 3 Printer port Connection for a parallel device, such as a printer or scanner. 4 Monitor port (The monitor port location may vary based on your computer contains the ports for a compatible digital device. Page 8 About the back panel...

Online Help Center (VAIO User Guide)
Page 11
Connecting a display (monitor) 1. If necessary, plug the display cable into the Monitor port. 2. Plug the display cable into the rear of an emergency. To connect a display Install your equipment so that you can easily reach the power outlet in the event of the display. Page 11
Connecting a display (monitor) 1. If necessary, plug the display cable into the Monitor port. 2. Plug the display cable into the rear of an emergency. To connect a display Install your equipment so that you can easily reach the power outlet in the event of the display. Page 11

Online Help Center (VAIO User Guide)
Page 21
To view the specific hardware configuration for your computer's hard disk drive performance, using i.LINK devices, Memory Stick media, PC Cards, and changing default settings. Configuring Your VAIO Computer This section provides basic information about managing your computer, see the online specifications sheet. About Your Hard Disk Drive Partition i.LINK Compatibility VAIO Action Setup Changing The Sony Software Window Design Using The Memory Stick Media Slot Using The PC Card Slot Page 21 Your computer may not be equipped with all ...
To view the specific hardware configuration for your computer's hard disk drive performance, using i.LINK devices, Memory Stick media, PC Cards, and changing default settings. Configuring Your VAIO Computer This section provides basic information about managing your computer, see the online specifications sheet. About Your Hard Disk Drive Partition i.LINK Compatibility VAIO Action Setup Changing The Sony Software Window Design Using The Memory Stick Media Slot Using The PC Card Slot Page 21 Your computer may not be equipped with all ...

Online Help Center (VAIO User Guide)
Page 25
Page 25 or 6-pin i.LINK port on your computer. Use the symbol to locate the i.LINK port on your compatible i.LINK device and on installation and use. Connecting an i.LINK (IEEE 1394) device 1. Plug the i.LINK cable connector into the corresponding 4- Plug the other end of the cable into this port. 2. See the instructions that came with your i.LINK device for more information on your computer.
Page 25 or 6-pin i.LINK port on your computer. Use the symbol to locate the i.LINK port on your compatible i.LINK device and on installation and use. Connecting an i.LINK (IEEE 1394) device 1. Plug the i.LINK cable connector into the corresponding 4- Plug the other end of the cable into this port. 2. See the instructions that came with your i.LINK device for more information on your computer.

Online Help Center (VAIO User Guide)
Page 35
You can download the System Reference Manual from the Sony Web site at http://www.sony.com/pcsupport. Overview Removing the Side Panel Installing an Add-on your system. Upgrading And Maintaining Your VAIO Computer In the future you may want to perform basic upgrades and maintenance on Card Installing Memory Replacing the Lithium Battery Installing an Additional Hard Disk Drive Replacing the Side Panel Page 35 This...
You can download the System Reference Manual from the Sony Web site at http://www.sony.com/pcsupport. Overview Removing the Side Panel Installing an Add-on your system. Upgrading And Maintaining Your VAIO Computer In the future you may want to perform basic upgrades and maintenance on Card Installing Memory Replacing the Lithium Battery Installing an Additional Hard Disk Drive Replacing the Side Panel Page 35 This...

Online Help Center (VAIO User Guide)
Page 38
... computer. Locate an available expansion slot. Remove the slot cover's screw, and then remove the slot cover. Replace the side panel. See Before you add cards to -Order (CTO) systems, may contain preinstalled add-on card should not exceed 9.05 inches. Shut down your computer and turn off all peripheral devices, such as Configure-to your system. Remove the side panel. An expansion slot enables you want to temporarily remove add-on card by model. Install the add-on cards...
... computer. Locate an available expansion slot. Remove the slot cover's screw, and then remove the slot cover. Replace the side panel. See Before you add cards to -Order (CTO) systems, may contain preinstalled add-on card should not exceed 9.05 inches. Shut down your computer and turn off all peripheral devices, such as Configure-to your system. Remove the side panel. An expansion slot enables you want to temporarily remove add-on card by model. Install the add-on cards...

Online Help Center (VAIO User Guide)
Page 40
... from the slot. 7. Remove the side panel. Grasp one edge of memory installed in a static-free bag. See the online specifications sheet for details about the amount of the module and lift it from your local retailer. Shut down your computer and turn off all peripheral devices, such as your printer. 2. Remove the power supply before installing the memory module(s), by following these steps: 1. Installing Memory The...
... from the slot. 7. Remove the side panel. Grasp one edge of memory installed in a static-free bag. See the online specifications sheet for details about the amount of the module and lift it from your local retailer. Shut down your computer and turn off all peripheral devices, such as your printer. 2. Remove the power supply before installing the memory module(s), by following these steps: 1. Installing Memory The...

Online Help Center (VAIO User Guide)
Page 41
...-static package. 7. Locate the notches on cards you may have removed. 12. To avoid damaging a DIMM slot, move the end latches slightly outward to an upside down evenly against the module's upper corners. Replace the side panel. Reinstall any components or add-on the bottom edge of the chassis. 6. See To replace the side panel. Rotate the power supply to relieve...
...-static package. 7. Locate the notches on cards you may have removed. 12. To avoid damaging a DIMM slot, move the end latches slightly outward to an upside down evenly against the module's upper corners. Replace the side panel. Reinstall any components or add-on the bottom edge of the chassis. 6. See To replace the side panel. Rotate the power supply to relieve...
Online Help Center (VAIO User Guide)
Page 42
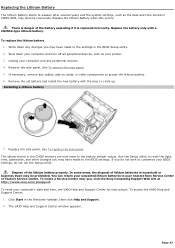
... Factory Service Center. You can return your BIOS settings, do not wish to the BIOS settings. Click Start in the BIOS Setup utility. 2. The VAIO Help and Support Center window appears. There is replaced incorrectly. See To replace the side panel. Replace the lithium battery when this occurs. To replace the lithium battery 1. Unplug your computer's date and time, see VAIO Help and Support Center for instructions. Replace the side panel. Remove the old battery and install the new battery with a CR2032-type lithium battery. To access...
... Factory Service Center. You can return your BIOS settings, do not wish to the BIOS settings. Click Start in the BIOS Setup utility. 2. The VAIO Help and Support Center window appears. There is replaced incorrectly. See To replace the side panel. Replace the lithium battery when this occurs. To replace the lithium battery 1. Unplug your computer's date and time, see VAIO Help and Support Center for instructions. Replace the side panel. Remove the old battery and install the new battery with a CR2032-type lithium battery. To access...
Online Help Center (VAIO User Guide)
Page 43
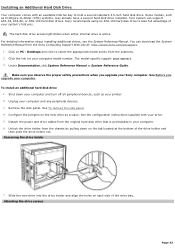
... on PC - The model-specific support page appears. 3. Make sure you observe the proper safety precautions when you upgrade your computer. Shut down on the new drive as your Sony computer. Remove the side panel. See the configuration instructions supplied with an available internal bay to take full advantage of your computer. 6. Installing an Additional Hard Disk Drive Your computer comes with your drive. 5. Detach the power and drive cables from the Sony Computing Support Web site at the...
... on PC - The model-specific support page appears. 3. Make sure you observe the proper safety precautions when you upgrade your computer. Shut down on the new drive as your Sony computer. Remove the side panel. See the configuration instructions supplied with an available internal bay to take full advantage of your computer. 6. Installing an Additional Hard Disk Drive Your computer comes with your drive. 5. Detach the power and drive cables from the Sony Computing Support Web site at the...

Online Help Center (VAIO User Guide)
Page 44
.... Connect the second power connector to your computer. Replace the side panel. Select Manage. The Computer Management window appears. 4. Orient the connector to display a shortcut menu. 7. Replacing the driv e holder 13. Reconnect the power cord to the new drive. Page 44 Connect the second drive connector to the drive holder. 9. A shortcut menu appears. 3. 8. See the instructions supplied with the necessary screws. Right-click on the new drive. 12. Select New Partition. Secure the drive to lock it must be configured...
.... Connect the second power connector to your computer. Replace the side panel. Select Manage. The Computer Management window appears. 4. Orient the connector to display a shortcut menu. 7. Replacing the driv e holder 13. Reconnect the power cord to the new drive. Page 44 Connect the second drive connector to the drive holder. 9. A shortcut menu appears. 3. 8. See the instructions supplied with the necessary screws. Right-click on the new drive. 12. Select New Partition. Secure the drive to lock it must be configured...

Online Help Center (VAIO User Guide)
Page 50
... in your computer's optical drive. 3. A blue screen appears during the downloading process. 1. Press the disc eject button to run the System Recovery program. The System Recovery utility starts from the first CD has been installed. When the VAIO System Recovery Utility dialog box appears, click Next. 7. Product Recovery window, select the appropriate option to complete the recovery process. Follow the on Use window appears. If you turn on your computer. Use the Application Recovery CD(s) to...
... in your computer's optical drive. 3. A blue screen appears during the downloading process. 1. Press the disc eject button to run the System Recovery program. The System Recovery utility starts from the first CD has been installed. When the VAIO System Recovery Utility dialog box appears, click Next. 7. Product Recovery window, select the appropriate option to complete the recovery process. Follow the on Use window appears. If you turn on your computer. Use the Application Recovery CD(s) to...

Online Help Center (VAIO User Guide)
Page 53
... My Computer. A devic e that requires the driver installation and click Update Driver from the shortcut menu. From the Hardware tab, click the Device Manager button. 4. Reinstalling device drivers The Microsoft® Windows® XP operating system is identified by a yellow exc lamation mark. Click Start in the next section to reinstall the device driver(s) using the Application Recovery CD(s). 1 A n unknown devic e(s ) is capable of reinstalling the original factory-installed device drivers, without using the Application Recovery CD...
... My Computer. A devic e that requires the driver installation and click Update Driver from the shortcut menu. From the Hardware tab, click the Device Manager button. 4. Reinstalling device drivers The Microsoft® Windows® XP operating system is identified by a yellow exc lamation mark. Click Start in the next section to reinstall the device driver(s) using the Application Recovery CD(s). 1 A n unknown devic e(s ) is capable of reinstalling the original factory-installed device drivers, without using the Application Recovery CD...

Online Help Center (VAIO User Guide)
Page 54
... requires the driver installation and click Update Driver from the optical drive, click Start in the Windows taskbar, select Turn Off Computer. From the Hardware tab, click the Device Manager button. 6. Insert Application Recovery CD #1 into the optical disc drive. The VAIO welcome window appears. Right-click to the Hardware Update Wizard. Click Start in the Windows taskbar and then right-click My Computer. Select the Turn Off option. 17. Click Next. 13. You are displayed. 11. Logon...
... requires the driver installation and click Update Driver from the optical drive, click Start in the Windows taskbar, select Turn Off Computer. From the Hardware tab, click the Device Manager button. 6. Insert Application Recovery CD #1 into the optical disc drive. The VAIO welcome window appears. Right-click to the Hardware Update Wizard. Click Start in the Windows taskbar and then right-click My Computer. Select the Turn Off option. 17. Click Next. 13. You are displayed. 11. Logon...

Online Help Center (VAIO User Guide)
Page 62
... Setup Utility screen. 4. Press the F10 key to highlight Parallel Port Mode and press Enter. Select the desired setting displays, and press Enter. 7. You can change the parallel port type to ECP, EPP, or bi-directional? Click Start in the Windows taskbar and select Turn Off Computer. How do I /O Device Configuration and press Enter. 5. You can toggle between the Normal (bi-directional), EPP, ECP, and ECP+EPP options using the System Setup utility (CMOS Setup Utility). To access...
... Setup Utility screen. 4. Press the F10 key to highlight Parallel Port Mode and press Enter. Select the desired setting displays, and press Enter. 7. You can change the parallel port type to ECP, EPP, or bi-directional? Click Start in the Windows taskbar and select Turn Off Computer. How do I /O Device Configuration and press Enter. 5. You can toggle between the Normal (bi-directional), EPP, ECP, and ECP+EPP options using the System Setup utility (CMOS Setup Utility). To access...
Online Help Center (VAIO User Guide)
Page 91
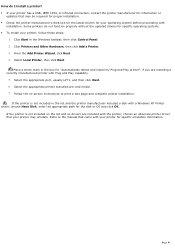
From the Add Printer Wizard, click Next. 4. Select the appropriate printer manufacturer and model. 7. Select the appropriate port, usually LPT1, and then click Next. 6. If the printer is not included in the list and the printer manufacturer included a disk with Plug and Play capability. 5. How do not function properly without the updated drivers for specific operating systems. To install your printer...
From the Add Printer Wizard, click Next. 4. Select the appropriate printer manufacturer and model. 7. Select the appropriate port, usually LPT1, and then click Next. 6. If the printer is not included in the list and the printer manufacturer included a disk with Plug and Play capability. 5. How do not function properly without the updated drivers for specific operating systems. To install your printer...
Online Help Center (VAIO User Guide)
Page 94
... to set up connection to the Internet. This support resource offers a variety of installed memory, identify optical drive specifications, and more. Click Start in the Windows taskbar and point to All Programs. A submenu appears, listing all preinstalled software applications. 2. Click Start in the Windows® taskbar 2. The online specifications sheet lists the hardware configuration and preinstalled software applications of the V A I O C omputer U s er Guide is supplied with Sony, and establish a dial-up your system's processor speed...
... to set up connection to the Internet. This support resource offers a variety of installed memory, identify optical drive specifications, and more. Click Start in the Windows taskbar and point to All Programs. A submenu appears, listing all preinstalled software applications. 2. Click Start in the Windows® taskbar 2. The online specifications sheet lists the hardware configuration and preinstalled software applications of the V A I O C omputer U s er Guide is supplied with Sony, and establish a dial-up your system's processor speed...
Marketing Specifications
Page 1
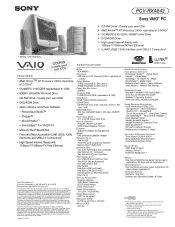
... upgrade. Simulated graphic shown on the Sony Desktop Computer are trademarks of additional fees or subscription for VAIO® PC • Memory Stick® Media Slot • Front and Rear Accessible i.LINK (IEEE 1394) Interfaces and USB 2.0 Connections1 • High-Speed Internet Ready with 10Base-T/100Base-TX Fast Ethernet ¾ i.LINK® (IEEE 1394) Interface and USB 2.0 Connectors1 * Display sold separately. CD-ROM Read FLOPPY DISK DRIVE 3.5" 1.44 MB Floppy Disk Drive VIDEO & GRAPHICS...
... upgrade. Simulated graphic shown on the Sony Desktop Computer are trademarks of additional fees or subscription for VAIO® PC • Memory Stick® Media Slot • Front and Rear Accessible i.LINK (IEEE 1394) Interfaces and USB 2.0 Connections1 • High-Speed Internet Ready with 10Base-T/100Base-TX Fast Ethernet ¾ i.LINK® (IEEE 1394) Interface and USB 2.0 Connectors1 * Display sold separately. CD-ROM Read FLOPPY DISK DRIVE 3.5" 1.44 MB Floppy Disk Drive VIDEO & GRAPHICS...


