Online Help Center
Page 3
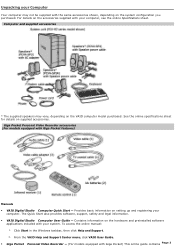
...you purchased. Unpacking your Computer Your computer may vary, depending on the VAIO computer model purchased. Giga Pocket Personal Video Recorder accessories (For m odels equipped with your computer, see the online ...Specifications sheet. Com puter and supplied accessories * The supplied speakers may not be supplied with Giga Pocket) This online guide contains Page 3 Provides basic information on supplied accessories. Click Start in the Windows...
...you purchased. Unpacking your Computer Your computer may vary, depending on the VAIO computer model purchased. Giga Pocket Personal Video Recorder accessories (For m odels equipped with your computer, see the online ...Specifications sheet. Com puter and supplied accessories * The supplied speakers may not be supplied with Giga Pocket) This online guide contains Page 3 Provides basic information on supplied accessories. Click Start in the Windows...
Online Help Center
Page 4
... equipment and software applications. This online specification sheet describes the hardware and software configuration of your computer. Explains how to restore the hard disk of this Sony computer. Application Recovery CD(s) - Recovery CDs System Recovery CD(s) - Other ...your computer's hardware configuration and preinstalled software information." Microsoft® Windows® XP guide - From the VAIO Help and Support Center menu, click VAIO Multimedia. 3. Click the link in the text, "View the VAIO Computer Specifications, which lists your computer if...
... equipment and software applications. This online specification sheet describes the hardware and software configuration of your computer. Explains how to restore the hard disk of this Sony computer. Application Recovery CD(s) - Recovery CDs System Recovery CD(s) - Other ...your computer's hardware configuration and preinstalled software information." Microsoft® Windows® XP guide - From the VAIO Help and Support Center menu, click VAIO Multimedia. 3. Click the link in the text, "View the VAIO Computer Specifications, which lists your computer if...

Online Help Center
Page 5
... footrest may strain muscles or tendons. Furniture and posture - Choose a location where windows and lights do not create glare and reflection on the floor. Use the palmrest only briefly, for your new computer and plan your comfort and work effectiveness. Adjust the level of the screen at the same... as the keyboard. Hold the mouse with the top of the keyboard so that your lower arms are several ergonomic factors to support the computer and other input devices - Sit with good back support and armrests. Position the mouse at or a little below eye level. Position the...
... footrest may strain muscles or tendons. Furniture and posture - Choose a location where windows and lights do not create glare and reflection on the floor. Use the palmrest only briefly, for your new computer and plan your comfort and work effectiveness. Adjust the level of the screen at the same... as the keyboard. Hold the mouse with the top of the keyboard so that your lower arms are several ergonomic factors to support the computer and other input devices - Sit with good back support and armrests. Position the mouse at or a little below eye level. Position the...

Online Help Center
Page 19
... button Press to its original size. PREV and NEXT buttons Not available for Giga Pocket functions. 7 DVD TITLE button Not available for more information. The window returns to launch Giga Pocket Video Recorder. Press again to close any error message dialog box. See the DVD player software instructions for Giga Pocket...
... button Press to its original size. PREV and NEXT buttons Not available for Giga Pocket functions. 7 DVD TITLE button Not available for more information. The window returns to launch Giga Pocket Video Recorder. Press again to close any error message dialog box. See the DVD player software instructions for Giga Pocket...

Online Help Center
Page 20
...and PAUSE buttons Press to stop recording. Press ENTER or the right direction arrow to select a cabinet or Video Capsule in the "Select Video Capsule" window. For more details about the function buttons on your remote control, see the Giga Pocket Help. 1 T he remote c ontrol is s upplied ...models that are equipped with Giga P oc ket features . For more information, s ee the Giga P oc ket Help. Press again to minimize the window. 16 Direction and ENTER buttons Press a direction arrow to select a cabinet or Video Capsule. 17 DVD RETURN button Not available for more information. See the...
...and PAUSE buttons Press to stop recording. Press ENTER or the right direction arrow to select a cabinet or Video Capsule in the "Select Video Capsule" window. For more details about the function buttons on your remote control, see the Giga Pocket Help. 1 T he remote c ontrol is s upplied ...models that are equipped with Giga P oc ket features . For more information, s ee the Giga P oc ket Help. Press again to minimize the window. 16 Direction and ENTER buttons Press a direction arrow to select a cabinet or Video Capsule. 17 DVD RETURN button Not available for more information. See the...

Online Help Center
Page 31
...you turn your computer on, follow these steps to Communications, and then click New Connection Wizard. Point to Accessories, point to set up your dial-up connection: 1. Location Inform ation window 3. Click OK. The Phone and Modem Options window appears. New Connection Wizard window Page 31 ...Click Start from the Windows taskbar and select All Programs. 2. Enter in your dialing location and then click ...
...you turn your computer on, follow these steps to Communications, and then click New Connection Wizard. Point to Accessories, point to set up your dial-up connection: 1. Location Inform ation window 3. Click OK. The Phone and Modem Options window appears. New Connection Wizard window Page 31 ...Click Start from the Windows taskbar and select All Programs. 2. Enter in your dialing location and then click ...

Online Help Center
Page 33
...switch to turn off the computer. About the power switch If your system stops responding, press and hold the Power switch for more than six seconds to force your system does not shut down . Click Start in the Windows taskbar, then select Turn Off Computer. Respond to any peripheral... devices connected to your computer 1. Turning Off Your Computer Follow these steps when you may need to repeat this procedure if your system to ...
...switch to turn off the computer. About the power switch If your system stops responding, press and hold the Power switch for more than six seconds to force your system does not shut down . Click Start in the Windows taskbar, then select Turn Off Computer. Respond to any peripheral... devices connected to your computer 1. Turning Off Your Computer Follow these steps when you may need to repeat this procedure if your system to ...

Online Help Center
Page 34
... default settings. Configuring Your VAIO Computer This section provides basic information about managing your computer, see the online specifications sheet. About Your Hard Disk Drive Partition i.LINK Compatibility VAIO Action Setup Changing The Sony Software Window Design Using The... Memory Stick Media Slot Using The PC Card Slot Page 34 Your computer may not be equipped with all of the hardware...
... default settings. Configuring Your VAIO Computer This section provides basic information about managing your computer, see the online specifications sheet. About Your Hard Disk Drive Partition i.LINK Compatibility VAIO Action Setup Changing The Sony Software Window Design Using The... Memory Stick Media Slot Using The PC Card Slot Page 34 Your computer may not be equipped with all of the hardware...

Online Help Center
Page 36
... your screen saver and close other open applications, if applicable. 2. Click Start in the Windows taskbar and select All Programs. 3. Point to Accessories, point to complete defragmentation, depending on the data capacity and current utilization of your computer's hard disk drive(s). The Disk Defragment dialog box appears. 4. Select Action from the menu...
... your screen saver and close other open applications, if applicable. 2. Click Start in the Windows taskbar and select All Programs. 3. Point to Accessories, point to complete defragmentation, depending on the data capacity and current utilization of your computer's hard disk drive(s). The Disk Defragment dialog box appears. 4. Select Action from the menu...

Online Help Center
Page 40
... an application from the list. The Confirmation Application Name window appears. Page 40 Then click Finish. Click Start in the Windows taskbar, to place it into the list box. 6. You can drag an application to launch VAIO Action 3. From the Select Application dialog box, click the... new name and description, if desired. Click the S Key you want to launch other applications. 1. Click Next. 7. Select VAIO Action Setup, then click VAIO Action Setup. The corresponding applications appear in the list box on the right. 5. You can also double-click Setup. Changing the...
... an application from the list. The Confirmation Application Name window appears. Page 40 Then click Finish. Click Start in the Windows taskbar, to place it into the list box. 6. You can drag an application to launch VAIO Action 3. From the Select Application dialog box, click the... new name and description, if desired. Click the S Key you want to launch other applications. 1. Click Next. 7. Select VAIO Action Setup, then click VAIO Action Setup. The corresponding applications appear in the list box on the right. 5. You can also double-click Setup. Changing the...

Online Help Center
Page 41
Page 41 Changing The Sony Software Window Design You can select from different window designs for certain Sony software applications and create your own personal computing environment.
Page 41 Changing The Sony Software Window Design You can select from different window designs for certain Sony software applications and create your own personal computing environment.

Online Help Center
Page 42
... compatible UI Design Selector software. Click Other Control Panel Options. 3. The "UI Design Selector" window design changes. When you have made your Sony software will match the "UI Design Selector" window. 7. Page 42 Changing the window design 1. Click Start in the Windows taskbar and select the Control Panel. 2. The UI Design Selector closes and the...
... compatible UI Design Selector software. Click Other Control Panel Options. 3. The "UI Design Selector" window design changes. When you have made your Sony software will match the "UI Design Selector" window. 7. Page 42 Changing the window design 1. Click Start in the Windows taskbar and select the Control Panel. 2. The UI Design Selector closes and the...
Online Help Center
Page 45
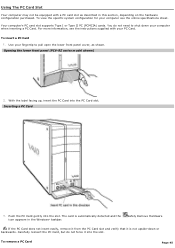
... do not force it is automatically detected and the icon appears in this section, depending on the hardware configuration purchased. Opening the lower front panel (PCV- RZ series m odel shown) 2. Safely Remove Hardware If the PC Card does not insert easily, remove it from the PC Card slot and verify...PC Card into the slot. The card is not upside-down your fingertip to pull open the lower front panel cover, as described in the Windows® taskbar. To view the specific system configuration for your computer see the instructions supplied with a PC card slot as shown.
... do not force it is automatically detected and the icon appears in this section, depending on the hardware configuration purchased. Opening the lower front panel (PCV- RZ series m odel shown) 2. Safely Remove Hardware If the PC Card does not insert easily, remove it from the PC Card slot and verify...PC Card into the slot. The card is not upside-down your fingertip to pull open the lower front panel cover, as described in the Windows® taskbar. To view the specific system configuration for your computer see the instructions supplied with a PC card slot as shown.

Online Help Center
Page 46
...by holding the edges and pulling it out carefully. Rem ov ing a PC Card (PCV- RZ series m odel shown) 5. The Stop a Hardware Device window appears. Page 46 If you eject the PC Card incorrectly, your computer may need to avoid data loss. 2. Click to eject and click Stop. When ...the PC Card ejects from the computer before you want to select the name of the system...
...by holding the edges and pulling it out carefully. Rem ov ing a PC Card (PCV- RZ series m odel shown) 5. The Stop a Hardware Device window appears. Page 46 If you eject the PC Card incorrectly, your computer may need to avoid data loss. 2. Click to eject and click Stop. When ...the PC Card ejects from the computer before you want to select the name of the system...
Online Help Center
Page 57
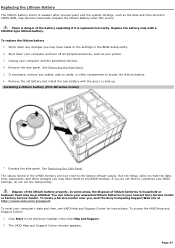
...VAIO Help and Support Center window appears. Page 57 Click Start in the CMOS memory are now reset to the factory default values. Unplug your nearest Sony Service Center or Factory Service Center. Remove the old battery and install the new battery with a CR2032-type lithium battery. If you , visit the Sony Computing... the Side Panel. The values stored in the Windows® taskbar, then click Help and Support. 2. Dispose of the battery exploding if it is replaced incorrectly. Remove the side panel. Installing a lithium battery (PCV- To locate a Service Center near you do ...
...VAIO Help and Support Center window appears. Page 57 Click Start in the CMOS memory are now reset to the factory default values. Unplug your nearest Sony Service Center or Factory Service Center. Remove the old battery and install the new battery with a CR2032-type lithium battery. If you , visit the Sony Computing... the Side Panel. The values stored in the Windows® taskbar, then click Help and Support. 2. Dispose of the battery exploding if it is replaced incorrectly. Remove the side panel. Installing a lithium battery (PCV- To locate a Service Center near you do ...

Online Help Center
Page 60
... disk drive, it must be configured as Administrator. 2. A shortcut menu appears. 3. Right-click on to Windows® as an extended partition in the Windows taskbar, then right-click My Computer. The Windows® XP operating system recognizes the new hard disk drive and applies the NTFS format. The...6. Select New Partition. RX series m odel) 13. Click on the right, go to display a shortcut menu. 7. Replacing the driv e holder (PCV- Under the file directory on the Unallocated area of the drive and then right-click to Storage and then select Disk Management. 5.
... disk drive, it must be configured as Administrator. 2. A shortcut menu appears. 3. Right-click on to Windows® as an extended partition in the Windows taskbar, then right-click My Computer. The Windows® XP operating system recognizes the new hard disk drive and applies the NTFS format. The...6. Select New Partition. RX series m odel) 13. Click on the right, go to display a shortcut menu. 7. Replacing the driv e holder (PCV- Under the file directory on the Unallocated area of the drive and then right-click to Storage and then select Disk Management. 5.

Online Help Center
Page 63
...complete the Windows registration process. The System Recovery process removes all the original, preinstalled software applications. If you experience a problem with the computer when you purchased it. Reinstall any applications that you may not need to recover the entire contents of the Sony computer you purchased.... When you successfully complete your hard disk drive and restores the operating system and all software that were not included with your computer to the original factory settings. Page 63 The ...
...complete the Windows registration process. The System Recovery process removes all the original, preinstalled software applications. If you experience a problem with the computer when you purchased it. Reinstall any applications that you may not need to recover the entire contents of the Sony computer you purchased.... When you successfully complete your hard disk drive and restores the operating system and all software that were not included with your computer to the original factory settings. Page 63 The ...

Online Help Center
Page 65
...CD into the upper optical drive. 4. Inserting the System Recov ery CD (PCV- On the Main Menu - Your system may include one System Recovery CD, insert the first CD to insert your computer. The recovery process takes approximately 30 to 60 minutes to insert the next ... CD(s), you turn on your Application Recovery CD(s) after restarting Windows. Use the Application Recovery CD(s) to recover your system. Turn off your computer. Press the disc eject button to complete the recovery process. When the VAIO System Recovery Utility dialog box appears, click Next. 7. If ...
...CD into the upper optical drive. 4. Inserting the System Recov ery CD (PCV- On the Main Menu - Your system may include one System Recovery CD, insert the first CD to insert your computer. The recovery process takes approximately 30 to 60 minutes to insert the next ... CD(s), you turn on your Application Recovery CD(s) after restarting Windows. Use the Application Recovery CD(s) to recover your system. Turn off your computer. Press the disc eject button to complete the recovery process. When the VAIO System Recovery Utility dialog box appears, click Next. 7. If ...

Online Help Center
Page 66
You must be in Windows to correct a problem that shipped with your computer, peripheral hardware, or specific software. To reinstall all of the software that you to reinstall individual software, individual drivers, and to reinstall the entire contents of your computer, use the System Recovery CD(s). Page 66 You can reinstall a software application or...
You must be in Windows to correct a problem that shipped with your computer, peripheral hardware, or specific software. To reinstall all of the software that you to reinstall individual software, individual drivers, and to reinstall the entire contents of your computer, use the System Recovery CD(s). Page 66 You can reinstall a software application or...

Online Help Center
Page 67
... the upper optical drive. 4. Double-click the Software folder. The Sony Application Recovery Program window appears. 5. Page 67 If your computer's optical drive. Click OK in the VAIO welcome window. Icons representing preinstalled software are displayed. 6. Double-click the application ...to complete the application recovery process. If your computer. Turn on your system is equipped with two optical drives, insert the Application Recovery CD into your computer is already on -screen instructions to the Windows® desktop. 3. Reinstalling software 1. Follow the on ,...
... the upper optical drive. 4. Double-click the Software folder. The Sony Application Recovery Program window appears. 5. Page 67 If your computer's optical drive. Click OK in the VAIO welcome window. Icons representing preinstalled software are displayed. 6. Double-click the application ...to complete the application recovery process. If your computer. Turn on your system is equipped with two optical drives, insert the Application Recovery CD into your computer is already on -screen instructions to the Windows® desktop. 3. Reinstalling software 1. Follow the on ,...


