Quick Start Guide
Page 2
... user license agreement. Software specifications are trademarks or registered trademarks of their respective owners. 2 Certain product(s) included with participating financial institutions. USE OF THE SOFTWARE PRODUCT(S) REQUIRES AGREEMENT TO APPLICABLE END USER AGREEMENTS AND FULL COMPLIANCE WITH APPLICABLE PRODUCT ACTIVATION PROCEDURES. Updates and additions to U.S. Important information for Canadian customers: Your new VAIO® computer includes certain software versions or upgrades, and Internet services or...
... user license agreement. Software specifications are trademarks or registered trademarks of their respective owners. 2 Certain product(s) included with participating financial institutions. USE OF THE SOFTWARE PRODUCT(S) REQUIRES AGREEMENT TO APPLICABLE END USER AGREEMENTS AND FULL COMPLIANCE WITH APPLICABLE PRODUCT ACTIVATION PROCEDURES. Updates and additions to U.S. Important information for Canadian customers: Your new VAIO® computer includes certain software versions or upgrades, and Internet services or...

Quick Start Guide
Page 9
Contents Getting Started 11 Unpacking Your Computer 12 Locating Controls And Ports 15 About the Front Panel 16 About the Back Panel 19 About the Remote Control 24 About the Keyboard 28 Setting Up Your Computer 31 Connecting a Display (Monitor 32 Connecting the Speakers 33 Connecting the Keyboard and Mouse 34 Connecting the Telephone and Modem Cables.........35 Connecting the Power Cords 36 Turning On your Computer 37 Registering your Computer 37 Turning Off your Computer 38 Troubleshooting 39 Support Options 41 Immediate...
Contents Getting Started 11 Unpacking Your Computer 12 Locating Controls And Ports 15 About the Front Panel 16 About the Back Panel 19 About the Remote Control 24 About the Keyboard 28 Setting Up Your Computer 31 Connecting a Display (Monitor 32 Connecting the Speakers 33 Connecting the Keyboard and Mouse 34 Connecting the Telephone and Modem Cables.........35 Connecting the Power Cords 36 Turning On your Computer 37 Registering your Computer 37 Turning Off your Computer 38 Troubleshooting 39 Support Options 41 Immediate...
Quick Start Guide
Page 16
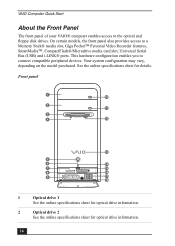
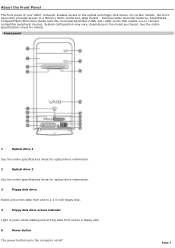
VAIO Computer Quick Start About the Front Panel The front panel of your VAIO® computer enables access to a Memory Stick® media slot, Giga Pocket™ Personal Video Recorder features, SmartMedia™, CompactFlash®/Microdrive media card slot, Universal Serial Bus (USB) and i.LINK® ports. On certain models, the front panel also provides access to the optical and floppy disk drives. This hardware configuration enables you to connect compatible peripheral devices. Front panel 1 10 2 11 3 4 12 13 5 6 14 7 15 8 16...
VAIO Computer Quick Start About the Front Panel The front panel of your VAIO® computer enables access to a Memory Stick® media slot, Giga Pocket™ Personal Video Recorder features, SmartMedia™, CompactFlash®/Microdrive media card slot, Universal Serial Bus (USB) and i.LINK® ports. On certain models, the front panel also provides access to the optical and floppy disk drives. This hardware configuration enables you to connect compatible peripheral devices. Front panel 1 10 2 11 3 4 12 13 5 6 14 7 15 8 16...
Quick Start Guide
Page 18
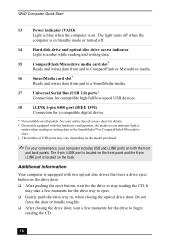
Additional information Your computer is located on the back. The 4-pin i.LINK port is located on the front panel and the 6-pin i.LINK port is equipped with this hardware configuration, the media access indicator light is on. Do not force the door or handle roughly. ❑ After closing the optical drive door. The light turns off . 14 Hard disk drive and optical disc drive access indicator Light is in , when closing the drive door, wait a few moments...
Additional information Your computer is located on the back. The 4-pin i.LINK port is located on the front panel and the 6-pin i.LINK port is equipped with this hardware configuration, the media access indicator light is on. Do not force the door or handle roughly. ❑ After closing the optical drive door. The light turns off . 14 Hard disk drive and optical disc drive access indicator Light is in , when closing the drive door, wait a few moments...
VAIO User Guide
Page 7
... to a floppy disk. 5 Power button The power button turns the computer on the model purchased. On certain models, the front panel also provides access to a Memory Stick® media slot, Giga Pocket Personal Video Recorder features, SmartMedia , CompactFlash®/Microdrive media card slot, Universal Serial Bus (USB) and i.LINK® ports that enable you to the optical and floppy disk drives. About the Front Panel The front panel of your VAIO® computer enables access to connect compatible peripheral devices. System configuration may vary...
... to a floppy disk. 5 Power button The power button turns the computer on the model purchased. On certain models, the front panel also provides access to a Memory Stick® media slot, Giga Pocket Personal Video Recorder features, SmartMedia , CompactFlash®/Microdrive media card slot, Universal Serial Bus (USB) and i.LINK® ports that enable you to the optical and floppy disk drives. About the Front Panel The front panel of your VAIO® computer enables access to connect compatible peripheral devices. System configuration may vary...

VAIO User Guide
Page 9
... media. 16 SmartMedia card slot1 Reads and writes data from and to a SmartMedia media. 17 Universal Serial Bus (USB 2.0) ports3 Connections for compatible high/full/low-speed USB devices. 18 i.LINK 4-pin S400 port (IEEE 1394) Connection for the drive to begin reading the CD. Do not force the door or handle roughly. After closing the optical drive door. See your computer includes USB and i.LINK ports...
... media. 16 SmartMedia card slot1 Reads and writes data from and to a SmartMedia media. 17 Universal Serial Bus (USB 2.0) ports3 Connections for compatible high/full/low-speed USB devices. 18 i.LINK 4-pin S400 port (IEEE 1394) Connection for the drive to begin reading the CD. Do not force the door or handle roughly. After closing the optical drive door. See your computer includes USB and i.LINK ports...

VAIO User Guide
Page 10
... configuration may vary based on your computer contains the ports for compatible high/full/low-speed USB devices. Back panel 1 AC Input port Connection for the supplied power cord. 2 Mouse port Connection for a PS/2® mouse. 3 Keyboard port Connection for a PS/2® keyboard. 4 Printer port Connection for a parallel device, such as a printer or scanner. 5 i.LINK 6-pin S400 port (IEEE 1394) Connection for a compatible digital device. 6 Universal Serial Bus (USB 2.0) ports (4) Connections for supplied and optional accessories. The icons on the back panel locate...
... configuration may vary based on your computer contains the ports for compatible high/full/low-speed USB devices. Back panel 1 AC Input port Connection for the supplied power cord. 2 Mouse port Connection for a PS/2® mouse. 3 Keyboard port Connection for a PS/2® keyboard. 4 Printer port Connection for a parallel device, such as a printer or scanner. 5 i.LINK 6-pin S400 port (IEEE 1394) Connection for a compatible digital device. 6 Universal Serial Bus (USB 2.0) ports (4) Connections for supplied and optional accessories. The icons on the back panel locate...

VAIO User Guide
Page 13
...-TX Ethernet interface. (The port marked with (Network) is for LAN connections only.) 5 Universal Serial Bus (USB 2.0) ports (2) Connections for compatible high/full/low-speed USB devices. 6 Monitor port Connection for a display. 7 Printer port Connection for a parallel device, such as a printer or scanner. 8 i.LINK 6-pin S400 port (IEEE 1394) Connection for a compatible digital device. 9 Serial port Connection for a compatible serial device. 10 Headphones jack Connection for a telephone cable (optional) to the computer. Line In jack Connection for an audio device. Page...
...-TX Ethernet interface. (The port marked with (Network) is for LAN connections only.) 5 Universal Serial Bus (USB 2.0) ports (2) Connections for compatible high/full/low-speed USB devices. 6 Monitor port Connection for a display. 7 Printer port Connection for a parallel device, such as a printer or scanner. 8 i.LINK 6-pin S400 port (IEEE 1394) Connection for a compatible digital device. 9 Serial port Connection for a compatible serial device. 10 Headphones jack Connection for a telephone cable (optional) to the computer. Line In jack Connection for an audio device. Page...

VAIO User Guide
Page 17
.../VIDEO button Press to change the on the monitor/display. 8 APPLICATION START button Press to launch the Giga Pocket software. 9 VOLUME button Press to raise or lower the volume. 10 STANDBY button Press to place the system into Stand by mode. (Note: You cannot place the computer into Stand by mode when certain Giga Pocket functions are running.) 11 AUDIO button Press to view available sound mode options on -screen image...
.../VIDEO button Press to change the on the monitor/display. 8 APPLICATION START button Press to launch the Giga Pocket software. 9 VOLUME button Press to raise or lower the volume. 10 STANDBY button Press to place the system into Stand by mode. (Note: You cannot place the computer into Stand by mode when certain Giga Pocket functions are running.) 11 AUDIO button Press to view available sound mode options on -screen image...

VAIO User Guide
Page 22
The location of the hardware features described in the section. Setting Up Your Computer Your computer may not be equipped with all of the controls, ports, and jacks may vary from the illustrations shown. See the online specifications sheet for your system's specific hardware configuration. Connecting a Display (Monitor) Connecting the Speakers Connecting the Keyboard and Mouse Connecting the Telephone and Modem Cables Connecting the Power Cords Turning On your Computer Registering your Computer Page 22
The location of the hardware features described in the section. Setting Up Your Computer Your computer may not be equipped with all of the controls, ports, and jacks may vary from the illustrations shown. See the online specifications sheet for your system's specific hardware configuration. Connecting a Display (Monitor) Connecting the Speakers Connecting the Keyboard and Mouse Connecting the Telephone and Modem Cables Connecting the Power Cords Turning On your Computer Registering your Computer Page 22

VAIO User Guide
Page 70
... not need to click Download All Channel Settings. 8. The Channel Information Converter window appears, if this download feature. If you are using Microsoft® Internet Explorer as your Web browser to access the Internet Electronic Program Guide service. If your TV provider adds new channels or changes existing channels, an Update icon appears next to Giga Pocket, then click TV Program Web site. Click Start in...
... not need to click Download All Channel Settings. 8. The Channel Information Converter window appears, if this download feature. If you are using Microsoft® Internet Explorer as your Web browser to access the Internet Electronic Program Guide service. If your TV provider adds new channels or changes existing channels, an Update icon appears next to Giga Pocket, then click TV Program Web site. Click Start in...
VAIO User Guide
Page 78
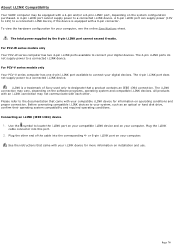
... or hard disk drive, confirm their operating system compatibility and required operating conditions. Before connecting compatible i.LINK devices to connect your computer. Plug the other . See the instructions that came with your computer. The 4-pin i.LINK port does not supply power to a connected i.LINK device. Plug the i.LINK cable connector into the corresponding 4- To view the hardware configuration for your i.LINK device for information on operating conditions and proper connection. For PCV-V series models only Your PCV-V series computer has one 4-pin i.LINK port...
... or hard disk drive, confirm their operating system compatibility and required operating conditions. Before connecting compatible i.LINK devices to connect your computer. Plug the other . See the instructions that came with your computer. The 4-pin i.LINK port does not supply power to a connected i.LINK device. Plug the i.LINK cable connector into the corresponding 4- To view the hardware configuration for your i.LINK device for information on operating conditions and proper connection. For PCV-V series models only Your PCV-V series computer has one 4-pin i.LINK port...

VAIO User Guide
Page 89
... Reference Manual or System Reference Guide. Remove the cover. See the configuration instructions supplied with System or Application Recovery CDs. Click Start from Sony. The model-specific support Web page appears. 3. See Before upgrading your Sony computer. Some models, such as a slave. Make sure you observe the proper safety precautions when you may not reflect correct drive/icon associations. Replacing the original hard disk drive If you replace the original, factory-installed hard disk drive, you upgrade your computer. Use the VAIO Recovery Wizard utility...
... Reference Manual or System Reference Guide. Remove the cover. See the configuration instructions supplied with System or Application Recovery CDs. Click Start from Sony. The model-specific support Web page appears. 3. See Before upgrading your Sony computer. Some models, such as a slave. Make sure you observe the proper safety precautions when you may not reflect correct drive/icon associations. Replacing the original hard disk drive If you replace the original, factory-installed hard disk drive, you upgrade your computer. Use the VAIO Recovery Wizard utility...

VAIO User Guide
Page 90
... and power connectors to lock the drive holder back into the drive holder and align the holes on the new drive. Release the drive holder from the original hard disk drive that is supplied with pin 1 on each side of the ribbon cable with the necessary screws. 5. Detach the power and drive cables from the chassis by removing the drive holder screw. 7. Attaching the driv e screws Your new hard disk drive is...
... and power connectors to lock the drive holder back into the drive holder and align the holes on the new drive. Release the drive holder from the original hard disk drive that is supplied with pin 1 on each side of the ribbon cable with the necessary screws. 5. Detach the power and drive cables from the chassis by removing the drive holder screw. 7. Attaching the driv e screws Your new hard disk drive is...

VAIO User Guide
Page 118
... online guide, VAIO Recovery Options, for more information. To access VAIO Recovery Options, follow these steps: 1. From the VAIO Help And Support Center menu, click VAIO Recovery Options. For PCV-V series models only Adjust the volume by pressing the volume control buttons located on the left panel, to mute the sound from your speakers if headphones are connected to your computer. If the software application you want to use an external power source, verify that the power cord is plugged into...
... online guide, VAIO Recovery Options, for more information. To access VAIO Recovery Options, follow these steps: 1. From the VAIO Help And Support Center menu, click VAIO Recovery Options. For PCV-V series models only Adjust the volume by pressing the volume control buttons located on the left panel, to mute the sound from your speakers if headphones are connected to your computer. If the software application you want to use an external power source, verify that the power cord is plugged into...

VAIO User Guide
Page 119
... that the speakers are plugged into a grounded wall outlet or power strip. If your speakers have been connected. From the Volume tab, adjust the Device volume by pressing the volume control buttons located on the wireless keyboard. To access VAIO Recovery Options, follow these steps: 1. If you are using these steps: 1. From the VAIO Help And Support Center menu, click VAIO Recovery Options. Click Start in the Windows taskbar, then select Control Panel. 2. For PCV-W series models only ...
... that the speakers are plugged into a grounded wall outlet or power strip. If your speakers have been connected. From the Volume tab, adjust the Device volume by pressing the volume control buttons located on the wireless keyboard. To access VAIO Recovery Options, follow these steps: 1. If you are using these steps: 1. From the VAIO Help And Support Center menu, click VAIO Recovery Options. Click Start in the Windows taskbar, then select Control Panel. 2. For PCV-W series models only ...

VAIO User Guide
Page 124
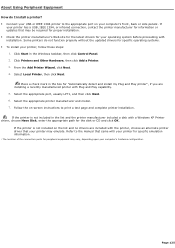
... a Windows XP Printer driver, choose Have Disk, enter the appropriate path for peripheral equipment may emulate. About Using Peripheral Equipment How do not function properly without the updated drivers for specific operating systems. To install your printer, follow these steps: 1. Click Start in the box for your operating system before proceeding with Plug and Play capability. 5. Select the appropriate printer manufacturer and model...
... a Windows XP Printer driver, choose Have Disk, enter the appropriate path for peripheral equipment may emulate. About Using Peripheral Equipment How do not function properly without the updated drivers for specific operating systems. To install your printer, follow these steps: 1. Click Start in the box for your operating system before proceeding with Plug and Play capability. 5. Select the appropriate printer manufacturer and model...
VAIO User Guide
Page 125
... Windows taskbar, then click Control Panel. 2. Select the appropriate port, usually LPT1, and then click Next. 6. From the Add Printer Wizard, click Next. 4. Refer to the manual that came with the printer, choose an alternate printer driver that may emulate. Some printers do I install a printer? Connect your USB or IEEE 1394 printer to print a test page and complete printer installation. About Using...
... Windows taskbar, then click Control Panel. 2. Select the appropriate port, usually LPT1, and then click Next. 6. From the Add Printer Wizard, click Next. 4. Refer to the manual that came with the printer, choose an alternate printer driver that may emulate. Some printers do I install a printer? Connect your USB or IEEE 1394 printer to print a test page and complete printer installation. About Using...

VAIO User Guide
Page 135
... supplied with Sony, and establish a dial-up your hard copy guides and supplements, or by accessing the online Computer User Guide and the individual software Help files. From the VAIO Help And Support Center menu, click VAIO User Guide. Specifications - In these support options: VAIO® Computer Quick Start - Provides specific information on preinstalled software on your computer with these Help files, you can find instructions on how to plan an ergonomic work space, connect power cords, cables...
... supplied with Sony, and establish a dial-up your hard copy guides and supplements, or by accessing the online Computer User Guide and the individual software Help files. From the VAIO Help And Support Center menu, click VAIO User Guide. Specifications - In these support options: VAIO® Computer Quick Start - Provides specific information on preinstalled software on your computer with these Help files, you can find instructions on how to plan an ergonomic work space, connect power cords, cables...
Marketing Specifications (PCV-RS421V)
Page 1
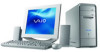
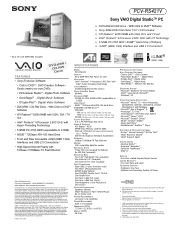
... hardware and software in U.S.A. 9/03 SPECIFICATIONS MODEL PCV-RS421V DISPLAY Sony SDM-HS53 Flat Panel 15" LCD PROCESSOR Intel® Pentium® 4 Processor 2.60C GHz† with Intel® Hyper-Threading Technology CACHE MEMORY 512KB Integrated On-Die Level 2 FRONT SIDE BUS SPEED 800MHz STANDARD RAM 512MB PC-2700 333MHz DDR (expandable to 2.0GB) • 80GB††3 7200rpm ATA-100 Hard Drive • Front and Rear Accessible...
... hardware and software in U.S.A. 9/03 SPECIFICATIONS MODEL PCV-RS421V DISPLAY Sony SDM-HS53 Flat Panel 15" LCD PROCESSOR Intel® Pentium® 4 Processor 2.60C GHz† with Intel® Hyper-Threading Technology CACHE MEMORY 512KB Integrated On-Die Level 2 FRONT SIDE BUS SPEED 800MHz STANDARD RAM 512MB PC-2700 333MHz DDR (expandable to 2.0GB) • 80GB††3 7200rpm ATA-100 Hard Drive • Front and Rear Accessible...


