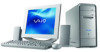
Quick Start Guide
Page 2
... PROPERTY ON ACCOUNT OF YOUR ACCESS TO, USE OF, OR BROWSING IN ANY DESCRIBED WEB SITE, OR YOUR DOWNLOADING OF ANY MATERIALS, DATA, TEXT, IMAGES, VIDEO, OR AUDIO FROM ANY DESCRIBED WEB SITE. Notice © 2003 Sony Electronics Inc. Reproduction in whole or in part, may include features such as copy protection and content management technology. All rights reserved...
... PROPERTY ON ACCOUNT OF YOUR ACCESS TO, USE OF, OR BROWSING IN ANY DESCRIBED WEB SITE, OR YOUR DOWNLOADING OF ANY MATERIALS, DATA, TEXT, IMAGES, VIDEO, OR AUDIO FROM ANY DESCRIBED WEB SITE. Notice © 2003 Sony Electronics Inc. Reproduction in whole or in part, may include features such as copy protection and content management technology. All rights reserved...

Quick Start Guide
Page 11
... Locating Controls And Ports 17 About the Front Panel 18 About the Back Panel 20 About the Keyboard 24 Setting Up Your Computer 27 Connecting a Display (Monitor 28 Connecting the Speakers 29 Connecting the Keyboard and Mouse 30 Connecting the Telephone and Modem Cables.........32 Connecting the Power Cords 33 Turning On Your Computer 34 Registering your Computer 35 Turning Off your Computer 36 Troubleshooting 37 VAIO Recovery Options 39 About Recovery Options 40 About the Recovery Media Kit 42 Using the VAIO Recovery Wizard 46 Support Options...
... Locating Controls And Ports 17 About the Front Panel 18 About the Back Panel 20 About the Keyboard 24 Setting Up Your Computer 27 Connecting a Display (Monitor 28 Connecting the Speakers 29 Connecting the Keyboard and Mouse 30 Connecting the Telephone and Modem Cables.........32 Connecting the Power Cords 33 Turning On Your Computer 34 Registering your Computer 35 Turning Off your Computer 36 Troubleshooting 37 VAIO Recovery Options 39 About Recovery Options 40 About the Recovery Media Kit 42 Using the VAIO Recovery Wizard 46 Support Options...
Quick Start Guide
Page 19
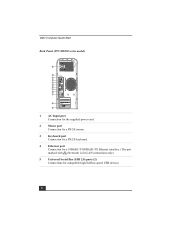
... eject button, wait for compatible high/full/low-speed USB devices. ✍ For your convenience, your computer includes USB and i.LINK ports on the back. The light turns off when the computer is in Standby mode or turned off. 12 Hard disk drive and optical disc drive access indicator Light is amber while reading and writing data. 13 Universal Serial Bus (USB 2.0) ports (2) Connections for the drive to stop reading the CD. About the Front Panel...
... eject button, wait for compatible high/full/low-speed USB devices. ✍ For your convenience, your computer includes USB and i.LINK ports on the back. The light turns off when the computer is in Standby mode or turned off. 12 Hard disk drive and optical disc drive access indicator Light is amber while reading and writing data. 13 Universal Serial Bus (USB 2.0) ports (2) Connections for the drive to stop reading the CD. About the Front Panel...
Quick Start Guide
Page 20
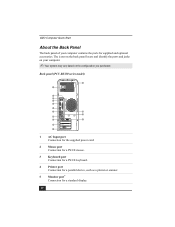
... back panel locate and identify the ports and jacks on your computer contains the ports for a standard display. 20 Back panel (PCV-RS320 series model) 12 1 2 3 4 5 6 7 13 14 8 9 MONITOR 15 10 11 1 AC Input port Connection for the supplied power cord. 2 Mouse port Connection for a PS/2® mouse. 3 Keyboard port Connection for a PS/2® keyboard. 4 Printer port Connection for a parallel device, such as a printer or scanner. 5 Monitor port* Connection for supplied and optional accessories. VAIO Computer Quick Start About the Back Panel The back panel of...
... back panel locate and identify the ports and jacks on your computer contains the ports for a standard display. 20 Back panel (PCV-RS320 series model) 12 1 2 3 4 5 6 7 13 14 8 9 MONITOR 15 10 11 1 AC Input port Connection for the supplied power cord. 2 Mouse port Connection for a PS/2® mouse. 3 Keyboard port Connection for a PS/2® keyboard. 4 Printer port Connection for a parallel device, such as a printer or scanner. 5 Monitor port* Connection for supplied and optional accessories. VAIO Computer Quick Start About the Back Panel The back panel of...

Quick Start Guide
Page 21
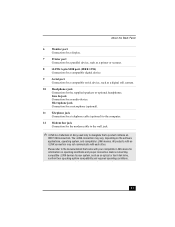
... display. * On some models, the monitor port may have a cover and is not available for use. † A DVI monitor port is available on selected models only. ‡ The speaker DC out jack is used to provide power to audio stereo speakers. About the Back Panel 6 i.LINK 6-pin S400 port (IEEE 1394) Connection for a compatible digital device. 7 Universal Serial Bus (USB 2.0) ports (4) Connections for compatible high/full/low-speed USB devices. 8 Microphone jack Connection for the supplied speakers or optional headphones...
... display. * On some models, the monitor port may have a cover and is not available for use. † A DVI monitor port is available on selected models only. ‡ The speaker DC out jack is used to provide power to audio stereo speakers. About the Back Panel 6 i.LINK 6-pin S400 port (IEEE 1394) Connection for a compatible digital device. 7 Universal Serial Bus (USB 2.0) ports (4) Connections for compatible high/full/low-speed USB devices. 8 Microphone jack Connection for the supplied speakers or optional headphones...
Quick Start Guide
Page 22
VAIO Computer Quick Start Back Panel (PCV-RS310 series model) 1 2 3 4 5 6 7 8 9 10 11 12 1 AC Input port Connection for the supplied power cord. 2 Mouse port Connection for a PS/2® mouse. 3 Keyboard port Connection for a PS/2® keyboard. 4 Ethernet port Connection for a 10BASE-T/100BASE-TX Ethernet interface. (The port marked with (Network) is for LAN connections only.) 5 Universal Serial Bus (USB 2.0) ports (2) Connections for compatible high/full/low-speed USB devices. 22
VAIO Computer Quick Start Back Panel (PCV-RS310 series model) 1 2 3 4 5 6 7 8 9 10 11 12 1 AC Input port Connection for the supplied power cord. 2 Mouse port Connection for a PS/2® mouse. 3 Keyboard port Connection for a PS/2® keyboard. 4 Ethernet port Connection for a 10BASE-T/100BASE-TX Ethernet interface. (The port marked with (Network) is for LAN connections only.) 5 Universal Serial Bus (USB 2.0) ports (2) Connections for compatible high/full/low-speed USB devices. 22
Quick Start Guide
Page 23
... your system, such as a digital still camera. 10 Headphones jack Connection for information on the software applications, operating system, and compatible i.LINK devices. About the Back Panel 6 Monitor port Connection for a display. 7 Printer port Connection for a parallel device, such as a printer or scanner. 8 i.LINK 6-pin S400 port (IEEE 1394) Connection for a compatible digital device. 9 Serial port Connection for a compatible serial device, such as an optical or hard disk drive, confirm their operating system compatibility and required...
... your system, such as a digital still camera. 10 Headphones jack Connection for information on the software applications, operating system, and compatible i.LINK devices. About the Back Panel 6 Monitor port Connection for a display. 7 Printer port Connection for a parallel device, such as a printer or scanner. 8 i.LINK 6-pin S400 port (IEEE 1394) Connection for a compatible digital device. 9 Serial port Connection for a compatible serial device, such as an optical or hard disk drive, confirm their operating system compatibility and required...

Quick Start Guide
Page 28
VAIO Computer Quick Start Connecting a Display (Monitor) Plug the display's cable into the back of an emergency. 28 If necessary, plug the display's cable into the monitor port. To connect a display (PCV-RS310 series model) ✍ Install your equipment so that you can easily reach the power outlet in the event of the display.
VAIO Computer Quick Start Connecting a Display (Monitor) Plug the display's cable into the back of an emergency. 28 If necessary, plug the display's cable into the monitor port. To connect a display (PCV-RS310 series model) ✍ Install your equipment so that you can easily reach the power outlet in the event of the display.
VAIO User Guide
Page 8
...; Gently push the drive tray in Standby mode or turned off. 12 Hard disk drive and optical disc drive access indicator Light is amber while reading and writing data. 13 Universal Serial Bus (USB 2.0) ports (2) Connections for compatible high/full/low-speed USB devices. Connection for a compatible digital device. 8 Optical drive 1 eject button Ejects a disc from Optical drive 1. 9 Optical drive 2 eject button Ejects a disc from Optical drive 2. 10 Floppy disk eject button Ejects a floppy disk. 11 Power indicator (VAIO) Light is blue when the computer is on the back...
...; Gently push the drive tray in Standby mode or turned off. 12 Hard disk drive and optical disc drive access indicator Light is amber while reading and writing data. 13 Universal Serial Bus (USB 2.0) ports (2) Connections for compatible high/full/low-speed USB devices. Connection for a compatible digital device. 8 Optical drive 1 eject button Ejects a disc from Optical drive 1. 9 Optical drive 2 eject button Ejects a disc from Optical drive 2. 10 Floppy disk eject button Ejects a floppy disk. 11 Power indicator (VAIO) Light is blue when the computer is on the back...

VAIO User Guide
Page 10
6 i.LINK 6-pin S400 port (IEEE 1394) Connection for a compatible digital device. 7 Universal Serial Bus (USB 2.0) ports (4) Connections for compatible high/full/low-speed USB devices. 8 Microphone jack Connection for the supplied speakers or optional headphones. Headphones jack Connection for a microphone (optional). Line In jack Connection for an audio device. 9 Monitor (DVI) port2 Connection for a DVI monitor. 10 Telephone jack Connection for a telephone cable (optional) to the computer. 11 Modem line jack Connection for the modem cable to the wall jack...
6 i.LINK 6-pin S400 port (IEEE 1394) Connection for a compatible digital device. 7 Universal Serial Bus (USB 2.0) ports (4) Connections for compatible high/full/low-speed USB devices. 8 Microphone jack Connection for the supplied speakers or optional headphones. Headphones jack Connection for a microphone (optional). Line In jack Connection for an audio device. 9 Monitor (DVI) port2 Connection for a DVI monitor. 10 Telephone jack Connection for a telephone cable (optional) to the computer. 11 Modem line jack Connection for the modem cable to the wall jack...

VAIO User Guide
Page 15
See the online specifications sheet for your system's specific hardware configuration. Connecting a Display (Monitor) Connecting the Speakers Connecting the Keyboard and Mouse Connecting the Telephone and Modem Cables Connecting the Power Cords Turning On Your Computer Registering your Computer Page 15 The location of the hardware features described in the section. Setting Up Your Computer Your computer may not be equipped with all of the controls, ports, and jacks may vary from the illustrations shown.
See the online specifications sheet for your system's specific hardware configuration. Connecting a Display (Monitor) Connecting the Speakers Connecting the Keyboard and Mouse Connecting the Telephone and Modem Cables Connecting the Power Cords Turning On Your Computer Registering your Computer Page 15 The location of the hardware features described in the section. Setting Up Your Computer Your computer may not be equipped with all of the controls, ports, and jacks may vary from the illustrations shown.

VAIO User Guide
Page 48
... click SonicStage. Point to All Programs. 2. Starting SonicStage software 1. Click Start on -screen instructions to register and use this service. SonicStage - The CDDB® registration window appears. The Confirm the setup of SonicStage... Follow the on the Windows taskbar, and point to SonicStage, and then click SonicStage Help. You need Internet access from your computer to register with the CDDB service. Welcom e 3. To access SonicStage software Help 1.
... click SonicStage. Point to All Programs. 2. Starting SonicStage software 1. Click Start on -screen instructions to register and use this service. SonicStage - The CDDB® registration window appears. The Confirm the setup of SonicStage... Follow the on the Windows taskbar, and point to SonicStage, and then click SonicStage Help. You need Internet access from your computer to register with the CDDB service. Welcom e 3. To access SonicStage software Help 1.
VAIO User Guide
Page 51
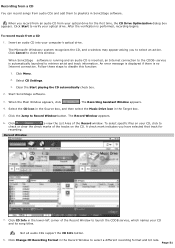
... Drive icon in SonicStage software. To select specific files on the CD. A check mark indicates you record from an audio CD from your computer's optical drive. Click Change CD Recording Format in the Record Window to playlists in the Target box. 5. To record music from a CD 1. Clear the Start playing the CD automatically check box. 2. Not all audio CDs support the CD Info button...
... Drive icon in SonicStage software. To select specific files on the CD. A check mark indicates you record from an audio CD from your computer's optical drive. Click Change CD Recording Format in the Record Window to playlists in the Target box. 5. To record music from a CD 1. Clear the Start playing the CD automatically check box. 2. Not all audio CDs support the CD Info button...
VAIO User Guide
Page 91
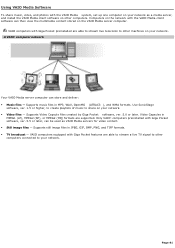
.... TV broadcast - Supports Video Capsule files created by Giga Pocket software, ver. 5.0 or later. Page 91 A VAIO® com puter network Your VAIO Media server computer can then view the multimedia content stored on the VAIO Media server computer. Computers on the network with Giga Pocket software, ver. 5.5 or later, can be used as a media server, and install the VAIO Media client software on other machines on your network. Video files - Use SonicStage software, ver. 1.5 or...
.... TV broadcast - Supports Video Capsule files created by Giga Pocket software, ver. 5.0 or later. Page 91 A VAIO® com puter network Your VAIO Media server computer can then view the multimedia content stored on the VAIO Media server computer. Computers on the network with Giga Pocket software, ver. 5.5 or later, can be used as a media server, and install the VAIO Media client software on other machines on your network. Video files - Use SonicStage software, ver. 1.5 or...
VAIO User Guide
Page 107
To view the hardware configuration for information on the software applications, operating system and compatible i.LINK devices. The total power supplied by the 6-pin i.LINK port cannot exceed 6 watts. For PCV-W series models only Your PCV-W series computer has two 4-pin i.LINK ports available to connect your computer, see the online specifications sheet. All products with an i.LINK connection may not communicate with a 4-pin and/or a 6-pin i.LINK® port, depending on the system configuration purchased...
To view the hardware configuration for information on the software applications, operating system and compatible i.LINK devices. The total power supplied by the 6-pin i.LINK port cannot exceed 6 watts. For PCV-W series models only Your PCV-W series computer has two 4-pin i.LINK ports available to connect your computer, see the online specifications sheet. All products with an i.LINK connection may not communicate with a 4-pin and/or a 6-pin i.LINK® port, depending on the system configuration purchased...

VAIO User Guide
Page 121
... Reference Guide. Make sure you observe the proper safety precautions when you upgrade your computer model number. See Before upgrading your computer. Your computer must have an active Internet connection to select the appropriate model series from the Sony Computing Support Web site at: http://www.sony.com/pcsupport. Page 121 Using the Sony Computing Support Web site For detailed information about installing additional hard disk drives, see the System Reference Manual. Click on Computers & Peripherals, Desktops and...
... Reference Guide. Make sure you observe the proper safety precautions when you upgrade your computer model number. See Before upgrading your computer. Your computer must have an active Internet connection to select the appropriate model series from the Sony Computing Support Web site at: http://www.sony.com/pcsupport. Page 121 Using the Sony Computing Support Web site For detailed information about installing additional hard disk drives, see the System Reference Manual. Click on Computers & Peripherals, Desktops and...
VAIO User Guide
Page 144
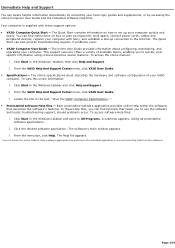
... instead of the supplied speakers, adjust the volume control dial, located on the left panel, to mute the sound from your speakers if headphones are connected to your computer. If the software application you want to the desired sound level. To access VAIO Recovery Options, follow these steps: 1. Click Start in the Windows® taskbar and click Help and Support. 2. From the VAIO Help And Support Center menu, click VAIO Recovery Options. Verify that...
... instead of the supplied speakers, adjust the volume control dial, located on the left panel, to mute the sound from your speakers if headphones are connected to your computer. If the software application you want to the desired sound level. To access VAIO Recovery Options, follow these steps: 1. Click Start in the Windows® taskbar and click Help and Support. 2. From the VAIO Help And Support Center menu, click VAIO Recovery Options. Verify that...

VAIO User Guide
Page 149
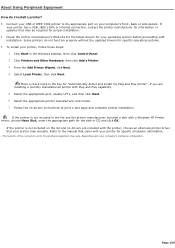
... drivers are installing a recently manufactured printer with a Windows XP Printer driver, choose Have Disk, enter the appropriate path for the disk or CD and click OK. Page 149 Some printers do I install a printer? Connect your USB or IEEE 1394 printer to the appropriate port on your computer's front, back or side panels1. If the printer is not included on -screen instructions to the manual...
... drivers are installing a recently manufactured printer with a Windows XP Printer driver, choose Have Disk, enter the appropriate path for the disk or CD and click OK. Page 149 Some printers do I install a printer? Connect your USB or IEEE 1394 printer to the appropriate port on your computer's front, back or side panels1. If the printer is not included on -screen instructions to the manual...
VAIO User Guide
Page 150
... list and the printer manufacturer included a disk with installation. Select the appropriate printer manufacturer and model. 7. About Using Peripheral Equipment How do not function properly without the updated drivers for specific operating systems. To install your printer, follow these steps: 1. Follow the on-screen instructions to the manual that may vary, depending upon your c omputer's hardware c onfiguration. Click Start in the Windows taskbar, then click Control Panel...
... list and the printer manufacturer included a disk with installation. Select the appropriate printer manufacturer and model. 7. About Using Peripheral Equipment How do not function properly without the updated drivers for specific operating systems. To install your printer, follow these steps: 1. Follow the on-screen instructions to the manual that may vary, depending upon your c omputer's hardware c onfiguration. Click Start in the Windows taskbar, then click Control Panel...
VAIO User Guide
Page 159
... troubleshooting support, if problems occur. VAIO® Computer User Guide - In these Help files, you to the Internet. The online User Guide provides information about configuring, maintaining, and upgrading your computer quickly and easily. Click Start in the text, "View the VAIO® Computer Specifications..." Preinstalled software Help files - Click Start in the Windows taskbar and click Help and Support. 2. To access the online manual: 1. From the VAIO Help And Support Center menu, click VAIO User Guide. Specifications...
... troubleshooting support, if problems occur. VAIO® Computer User Guide - In these Help files, you to the Internet. The online User Guide provides information about configuring, maintaining, and upgrading your computer quickly and easily. Click Start in the text, "View the VAIO® Computer Specifications..." Preinstalled software Help files - Click Start in the Windows taskbar and click Help and Support. 2. To access the online manual: 1. From the VAIO Help And Support Center menu, click VAIO User Guide. Specifications...


