Operating Instructions
Page 1
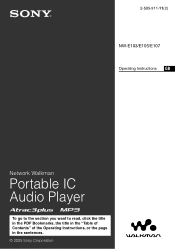
2-595-911-11(2) NW-E103/E105/E107 Operating Instructions GB Network Walkman Portable IC Audio Player To go to the section you want to read, click the title in the PDF Bookmarks, the title in the "Table of Contents" of the Operating Instructions, or the page in the sentences. © 2005 Sony Corporation
2-595-911-11(2) NW-E103/E105/E107 Operating Instructions GB Network Walkman Portable IC Audio Player To go to the section you want to read, click the title in the PDF Bookmarks, the title in the "Table of Contents" of the Operating Instructions, or the page in the sentences. © 2005 Sony Corporation
Operating Instructions
Page 4
...in part, or renting the software without notice. • Operation of this player with the SonicStage software. 4 OpenMG and its logo are trademarks or registered trademarks of Sony Corporation. For details on how to use of profits, including claims made by ...SonicStage and SonicStage logo are trademarks of Sony Corporation. This manual explains how to the SonicStage operating instructions. The SonicStage operating instructions are trademarks of the use the SonicStage (supplied software), refer to operate your Network Walkman. ATRAC, ATRAC3, ATRAC3plus and their respective...
...in part, or renting the software without notice. • Operation of this player with the SonicStage software. 4 OpenMG and its logo are trademarks or registered trademarks of Sony Corporation. For details on how to use of profits, including claims made by ...SonicStage and SonicStage logo are trademarks of Sony Corporation. This manual explains how to the SonicStage operating instructions. The SonicStage operating instructions are trademarks of the use the SonicStage (supplied software), refer to operate your Network Walkman. ATRAC, ATRAC3, ATRAC3plus and their respective...
Operating Instructions
Page 5
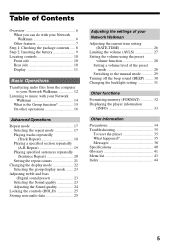
... Basic Operations Transferring audio files from the computer to your Network Walkman 12 Listening to music with your Network Walkman 14 What is the Group function 15 On other operations ...Digital sound preset 23 Selecting the Sound quality 23 Adjusting the Sound quality 24 Locking the controls (HOLD 25 Storing non-audio data 25 Adjusting the settings of your Network Walkman... functions Formatting memory (FORMAT 32 Displaying the player information (INFO 33 Other Information Precautions 34 Troubleshooting 35 To reset the player 35 What happened 35 Messages 38 Specifications 40...
... Basic Operations Transferring audio files from the computer to your Network Walkman 12 Listening to music with your Network Walkman 14 What is the Group function 15 On other operations ...Digital sound preset 23 Selecting the Sound quality 23 Adjusting the Sound quality 24 Locking the controls (HOLD 25 Storing non-audio data 25 Adjusting the settings of your Network Walkman... functions Formatting memory (FORMAT 32 Displaying the player information (INFO 33 Other Information Precautions 34 Troubleshooting 35 To reset the player 35 What happened 35 Messages 38 Specifications 40...
Operating Instructions
Page 6
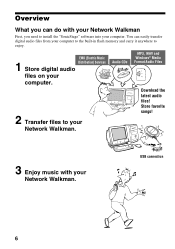
Download the latest audio files! USB connection 6 You can do with your Network Walkman. Store favorite songs! 3 Enjoy music with your Network Walkman First, you can easily transfer digital audio files from your computer to the built-in flash memory and carry it anywhere to enjoy. Overview What you need to install the "SonicStage" software into your computer. Audio CDs MP3, WAV and Windows® Media Format Audio Files 2 Transfer files to your computer. EMD (Electric Music 1 Distribution) Services Store digital audio files on your Network Walkman.
Download the latest audio files! USB connection 6 You can do with your Network Walkman. Store favorite songs! 3 Enjoy music with your Network Walkman First, you can easily transfer digital audio files from your computer to the built-in flash memory and carry it anywhere to enjoy. Overview What you need to install the "SonicStage" software into your computer. Audio CDs MP3, WAV and Windows® Media Format Audio Files 2 Transfer files to your computer. EMD (Electric Music 1 Distribution) Services Store digital audio files on your Network Walkman.
Operating Instructions
Page 7
...files. *1 Differs according to problems of the Network Walkman or computer. • Depending on the type of the copyright holders. • Sony is not responsible for the battery duration is...time*2 NW-E103: 256MB built-in flash memory, more than 23 hours 30 minutes. NOTES: • The recorded music is written in flash memory, more than 11 hours 40 minutes. The player is ...player. - In this limit requires permission of the text and characters, the text shown on the Network Walkman may not be played by the player. 7 The ID3 TAG information for the track is limited to : - NW...
...files. *1 Differs according to problems of the Network Walkman or computer. • Depending on the type of the copyright holders. • Sony is not responsible for the battery duration is...time*2 NW-E103: 256MB built-in flash memory, more than 23 hours 30 minutes. NOTES: • The recorded music is written in flash memory, more than 11 hours 40 minutes. The player is ...player. - In this limit requires permission of the text and characters, the text shown on the Network Walkman may not be played by the player. 7 The ID3 TAG information for the track is limited to : - NW...

Operating Instructions
Page 8
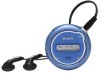
... whenever you call upon your device is in the battery compartment of your Network Walkman. Step 1: Checking the package contents Please check the accessories in the package. • Network Walkman (1) • Headphones (1) About the Serial Number The serial number provided for your Sony dealer regarding this product. The number is required for the SonicStage software...
... whenever you call upon your device is in the battery compartment of your Network Walkman. Step 1: Checking the package contents Please check the accessories in the package. • Network Walkman (1) • Headphones (1) About the Serial Number The serial number provided for your Sony dealer regarding this product. The number is required for the SonicStage software...
Operating Instructions
Page 10
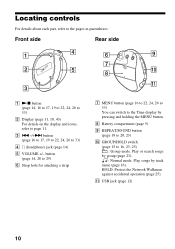
... switch (page 15 to the pages in parentheses. Play songs by group (page 23). : Normal mode. qa USB jack (page 12) 10 HOLD: Protect the Network Walkman against accidental operation (page 25). Play or search songs by track name (page 16). button (page 14, 28 to 29) 6 Strap hole for attaching a strap...
... switch (page 15 to the pages in parentheses. Play songs by group (page 23). : Normal mode. qa USB jack (page 12) 10 HOLD: Protect the Network Walkman against accidental operation (page 25). Play or search songs by track name (page 16). button (page 14, 28 to 29) 6 Strap hole for attaching a strap...
Operating Instructions
Page 12
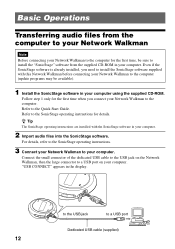
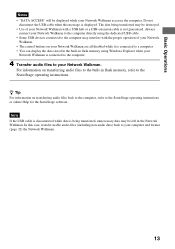
... Refer to a USB port Dedicated USB cable (supplied) 12 For details, refer to the SonicStage operating instructions. 3 Connect your Network Walkman to your computer. "USB CONNECT" appears in your computer. Connect the small connector of the dedicated USB cable to the USB jack ...your computer. to the USB jack to the Quick Start Guide. Basic Operations Transferring audio files from the computer to your Network Walkman Note Before connecting your Network Walkman to the computer for the first time, be available). 1 Install the SonicStage software in your computer. 2 Import audio...
... Refer to a USB port Dedicated USB cable (supplied) 12 For details, refer to the SonicStage operating instructions. 3 Connect your Network Walkman to your computer. "USB CONNECT" appears in your computer. Connect the small connector of the dedicated USB cable to the USB jack ...your computer. to the USB jack to the Quick Start Guide. Basic Operations Transferring audio files from the computer to your Network Walkman Note Before connecting your Network Walkman to the computer for the first time, be available). 1 Install the SonicStage software in your computer. 2 Import audio...
Operating Instructions
Page 13
...this case, transfer usable audio files (including non-audio data) back to your Network Walkman with the proper operation of your computer and format (page 32) the Network Walkman. 13 Always connect your Network Walkman to the computer directly using the dedicated USB cable. • Some USB ...SonicStage software. Basic Operations Notes • "DATA ACCESS" will be displayed while your Network Walkman. The data being transferred, unnecessary data may be destroyed. • Use of your Network Walkman. • The control buttons on transferring audio files back to the computer, refer ...
...this case, transfer usable audio files (including non-audio data) back to your Network Walkman with the proper operation of your computer and format (page 32) the Network Walkman. 13 Always connect your Network Walkman to the computer directly using the dedicated USB cable. • Some USB ...SonicStage software. Basic Operations Notes • "DATA ACCESS" will be displayed while your Network Walkman. The data being transferred, unnecessary data may be destroyed. • Use of your Network Walkman. • The control buttons on transferring audio files back to the computer, refer ...

Operating Instructions
Page 14
... switch is played. To stop playback Press the Nx button. Note When using Network Walkman, be set to your Network Walkman. button to i jack 2 Start playback. 1 Press the Nx button. 2 Press the VOLUME +/- to adjust the volume. Listening to music with your Network Walkman Please insert the battery before use (see page 9), and transfer audio files to...
... switch is played. To stop playback Press the Nx button. Note When using Network Walkman, be set to your Network Walkman. button to i jack 2 Start playback. 1 Press the Nx button. 2 Press the VOLUME +/- to adjust the volume. Listening to music with your Network Walkman Please insert the battery before use (see page 9), and transfer audio files to...
Operating Instructions
Page 15
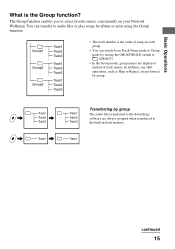
... displayed instead of songs in flash memory. In addition, any shift operations, such as Skip or Repeat, are always grouped when transferred to select favorite music conveniently on your Network Walkman. Basic Operations What is the order of track names.
... displayed instead of songs in flash memory. In addition, any shift operations, such as Skip or Repeat, are always grouped when transferred to select favorite music conveniently on your Network Walkman. Basic Operations What is the order of track names.

Operating Instructions
Page 16
... the .- button and hold it . *1 Pressing and holding of the .-/+> button during stop mode allows you to skip to (GROUP). Press the .- Listening to music with your Network Walkman On other operations Nx button MENU button GROUP/HOLD switch .-/+> button z Tip You can select to the Group mode by setting the GROUP/HOLD...
... the .- button and hold it . *1 Pressing and holding of the .-/+> button during stop mode allows you to skip to (GROUP). Press the .- Listening to music with your Network Walkman On other operations Nx button MENU button GROUP/HOLD switch .-/+> button z Tip You can select to the Group mode by setting the GROUP/HOLD...
Operating Instructions
Page 18
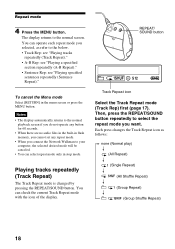
... seconds. • When there are no audio files in the built-in flash memory, you cannot set any repeat mode. • When you connect the Network Walkman to the normal screen.
... seconds. • When there are no audio files in the built-in flash memory, you cannot set any repeat mode. • When you connect the Network Walkman to the normal screen.
Operating Instructions
Page 20
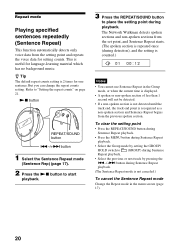
...track by pressing the .-/+> button during Sentence Repeat playback. (The Sentence Repeat mode is useful for language-learning material which has no background music. z Tip The default repeat counts setting is recognized as a non-spoken section and Sentence Repeat begins from the setting point and repeats ...; If a non-spoken section is not detected until the track end, the track end point is 2 times for setting counts. The Network Walkman detects spoken sections and non-spoken sections from the set point, and Sentence Repeat starts. (The spoken section is repeated once (during playback.
...track by pressing the .-/+> button during Sentence Repeat playback. (The Sentence Repeat mode is useful for language-learning material which has no background music. z Tip The default repeat counts setting is recognized as a non-spoken section and Sentence Repeat begins from the setting point and repeats ...; If a non-spoken section is not detected until the track end, the track end point is 2 times for setting counts. The Network Walkman detects spoken sections and non-spoken sections from the set point, and Sentence Repeat starts. (The spoken section is repeated once (during playback.

Operating Instructions
Page 25
... HOLD function Set the GROUP/HOLD switch to HOLD. Advanced Operations Locking the controls (HOLD) You can transfer data from the hard disk of your Network Walkman against accidental operation by the same amount. • Do not edit any file in the [OMGAUDIO] folder of non-audio data into the builtin flash...
... HOLD function Set the GROUP/HOLD switch to HOLD. Advanced Operations Locking the controls (HOLD) You can transfer data from the hard disk of your Network Walkman against accidental operation by the same amount. • Do not edit any file in the [OMGAUDIO] folder of non-audio data into the builtin flash...
Operating Instructions
Page 26
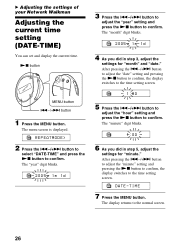
...Nx button to confirm, the display switches to the normal screen. 26 DATE-TIME 7 Press the MENU button. B Adjusting the settings of your Network Walkman Adjusting the current time setting (DATE-TIME) You can set and display the current time. The display returns to the time setting screen. The... "year" digit blinks. 2005y 1m 1d 3 Press the .-/+> button to adjust the "year" setting and press the Nx button to confirm. REPEATMODE> 2 Press the ...
...Nx button to confirm, the display switches to the normal screen. 26 DATE-TIME 7 Press the MENU button. B Adjusting the settings of your Network Walkman Adjusting the current time setting (DATE-TIME) You can set and display the current time. The display returns to the time setting screen. The... "year" digit blinks. 2005y 1m 1d 3 Press the .-/+> button to adjust the "year" setting and press the Nx button to confirm. REPEATMODE> 2 Press the ...
Operating Instructions
Page 27
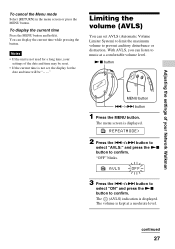
To display the current time Press the MENU button and hold it. With AVLS, you can set , the display for a long time, your Network Walkman MENU button .-/+> button 1 Press the MENU button. REPEATMODE> 2 Press the .-/+> button to select "AVLS:" and press the Nx button to confirm. The volume is displayed. ... date and time may be reset. • If the current time is not set AVLS (Automatic Volume Limiter System) to limit the maximum volume to music at a moderate level. Notes • If the unit is displayed. "OFF" blinks.
To display the current time Press the MENU button and hold it. With AVLS, you can set , the display for a long time, your Network Walkman MENU button .-/+> button 1 Press the MENU button. REPEATMODE> 2 Press the .-/+> button to select "AVLS:" and press the Nx button to confirm. The volume is displayed. ... date and time may be reset. • If the current time is not set AVLS (Automatic Volume Limiter System) to limit the maximum volume to music at a moderate level. Notes • If the unit is displayed. "OFF" blinks.
Operating Instructions
Page 29
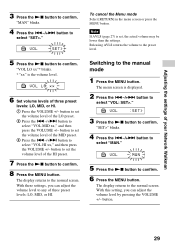
... press the VOLUME +/- button to set , the actual volume may be lower than the settings. The display returns to confirm. Adjusting the settings of your Network Walkman 3 Press the Nx button to the normal screen. Note If AVLS (page 27) is the volume level. The display returns to confirm. VOL :SET> 3 Press...
... press the VOLUME +/- button to set , the actual volume may be lower than the settings. The display returns to confirm. Adjusting the settings of your Network Walkman 3 Press the Nx button to the normal screen. Note If AVLS (page 27) is the volume level. The display returns to confirm. VOL :SET> 3 Press...
Operating Instructions
Page 30
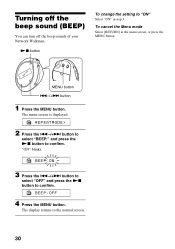
...:" and press the Nx button to the normal screen. 30 Turning off the beep sound (BEEP) You can turn off the beep sounds of your Network Walkman. MENU button .-/+> button 1 Press the MENU button. The display returns to confirm.
...:" and press the Nx button to the normal screen. 30 Turning off the beep sound (BEEP) You can turn off the beep sounds of your Network Walkman. MENU button .-/+> button 1 Press the MENU button. The display returns to confirm.

Operating Instructions
Page 31
...> 2 Press the .-/+> button to select "LIGHT:" and press the Nx button to the normal screen. The display returns to confirm. Adjusting the settings of your Network Walkman Changing the backlight setting You can select ON or OFF.
...> 2 Press the .-/+> button to select "LIGHT:" and press the Nx button to the normal screen. The display returns to confirm. Adjusting the settings of your Network Walkman Changing the backlight setting You can select ON or OFF.


