Operating Instructions
Page 3
...equipment does cause harmful interference to radio or television reception, which the receiver is no guarantee that to correct the interference by turning the equipment off and on a circuit different from that interference will not occur in the U.S.A. and Canada RECYCLING LITHIUM-ION BATTERIES...particular installation. For more of the FCC Rules. If this equipment. Consult the dealer or an experienced radio/ TV technician for a Class B digital device, pursuant to Subpart B of Part 15 of rechargeable batteries, call toll free 1-800-822-8837, or visit http://www.rbrc.org/ ...
...equipment does cause harmful interference to radio or television reception, which the receiver is no guarantee that to correct the interference by turning the equipment off and on a circuit different from that interference will not occur in the U.S.A. and Canada RECYCLING LITHIUM-ION BATTERIES...particular installation. For more of the FCC Rules. If this equipment. Consult the dealer or an experienced radio/ TV technician for a Class B digital device, pursuant to Subpart B of Part 15 of rechargeable batteries, call toll free 1-800-822-8837, or visit http://www.rbrc.org/ ...
Operating Instructions
Page 8
... 10 Identifying the parts 11 Getting started Charging the battery pack 13 Using an external power source 16 Using your camera abroad 16 Turning on/off your camera 17 Setting the date and time 17 Shooting still images Inserting a disc 20 Initializing a disc 21 What is initialization 21 ...images in singe-image mode 39 Deleting images in index (nine-image) mode 40 Deleting images in index (triple-image) mode 41 Formatting a CD-RW 42 Copying images to your computer Preparation for viewing images using a computer (Finalize 44 Finalizing a disc 44 What is finalization 44 Canceling ...
... 10 Identifying the parts 11 Getting started Charging the battery pack 13 Using an external power source 16 Using your camera abroad 16 Turning on/off your camera 17 Setting the date and time 17 Shooting still images Inserting a disc 20 Initializing a disc 21 What is initialization 21 ...images in singe-image mode 39 Deleting images in index (nine-image) mode 40 Deleting images in index (triple-image) mode 41 Formatting a CD-RW 42 Copying images to your computer Preparation for viewing images using a computer (Finalize 44 Finalizing a disc 44 What is finalization 44 Canceling ...

Operating Instructions
Page 13
Use a dry cotton swab to turn off your camera. Slide the cover in the direction of your camera when charging the battery pack. • "InfoLITHIUM" is easily inserted by pushing the battery eject lever at the front of the AC power adaptor with ...) (supplied) (page 120). 2 , Install the battery pack, then close the cover so that it is dirty. "InfoLITHIUM" M series battery packs have the mark. • Your camera operates only with a metallic object, as illustrated. DC connecting cable 3 AC power adaptor (supplied) , Open the DC IN jack cover and connect the DC connecting...
Use a dry cotton swab to turn off your camera. Slide the cover in the direction of your camera when charging the battery pack. • "InfoLITHIUM" is easily inserted by pushing the battery eject lever at the front of the AC power adaptor with ...) (supplied) (page 120). 2 , Install the battery pack, then close the cover so that it is dirty. "InfoLITHIUM" M series battery packs have the mark. • Your camera operates only with a metallic object, as illustrated. DC connecting cable 3 AC power adaptor (supplied) , Open the DC IN jack cover and connect the DC connecting...

Operating Instructions
Page 15
... (min.) images Approx. 120 Approx. 2300 Approx. 120 Approx. 2400 * Shooting at low temperatures, using the flash, turning the power on/off repeatedly, or using the camera at about 4-second intervals MVC-CD250 Image size 1600×1200 640×480 NP-FM50 (supplied) Battery life No. of...1704 NP-FM50 (supplied) Battery life No. The surrounding temperature is low The battery capacity decreases as time passes (page 121). The camera has been turned ON and OFF many times - Battery life and number of images that can be decreased when using the zoom. 15 The battery ...
... (min.) images Approx. 120 Approx. 2300 Approx. 120 Approx. 2400 * Shooting at low temperatures, using the flash, turning the power on/off repeatedly, or using the camera at about 4-second intervals MVC-CD250 Image size 1600×1200 640×480 NP-FM50 (supplied) Battery life No. of...1704 NP-FM50 (supplied) Battery life No. The surrounding temperature is low The battery capacity decreases as time passes (page 121). The camera has been turned ON and OFF many times - Battery life and number of images that can be decreased when using the zoom. 15 The battery ...

Operating Instructions
Page 17
...the following circumstances. • When viewing movies • When a connector is plugged into the USB jack or the A/V OUT jack. When you turn on your camera POWER lamp POWER switch 1 , Slide the POWER switch in [SETUP 1] (page 117), and perform the procedure from step 3. * MVC-CD400...power source (battery pack or AC power adaptor). When playing back a Slide Show (page 87), the power automatically turns off . • If you turn on . Turning off function only operates when the camera is set the mode dial to , S, A, M, SCN or , the lens portion moves (MVC-CD400 only)....
...the following circumstances. • When viewing movies • When a connector is plugged into the USB jack or the A/V OUT jack. When you turn on your camera POWER lamp POWER switch 1 , Slide the POWER switch in [SETUP 1] (page 117), and perform the procedure from step 3. * MVC-CD400...power source (battery pack or AC power adaptor). When playing back a Slide Show (page 87), the power automatically turns off . • If you turn on . Turning off function only operates when the camera is set the mode dial to , S, A, M, SCN or , the lens portion moves (MVC-CD400 only)....

Operating Instructions
Page 18
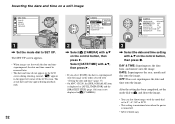
... control button, then press z. CLOCK SET Y/M/D M/D/Y D/M/Y 2002 / OK 1/ 1 12 : 00 OK AM CANCEL 4 , Select the year, month, day, hour or minute item you want to turn on the LCD screen. CLOCK SET Y/M/D M/D/Y D/M/Y 2002 / OK 1/ 1 12 : 00 OK AM CANCEL POWER switch 2 , Slide the POWER switch in the direction of the arrow...
... control button, then press z. CLOCK SET Y/M/D M/D/Y D/M/Y 2002 / OK 1/ 1 12 : 00 OK AM CANCEL 4 , Select the year, month, day, hour or minute item you want to turn on the LCD screen. CLOCK SET Y/M/D M/D/Y D/M/Y 2002 / OK 1/ 1 12 : 00 OK AM CANCEL POWER switch 2 , Slide the POWER switch in the direction of the arrow...

Operating Instructions
Page 20
... Lock tab Pickup lens 1 , Open the disc cover. Never open the disc cover or turn off the power at this time, as the image data may be damaged or the disc may become unusable. • While the camera is writing data on a disc, the disc cover OPEN lever is locked. • After... take about 10 minutes to the left , slide down the disc cover OPEN lever, and open the disc cover. • You can use only 8 cm CD-R/CD-RW discs that image data is lit up , and push down on the center of the disc until it means that have these marks. Disc...
... Lock tab Pickup lens 1 , Open the disc cover. Never open the disc cover or turn off the power at this time, as the image data may be damaged or the disc may become unusable. • While the camera is writing data on a disc, the disc cover OPEN lever is locked. • After... take about 10 minutes to the left , slide down the disc cover OPEN lever, and open the disc cover. • You can use only 8 cm CD-R/CD-RW discs that image data is lit up , and push down on the center of the disc until it means that have these marks. Disc...

Operating Instructions
Page 21
... PLACE ON LEVEL SURFACE" appears on the LCD screen. • You can continue to record images. Initialization is set the mode dial to , then turn on the power. To cancel initialization Select [CANCEL] with v on the control button, then press z. When you can also carry out this operation when... the mode dial is required to record images on a disc. Do not shake or strike the camera during initialization. Shooting still images Initializing a disc What is also automatically performed, and you perform finalization (page 44) using your...
... PLACE ON LEVEL SURFACE" appears on the LCD screen. • You can continue to record images. Initialization is set the mode dial to , then turn on the power. To cancel initialization Select [CANCEL] with v on the control button, then press z. When you can also carry out this operation when... the mode dial is required to record images on a disc. Do not shake or strike the camera during initialization. Shooting still images Initializing a disc What is also automatically performed, and you perform finalization (page 44) using your...

Operating Instructions
Page 22
..., or set . 22 The menu appears. • You can also carry out this operation when the mode dial is set the mode dial to , and turn on the control button, then press z. * MVC-CD400 only • You can also perform initialization using [DISC TOOL] in the SET UP settings (page 116...
..., or set . 22 The menu appears. • You can also carry out this operation when the mode dial is set the mode dial to , and turn on the control button, then press z. * MVC-CD400 only • You can also perform initialization using [DISC TOOL] in the SET UP settings (page 116...
Operating Instructions
Page 23
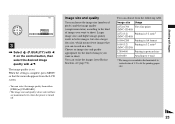
The image quality is turned off. You can select the image quality from the following table. You can choose from either [FINE] or [STANDARD]. • The image size and quality ...
The image quality is turned off. You can select the image quality from the following table. You can choose from either [FINE] or [STANDARD]. • The image size and quality ...

Operating Instructions
Page 24
Remove the lens cap. • Still images are adjusted automatically. 2 , Hold the camera steadily with both hands and position the subject in JPEG format. • When you turn on the power (MVC-CD400 only) • You can choose either Multipoint AF or Focus range select mode (MVC-CD400), or ... still image shooting (using auto adjustment mode) Mode dial 1 , Set the mode dial to [NORMAL]. Images viewed on the LCD screen of the camera all appear the same size. • The actual number of images may differ depending on the shooting conditions. • The image size value (e.g., 2272...
Remove the lens cap. • Still images are adjusted automatically. 2 , Hold the camera steadily with both hands and position the subject in JPEG format. • When you turn on the power (MVC-CD400 only) • You can choose either Multipoint AF or Focus range select mode (MVC-CD400), or ... still image shooting (using auto adjustment mode) Mode dial 1 , Set the mode dial to [NORMAL]. Images viewed on the LCD screen of the camera all appear the same size. • The actual number of images may differ depending on the shooting conditions. • The image size value (e.g., 2272...

Operating Instructions
Page 25
...The flash automatically pops up . When the AE/AF lock indicator changes from flashing to lighted up, the camera is ready for about three minutes during recording or playback, the camera turns off automatically to actually record the image on a disc (page 83). • While the image is ...being recorded on the disc. When "RECORDING" disappears, you can shoot the next image. • When operating the camera using a battery pack, if you...
...The flash automatically pops up . When the AE/AF lock indicator changes from flashing to lighted up, the camera is ready for about three minutes during recording or playback, the camera turns off automatically to actually record the image on a disc (page 83). • While the image is ...being recorded on the disc. When "RECORDING" disappears, you can shoot the next image. • When operating the camera using a battery pack, if you...

Operating Instructions
Page 29
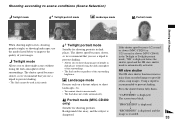
...timer) indicator appears on the control button repeatedly to , and press V ( ) on the control button. r (Forced flash): The flash strobes regardless of the camera, the focus and the exposure may not be correctly set to S*, A*, M*, SCN, or . * MVC-CD400 only 2 , Center the subject in the frame... brightness. Using the self-timer 60min 640 4 60min 640 3 0EV F5.6 50 Selecting a flash mode 60min 640 4 Shooting still images 1 , Turn the mode dial to select a flash mode. No indicator (Auto): The flash automatically pops up and strobes when the surroundings are dark (default). r...
...timer) indicator appears on the control button repeatedly to , and press V ( ) on the control button. r (Forced flash): The flash strobes regardless of the camera, the focus and the exposure may not be correctly set to S*, A*, M*, SCN, or . * MVC-CD400 only 2 , Center the subject in the frame... brightness. Using the self-timer 60min 640 4 60min 640 3 0EV F5.6 50 Selecting a flash mode 60min 640 4 Shooting still images 1 , Turn the mode dial to select a flash mode. No indicator (Auto): The flash automatically pops up and strobes when the surroundings are dark (default). r...

Operating Instructions
Page 30
... the charging is complete, the lamp goes out. • When you look at the same time. • If the menu is strobing, the /CHG lamp turns on. • Attaching a conversion lens (not supplied) may block the light from the built-in flash or cause the lens shadow to appear. • You...
... the charging is complete, the lamp goes out. • When you look at the same time. • If the menu is strobing, the /CHG lamp turns on. • Attaching a conversion lens (not supplied) may block the light from the built-in flash or cause the lens shadow to appear. • You...
Operating Instructions
Page 32
... the [BRACKET STEP] (page 116) item is turned off. * MVC-CD400 only Inserting the date and time on a still image DISC TOOL FINALIZE : FORMAT : INITIALIZE : UNFINALIZE : SELECT CAMERA MOVING IMAGE : DAY&TIME DATE/TIME : DATE DIGITAL ZOOM : OFF BRACKET STEP : RED EYE REDUCTION ...: HOLOGRAM AF : OK CAMERA MOVING IMAGE : MPEG MOVIE DATE/TIME : DATE DIGITAL ZOOM : ON BRACKET STEP : ±0.7EV RED EYE REDUCTION...
... the [BRACKET STEP] (page 116) item is turned off. * MVC-CD400 only Inserting the date and time on a still image DISC TOOL FINALIZE : FORMAT : INITIALIZE : UNFINALIZE : SELECT CAMERA MOVING IMAGE : DAY&TIME DATE/TIME : DATE DIGITAL ZOOM : OFF BRACKET STEP : RED EYE REDUCTION ...: HOLOGRAM AF : OK CAMERA MOVING IMAGE : MPEG MOVIE DATE/TIME : DATE DIGITAL ZOOM : ON BRACKET STEP : ±0.7EV RED EYE REDUCTION...
Operating Instructions
Page 33
... mode, "NR" is displayed before the shutter speed and the NR slow shutter mode is recorded. 33 Press the shutter button fully down. The screen turns black. If the shutter speed becomes 1/2 second or slower (MVC-CD250) or 1/25 second or slower (MVC-CD400) in macro mode. • The flash does...
... mode, "NR" is displayed before the shutter speed and the NR slow shutter mode is recorded. 33 Press the shutter button fully down. The screen turns black. If the shutter speed becomes 1/2 second or slower (MVC-CD250) or 1/25 second or slower (MVC-CD400) in macro mode. • The flash does...

Operating Instructions
Page 34
The menu appears. 2 , Select [SCN] with b/B on the control button. • (EV), 9 (FOCUS) and (SPOT METER) are displayed on the MVC-CD250 menu (page 62). 3 , Select the desired mode with v/V on the control button. The mode is turned off. 34 When the setting is complete, press MENU so that the menu disappears from the LCD screen. • To cancel Scene Selection, set . SCN WB MODE SCN WB MODE 1 MENU , Set the mode dial to a different mode. • This setting is maintained even when the power is set the mode dial to SCN, then press MENU.
The menu appears. 2 , Select [SCN] with b/B on the control button. • (EV), 9 (FOCUS) and (SPOT METER) are displayed on the MVC-CD250 menu (page 62). 3 , Select the desired mode with v/V on the control button. The mode is turned off. 34 When the setting is complete, press MENU so that the menu disappears from the LCD screen. • To cancel Scene Selection, set . SCN WB MODE SCN WB MODE 1 MENU , Set the mode dial to a different mode. • This setting is maintained even when the power is set the mode dial to SCN, then press MENU.

Operating Instructions
Page 35
...single images 60min 640 8/8 100-0028 2002 7 4 10:30PM FILE BACK/NEXT VOLUME 1 , Set the mode dial to , and turn on the screen. Index (nine-image) screen Nine images are displayed simultaneously in separate panels on the LCD screen. Various image information items ... can select the following three methods for viewing images. Index (triple-image) screen Three images are also displayed. • For a detailed description of your camera Single (single-image) screen 60min 640 2/28 Index (nine-image) screen 100-0002 2002 7 4 10:30PM FILE BACK/NEXT VOLUME • SINGLE DISPLAY...
...single images 60min 640 8/8 100-0028 2002 7 4 10:30PM FILE BACK/NEXT VOLUME 1 , Set the mode dial to , and turn on the screen. Index (nine-image) screen Nine images are displayed simultaneously in separate panels on the LCD screen. Various image information items ... can select the following three methods for viewing images. Index (triple-image) screen Three images are also displayed. • For a detailed description of your camera Single (single-image) screen 60min 640 2/28 Index (nine-image) screen 100-0002 2002 7 4 10:30PM FILE BACK/NEXT VOLUME • SINGLE DISPLAY...

Operating Instructions
Page 37
... jacks, connect the audio plug (black) of the A/V connecting cable to the Lch jack. • Turn off both your camera and the TV before connecting the camera and the TV with the A/V connecting cable. 2 TV/Video switch , Turn on the TV and set the TV/ Video switch to "Video". • The name and location... on your TV. 100-0028 2002 7 4 10:30PM FILE BACK/NEXT VOLUME 3 , Set the mode dial to , and turn on the control button to select the desired image. • When using your camera abroad, it may be necessary to switch the video output signal to match that of your TV system (page...
... jacks, connect the audio plug (black) of the A/V connecting cable to the Lch jack. • Turn off both your camera and the TV before connecting the camera and the TV with the A/V connecting cable. 2 TV/Video switch , Turn on the TV and set the TV/ Video switch to "Video". • The name and location... on your TV. 100-0028 2002 7 4 10:30PM FILE BACK/NEXT VOLUME 3 , Set the mode dial to , and turn on the control button to select the desired image. • When using your camera abroad, it may be necessary to switch the video output signal to match that of your TV system (page...

Operating Instructions
Page 39
... LCD screen. "DISC ACCESS" appears on the control button, then press z. To cancel deleting Select [CANCEL] with v on the camera. Press b/B on the control button to select the image you want to delete. • When using a CD-R, the disc remaining space does not increase even if you delete images. • When using... a CD-RW, the disc remaining space only increases if you delete the last image you may not be able to delete the image. • If there are file names on the disc with names having the same last 4 digits as the file name of the image to , and turn on the...
... LCD screen. "DISC ACCESS" appears on the control button, then press z. To cancel deleting Select [CANCEL] with v on the camera. Press b/B on the control button to select the image you want to delete. • When using a CD-R, the disc remaining space does not increase even if you delete images. • When using... a CD-RW, the disc remaining space only increases if you delete the last image you may not be able to delete the image. • If there are file names on the disc with names having the same last 4 digits as the file name of the image to , and turn on the...


