
Operating Instructions
Page 4
...This digital still camera uses 8 cm CD-Rs as "disc" in capital letters. Note on the camera are manufactured using your camera, etc. No compensation for contents of the recording Contents of the recording cannot be compensated for long periods may be careful not to get the camera wet ... as recording media. Be sure to read the following before using the camera. Precaution on the viewfinder. Do not shake or strike the camera In addition to malfunctions and inability to record images, this camera with Mavica discs*. • While the image is working correctly. Over 99.99% ...
...This digital still camera uses 8 cm CD-Rs as "disc" in capital letters. Note on the camera are manufactured using your camera, etc. No compensation for contents of the recording Contents of the recording cannot be compensated for long periods may be careful not to get the camera wet ... as recording media. Be sure to read the following before using the camera. Precaution on the viewfinder. Do not shake or strike the camera In addition to malfunctions and inability to record images, this camera with Mavica discs*. • While the image is working correctly. Over 99.99% ...

Operating Instructions
Page 5
... Getting started Identifying the parts 6 Preparing the power supply 8 Setting the date and time 12 Inserting a disc 14 Basic operations B Recording Initializing a disc (INITIALIZE) ...16 Recording still images 18 Recording moving images 24 B Playback Playing back still images 25 Playing...recorded still image size (RESIZE 62 Selecting still images to print (PRINT MARK 62 Additional information Precautions 64 On discs 66 Using your camera abroad 67 Troubleshooting 68 Warning and notice messages .......72 Self-diagnosis display 73 Specifications 74 LCD screen/viewfinder indicators ...
... Getting started Identifying the parts 6 Preparing the power supply 8 Setting the date and time 12 Inserting a disc 14 Basic operations B Recording Initializing a disc (INITIALIZE) ...16 Recording still images 18 Recording moving images 24 B Playback Playing back still images 25 Playing...recorded still image size (RESIZE 62 Selecting still images to print (PRINT MARK 62 Additional information Precautions 64 On discs 66 Using your camera abroad 67 Troubleshooting 68 Warning and notice messages .......72 Self-diagnosis display 73 Specifications 74 LCD screen/viewfinder indicators ...

Operating Instructions
Page 6
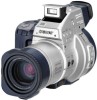
...20) F Photocell window for details of operation. 1 qa 2 qs 3 qd 4 qf 5 qg 6 qh 7 qj 8 qk 9 ql 0 w; G Focus ring (50) H Lens I DIGITAL I/O jack (34) J PROGRAM AE button (51) K WHITE BALANCE button (53) L Accessory shoe M OPEN (FLASH) button (22) N (One-push white balance) button (53) O (External... flash) jack P Disc cover OPEN lever (15) Q Lens cap (supplied) R STEADY SHOT ON/OFF switch (21) S FOCUS AUTO/MANUAL switch (50) T A/V OUT (MONO) jack (59...
...20) F Photocell window for details of operation. 1 qa 2 qs 3 qd 4 qf 5 qg 6 qh 7 qj 8 qk 9 ql 0 w; G Focus ring (50) H Lens I DIGITAL I/O jack (34) J PROGRAM AE button (51) K WHITE BALANCE button (53) L Accessory shoe M OPEN (FLASH) button (22) N (One-push white balance) button (53) O (External... flash) jack P Disc cover OPEN lever (15) Q Lens cap (supplied) R STEADY SHOT ON/OFF switch (21) S FOCUS AUTO/MANUAL switch (50) T A/V OUT (MONO) jack (59...

Operating Instructions
Page 7
...(52) L Control button (40) M ACCESS lamp (18) Do not shake or strike the camera while the ACCESS lamp is lit. You will be unable to firmly secure the camera to tripods having longer screws, and may damage the camera. 7 N PLAY/STILL/MOVIE selector (40) O DC IN jack (9, 11) P POWER ON...with a screw length of less than 7/32 inch (6.5 mm). Getting started 1 2 3 4 5 6 7 8 9 A (Macro) button (50) B (Flash) button (22) C Viewfinder (19) D Speaker E DISPLAY button (21) F Disc window G Viewfinder adjustment lever (19) H VOLUME+/- Attaching the shoulder strap qa qs qd qf qg qh qj qk ql w; q;
...(52) L Control button (40) M ACCESS lamp (18) Do not shake or strike the camera while the ACCESS lamp is lit. You will be unable to firmly secure the camera to tripods having longer screws, and may damage the camera. 7 N PLAY/STILL/MOVIE selector (40) O DC IN jack (9, 11) P POWER ON...with a screw length of less than 7/32 inch (6.5 mm). Getting started 1 2 3 4 5 6 7 8 9 A (Macro) button (50) B (Flash) button (22) C Viewfinder (19) D Speaker E DISPLAY button (21) F Disc window G Viewfinder adjustment lever (19) H VOLUME+/- Attaching the shoulder strap qa qs qd qf qg qh qj qk ql w; q;

Operating Instructions
Page 14
Push down the disc cover OPEN lever. Pickup lens Push here Disc 3 Close the disc cover. 14 When installing, do not push with the blue side down. Open the disc cover by your hand after the cover is unlocked. 2 Place a disc with too much force and do not touch the pickup lens. Inserting a disc You can use only the 8 cm CD-Rs that have this mark. 1 2 Disc cover OPEN lever Lock tab 1 While sliding the lock tab to the left, slide down the center of the disc until it clicks.
Push down the disc cover OPEN lever. Pickup lens Push here Disc 3 Close the disc cover. 14 When installing, do not push with the blue side down. Open the disc cover by your hand after the cover is unlocked. 2 Place a disc with too much force and do not touch the pickup lens. Inserting a disc You can use only the 8 cm CD-Rs that have this mark. 1 2 Disc cover OPEN lever Lock tab 1 While sliding the lock tab to the left, slide down the center of the disc until it clicks.

Operating Instructions
Page 15
Notes • Before removing the disc, be damaged or the disc may become unusable. 15 Getting started Removing the disc While sliding the lock tab to check that the disc is not rotating. • Do not open the disc cover after the cover is lit. Otherwise, the recorded image may be sure to the left, slide down the disc cover OPEN lever, and open the disc cover while the ACCESS lamp is unlocked. Then, remove the disc as illustrated below.
Notes • Before removing the disc, be damaged or the disc may become unusable. 15 Getting started Removing the disc While sliding the lock tab to check that the disc is not rotating. • Do not open the disc cover after the cover is lit. Otherwise, the recorded image may be sure to the left, slide down the disc cover OPEN lever, and open the disc cover while the ACCESS lamp is unlocked. Then, remove the disc as illustrated below.

Operating Instructions
Page 16
...with B on the control button, then press the center x. 3 Select [DISC TOOL] with v on the control button. Basic operations B Recording Initializing a disc (INITIALIZE) When you use a new disc, you have to turn on the power before initializing a disc. 1-6 Control button 1 Press v on the control button, then press the... center x. INDEX DELETE FILE TOOL SETUP SELECT OK MENU BAR OFF DISC TOOL ROTATE SLIDE SHOW PRINT MARK PROTECT INDEX DELETE FILE TOOL SETUP SELECT CLOSE DISC TOOL ROTATE SLIDE SHOW PRINT MARK PROTECT INITIALIZE FINALIZE CANCEL INDEX DELETE FILE TOOL ...
...with B on the control button, then press the center x. 3 Select [DISC TOOL] with v on the control button. Basic operations B Recording Initializing a disc (INITIALIZE) When you use a new disc, you have to turn on the power before initializing a disc. 1-6 Control button 1 Press v on the control button, then press the... center x. INDEX DELETE FILE TOOL SETUP SELECT OK MENU BAR OFF DISC TOOL ROTATE SLIDE SHOW PRINT MARK PROTECT INDEX DELETE FILE TOOL SETUP SELECT CLOSE DISC TOOL ROTATE SLIDE SHOW PRINT MARK PROTECT INITIALIZE FINALIZE CANCEL INDEX DELETE FILE TOOL ...

Operating Instructions
Page 17
... button, then press the center x. The initialization is initialization? Initialization starts. "PLACE ON LEVEL SURFACE" appears on the LCD screen or on a disc. Be sure to view images on a CDROM drive, you execute the initialization again. OK CANCEL 6 Select [OK] with v on the control ... [INITIALIZE] with v on the control button, then press the center x. DISC TOOL ROTATE SLIDE SHOW PRINT MARK PROTECT INITIALIZE? Images previously recorded will remain on the disc if you can record images on the disc. 17 In case that you have executed the finalization (page 29) to ...
... button, then press the center x. The initialization is initialization? Initialization starts. "PLACE ON LEVEL SURFACE" appears on the LCD screen or on a disc. Be sure to view images on a CDROM drive, you execute the initialization again. OK CANCEL 6 Select [OK] with v on the control ... [INITIALIZE] with v on the control button, then press the center x. DISC TOOL ROTATE SLIDE SHOW PRINT MARK PROTECT INITIALIZE? Images previously recorded will remain on the disc if you can record images on the disc. 17 In case that you have executed the finalization (page 29) to ...

Operating Instructions
Page 18
...to turn on the power and insert a disc. 1 2, 3 ACCESS lamp 1 Set the PLAY/STILL/MOVIE selector to STILL. 2 Press and hold the shutter button halfway down . The focus is not automatically adjusted when the camera is ready for recording. When the camera finishes the automatic adjustments*, the AE lock ...indicator z lights up and the camera is in manual focus mode. While the AE lock indicator z (green) is flashing, the image is frozen, however, the image is recorded on the disc. The shutter clicks and ...
...to turn on the power and insert a disc. 1 2, 3 ACCESS lamp 1 Set the PLAY/STILL/MOVIE selector to STILL. 2 Press and hold the shutter button halfway down . The focus is not automatically adjusted when the camera is ready for recording. When the camera finishes the automatic adjustments*, the AE lock ...indicator z lights up and the camera is in manual focus mode. While the AE lock indicator z (green) is flashing, the image is frozen, however, the image is recorded on the disc. The shutter clicks and ...
Operating Instructions
Page 19
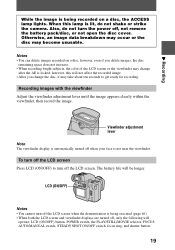
... After you delete images, the disc remaining space does not increase. • When... the disc, it may become unusable. Otherwise, an image data breakdown may occur or the disc may... take about ten seconds to turn off the LCD screen Press LCD (ON/OFF) to get ready for recording. To turn off the LCD screen. LCD (ON/OFF) Notes • You cannot turn the power off, not remove the battery pack/disc..., or not open the disc cover. Notes • You can delete images recorded on a disc, the ACCESS lamp... recorded on a disc, however, even if you change after the ...
... After you delete images, the disc remaining space does not increase. • When... the disc, it may become unusable. Otherwise, an image data breakdown may occur or the disc may... take about ten seconds to turn off the LCD screen Press LCD (ON/OFF) to get ready for recording. To turn off the LCD screen. LCD (ON/OFF) Notes • You cannot turn the power off, not remove the battery pack/disc..., or not open the disc cover. Notes • You can delete images recorded on a disc, the ACCESS lamp... recorded on a disc, however, even if you change after the ...

Operating Instructions
Page 20
... farther away) If you delete images, the disc remaining space does not increase. However, even if you cannot get a sharp focus on the control button, then press the center x. Minimum focal distance to function when the zoom exceeds 10×. Digital zoom function This camera has a digital zoom function. This adjustment does not affect...
... farther away) If you delete images, the disc remaining space does not increase. However, even if you cannot get a sharp focus on the control button, then press the center x. Minimum focal distance to function when the zoom exceeds 10×. Digital zoom function This camera has a digital zoom function. This adjustment does not affect...

Operating Instructions
Page 24
... not recorded. The recording lamp lights up to 60 seconds. However, when [IMAGE SIZE] in the menu settings is set to turn on the disc. See page 75 for up during recording Press DISPLAY to 10 or 15 seconds with audio are recorded for 5 seconds. If you hold the shutter... button down . These indicators are recorded on the power and insert a disc. 1 2 Recording lamp 1 Set the PLAY/STILL/MOVIE selector to 22. Adjusting the brightness of the indicators. 24 The recording time can be set to [...
... not recorded. The recording lamp lights up to 60 seconds. However, when [IMAGE SIZE] in the menu settings is set to turn on the disc. See page 75 for up during recording Press DISPLAY to 10 or 15 seconds with audio are recorded for 5 seconds. If you hold the shutter... button down . These indicators are recorded on the power and insert a disc. 1 2 Recording lamp 1 Set the PLAY/STILL/MOVIE selector to 22. Adjusting the brightness of the indicators. 24 The recording time can be set to [...

Operating Instructions
Page 28
For Windows users A Viewing images with a CD-ROM drive (page 33) Finalize the disc beforehand (page 29). Make sure that applications that support these file formats are installed on your camera is stored in the following formats. Moving image/Voice memo: MPEG format - Still image in TEXT mode:...For Macintosh users Viewing images with a CD-ROM drive (page 37) Finalize the disc beforehand (page 29).You have to finalize the disc. Viewing images using a personal computer You can view data with your camera on a personal computer and attach it to install the driver, Adaptec UDF Volume ...
For Windows users A Viewing images with a CD-ROM drive (page 33) Finalize the disc beforehand (page 29). Make sure that applications that support these file formats are installed on your camera is stored in the following formats. Moving image/Voice memo: MPEG format - Still image in TEXT mode:...For Macintosh users Viewing images with a CD-ROM drive (page 37) Finalize the disc beforehand (page 29).You have to finalize the disc. Viewing images using a personal computer You can view data with your camera on a personal computer and attach it to install the driver, Adaptec UDF Volume ...

Operating Instructions
Page 29
..., Inc. • DirectCD is required to view images on a CD-ROM drive. • You can record new images on the finalized disc if you execute the initialization on it from the camera. A disc that you execute the finalization onto compiled data at a time. • You can play back the... disc recorded with B on the control button, then press the center x. We recommend that has not been executed the finalization cannot be ...
..., Inc. • DirectCD is required to view images on a CD-ROM drive. • You can record new images on the finalized disc if you execute the initialization on it from the camera. A disc that you execute the finalization onto compiled data at a time. • You can play back the... disc recorded with B on the control button, then press the center x. We recommend that has not been executed the finalization cannot be ...

Operating Instructions
Page 30
... the an external power source (page 11). 30 Do not shake or jar the camera during the finalization. Place the camera on the control button, then press the center x. DISC TOOL ROTATE SLIDE SHOW PRINT MARK PROTECT INITIALIZE FINALIZE CANCEL INDEX DELETE FILE TOOL SETUP SELECT...on a stable surface during the finalization. • When you execute the finalization, we recommend that you cannot cancel it. Finalization starts and the disc remaining indicator changes from to execute the finalization. OK CANCEL 6 Select [OK] with v on the control button, then press the center x. ...
... the an external power source (page 11). 30 Do not shake or jar the camera during the finalization. Place the camera on the control button, then press the center x. DISC TOOL ROTATE SLIDE SHOW PRINT MARK PROTECT INITIALIZE FINALIZE CANCEL INDEX DELETE FILE TOOL SETUP SELECT...on a stable surface during the finalization. • When you execute the finalization, we recommend that you cannot cancel it. Finalization starts and the disc remaining indicator changes from to execute the finalization. OK CANCEL 6 Select [OK] with v on the control button, then press the center x. ...

Operating Instructions
Page 31
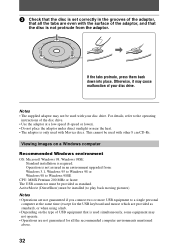
... slip into place. B Playback 31 Release the third tab and the disc will be held firmly in the numbered order. 1 Printed side of the disc (The other blue side is recordable side.) Printed side of the adaptor (SONY is printed 2 on this side and the other side is an upright type, use the... supplied 8 cm CD adaptor. 1 Slide the disc into the inner groove and under two of the tabs on the inner circle of adaptor in place...
... slip into place. B Playback 31 Release the third tab and the disc will be held firmly in the numbered order. 1 Printed side of the disc (The other blue side is recordable side.) Printed side of the adaptor (SONY is printed 2 on this side and the other side is an upright type, use the... supplied 8 cm CD adaptor. 1 Slide the disc into the inner groove and under two of the tabs on the inner circle of adaptor in place...
Operating Instructions
Page 32
...speed (8-speed or lower). • Do not place the adaptor under direct sunlight or near the heat. • The adaptor is only used with Mavica discs. If the tabs protrude, press them back down into place. This cannot be used with other 8 cm CD-Rs. Notes • The supplied adaptor...moving pictures) Notes • Operations are not guaranteed if you connect two or more USB equipment to the operating instructions of your disc drive. 3 Check that the disc is set correctly in an environment upgraded from the adaptor. Otherwise, it may not operate. • Operations are not guaranteed ...
...speed (8-speed or lower). • Do not place the adaptor under direct sunlight or near the heat. • The adaptor is only used with Mavica discs. If the tabs protrude, press them back down into place. This cannot be used with other 8 cm CD-Rs. Notes • The supplied adaptor...moving pictures) Notes • Operations are not guaranteed if you connect two or more USB equipment to the operating instructions of your disc drive. 3 Check that the disc is set correctly in an environment upgraded from the adaptor. Otherwise, it may not operate. • Operations are not guaranteed ...

Operating Instructions
Page 33
...Viewing images with the USB cable Once you do not need to finalize the disc to view images on the screen. 33 ROM drive of DirectCD appears, click [Finish] on the disc. You can exchange data between the camera and a computer using the supplied USB cable and CD-ROMs. Installing the ...USB driver Before connecting your camera to your personal computer, install the USB driver to load. 2 Insert the...
...Viewing images with the USB cable Once you do not need to finalize the disc to view images on the screen. 33 ROM drive of DirectCD appears, click [Finish] on the disc. You can exchange data between the camera and a computer using the supplied USB cable and CD-ROMs. Installing the ...USB driver Before connecting your camera to your personal computer, install the USB driver to load. 2 Insert the...
Operating Instructions
Page 34
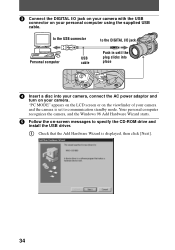
... install the USB driver. 1 Check that the Add Hardware Wizard is set to the DIGITAL I /O jack on your camera with the USB connector on your camera. Your personal computer recognizes the camera, and the Windows 98 Add Hardware Wizard starts. 5 Follow the on the viewfinder of... your camera and the camera is displayed, then click [Next]. 34 to the USB connector to communication standby mode. 3 Connect the DIGITAL I /O jack Personal computer USB cable Push in until the plug clicks into place 2 1 4 Insert a disc into your camera, connect the AC power adaptor...
... install the USB driver. 1 Check that the Add Hardware Wizard is set to the DIGITAL I /O jack on your camera with the USB connector on your camera. Your personal computer recognizes the camera, and the Windows 98 Add Hardware Wizard starts. 5 Follow the on the viewfinder of... your camera and the camera is displayed, then click [Next]. 34 to the USB connector to communication standby mode. 3 Connect the DIGITAL I /O jack Personal computer USB cable Push in until the plug clicks into place 2 1 4 Insert a disc into your camera, connect the AC power adaptor...

Operating Instructions
Page 35
... to install DirectCD included in the window, then click [Next]. 3 Check that your new hardware device requires.] is searched, click [Next]. For details on the disc which has not been finalized, you view images on DirectCD, refer to the software operating instructions of the driver is displayed, click [Finish]. For Windows...
... to install DirectCD included in the window, then click [Next]. 3 Check that your new hardware device requires.] is searched, click [Next]. For details on the disc which has not been finalized, you view images on DirectCD, refer to the software operating instructions of the driver is displayed, click [Finish]. For Windows...


