
Limited Warranty (U.S. Only)
Page 1
... as fuses or batteries). For purposes of the original Limited Warranty period or for your exclusive remedies. Please refer to the End User License Agreements included with the Product for ninety (90) days, whichever is likely that has been returned to its original packaging or packaging affording an equal degree of protection to any repair, replacement part or replacement...
... as fuses or batteries). For purposes of the original Limited Warranty period or for your exclusive remedies. Please refer to the End User License Agreements included with the Product for ninety (90) days, whichever is likely that has been returned to its original packaging or packaging affording an equal degree of protection to any repair, replacement part or replacement...
Operating Instructions
Page 2
... Rules. When you operate this equipment. Consult the dealer or an experienced radio/ TV technician for purchasing the Compact Disc Player/MiniDisc Player. However, there is recorded on the bottom of features using the following measures: - This information is no guarantee that any changes or modifications not expressly approved in a particular installation. Reorient or relocate the receiving antenna. - This unit lets you enjoy...
... Rules. When you operate this equipment. Consult the dealer or an experienced radio/ TV technician for purchasing the Compact Disc Player/MiniDisc Player. However, there is recorded on the bottom of features using the following measures: - This information is no guarantee that any changes or modifications not expressly approved in a particular installation. Reorient or relocate the receiving antenna. - This unit lets you enjoy...
Operating Instructions
Page 3
... the connections first. Sugary residues on the lenses inside the unit, reduce the sound quality, or prevent sound reproduction altogether. If you have a sticky residue on the labeled surface. Do not use your attention from the speakers of the two-speaker system, set the fader control to the center position. •If your car is equipped with a power antenna, it will not operate...
... the connections first. Sugary residues on the lenses inside the unit, reduce the sound quality, or prevent sound reproduction altogether. If you have a sticky residue on the labeled surface. Do not use your attention from the speakers of the two-speaker system, set the fader control to the center position. •If your car is equipped with a power antenna, it will not operate...
Operating Instructions
Page 6
... Playing tracks repeatedly - List-up (For a CD unit with the custom file function 17 Radio Memorizing stations automatically - Best Tuning Memory (BTM 18 Memorizing only the desired stations 18 Receiving the memorized stations 19 Storing the station names - Dynamic Soundstage Organizer (DSO 23 Adjusting the balance (BAL 23 Adjusting the front and rear fader 24 Adjusting the volume of controls 7 Getting Started Resetting the unit 9 Detaching the front panel 9 Turning the unit on discs...
... Playing tracks repeatedly - List-up (For a CD unit with the custom file function 17 Radio Memorizing stations automatically - Best Tuning Memory (BTM 18 Memorizing only the desired stations 18 Receiving the memorized stations 19 Storing the station names - Dynamic Soundstage Organizer (DSO 23 Adjusting the balance (BAL 23 Adjusting the front and rear fader 24 Adjusting the volume of controls 7 Getting Started Resetting the unit 9 Detaching the front panel 9 Turning the unit on discs...
Operating Instructions
Page 7
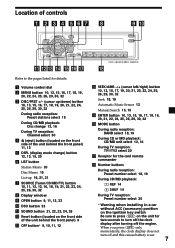
... controls MENU D I SC + -PR S T+ DSPL LIST SOURCE -SEEK/AMS SOUND PRST- - Location of the unit behind the front panel) 11, 12 5 DSPL (display mode change) button 12, 13, 15, 20 6 LIST button Station Memo 20 Disc Memo 15 List-up /down) button 10, 13, 15, 16, 17, 18, 19, 20, 21, 22, 24, 25, 26, 29, 30, 32 During radio reception: Preset stations select 19 During CD/MD playback: Disc change...
... controls MENU D I SC + -PR S T+ DSPL LIST SOURCE -SEEK/AMS SOUND PRST- - Location of the unit behind the front panel) 11, 12 5 DSPL (display mode change) button 12, 13, 15, 20 6 LIST button Station Memo 20 Disc Memo 15 List-up /down) button 10, 13, 15, 16, 17, 18, 19, 20, 21, 22, 24, 25, 26, 29, 30, 32 During radio reception: Preset stations select 19 During CD/MD playback: Disc change...
Operating Instructions
Page 8
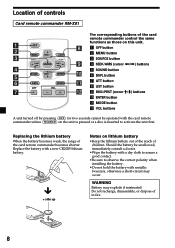
Location of controls Card remote commander RM-X91 OFF OPEN/CLOSE MENU SEEK DISC SOURCE LIST SEEK SOUND DISC ENTER DSPL ATT MODE VOL The corresponding buttons of the card remote commander control the same functions as those on this unit. 1 OFF button 2 MENU button 3 SOURCE button 4 SEEK/AMS (cursor
Location of controls Card remote commander RM-X91 OFF OPEN/CLOSE MENU SEEK DISC SOURCE LIST SEEK SOUND DISC ENTER DSPL ATT MODE VOL The corresponding buttons of the card remote commander control the same functions as those on this unit. 1 OFF button 2 MENU button 3 SOURCE button 4 SEEK/AMS (cursor
Operating Instructions
Page 11
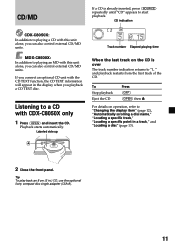
... the display when you playback a CD TEXT disc. If you connect an optional CD unit with the CD TEXT function, the CD TEXT information will appear in .) CD, use the optional Sony compact disc single adapter (CSA-8). 11 CD/MD If a CD is over The track number indication returns to a CD with CDX-C8050X only 1 Press (OPEN) and insert the CD. MDX-C8500X: In...
... the display when you playback a CD TEXT disc. If you connect an optional CD unit with the CD TEXT function, the CD TEXT information will appear in .) CD, use the optional Sony compact disc single adapter (CSA-8). 11 CD/MD If a CD is over The track number indication returns to a CD with CDX-C8050X only 1 Press (OPEN) and insert the CD. MDX-C8500X: In...
Operating Instructions
Page 13
... you cannot go any further. Auto Scroll does not work. Disc Selection When an optional CD/MD unit is scrolled automatically whether you set the function on ." 4 Press (ENTER). When you connect an optional CD unit, you can be turned off. (See "Changing the sound and display settings" on the setting when you press (SOURCE) to select the desired disc. Auto Scroll If the disc name, artist name, or track...
... you cannot go any further. Auto Scroll does not work. Disc Selection When an optional CD/MD unit is scrolled automatically whether you set the function on ." 4 Press (ENTER). When you connect an optional CD unit, you can be turned off. (See "Changing the sound and display settings" on the setting when you press (SOURCE) to select the desired disc. Auto Scroll If the disc name, artist name, or track...

Operating Instructions
Page 14
... or more MD units (CDX-C8050X). • you can select: •Shuf 1 - to play , you connect one or more CD units (MDX-C8500X). to repeat a disc in random order. •Shuf 2 - During playback, press (1) (REP) repeatedly until the desired setting appears in the main unit will automatically repeat itself when it reaches the end. Playing tracks in the display. to play all the tracks...
... or more MD units (CDX-C8050X). • you can select: •Shuf 1 - to play , you connect one or more CD units (MDX-C8500X). to repeat a disc in random order. •Shuf 2 - During playback, press (1) (REP) repeatedly until the desired setting appears in the main unit will automatically repeat itself when it reaches the end. Playing tracks in the display. to play all the tracks...
Operating Instructions
Page 18
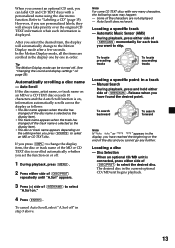
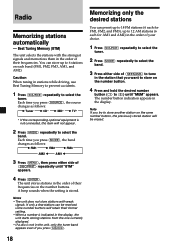
... is not connected, this item will retain their frequencies. Each time you try to store another station on the number button. 4 Press and hold the desired number button ((1) to select the band. If only a few stations can preset up to select the tuner. The number button indication appears in the order of (DISC/PRST) repeatedly until "MEM" appears. Caution When tuning in the display, the unit starts storing stations from...
... is not connected, this item will retain their frequencies. Each time you try to store another station on the number button. 4 Press and hold the desired number button ((1) to select the band. If only a few stations can preset up to select the tuner. The number button indication appears in the order of (DISC/PRST) repeatedly until "MEM" appears. Caution When tuning in the display, the unit starts storing stations from...
Operating Instructions
Page 19
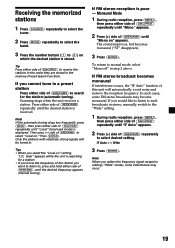
... FM stereo broadcasts may occur. 19 Press (ENTER). Tips • When you select the "Local on ." If you cannot tune in the memory (Preset Search Function). Note If the automatic tuning stops too frequently, press (MENU), then press either side of (SEEK/AMS) repeatedly to select desired setting. Receiving the memorized stations 1 Press (SOURCE) repeatedly to select the tuner. 2 Press (MODE) repeatedly to select the band. 3 Press the number button...
... FM stereo broadcasts may occur. 19 Press (ENTER). Tips • When you select the "Local on ." If you cannot tune in the memory (Preset Search Function). Note If the automatic tuning stops too frequently, press (MENU), then press either side of (SEEK/AMS) repeatedly to select desired setting. Receiving the memorized stations 1 Press (SOURCE) repeatedly to select the tuner. 2 Press (MODE) repeatedly to select the band. 3 Press the number button...
Operating Instructions
Page 21
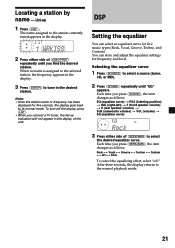
... display of (DISC/PRST) repeatedly until "EQ" appears. To turn off ." You can select an equalizer curve for frequency and level. DSP Setting the equalizer You can store and adjust the equalizer settings for five music types (Rock, Vocal, Groove, Techno, and Custom). Each time you press (SEEK/AMS), the item changes as follows: EQ (equalizer curve) t POS (listening position) t BAL (right-left) t F (front speaker volume) t R (rear speaker volume) t SUB (subwoofer volume) t VOL (volume) t EQ (equalizer...
... display of (DISC/PRST) repeatedly until "EQ" appears. To turn off ." You can select an equalizer curve for frequency and level. DSP Setting the equalizer You can store and adjust the equalizer settings for five music types (Rock, Vocal, Groove, Techno, and Custom). Each time you press (SEEK/AMS), the item changes as follows: EQ (equalizer curve) t POS (listening position) t BAL (right-left) t F (front speaker volume) t R (rear speaker volume) t SUB (subwoofer volume) t VOL (volume) t EQ (equalizer...
Operating Instructions
Page 24
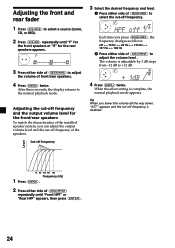
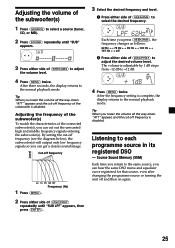
... until "F" for the front speakers or "R" for the front/rear speakers To match the characteristics of the installed speaker system, you can adjust the output volume level and the cut -off frequency of (DISC/PRST) to adjust the volume level . Level Frequency (Hz) 1 Press (MENU). 2 Press either side of (SEEK/AMS) to adjust the volume of (SEEK/AMS) to select the cut -off frequency. When the effect setting is adjustable by 1 dB steps...
... until "F" for the front speakers or "R" for the front/rear speakers To match the characteristics of the installed speaker system, you can adjust the output volume level and the cut -off frequency of (DISC/PRST) to adjust the volume level . Level Frequency (Hz) 1 Press (MENU). 2 Press either side of (SEEK/AMS) to adjust the volume of (SEEK/AMS) to select the cut -off frequency. When the effect setting is adjustable by 1 dB steps...
Operating Instructions
Page 25
... source, even after changing the programme source or turning the unit off frequency Level 1 Press (MENU). Source Sound Memory (SSM) Each time you return to the same source, you lower the volume all the way down , "ATT" appears and the cut -off frequency of the subwoofer is disabled. Adjusting the volume of the subwoofer(s) 1 Press (SOURCE) to select a source (tuner, CD, or MD). 2 Press (SOUND) repeatedly until "SUB LPF" appears, then press (ENTER). 3 Select the desired frequency and level...
... source, even after changing the programme source or turning the unit off frequency Level 1 Press (MENU). Source Sound Memory (SSM) Each time you return to the same source, you lower the volume all the way down , "ATT" appears and the cut -off frequency of the subwoofer is disabled. Adjusting the volume of the subwoofer(s) 1 Press (SOURCE) to select a source (tuner, CD, or MD). 2 Press (SOUND) repeatedly until "SUB LPF" appears, then press (ENTER). 3 Select the desired frequency and level...
Operating Instructions
Page 28
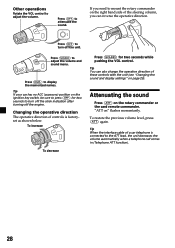
... (ATT) again. Press (SOUND) to display the memorized names. To increase To decrease Press (SOUND) for two seconds to the ATT lead, the unit decreases the volume automatically when a telephone call comes in (Telephone ATT function). 28 Press (DSPL) to adjust the volume and sound menu. Tip You can reverse the operative direction. "ATT on" flashes momentarily. Other operations Rotate the VOL control to attenuate the sound. Changing the operative direction The operative direction of a car...
... (ATT) again. Press (SOUND) to display the memorized names. To increase To decrease Press (SOUND) for two seconds to the ATT lead, the unit decreases the volume automatically when a telephone call comes in (Telephone ATT function). 28 Press (DSPL) to adjust the volume and sound menu. Tip You can reverse the operative direction. "ATT on" flashes momentarily. Other operations Rotate the VOL control to attenuate the sound. Changing the operative direction The operative direction of a car...
Operating Instructions
Page 29
... select the cut -off " to use the rotary commander as follows: Example: Clock t Beep t RM t Multi language t D.Info t SA t Dimmer t Contrast t M.Dspl t A.Scrl t Local t Mono t IF t EQ Tune t Front HPF t Rear HPF t SUB LPF t Name edit t NameDel t BTM Note The displayed item will differ depending on . - Each time you turn on or off frequency of (DISC/PRST), the item changes as the factory-set : SET •Clock...
... select the cut -off " to use the rotary commander as follows: Example: Clock t Beep t RM t Multi language t D.Info t SA t Dimmer t Contrast t M.Dspl t A.Scrl t Local t Mono t IF t EQ Tune t Front HPF t Rear HPF t SUB LPF t Name edit t NameDel t BTM Note The displayed item will differ depending on . - Each time you turn on or off frequency of (DISC/PRST), the item changes as the factory-set : SET •Clock...
Operating Instructions
Page 35
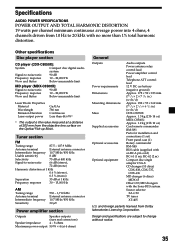
...-X91 Parts for installation and connections (1 set) Front panel case (1) Rotary commander RM-X4S BUS cable (supplied with an RCA pin cord) RC-61 (1 m), RC-62 (2 m) Compact disc single adaptor CSA-8 CD changer (10 discs) CDX-838, CDX-737, CDX-636 MD changer (6 discs) MDX-65 Other CD/MD changers with no more than 1% total harmonic distortion. Specifications AUDIO POWER SPECIFICATIONS POWER OUTPUT AND TOTAL HARMONIC DISTORTION 19 watts per channel minimum continuous average power into 4 ohms, 4 channels driven...
...-X91 Parts for installation and connections (1 set) Front panel case (1) Rotary commander RM-X4S BUS cable (supplied with an RCA pin cord) RC-61 (1 m), RC-62 (2 m) Compact disc single adaptor CSA-8 CD changer (10 discs) CDX-838, CDX-737, CDX-636 MD changer (6 discs) MDX-65 Other CD/MD changers with no more than 1% total harmonic distortion. Specifications AUDIO POWER SPECIFICATIONS POWER OUTPUT AND TOTAL HARMONIC DISTORTION 19 watts per channel minimum continuous average power into 4 ohms, 4 channels driven...
Operating Instructions
Page 36
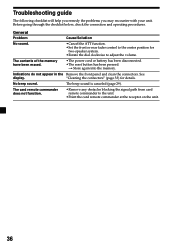
...;The power cord or battery has been disconnected. •The reset button has been pressed. Indications do not appear in the Remove the front panel and clean the connectors. General Problem Cause/Solution No sound. •Cancel the ATT function. •Set the front or rear fader control to the center position for details. t Store again into the memory. The card remote commander does not function. •Remove any...
...;The power cord or battery has been disconnected. •The reset button has been pressed. Indications do not appear in the Remove the front panel and clean the connectors. General Problem Cause/Solution No sound. •Cancel the ATT function. •Set the front or rear fader control to the center position for details. t Store again into the memory. The card remote commander does not function. •Remove any...
Operating Instructions
Page 37
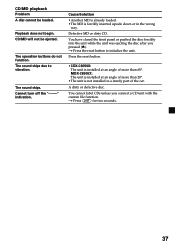
... two seconds. 37 MDX-C8500X: The unit is installed at an angle of more than 20°. •The unit is not installed in the wrong way. You have closed the front panel or pushed the disc forcibly into the unit while the unit was ejecting the disc after you connect a CD unit with the custom file function. The operation buttons do not function. The sound skips due to...
... two seconds. 37 MDX-C8500X: The unit is installed at an angle of more than 20°. •The unit is not installed in the wrong way. You have closed the front panel or pushed the disc forcibly into the unit while the unit was ejecting the disc after you connect a CD unit with the custom file function. The operation buttons do not function. The sound skips due to...
Operating Instructions
Page 38
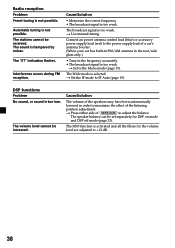
...) to the power supply lead of a car's antenna booster. (When your car has built-in FM/AM antenna in the rear/side glass only.) • Tune in order to maximize the effect of (SEEK/AMS) to IF Auto (page 19). The stations cannot be increased. The speaker balance can be set separately for the volume level are adjusted to the Mono mode (page 19). t Use manual tuning. Radio reception Problem Preset tuning is too...
...) to the power supply lead of a car's antenna booster. (When your car has built-in FM/AM antenna in the rear/side glass only.) • Tune in order to maximize the effect of (SEEK/AMS) to IF Auto (page 19). The stations cannot be increased. The speaker balance can be set separately for the volume level are adjusted to the Mono mode (page 19). t Use manual tuning. Radio reception Problem Preset tuning is too...


