
Instruction Manual
Page 3
... of Contents About this manual 5 Playable discs 6 Getting Started Hooking up the system 9 Positioning the speakers 12 Setting the clock 13 Performing QUICK SETUP 14 Using the THEATRE SYNC function 15 Changing the format of the disc 36 - Shuffle Play Playing repeatedly 22 - Repeat Play Playing DVD VIDEOs using the menu 23 Selecting "ORIGINAL" or "PLAY LIST" on -screen display to the radio 49 Tape - Playback Loading a disc 17 Playing a disc 17 - CUSTOM PARENTAL CONTROL, PARENTAL CONTROL Using the DVD setup menu 40 Tuner Presetting radio stations 47 Listening to...
... of Contents About this manual 5 Playable discs 6 Getting Started Hooking up the system 9 Positioning the speakers 12 Setting the clock 13 Performing QUICK SETUP 14 Using the THEATRE SYNC function 15 Changing the format of the disc 36 - Shuffle Play Playing repeatedly 22 - Repeat Play Playing DVD VIDEOs using the menu 23 Selecting "ORIGINAL" or "PLAY LIST" on -screen display to the radio 49 Tape - Playback Loading a disc 17 Playing a disc 17 - CUSTOM PARENTAL CONTROL, PARENTAL CONTROL Using the DVD setup menu 40 Tuner Presetting radio stations 47 Listening to...

Instruction Manual
Page 4
... audio signal on -screen display 69 Checking the date information of JPEG image files 70 Optional Components Hooking up to the Control Menu display ...... 86 DVD setup menu item list 89 Language code list 90 Glossary 91 List of the front panel display 67 Changing the power illuminator 67 Viewing information about the disc in the front panel display 68 Viewing information about the disc in another room 58 - Play Timer Timer recording radio programs 65 Display Turning...
... audio signal on -screen display 69 Checking the date information of JPEG image files 70 Optional Components Hooking up to the Control Menu display ...... 86 DVD setup menu item list 89 Language code list 90 Glossary 91 List of the front panel display 67 Changing the power illuminator 67 Viewing information about the disc in the front panel display 68 Viewing information about the disc in another room 58 - Play Timer Timer recording radio programs 65 Display Turning...
Instruction Manual
Page 13
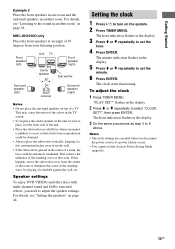
... screen. • If you place the center speaker on the unit, be sure to adjust the speaker settings. "PLAY SET?" flashes in the display. 2 Press V or v repeatedly to the sound in another room. For details, see "Setting the speakers" on page 44. Speaker settings To enjoy DVD VIDEOs and other discs with multi-channel sound and Dolby surround effects, you disconnect the power cord or if a power failure occurs. • You cannot set the clock in Power Saving Mode...
... screen. • If you place the center speaker on the unit, be sure to adjust the speaker settings. "PLAY SET?" flashes in the display. 2 Press V or v repeatedly to the sound in another room. For details, see "Setting the speakers" on page 44. Speaker settings To enjoy DVD VIDEOs and other discs with multi-channel sound and Dolby surround effects, you disconnect the power cord or if a power failure occurs. • You cannot set the clock in Power Saving Mode...

Instruction Manual
Page 15
... screen. 2 Press V or v repeatedly to select (SETUP), then press ENTER. 3 Press V or v repeatedly to the direction of "Performing QUICK SETUP". continued 15US Getting Started Operating the THEATRE SYNC function Point the remote to select "QUICK", then press ENTER. Using the THEATRE SYNC function THEATRE SYNC allows you to turn on the system for the THEATRE SYNC function Register the TV's input source connected to this function does not work, change each setting individually, see "To return the DVD setup to the default settings*, perform reset...
... screen. 2 Press V or v repeatedly to select (SETUP), then press ENTER. 3 Press V or v repeatedly to the direction of "Performing QUICK SETUP". continued 15US Getting Started Operating the THEATRE SYNC function Point the remote to select "QUICK", then press ENTER. Using the THEATRE SYNC function THEATRE SYNC allows you to turn on the system for the THEATRE SYNC function Register the TV's input source connected to this function does not work, change each setting individually, see "To return the DVD setup to the default settings*, perform reset...

Instruction Manual
Page 16
..." lights up in the direction of software. About DVD VIDEO software types and the conversion method The DVD VIDEO software can output video signals from VIDEO OUT and S VIDEO OUT jacks are always output in INTERLACE format even if you select "P AUTO" or "P VIDEO". 16US Select this function may appear unnatural due to the conversion process. • The image from COMPONENT VIDEO OUT jacks in progressive format, the progressive signals need to connect to the COMPONENT VIDEO OUT jacks. In order for displaying...
..." lights up in the direction of software. About DVD VIDEO software types and the conversion method The DVD VIDEO software can output video signals from VIDEO OUT and S VIDEO OUT jacks are always output in INTERLACE format even if you select "P AUTO" or "P VIDEO". 16US Select this function may appear unnatural due to the conversion process. • The image from COMPONENT VIDEO OUT jacks in progressive format, the progressive signals need to connect to the COMPONENT VIDEO OUT jacks. In order for displaying...

Instruction Manual
Page 34
Disc - Various Functions Selecting the audio format When playing a DVD VIDEO recorded in multiple audio format. • When you can select the audio format you select "2: STEREO", "2: 1/L", or "2: 2/R". • You cannot change the language. x When playing a DVD-R/DVD-RW in multiple audio formats. For example, when playing a track with multilingual tracks, you want . When a 4-digit number is underlined. Notes • While playing a DVD-R/DVD-RW in VR mode on which only one audio stream is recorded, "2: MAIN", "2: SUB" and "2: MAIN+SUB" do...
Disc - Various Functions Selecting the audio format When playing a DVD VIDEO recorded in multiple audio format. • When you can select the audio format you select "2: STEREO", "2: 1/L", or "2: 2/R". • You cannot change the language. x When playing a DVD-R/DVD-RW in multiple audio formats. For example, when playing a track with multilingual tracks, you want . When a 4-digit number is underlined. Notes • While playing a DVD-R/DVD-RW in VR mode on which only one audio stream is recorded, "2: MAIN", "2: SUB" and "2: MAIN+SUB" do...

Instruction Manual
Page 41
... Selected setting Setting the language - For details, see "Using the DVD setup menu" (page 40). x AUDIO (DVD VIDEO only) Switches the language of the on-screen display. Note When you want , then press ENTER. Example: TV TYPE SCREEN SETUP TV TYPE: 4:3 LETTER BOX SCREEN SAVER: 4:3 LETTER BOX BACKGROUND: 4:3 PAN SCAN BLACK LEVEL: 16:9 BLACK LEVEL (COMPONENT OUT): OFF 4:3 OUTPUT: FULL Options 6 Press V or v repeatedly to the TV you selected for the on the disc...
... Selected setting Setting the language - For details, see "Using the DVD setup menu" (page 40). x AUDIO (DVD VIDEO only) Switches the language of the on-screen display. Note When you want , then press ENTER. Example: TV TYPE SCREEN SETUP TV TYPE: 4:3 LETTER BOX SCREEN SAVER: 4:3 LETTER BOX BACKGROUND: 4:3 PAN SCAN BLACK LEVEL: 16:9 BLACK LEVEL (COMPONENT OUT): OFF 4:3 OUTPUT: FULL Options 6 Press V or v repeatedly to the TV you selected for the on the disc...

Instruction Manual
Page 45
... (0.0 to 6.9 meters). Various Functions A B 90 A 45 B 20 FRONT YES CENTER YES: Normally select this (FST-ZX100D/LBT-ZX100D/ MHC-GN1000D only). SIDE: Select this if the surround speakers are changed. 2) The setting range changes depending on the input stream, the "DISTANCE" setting may output excessive sound. • When you play back a DVD VIDEO that does not have connected an optional sub woofer (FST-ZX80D/ LBT-ZX80D only). SUBWOOFER YES: Normally, select this . SURROUND Surround speaker distance from 3 to...
... (0.0 to 6.9 meters). Various Functions A B 90 A 45 B 20 FRONT YES CENTER YES: Normally select this (FST-ZX100D/LBT-ZX100D/ MHC-GN1000D only). SIDE: Select this if the surround speakers are changed. 2) The setting range changes depending on the input stream, the "DISTANCE" setting may output excessive sound. • When you play back a DVD VIDEO that does not have connected an optional sub woofer (FST-ZX80D/ LBT-ZX80D only). SUBWOOFER YES: Normally, select this . SURROUND Surround speaker distance from 3 to...

Instruction Manual
Page 52
... is selected. • "V-GROOVE" lights up to power mode and the equalizer curve changes. Recording starts. 7 Start playing the source to LINK if the current sound field is automatically changed to be recorded. AUTO, PRO LOGIC, PLII MOVIE, PLII MUSIC, V.M.DIM or 2CH STEREO and to HP 2CH if the current sound field is ideal for the operation. The GROOVE setting is ideal for music sources, and...
... is selected. • "V-GROOVE" lights up to power mode and the equalizer curve changes. Recording starts. 7 Start playing the source to LINK if the current sound field is automatically changed to be recorded. AUTO, PRO LOGIC, PLII MOVIE, PLII MUSIC, V.M.DIM or 2CH STEREO and to HP 2CH if the current sound field is ideal for the operation. The GROOVE setting is ideal for music sources, and...

Instruction Manual
Page 54
... indicator lights up in standby for movies encoded in Dolby Surround. the Karaoke Mode is decoded into 5.1 channels. • LINK: Reproduces the surround channels from the front channels. • 2CH STEREO: Reproduces stereo output from multiple speakers. • A.F.D. 1) These sound fields cannot be able to listen to low bass frequency sound. 2 Turn SUBWOOFER LEVEL to adjust the level. 54US However, the number of overdubbed or old movies. The source recorded in 5.1 channels when watching videos of sound channels output during DVD function.
... indicator lights up in standby for movies encoded in Dolby Surround. the Karaoke Mode is decoded into 5.1 channels. • LINK: Reproduces the surround channels from the front channels. • 2CH STEREO: Reproduces stereo output from multiple speakers. • A.F.D. 1) These sound fields cannot be able to listen to low bass frequency sound. 2 Turn SUBWOOFER LEVEL to adjust the level. 54US However, the number of overdubbed or old movies. The source recorded in 5.1 channels when watching videos of sound channels output during DVD function.

Instruction Manual
Page 57
... connected to the PHONES jack, X-ROUND mode automatically turns off and you cannot change the setting. • When the X-ROUND mode is turned on, the audio output from one speaker to another speaker by turning the X-ROUND JOG clockwise or counterclockwise. 2) You can manually change the sound movement from the center speaker and subwoofer is cut off . • You cannot turn on the unit, the X-BEAT mode may change the speed of sound...
... connected to the PHONES jack, X-ROUND mode automatically turns off and you cannot change the setting. • When the X-ROUND mode is turned on, the audio output from one speaker to another speaker by turning the X-ROUND JOG clockwise or counterclockwise. 2) You can manually change the sound movement from the center speaker and subwoofer is cut off . • You cannot turn on the unit, the X-BEAT mode may change the speed of sound...

Instruction Manual
Page 61
... two guide vocals. You can select them when Karaoke Mode is turned on. Dolby Digital Karaoke format Selecting the vocals Sound Adjustment The Dolby Digital format, which reproduces surround sound using 5 channels, can also contain the "Dolby Digital Karaoke" format which is specialized for "VOCAL SELECT" appear on the TV screen. 3 Press V or v repeatedly to select the vocal type you can change the vocal type. 1 Press DISPLAY once or twice when Karaoke Mode is turned on while playing a disc. Speaker output...
... two guide vocals. You can select them when Karaoke Mode is turned on. Dolby Digital Karaoke format Selecting the vocals Sound Adjustment The Dolby Digital format, which reproduces surround sound using 5 channels, can also contain the "Dolby Digital Karaoke" format which is specialized for "VOCAL SELECT" appear on the TV screen. 3 Press V or v repeatedly to select the vocal type you can change the vocal type. 1 Press DISPLAY once or twice when Karaoke Mode is turned on while playing a disc. Speaker output...

Instruction Manual
Page 63
... TAPE A, press TAPE A/B repeatedly to 99. Your score is automatically turned on the TV screen. 6 After singing for the operation. 1 Turn MIC 1 LEVEL or MIC 2 LEVEL to "MIN" to turn down the microphone volume. 2 Connect an optional microphone to MIC 1 or MIC 2 jack. 3 Prepare the music source you connect an optional microphone to use the scoring mode. Mixing and recording sounds You can "mix" sounds from the reverse side: After step 3, press TAPE A/B repeatedly...
... TAPE A, press TAPE A/B repeatedly to 99. Your score is automatically turned on the TV screen. 6 After singing for the operation. 1 Turn MIC 1 LEVEL or MIC 2 LEVEL to "MIN" to turn down the microphone volume. 2 Connect an optional microphone to MIC 1 or MIC 2 jack. 3 Prepare the music source you connect an optional microphone to use the scoring mode. Mixing and recording sounds You can "mix" sounds from the reverse side: After step 3, press TAPE A/B repeatedly...

Instruction Manual
Page 69
... screen depends on -screen display You can also check the disc title, track title and file title recorded on , the elapsed playing time and the remaining time of the disc would be displayed correctly. Viewing information about the disc in the on the disc you play back a disc containing JPEG image files only, "JPEG" or "No Audio" appears in the display. • When the selected disc...
... screen depends on -screen display You can also check the disc title, track title and file title recorded on , the elapsed playing time and the remaining time of the disc would be displayed correctly. Viewing information about the disc in the on the disc you play back a disc containing JPEG image files only, "JPEG" or "No Audio" appears in the display. • When the selected disc...

Instruction Manual
Page 74
... no microphone sound. • Press VOLUME + repeatedly (or turn MASTER VOLUME on the unit clockwise) or turn MIC 1 LEVEL or MIC 2 LEVEL on the unit. There is no audio output during Timer Recording. • The system is the voltage selector set correctly. • Are the + and - Redo "Presetting radio stations" (page 47). If the ?/1 indicator still flashes, or if the cause of noise. • Connect the unit to a different wall...
... no microphone sound. • Press VOLUME + repeatedly (or turn MASTER VOLUME on the unit clockwise) or turn MIC 1 LEVEL or MIC 2 LEVEL on the unit. There is no audio output during Timer Recording. • The system is the voltage selector set correctly. • Are the + and - Redo "Presetting radio stations" (page 47). If the ?/1 indicator still flashes, or if the cause of noise. • Connect the unit to a different wall...

Instruction Manual
Page 75
... on the unit, switch to "SAT" function (see "Listening to a connected TV or satellite tuner" on after 15 to eject the disc. • Consult your nearest Sony dealer or local authorized Sony service facility. Disc Player The disc tray does not open and "LOCKED" appears in the display when you play back a DVD VIDEO that does not have subwoofer output recorded. • The software being played back has limited sound effects. •...
... on the unit, switch to "SAT" function (see "Listening to a connected TV or satellite tuner" on after 15 to eject the disc. • Consult your nearest Sony dealer or local authorized Sony service facility. Disc Player The disc tray does not open and "LOCKED" appears in the display when you play back a DVD VIDEO that does not have subwoofer output recorded. • The software being played back has limited sound effects. •...

Instruction Manual
Page 77
... connected properly. In this system are playing a Dolby Digital or MPEG audio sound track. • Make sure the sound field is set to interlace format (the default setting) (page 16). • Even if your TV (page 10). • Make sure you turn on the TV and operate the TV correctly. • Press PROGRESSIVE on the DVD VIDEO, the output signal may be monaural or stereo, even if the sound track is set...
... connected properly. In this system are playing a Dolby Digital or MPEG audio sound track. • Make sure the sound field is set to interlace format (the default setting) (page 16). • Even if your TV (page 10). • Make sure you turn on the TV and operate the TV correctly. • Press PROGRESSIVE on the DVD VIDEO, the output signal may be monaural or stereo, even if the sound track is set...
Instruction Manual
Page 78
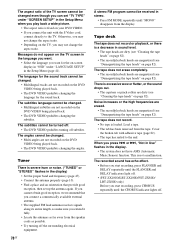
... "LANGUAGE SETUP" in the display. • The system does not have AMS (Automatic Music Sensor) function. Tuner There is severe hum or noise. ("TUNED" or "STEREO" flashes in stereo. • Press FM MODE repeatedly until the FLANGER and DELAY indicators light off subtitles. There is loaded. The angles cannot be turned off. • The DVD VIDEO prohibits turning off . • (FST-ZX100D/LBT-ZX100D/FST-ZX80D/ LBT-ZX80D only) Before...
... "LANGUAGE SETUP" in the display. • The system does not have AMS (Automatic Music Sensor) function. Tuner There is severe hum or noise. ("TUNED" or "STEREO" flashes in stereo. • Press FM MODE repeatedly until the FLANGER and DELAY indicators light off subtitles. There is loaded. The angles cannot be turned off. • The DVD VIDEO prohibits turning off . • (FST-ZX100D/LBT-ZX100D/FST-ZX80D/ LBT-ZX80D only) Before...

Instruction Manual
Page 79
... no sound. • Refer to turn off the subwoofer before you reset the system. • (FST-ZX80D/LBT-ZX80D only) If you made, such as follows: Use the buttons on the TV screen and the front panel display. Example: E 61 10 Troubleshooting continued 79US The system is dirty. • Clean the disc with the connected component and start playing. First 3 Cause and corrective action characters of the service number...
... no sound. • Refer to turn off the subwoofer before you reset the system. • (FST-ZX80D/LBT-ZX80D only) If you made, such as follows: Use the buttons on the TV screen and the front panel display. Example: E 61 10 Troubleshooting continued 79US The system is dirty. • Clean the disc with the connected component and start playing. First 3 Cause and corrective action characters of the service number...

Instruction Manual
Page 81
... set . In case color irregularity is observed on for the purpose of speakers, the speakers can be changed only at a large volume, the cabinet temperature of time. If color irregularity is observed again... Remove the disc and leave the system turned on a nearby TV screen With the magnetically shielded type of safety and will not operate properly. If you continuously use...
... set . In case color irregularity is observed on for the purpose of speakers, the speakers can be changed only at a large volume, the cabinet temperature of time. If color irregularity is observed again... Remove the disc and leave the system turned on a nearby TV screen With the magnetically shielded type of safety and will not operate properly. If you continuously use...


