Primary User Manual
Page 10
... DVDs. ❑ Velocity Modulation: Vertical line enhancement that sharpens picture definition. ❑ Steady Sound: Equalizes volume levels so there is minimal glare from the flat picture tube. Moving pictures will enjoy with the ability to eight favorite channels without distortion,...S VIDEO Inputs: Provides a high-quality video signal from any location in one picture. Introducing the FD Trinitron Wega Presenting the FD Trinitron Wega The FD Trinitron Wega (pronounced VAY-GAH) is characterized by automatically detecting film content and applying a reverse 3/2 pulldown process.
... DVDs. ❑ Velocity Modulation: Vertical line enhancement that sharpens picture definition. ❑ Steady Sound: Equalizes volume levels so there is minimal glare from the flat picture tube. Moving pictures will enjoy with the ability to eight favorite channels without distortion,...S VIDEO Inputs: Provides a high-quality video signal from any location in one picture. Introducing the FD Trinitron Wega Presenting the FD Trinitron Wega The FD Trinitron Wega (pronounced VAY-GAH) is characterized by automatically detecting film content and applying a reverse 3/2 pulldown process.
Primary User Manual
Page 12
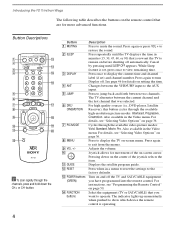
...Introducing the FD Trinitron Wega The following table describes the buttons on the remote control that are for details on setting the time. qs z To scan rapidly through the available video picture modes: Vivid...46 for more advanced functions. For details, see "Selecting Video Options" on page 36. Joystick allows for movement of the on the center of the joystick selects the item...buttons Description Press to restore the sound. Press repeatedly until SLEEP OFF appears. Also available in the Video menu. Press again or press VOL + to mute the sound. Press to view remaining time...
...Introducing the FD Trinitron Wega The following table describes the buttons on the remote control that are for details on setting the time. qs z To scan rapidly through the available video picture modes: Vivid...46 for more advanced functions. For details, see "Selecting Video Options" on page 36. Joystick allows for movement of the on the center of the joystick selects the item...buttons Description Press to restore the sound. Press repeatedly until SLEEP OFF appears. Also available in the Video menu. Press again or press VOL + to mute the sound. Press to view remaining time...
Primary User Manual
Page 22
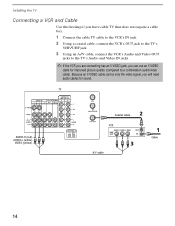
... Video OUT jacks to a combination audio/video cable). Because an S VIDEO cable carries only the video signal, you can use an S VIDEO cable for improved picture quality (compared to the TV's Audio and Video IN jacks. ✍ If the VCR you are connecting has an S VIDEO jack, you will need audio...
... Video OUT jacks to a combination audio/video cable). Because an S VIDEO cable carries only the video signal, you can use an S VIDEO cable for improved picture quality (compared to the TV's Audio and Video IN jacks. ✍ If the VCR you are connecting has an S VIDEO jack, you will need audio...

Primary User Manual
Page 26
...the recording VCR into your VCR's user guide for instructions. Because S VIDEO cables carry only the video signal, you will need audio cables for sound. 18 Installing the TV Connecting Two VCRs for Tape Editing If you connect two VCRs, so you can record from one to the other, you... can use S VIDEO cables for improved picture quality (compared to a combination audio/video cable). TV VCR (playback) VCR (recording) AUDIO-R (red) AUDIO-L (white) VIDEO (yellow) A/V cable A/V cable To change the ...
...the recording VCR into your VCR's user guide for instructions. Because S VIDEO cables carry only the video signal, you will need audio cables for sound. 18 Installing the TV Connecting Two VCRs for Tape Editing If you connect two VCRs, so you can record from one to the other, you... can use S VIDEO cables for improved picture quality (compared to a combination audio/video cable). TV VCR (playback) VCR (recording) AUDIO-R (red) AUDIO-L (white) VIDEO (yellow) A/V cable A/V cable To change the ...
Primary User Manual
Page 27
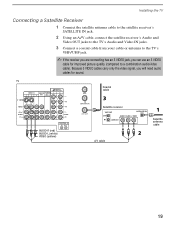
Because S VIDEO cables carry only the video signal, you can use an S VIDEO cable for sound. Installing the TV Connecting a Satellite Receiver 1 Connect the satellite antenna cable to the satellite receiver's SATELLITE IN jack. 2 Using an A/V cable, connect the satellite ... to the TV's VHF/UHF jack. ✍ If the receiver you are connecting has an S VIDEO jack, you will need audio cables for improved picture quality (compared to a combination audio/video cable). TV Coaxial cable AUDIO-R (red) AUDIO-L (white) VIDEO (yellow) Satellite receiver A/V cable Satellite antenna cable 19...
Because S VIDEO cables carry only the video signal, you can use an S VIDEO cable for sound. Installing the TV Connecting a Satellite Receiver 1 Connect the satellite antenna cable to the satellite receiver's SATELLITE IN jack. 2 Using an A/V cable, connect the satellite ... to the TV's VHF/UHF jack. ✍ If the receiver you are connecting has an S VIDEO jack, you will need audio cables for improved picture quality (compared to a combination audio/video cable). TV Coaxial cable AUDIO-R (red) AUDIO-L (white) VIDEO (yellow) Satellite receiver A/V cable Satellite antenna cable 19...
Primary User Manual
Page 28
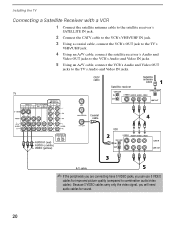
... VIDEO (yellow) Coaxial cable VCR A/V cable ✍ If the peripherals you are connecting have S VIDEO jacks, you will need audio cables for improved picture quality (compared to the TV's Audio and Video IN jacks. Because S VIDEO cables carry only the video signal, you can use S VIDEO cables for... sound. 20 Installing the TV Connecting a Satellite Receiver with a VCR 1 Connect the satellite antenna cable to the satellite receiver's SATELLITE IN jack. 2 ...
... VIDEO (yellow) Coaxial cable VCR A/V cable ✍ If the peripherals you are connecting have S VIDEO jacks, you will need audio cables for improved picture quality (compared to the TV's Audio and Video IN jacks. Because S VIDEO cables carry only the video signal, you can use S VIDEO cables for... sound. 20 Installing the TV Connecting a Satellite Receiver with a VCR 1 Connect the satellite antenna cable to the satellite receiver's SATELLITE IN jack. 2 ...
Primary User Manual
Page 34
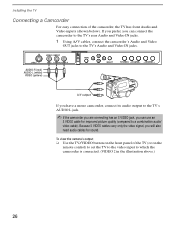
If you prefer, you will also need audio cables for improved picture quality (compared to which the camcorder is connected. (VIDEO 2 in the illustration above.) 26 Because S VIDEO cables carry only the video signal, you can use an S VIDEO cable for sound. To view the camera's output ❑ Use the TV/VIDEO button...
If you prefer, you will also need audio cables for improved picture quality (compared to which the camcorder is connected. (VIDEO 2 in the illustration above.) 26 Because S VIDEO cables carry only the video signal, you can use an S VIDEO cable for sound. To view the camera's output ❑ Use the TV/VIDEO button...
Primary User Manual
Page 39
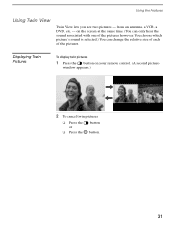
Displaying Twin Pictures To display twin pictures 1 Press the button on the screen at the same time. (You can change the relative size of each of the pictures however. Using the Features Using Twin View Twin View lets you see two pictures - from an antenna, a VCR, a DVD, etc, - on your remote control. (A second picture- You choose which picture's sound is selected.) You can only hear the sound associated with one of the pictures. window appears.) , , 2 To cancel twin pictures ❑ Press the or ❑ Press the button button. 31
Displaying Twin Pictures To display twin pictures 1 Press the button on the screen at the same time. (You can change the relative size of each of the pictures however. Using the Features Using Twin View Twin View lets you see two pictures - from an antenna, a VCR, a DVD, etc, - on your remote control. (A second picture- You choose which picture's sound is selected.) You can only hear the sound associated with one of the pictures. window appears.) , , 2 To cancel twin pictures ❑ Press the or ❑ Press the button button. 31
Primary User Manual
Page 43
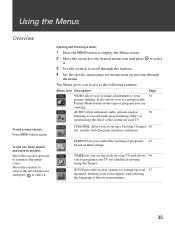
... based on your picture settings. Opening and choosing a menu: 1 Press the MENU button to display the Menu screen. 2 Move the joystick to the desired menu icon and press to scroll through the menu. Page 36 38 CHANNEL allows you to make adjustments to set the clock on the type of programs 42... TV and allows 46 you are viewing. TIMER lets you set up your 47 channels, labeling your video inputs, and selecting the language of the sound on -screen menus. 35 To end one menu session and move to another: Move the joystick upward to return to second audio programming (SAP), or...
... based on your picture settings. Opening and choosing a menu: 1 Press the MENU button to display the Menu screen. 2 Move the joystick to the desired menu icon and press to scroll through the menu. Page 36 38 CHANNEL allows you to make adjustments to set the clock on the type of programs 42... TV and allows 46 you are viewing. TIMER lets you set up your 47 channels, labeling your video inputs, and selecting the language of the sound on -screen menus. 35 To end one menu session and move to another: Move the joystick upward to return to second audio programming (SAP), or...
Primary User Manual
Page 63
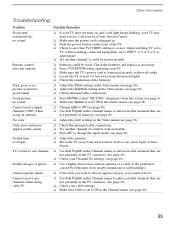
... be weak. it could be station trouble. ❏ Batteries could be station trouble). ❏ Press ANT to choose appears in the Video menu (see page 36). ❏ Check the antenna/cable connections. ❏ Try another channel; when watching connected equipment, set to VIDEO 1, 2, 3, 4, 5 or 6, as ..., poor or no picture (screen lit), good sound Good picture, no sound Cannot receive upper channels (UHF) when using cable TV Possible Remedies ❏ If your TV does not turn on, and a red light keeps flashing, your TV may need service. Call your local Sony Service Center. ❏...
... be weak. it could be station trouble. ❏ Batteries could be station trouble). ❏ Press ANT to choose appears in the Video menu (see page 36). ❏ Check the antenna/cable connections. ❏ Try another channel; when watching connected equipment, set to VIDEO 1, 2, 3, 4, 5 or 6, as ..., poor or no picture (screen lit), good sound Good picture, no sound Cannot receive upper channels (UHF) when using cable TV Possible Remedies ❏ If your TV does not turn on, and a red light keeps flashing, your TV may need service. Call your local Sony Service Center. ❏...
Primary User Manual
Page 67
... Extended Data Service 47 59 Index 16:9 (widescreen) 2, 48 A Adding channels to the channel list 40 Adjusting the picture definition 36 Adjusting the audio Steady sound 38 Activating Twin View 31 ANT button 4 antenna, connecting 10 Aspect ratio, 16:9 in Twin View 32 Audio menu 35, 38 audio ... setup 28, 40 B balance, adjusting 38 bass, adjusting 38 batteries inserting in remote 3 bilingual audio 39 blocking programs. See ratings. brightness, adjusting 36 C cable box, connecting with VCR 15 connecting 10-13 setting ON/OFF 40 with VCR, connecting 14 cable box, using with TV remote control 53...
... Extended Data Service 47 59 Index 16:9 (widescreen) 2, 48 A Adding channels to the channel list 40 Adjusting the picture definition 36 Adjusting the audio Steady sound 38 Activating Twin View 31 ANT button 4 antenna, connecting 10 Aspect ratio, 16:9 in Twin View 32 Audio menu 35, 38 audio ... setup 28, 40 B balance, adjusting 38 bass, adjusting 38 batteries inserting in remote 3 bilingual audio 39 blocking programs. See ratings. brightness, adjusting 36 C cable box, connecting with VCR 15 connecting 10-13 setting ON/OFF 40 with VCR, connecting 14 cable box, using with TV remote control 53...
Primary User Manual
Page 69
... 38 speakers turning on/off 39 using external speakers 22, 39 specifications 57-58 Steady Sound, adjusting 38 Steady Sound, described 2 Surround Sound 38 T tape-to-tape editing 18 Time set current 46 set daylight saving 46 Timer setting 46 tilt, correcting 48 Timer ...picture size 33 displaying a picture 31 V VCR connecting two, for tape editing 18 using with TV remote control 53 with cable box, connecting 15 with cable, connecting 14 with satellite receiver, connecting 20 VCR/DVD Power button 6 Velocity Modulation 2, 37 video inputs, labeling 48 Video menu 35, 36 Video Modes, selecting 36 W Wega...
... 38 speakers turning on/off 39 using external speakers 22, 39 specifications 57-58 Steady Sound, adjusting 38 Steady Sound, described 2 Surround Sound 38 T tape-to-tape editing 18 Time set current 46 set daylight saving 46 Timer setting 46 tilt, correcting 48 Timer ...picture size 33 displaying a picture 31 V VCR connecting two, for tape editing 18 using with TV remote control 53 with cable box, connecting 15 with cable, connecting 14 with satellite receiver, connecting 20 VCR/DVD Power button 6 Velocity Modulation 2, 37 video inputs, labeling 48 Video menu 35, 36 Video Modes, selecting 36 W Wega...


