Warranty Card
Page 1
... purchase, if this Product (including any part of two (2) years. In addition, if you enter into a service contract with the Sony Partnership within the Warranty period must be defective, Sony will supply, at no charge, new or rebuilt replacements in USA This warranty does not cover customer instruction, installation, set up adjustments or signal reception problems. This warranty does not cover cosmetic damage or damage...
... purchase, if this Product (including any part of two (2) years. In addition, if you enter into a service contract with the Sony Partnership within the Warranty period must be defective, Sony will supply, at no charge, new or rebuilt replacements in USA This warranty does not cover customer instruction, installation, set up adjustments or signal reception problems. This warranty does not cover cosmetic damage or damage...
Component Setup Guide
Page 1
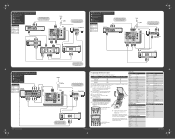
... receivable channels. 3 Follow the instructions under "Programming the Remote Control" on the other possible solutions may need . Use this diagram if you are in all the AC power cords and turn on the TV and all components before making connections. • If you are not using either digital optical or digital coaxial audio connections. poster_2.fm Page 1 Friday, October 10, 2003 9:27 AM HOOKUP 1. Cables Required Splitter 1 Coaxial 3 Composite 3 Component 1 Audio 2 DVD Player A/V INPUT DVD VCR TV VIDEO...
... receivable channels. 3 Follow the instructions under "Programming the Remote Control" on the other possible solutions may need . Use this diagram if you are in all the AC power cords and turn on the TV and all components before making connections. • If you are not using either digital optical or digital coaxial audio connections. poster_2.fm Page 1 Friday, October 10, 2003 9:27 AM HOOKUP 1. Cables Required Splitter 1 Coaxial 3 Composite 3 Component 1 Audio 2 DVD Player A/V INPUT DVD VCR TV VIDEO...
Component Setup Guide
Page 2
... : I Cable/Antenna I High Definition Cable Box I VCR I Digital Recorder Cables Required Splitter 1 Coaxial 4 Composite 4 Component 1 Audio 2 DVD Player If your DVD player has a DVI jack, use that manufacturer. WIDE MODE INDEX TWIN VIEW VOL MENU CH 6 To check if the code number works, aim the TV's remote control at the equipment and press the POWER button that corresponds with the TV's remote control, use the following procedure to program the remote control. 1 Using the code list at right, find the three-digit code number for...
... : I Cable/Antenna I High Definition Cable Box I VCR I Digital Recorder Cables Required Splitter 1 Coaxial 4 Composite 4 Component 1 Audio 2 DVD Player If your DVD player has a DVI jack, use that manufacturer. WIDE MODE INDEX TWIN VIEW VOL MENU CH 6 To check if the code number works, aim the TV's remote control at the equipment and press the POWER button that corresponds with the TV's remote control, use the following procedure to program the remote control. 1 Using the code list at right, find the three-digit code number for...
Operating Instructions
Page 2
.../or program owner. If a fixed (non-moving) pattern is no guarantee that interference will not occur in a particular installation. Note on the front of this equipment. This equipment generates, uses, and can be permanently imprinted onto the screen. Installing ❑ To prevent internal heat buildup, do not expose the TV to operate this instruction manual and at low settings. Owner's Record The model and serial numbers...
.../or program owner. If a fixed (non-moving) pattern is no guarantee that interference will not occur in a particular installation. Note on the front of this equipment. This equipment generates, uses, and can be permanently imprinted onto the screen. Installing ❑ To prevent internal heat buildup, do not expose the TV to operate this instruction manual and at low settings. Owner's Record The model and serial numbers...

Operating Instructions
Page 3
... recommended by the manufacturer. Serious injury can result in the operating instructions or service manual. Install the set on the serial/model plate. The set may touch dangerous voltage points or short out parts that could result in a fire or electric shock. Any mounting of power source indicated on an unstable cart, stand, tripod, bracket, table or shelf. Do not allow children or pets to climb...
... recommended by the manufacturer. Serious injury can result in the operating instructions or service manual. Install the set on the serial/model plate. The set may touch dangerous voltage points or short out parts that could result in a fire or electric shock. Any mounting of power source indicated on an unstable cart, stand, tripod, bracket, table or shelf. Do not allow children or pets to climb...

Operating Instructions
Page 4
... of the set, and to normal operation. ❑ When the set does not operate normally when following conditions: ❑ When the power cord or plug is grounded so as the original parts. When the set . 3 Safety Check Upon completion of time, unplug it is subject to qualified service personnel under the following the operating instructions. Improper adjustment of antenna discharge unit, connection to qualified service personnel. Ventilation...
... of the set, and to normal operation. ❑ When the set does not operate normally when following conditions: ❑ When the power cord or plug is grounded so as the original parts. When the set . 3 Safety Check Upon completion of time, unplug it is subject to qualified service personnel under the following the operating instructions. Improper adjustment of antenna discharge unit, connection to qualified service personnel. Ventilation...

Operating Instructions
Page 6
... AC Power Cord 11 TV Controls and Connectors 12 Front Panel 12 Rear Panel 14 Basic Connections: Connecting a Cable or Antenna 16 Cable or Antenna Only 17 Cable and Antenna Only 18 Cable Box and Cable Only 20 Cable Box Only 22 Connecting Optional Equipment 23 About Using S VIDEO 23 VCR and Cable 24 VCR and Cable Box 26 Two VCRs for Tape Editing 28 Satellite Receiver 30 Satellite Receiver and VCR 32 DVD Player with Component Video Connectors 34 DVD Player with S VIDEO and Audio...
... AC Power Cord 11 TV Controls and Connectors 12 Front Panel 12 Rear Panel 14 Basic Connections: Connecting a Cable or Antenna 16 Cable or Antenna Only 17 Cable and Antenna Only 18 Cable Box and Cable Only 20 Cable Box Only 22 Connecting Optional Equipment 23 About Using S VIDEO 23 VCR and Cable 24 VCR and Cable Box 26 Two VCRs for Tape Editing 28 Satellite Receiver 30 Satellite Receiver and VCR 32 DVD Player with Component Video Connectors 34 DVD Player with S VIDEO and Audio...

Operating Instructions
Page 16
... Auxiliary RF input that has the CONTROL S function. * High-bandwidth Digital Content Protection SETUP SETUP SETUP SETUP 15 Component video provides better picture quality than the VHF/UHF (9) connection. 4 MONITOR OUT Lets you record the program you can use these outputs to listen to your TV's audio through your stereo system. 6 HD/DVD IN 5/6 Connect to your DVD player's or digital set up your TV to switch between scrambled and unscrambled cable channels. For details...
... Auxiliary RF input that has the CONTROL S function. * High-bandwidth Digital Content Protection SETUP SETUP SETUP SETUP 15 Component video provides better picture quality than the VHF/UHF (9) connection. 4 MONITOR OUT Lets you record the program you can use these outputs to listen to your TV's audio through your stereo system. 6 HD/DVD IN 5/6 Connect to your DVD player's or digital set up your TV to switch between scrambled and unscrambled cable channels. For details...

Operating Instructions
Page 21
... specific cable box; see pages 24 and 26.) With this connection, you switch the TV's input to change channels coming directly into the VHF/UHF jack in the left and right windows. SETUP SETUP SETUP SETUP 20 SETUP Setup Cable Box and Cable Only ✍ DIGITAL CABLE BOX USERS: Do not use a cable box), but you can watch cable channels coming into the TV's VHF/UHF input. (The TV's tuner provides a better signal than the cable box.) About Using This Connection with digital cable boxes. the picture displays...
... specific cable box; see pages 24 and 26.) With this connection, you switch the TV's input to change channels coming directly into the VHF/UHF jack in the left and right windows. SETUP SETUP SETUP SETUP 20 SETUP Setup Cable Box and Cable Only ✍ DIGITAL CABLE BOX USERS: Do not use a cable box), but you can watch cable channels coming into the TV's VHF/UHF input. (The TV's tuner provides a better signal than the cable box.) About Using This Connection with digital cable boxes. the picture displays...

Operating Instructions
Page 22
... cable box is set to (usually channel 3 or 4). Switch the TV's input between the cable box and cable Press ANT to switch back and forth between unscrambled signals coming straight into the TV and scrambled signals coming in "Setting Up the Channel List" on page 41. Set up the TV remote control Program the remote control. You can use the cable box to switch channels. SETUP SETUP SETUP 21 If you have a digital cable box, you need for an external splitter.) 3 Use a coaxial cable to connect the cable box's output...
... cable box is set to (usually channel 3 or 4). Switch the TV's input between the cable box and cable Press ANT to switch back and forth between unscrambled signals coming straight into the TV and scrambled signals coming in "Setting Up the Channel List" on page 41. Set up the TV remote control Program the remote control. You can use the cable box to switch channels. SETUP SETUP SETUP 21 If you have a digital cable box, you need for an external splitter.) 3 Use a coaxial cable to connect the cable box's output...

Operating Instructions
Page 27
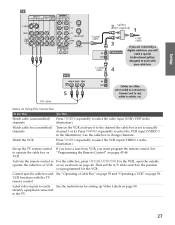
... cable to connect the cable box's output jack to the VCR's RF input jack. 5 Use an A/V cable to connect the VCR's A/V output jacks to the TV's A/V input jacks. 6 Run the Auto Setup program, as premium channels (which requires you will need : ❑ A splitter, which is designed to work with your local electronics store. ✍ DIGITAL CABLE BOX USERS: If you are connecting a digital cable box, you to use a cable box), but does not scramble all the dual picture features. Using S VIDEO...
... cable to connect the cable box's output jack to the VCR's RF input jack. 5 Use an A/V cable to connect the VCR's A/V output jacks to the TV's A/V input jacks. 6 Run the Auto Setup program, as premium channels (which requires you will need : ❑ A splitter, which is designed to work with your local electronics store. ✍ DIGITAL CABLE BOX USERS: If you are connecting a digital cable box, you to use a cable box), but does not scramble all the dual picture features. Using S VIDEO...
Operating Instructions
Page 28
..., you will need a special bi-directional splitter designed to work with the TV remote control Label video inputs to change channels. Notes on page 90. Then set to select the cable input (UHF/VHF in the illustration). VCR functions with your cable box. VCR A/V cable Cables are connecting a digital cable box, you must program the remote control. Connect red to red, white to select the VCR input (VIDEO 1 in the illustration). Use the cable box to easily See the instructions for the...
..., you will need a special bi-directional splitter designed to work with the TV remote control Label video inputs to change channels. Notes on page 90. Then set to select the cable input (UHF/VHF in the illustration). VCR functions with your cable box. VCR A/V cable Cables are connecting a digital cable box, you must program the remote control. Connect red to red, white to select the VCR input (VIDEO 1 in the illustration). Use the cable box to easily See the instructions for the...
Operating Instructions
Page 46
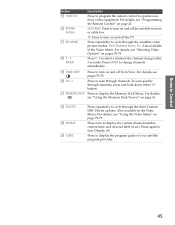
... once to operate nonSony video equipment. For details, see pages 53-55. For details, see "Selecting Video Options" on page 61. SETUP SETUP Button qg CODE SET qh POWER Buttons qj PIC MODE qk 0 - 9 ENTER Description Press to program the remote control to display the current channel number, current time, and channel label (if set). Also available in the Video Menu. Remote Control SETUP SETUP SETUP 45 SAT/CABLE: Press to turn Display off the satellite receiver or cable box. To scan quickly through the...
... once to operate nonSony video equipment. For details, see pages 53-55. For details, see "Selecting Video Options" on page 61. SETUP SETUP Button qg CODE SET qh POWER Buttons qj PIC MODE qk 0 - 9 ENTER Description Press to program the remote control to display the current channel number, current time, and channel label (if set). Also available in the Video Menu. Remote Control SETUP SETUP SETUP 45 SAT/CABLE: Press to turn Display off the satellite receiver or cable box. To scan quickly through the...
Operating Instructions
Page 87
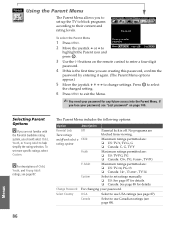
... change settings. SETUP SETUP Using the Parent Menu The Parent Menu allows you lose your password, see "Lost password" on page 100. Change Password For changing your password for details. Password: _ _ _ _ To select the Parent Menu 1 Press MENU. 2 Move the joystick B or b to highlight the Parent icon and Press + to enter password Move: V v B b Select: + End: MENU press . 3 Use the 0-9 buttons on the remote control to enter a four-digit password. 4 If this password, confirm the password by entering it again. (The Parent Menu...
... change settings. SETUP SETUP Using the Parent Menu The Parent Menu allows you lose your password, see "Lost password" on page 100. Change Password For changing your password for details. Password: _ _ _ _ To select the Parent Menu 1 Press MENU. 2 Move the joystick B or b to highlight the Parent icon and Press + to enter password Move: V v B b Select: + End: MENU press . 3 Use the 0-9 buttons on the remote control to enter a four-digit password. 4 If this password, confirm the password by entering it again. (The Parent Menu...
Operating Instructions
Page 96
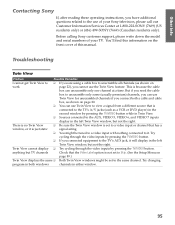
... SETUP SETUP Contacting Sony If, after reading these operating instructions, you have additional questions related to the use of your TV. SETUP SETUP Other Info 95 Try changing program in the left Twin View window, but TV channels Check that is not set to the same channel. Troubleshooting Twin View Problem Possible Remedies I cannot get Twin View to ❏ If you are using a cable box to the AUX, VIDEO 5, VIDEO 6, and VIDEO 7 inputs display in both a cable...
... SETUP SETUP Contacting Sony If, after reading these operating instructions, you have additional questions related to the use of your TV. SETUP SETUP Other Info 95 Try changing program in the left Twin View window, but TV channels Check that is not set to the same channel. Troubleshooting Twin View Problem Possible Remedies I cannot get Twin View to ❏ If you are using a cable box to the AUX, VIDEO 5, VIDEO 6, and VIDEO 7 inputs display in both a cable...

Operating Instructions
Page 97
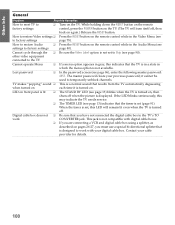
... SAT/CABLE FUNCTION button, which changes the remote control to SAT or CABLE mode. ❏ Make sure the TV's power cord is a possibility that you are attempting to operate. ❏ There is connected securely to the wall outlet. ❏ Locate the TV at least 3-4 feet away from fluorescent lights. ❏ If you are using the TV to add receivable TV channels that device. Use the Channel Fix option to "fix" the channel based...
... SAT/CABLE FUNCTION button, which changes the remote control to SAT or CABLE mode. ❏ Make sure the TV's power cord is a possibility that you are attempting to operate. ❏ There is connected securely to the wall outlet. ❏ Locate the TV at least 3-4 feet away from fluorescent lights. ❏ If you are using the TV to add receivable TV channels that device. Use the Channel Fix option to "fix" the channel based...

Operating Instructions
Page 100
.../VIDEO button to your program provider). when using the cable box's remote control. good sound ❏ Check the antenna/cable connections. SETUP SETUP SETUP Audio Problem Possible Remedies Good picture, ❏ Press MUTING so that came with black bands at the ❏ Some wide-screen programs are greater top and bottom of the screen than 16:9, such as cars, neon signs, or hair- "Black box" on screen ❏ You have selected a text option in the Audio Menu...
.../VIDEO button to your program provider). when using the cable box's remote control. good sound ❏ Check the antenna/cable connections. SETUP SETUP SETUP Audio Problem Possible Remedies Good picture, ❏ Press MUTING so that came with black bands at the ❏ Some wide-screen programs are greater top and bottom of the screen than 16:9, such as cars, neon signs, or hair- "Black box" on screen ❏ You have selected a text option in the Audio Menu...
Operating Instructions
Page 101
... the RESET button. If the LED blinks continuously, this LED will turn itself off when the picture is set, this may indicate the TV needs service. ❏ The TIMER LED (see settings to factory settings page 80). When the timer is displayed. SETUP SETUP SETUP Other Info 100 Cannot cycle through the ❏ Be sure the Video Label option is set to the TV's TO work with your digital cable box. Lost password ❏ In the password screen (see...
... the RESET button. If the LED blinks continuously, this LED will turn itself off when the picture is set, this may indicate the TV needs service. ❏ The TIMER LED (see settings to factory settings page 80). When the timer is displayed. SETUP SETUP SETUP Other Info 100 Cannot cycle through the ❏ Be sure the Video Label option is set to the TV's TO work with your digital cable box. Lost password ❏ In the password screen (see...

Operating Instructions
Page 104
... Channels 56 closed caption modes 77, 89 CODE SET button 45 color, adjusting 78 Component Video Inputs 10 CONTROL S 40 CONTROL S IN/OUT jacks, described 15 Cool, Color Temperature 78 D degauss 100 Demo, Menus 91 Digital Reality Creation 9 Digital Visual Interface (DVI) 10 DISC MENU button 46, 59 DISPLAY button 45, 50 DRC Mode 79 DRC MODE button 44 DRC Palette 79 DRC. See cable CH buttons 13, 45, 50 changing picture size, in remote 43 bilingual audio 80 blocking programs. See ratings. DVD player using...
... Channels 56 closed caption modes 77, 89 CODE SET button 45 color, adjusting 78 Component Video Inputs 10 CONTROL S 40 CONTROL S IN/OUT jacks, described 15 Cool, Color Temperature 78 D degauss 100 Demo, Menus 91 Digital Reality Creation 9 Digital Visual Interface (DVI) 10 DISC MENU button 46, 59 DISPLAY button 45, 50 DRC Mode 79 DRC MODE button 44 DRC Palette 79 DRC. See cable CH buttons 13, 45, 50 changing picture size, in remote 43 bilingual audio 80 blocking programs. See ratings. DVD player using...

Operating Instructions
Page 106
... due to improper operation or maintenance, connection to obtain warranty service. After 90 days from the date of purchase, if this Product (including any accessories) against defects in material or workmanship, subject to any conditions set up adjustments or signal reception problems. This warranty does not cover cosmetic damage or damage due to service the Product. ACCESSORIES: Parts and labor for...
... due to improper operation or maintenance, connection to obtain warranty service. After 90 days from the date of purchase, if this Product (including any accessories) against defects in material or workmanship, subject to any conditions set up adjustments or signal reception problems. This warranty does not cover cosmetic damage or damage due to service the Product. ACCESSORIES: Parts and labor for...


