Warranty Card
Page 1
... authorized Sony service facility. LABOR: For a period of 90 days from the date of sale or receipted invoice which vary from state to you must be defective, Sony will supply, at no charge, new or rebuilt replacements in Japan 4-557-166-02 ® Color TV Color Video TV LIMITED WARRANTY Sony Electronics Inc. ("Sony") warrants this Product is invalid if the factory applied serial number has...
... authorized Sony service facility. LABOR: For a period of 90 days from the date of sale or receipted invoice which vary from state to you must be defective, Sony will supply, at no charge, new or rebuilt replacements in Japan 4-557-166-02 ® Color TV Color Video TV LIMITED WARRANTY Sony Electronics Inc. ("Sony") warrants this Product is invalid if the factory applied serial number has...

Operating Instructions
Page 1
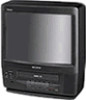
Record these numbers in U.S.A. Getting Started 1 KV-13VM42/43/KV-20VM42/KV-20VS42 9-884-613-02 (1) KV-13VM42/43 KV-20VM42 KV-20VS42 Operating Instructions US Mode d'emploi FR Manuel de instrucciones ES Trinitron® Color Video/TV G Owner's Record The model and serial numbers are located at the rear of the video TV. Serial No. © 1999 Sony Corporation Printed in the spaces provided below. Refer to them whenever you call upon your Sony dealer regarding this product. Model No.
Record these numbers in U.S.A. Getting Started 1 KV-13VM42/43/KV-20VM42/KV-20VS42 9-884-613-02 (1) KV-13VM42/43 KV-20VM42 KV-20VS42 Operating Instructions US Mode d'emploi FR Manuel de instrucciones ES Trinitron® Color Video/TV G Owner's Record The model and serial numbers are located at the rear of the video TV. Serial No. © 1999 Sony Corporation Printed in the spaces provided below. Refer to them whenever you call upon your Sony dealer regarding this product. Model No.
Operating Instructions
Page 2
... alert the user to the presence of important operating and maintenance (servicing) instructions in particular, specifies that the cable ground shall be connected to the grounding system of the building as close to Article 820-40 of the NEC that provides guidelines for safety transport of the FCC rules. When using TV games, computers, and similar products with your Video/TV in...
... alert the user to the presence of important operating and maintenance (servicing) instructions in particular, specifies that the cable ground shall be connected to the grounding system of the building as close to Article 820-40 of the NEC that provides guidelines for safety transport of the FCC rules. When using TV games, computers, and similar products with your Video/TV in...
Operating Instructions
Page 3
... model number located on -screen information 24 Watching a video input signal through the line input jacks 24 Listening with the TV off 18 Selecting TV programs 18 Adjusting the volume 18 Muting the sound 18 Switching quickly between two channels ......... 18 Adjusting the picture 19 Adjusting the sound (KV-20VS42 only 20 Selecting stereo or bilingual programs (KV-20VS42 only 21 Listening to Parts and Controls 61 Video/TV set-front 61 Remote control 62 * VCR Plus+ and PlusCode are for models KV-13VM42, KV-13VM43, KV...
... model number located on -screen information 24 Watching a video input signal through the line input jacks 24 Listening with the TV off 18 Selecting TV programs 18 Adjusting the volume 18 Muting the sound 18 Switching quickly between two channels ......... 18 Adjusting the picture 19 Adjusting the sound (KV-20VS42 only 20 Selecting stereo or bilingual programs (KV-20VS42 only 21 Listening to Parts and Controls 61 Video/TV set-front 61 Remote control 62 * VCR Plus+ and PlusCode are for models KV-13VM42, KV-13VM43, KV...

Operating Instructions
Page 5
... can use the U/V mixer, snow and noise may appear in the picture when viewing cable TV channels over 37 (W+1). • The cable box is supplied by the cable company. CHANNEL FIX" on page 38.) Getting Started 5 Connecting the Antenna Although you use either an indoor or outdoor antenna with your cable box, you control all channels. (Rear of Video/TV) VHF/UHF EAC-66 U/V mixer (not supplied) Notes • Most VHF/UHF combination antennas have a signal splitter...
... can use the U/V mixer, snow and noise may appear in the picture when viewing cable TV channels over 37 (W+1). • The cable box is supplied by the cable company. CHANNEL FIX" on page 38.) Getting Started 5 Connecting the Antenna Although you use either an indoor or outdoor antenna with your cable box, you control all channels. (Rear of Video/TV) VHF/UHF EAC-66 U/V mixer (not supplied) Notes • Most VHF/UHF combination antennas have a signal splitter...

Operating Instructions
Page 6
... Video/TV Automatically - CHANNEL +/- "AUTO PROGRAM" appears on the remote control. When all receivable channels are set to turn the Video/TV on or off" (page 9), and "Presetting channels - To set up each item individually, see "Changing the menu language" (page 11), "Setting cable TV on . for Spanish or VOL + for French. AU TO PROGRAM To reset the factory settings Press POWER on the Video/TV while pressing RESET on the screen and the Video/TV starts scanning and presetting channels automatically. POWER STANDBY REC TIMER...
... Video/TV Automatically - CHANNEL +/- "AUTO PROGRAM" appears on the remote control. When all receivable channels are set to turn the Video/TV on or off" (page 9), and "Presetting channels - To set up each item individually, see "Changing the menu language" (page 11), "Setting cable TV on . for Spanish or VOL + for French. AU TO PROGRAM To reset the factory settings Press POWER on the Video/TV while pressing RESET on the screen and the Video/TV starts scanning and presetting channels automatically. POWER STANDBY REC TIMER...

Operating Instructions
Page 7
... black, the Video/TV is set to receive a video input signal through the input jacks and you can erase unnecessary channels or add more channels. 1 Press MENU to display the main menu. Press INPUT SELECT so that a channel number appears on the screen. V I DEO AUDIO TIMER TAPE SET UP Move S e l e c t SELECT E x i t MENU 2 Move the cursor (z) to "CHANNEL SET UP" with + ◊ or - √ and press SELECT. The SET UP menu appears. The CHANNEL SET UP menu appears. SET UP CHANNEL SET UP PARENTAL CONTROL...
... black, the Video/TV is set to receive a video input signal through the input jacks and you can erase unnecessary channels or add more channels. 1 Press MENU to display the main menu. Press INPUT SELECT so that a channel number appears on the screen. V I DEO AUDIO TIMER TAPE SET UP Move S e l e c t SELECT E x i t MENU 2 Move the cursor (z) to "CHANNEL SET UP" with + ◊ or - √ and press SELECT. The SET UP menu appears. The CHANNEL SET UP menu appears. SET UP CHANNEL SET UP PARENTAL CONTROL...

Operating Instructions
Page 9
... REW PLAY FF STOP Setting cable TV on the screen. 5 Using + ◊ or - √, select "ON" or "OFF" and press SELECT. CHANNEL SET UP CABLE: OFF CHANNEL FIX: OFF AUTO PROGRAM CHANNEL SKIP/ADD VCR P l u s + SET UP MENU Move S e l e c t SELECT E x i t MENU Note If CABLE appears in black, the Video/TV is set to receive a video input signal through the input jacks and you have connected the Video/TV to a cable TV system, set CABLE to OFF to watch VHF or UHF channels. 1 Press MENU to display the main menu...
... REW PLAY FF STOP Setting cable TV on the screen. 5 Using + ◊ or - √, select "ON" or "OFF" and press SELECT. CHANNEL SET UP CABLE: OFF CHANNEL FIX: OFF AUTO PROGRAM CHANNEL SKIP/ADD VCR P l u s + SET UP MENU Move S e l e c t SELECT E x i t MENU Note If CABLE appears in black, the Video/TV is set to receive a video input signal through the input jacks and you have connected the Video/TV to a cable TV system, set CABLE to OFF to watch VHF or UHF channels. 1 Press MENU to display the main menu...

Operating Instructions
Page 10
... display the main menu. 2 Move the cursor (z) to "AUTO PROGRAM" with + ◊ or - √ and press SELECT. CHANNEL SET UP CABLE: OFF CHANNEL FIX: OFF AUTO PROGRAM CHANNEL SKIP/ADD VCR P l u s + SET UP MENU Move S e l e c t SELECT E x i t MENU 4 Move the cursor (z) to "SET UP" with + ◊ or - √ and press SELECT. To exit AUTO PROGRAM Press any button. Note If AUTO PROGRAM appears in black, the Video/TV is displayed. The SET UP menu appears. EJECT POWER MUTING DISPLAY TV INPUT SELECT SLEEP TIMER ON SCREEN MENU RESET...
... display the main menu. 2 Move the cursor (z) to "AUTO PROGRAM" with + ◊ or - √ and press SELECT. CHANNEL SET UP CABLE: OFF CHANNEL FIX: OFF AUTO PROGRAM CHANNEL SKIP/ADD VCR P l u s + SET UP MENU Move S e l e c t SELECT E x i t MENU 4 Move the cursor (z) to "SET UP" with + ◊ or - √ and press SELECT. To exit AUTO PROGRAM Press any button. Note If AUTO PROGRAM appears in black, the Video/TV is displayed. The SET UP menu appears. EJECT POWER MUTING DISPLAY TV INPUT SELECT SLEEP TIMER ON SCREEN MENU RESET...

Operating Instructions
Page 12
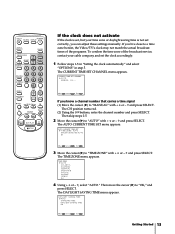
.... Setting the Clock EJECT POWER MUTING DISPLAY TV INPUT SELECT SLEEP TIMER ON SCREEN MENU RESET SELECT VCR Plus 123 COUNTER/ REMAIN COUNTER RESET 4 7 JUMP INDEX 56 89 ENTER 0 VOL CH TAPE SPEED REC X2 &SLOW 7 SEARCH PAUSE REW PLAY FF STOP Setting the clock automatically Some TV and cable channels transmit time signals with + ◊ or - √ and press SELECT. CURRENT TIME SET AUTO MANUAL MENU Move S e l e c t SELECT E x i t MENU 4 Move the cursor (z) to "CURRENT TIME SET...
.... Setting the Clock EJECT POWER MUTING DISPLAY TV INPUT SELECT SLEEP TIMER ON SCREEN MENU RESET SELECT VCR Plus 123 COUNTER/ REMAIN COUNTER RESET 4 7 JUMP INDEX 56 89 ENTER 0 VOL CH TAPE SPEED REC X2 &SLOW 7 SEARCH PAUSE REW PLAY FF STOP Setting the clock automatically Some TV and cable channels transmit time signals with + ◊ or - √ and press SELECT. CURRENT TIME SET AUTO MANUAL MENU Move S e l e c t SELECT E x i t MENU 4 Move the cursor (z) to "CURRENT TIME SET...
Operating Instructions
Page 13
... settings manually. TIME ZONE AUTO ATLANTIC EASTERN CENTRAL MOUNTAIN PACIFIC ALASKA HAWAII OK 4 Using + ◊ or - √, select "AUTO." The DAYLIGHT SAVING TIME menu appears. CURRENT TIME SET CHANNEL AUTO MANUAL CH___ Move S e l e c t SELECT E x i t MENU If you know a channel number that carries a time signal (1) Move the cursor (z) to "OK," and press SELECT. DAYLIGHT SAVING TIME AUTO STANDARD TIME DAYLIGHT SAVING TIME OK Move S e l e c t SELECT E x i t MENU Getting Started 13 The CH position turns red. (2) Using the 0-9 buttons, enter the channel number...
... settings manually. TIME ZONE AUTO ATLANTIC EASTERN CENTRAL MOUNTAIN PACIFIC ALASKA HAWAII OK 4 Using + ◊ or - √, select "AUTO." The DAYLIGHT SAVING TIME menu appears. CURRENT TIME SET CHANNEL AUTO MANUAL CH___ Move S e l e c t SELECT E x i t MENU If you know a channel number that carries a time signal (1) Move the cursor (z) to "OK," and press SELECT. DAYLIGHT SAVING TIME AUTO STANDARD TIME DAYLIGHT SAVING TIME OK Move S e l e c t SELECT E x i t MENU Getting Started 13 The CH position turns red. (2) Using the 0-9 buttons, enter the channel number...

Operating Instructions
Page 16
... menu appears. The GUIDE CH position turns red. Setting up Chart" in your area that a channel number appears on the screen. Setting the guide channel 1 Press MENU to display the main menu. 2 Move the cursor (z) to "CHANNEL SET UP" with + ◊ or - √ and press SELECT. The SET UP menu appears. If you turn to on the next page. VCR Plus+ System SET UP GUIDE CH - CHANNEL SET UP CABLE: OFF CHANNEL FIX: OFF AUTO PROGRAM CHANNEL SKIP/ADD VCR P l u s + System MENU...
... menu appears. The GUIDE CH position turns red. Setting up Chart" in your area that a channel number appears on the screen. Setting the guide channel 1 Press MENU to display the main menu. 2 Move the cursor (z) to "CHANNEL SET UP" with + ◊ or - √ and press SELECT. The SET UP menu appears. If you turn to on the next page. VCR Plus+ System SET UP GUIDE CH - CHANNEL SET UP CABLE: OFF CHANNEL FIX: OFF AUTO PROGRAM CHANNEL SKIP/ADD VCR P l u s + System MENU...

Operating Instructions
Page 18
.... Selecting TV programs Turn the cable mode ON or OFF to select the type of the operations can not jump to channels you want to use while watching the TV. on the remote control, or CHANNEL +/- For more information on setting the cable mode, see "Setting cable TV on or off Switching on page 9. or the 0-9 buttons on the Video/TV. The channel switches to the originally selected channel. CHANNEL + POWER ‰/ STANDBY EJECT POWER MUTING DISPLAY TV INPUT SELECT SLEEP TIMER ON SCREEN MENU RESET SELECT VCR Plus...
.... Selecting TV programs Turn the cable mode ON or OFF to select the type of the operations can not jump to channels you want to use while watching the TV. on the remote control, or CHANNEL +/- For more information on setting the cable mode, see "Setting cable TV on or off Switching on page 9. or the 0-9 buttons on the Video/TV. The channel switches to the originally selected channel. CHANNEL + POWER ‰/ STANDBY EJECT POWER MUTING DISPLAY TV INPUT SELECT SLEEP TIMER ON SCREEN MENU RESET SELECT VCR Plus...

Operating Instructions
Page 29
... mode at the desired scene. When the tape reaches the end, it on for more than 5 minutes, the Video/TV stops recording. Basic Operations 29 You can cut out an unwanted scene during recording, the TV screen turns on the screen. Recording resumes from a cable box, turn it stops and ejects the cassette. Recording TV Programs POWER STANDBY REC TIMER REC EJECT INPUT SELEECT - To enter double-digit numbers...
... mode at the desired scene. When the tape reaches the end, it on for more than 5 minutes, the Video/TV stops recording. Basic Operations 29 You can cut out an unwanted scene during recording, the TV screen turns on the screen. Recording resumes from a cable box, turn it stops and ejects the cassette. Recording TV Programs POWER STANDBY REC TIMER REC EJECT INPUT SELEECT - To enter double-digit numbers...

Operating Instructions
Page 31
... STOP CH 10/ 6 WED 8 : 1 5 PM 9 : _ _ PM Move S e l e c t SELECT E x i t MENU 7 Press SELECT, then set the minute of the recording stop time to "15" with + ◊ or - √. If you try to "55" with + ◊ or - √. EJECT POWER MUTING DISPLAY TV INPUT SELECT SLEEP TIMER ON SCREEN MENU RESET SELECT VCR Plus 123 COUNTER/ REMAIN COUNTER RESET 4 7 JUMP INDEX 56 89 ENTER 0 VOL CH TAPE...
... STOP CH 10/ 6 WED 8 : 1 5 PM 9 : _ _ PM Move S e l e c t SELECT E x i t MENU 7 Press SELECT, then set the minute of the recording stop time to "15" with + ◊ or - √. If you try to "55" with + ◊ or - √. EJECT POWER MUTING DISPLAY TV INPUT SELECT SLEEP TIMER ON SCREEN MENU RESET SELECT VCR Plus 123 COUNTER/ REMAIN COUNTER RESET 4 7 JUMP INDEX 56 89 ENTER 0 VOL CH TAPE...

Operating Instructions
Page 34
... time period after a specific time period. CHANNEL + QUICK TIMER REC EJECT POWER MUTING DISPLAY TV INPUT SELECT SLEEP TIMER ON SCREEN MENU RESET SELECT VCR Plus 123 COUNTER/ REMAIN COUNTER RESET 4 7 JUMP INDEX 56 89 ENTER 0 VOL CH TAPE SPEED REC X2 &SLOW 7 SEARCH PAUSE Recording using QUICK TIMER You can be used. With each press, the time period changes as follows: 0:00 0:30 1:00 .... 7:30 8:00 The time period turns yellow and recording starts. POWER STANDBY...
... time period after a specific time period. CHANNEL + QUICK TIMER REC EJECT POWER MUTING DISPLAY TV INPUT SELECT SLEEP TIMER ON SCREEN MENU RESET SELECT VCR Plus 123 COUNTER/ REMAIN COUNTER RESET 4 7 JUMP INDEX 56 89 ENTER 0 VOL CH TAPE SPEED REC X2 &SLOW 7 SEARCH PAUSE Recording using QUICK TIMER You can be used. With each press, the time period changes as follows: 0:00 0:30 1:00 .... 7:30 8:00 The time period turns yellow and recording starts. POWER STANDBY...

Operating Instructions
Page 38
... turns red. CHANNEL SET UP CABLE: OFF CHANNEL FIX: OFF AUTO PROGRAM CHANNEL SKIP/ADD VCR PLUS+ SET UP MENU Move S e l e c t SELECT E x i t MENU 5 Using + ◊ or - √, select the Video/TV's cable box input channel that you set up your Video/TV as follows: OFF 2 3 4 5 6 LINE When you set CHANNEL FIX to set CHANNEL FIX to "LINE," you connect a cable box. 1 Press MENU to display the main menu. 2 Move the cursor (z) to "CHANNEL FIX" with + ◊ or - √ and press SELECT. CHANNEL FIX EJECT POWER MUTING DISPLAY TV INPUT SELECT SLEEP TIMER ON SCREEN MENU RESET...
... turns red. CHANNEL SET UP CABLE: OFF CHANNEL FIX: OFF AUTO PROGRAM CHANNEL SKIP/ADD VCR PLUS+ SET UP MENU Move S e l e c t SELECT E x i t MENU 5 Using + ◊ or - √, select the Video/TV's cable box input channel that you set up your Video/TV as follows: OFF 2 3 4 5 6 LINE When you set CHANNEL FIX to set CHANNEL FIX to "LINE," you connect a cable box. 1 Press MENU to display the main menu. 2 Move the cursor (z) to "CHANNEL FIX" with + ◊ or - √ and press SELECT. CHANNEL FIX EJECT POWER MUTING DISPLAY TV INPUT SELECT SLEEP TIMER ON SCREEN MENU RESET...
Operating Instructions
Page 58
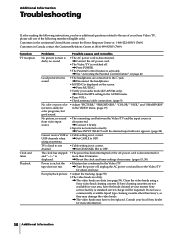
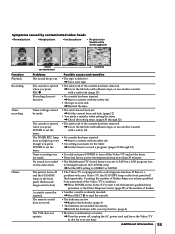
... the AUDIO menu. • Press VOL+. • Check antenna/cable connections. (page 5) No color or poor color (screen is activated. / See "Activating the Parental Control feature" on the screen. / Press MUTING. • Verify your area, have the heads cleaned at : (416) 499-SONY (7669) Function TV reception Clock and timer Playback Problems Possible causes and remedies No picture (screen is dark), no sound from video input source • The connecting cord between the Video/TV...
... the AUDIO menu. • Press VOL+. • Check antenna/cable connections. (page 5) No color or poor color (screen is activated. / See "Activating the Parental Control feature" on the screen. / Press MUTING. • Verify your area, have the heads cleaned at : (416) 499-SONY (7669) Function TV reception Clock and timer Playback Problems Possible causes and remedies No picture (screen is dark), no sound from video input source • The connecting cord between the Video/TV...
Operating Instructions
Page 59
... the number of the Video/TV's condition. / Press POWER on the audio track. • The Multichannel TV Sound feature was set the timer. The picture turns off the Video/TV and set to SAP but a SAP program was made . • There has been a power interruption lasting more than 30 minutes. The remote control does not work. • The batteries are low. /Replace the batteries. (page 4) • The batteries are installed incorrectly. /Install...
... the number of the Video/TV's condition. / Press POWER on the audio track. • The Multichannel TV Sound feature was set the timer. The picture turns off the Video/TV and set to SAP but a SAP program was made . • There has been a power interruption lasting more than 30 minutes. The remote control does not work. • The batteries are low. /Replace the batteries. (page 4) • The batteries are installed incorrectly. /Install...

Operating Instructions
Page 60
Specifications TV Section Television system Channel coverage Picture tube Screen size Antenna American TV Standard VHF: 2-13/UHF:14-69/ CATV: 1-125 KV-13VM42/43: MicroblackTM Trinitron® tube KV-20VM42: Trinitron® Tube 20-inch picture measured diagonally KV-20VS42: Trinitron® Tube 20-inch picture measured diagonally KV-13VM42/43: 13-inch picture measured diagonally KV-20VM42/KV-20VS42: 20-inch picture measured diagonally 75-ohm external antenna terminal for VHF/UHF Video Section Format VHS NTSC standard VCR system KV-13VM42/KV-13VM43...
Specifications TV Section Television system Channel coverage Picture tube Screen size Antenna American TV Standard VHF: 2-13/UHF:14-69/ CATV: 1-125 KV-13VM42/43: MicroblackTM Trinitron® tube KV-20VM42: Trinitron® Tube 20-inch picture measured diagonally KV-20VS42: Trinitron® Tube 20-inch picture measured diagonally KV-13VM42/43: 13-inch picture measured diagonally KV-20VM42/KV-20VS42: 20-inch picture measured diagonally 75-ohm external antenna terminal for VHF/UHF Video Section Format VHS NTSC standard VCR system KV-13VM42/KV-13VM43...


