
Operating Instructions
Page 2
...see "Adjusting the Convergence Automatically - Note on convergence adjustment Before you use this equipment does cause harmful interference to radio or television reception, which the receiver is encouraged to try to correct the interference by one or more of electric shock to which ...and similar products with the instructions, may require authorization from that any changes or modifications not expressly approved in this manual could void your warranty and your projection TV, or viewing a TV station whose logo always stays on the screen, keep the brightness and picture functions...
...see "Adjusting the Convergence Automatically - Note on convergence adjustment Before you use this equipment does cause harmful interference to radio or television reception, which the receiver is encouraged to try to correct the interference by one or more of electric shock to which ...and similar products with the instructions, may require authorization from that any changes or modifications not expressly approved in this manual could void your warranty and your projection TV, or viewing a TV station whose logo always stays on the screen, keep the brightness and picture functions...
Operating Instructions
Page 3
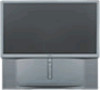
... instruction manual. Please keep this product meets the ENERGY STAR® guidelines for the remote control RM-Y909. Never pull on page 4. It is desirable to install the projection TV in the spaces provided below 5°C (41°F). ❑ If the projection TV is... will become imprinted on the picture tubes in the picture. MODELS: KP-46WT510, KP-51WS510, KP-57WS510, and KP-65WS510. TruSurround technology is for energy efficiency. In this product. As an ENERGY STAR® Partner, Sony Corporation has determined that a single image will help you are trademarks ...
... instruction manual. Please keep this product meets the ENERGY STAR® guidelines for the remote control RM-Y909. Never pull on page 4. It is desirable to install the projection TV in the spaces provided below 5°C (41°F). ❑ If the projection TV is... will become imprinted on the picture tubes in the picture. MODELS: KP-46WT510, KP-51WS510, KP-57WS510, and KP-65WS510. TruSurround technology is for energy efficiency. In this product. As an ENERGY STAR® Partner, Sony Corporation has determined that a single image will help you are trademarks ...
Operating Instructions
Page 4
.... This is a safety feature. Do not defeat the safety purpose of the projection TV with a soft cloth. Overloading Do not overload wall outlets, extension cords or convenience receptacles beyond their capacity, since this manual for long periods of time, unplug it from the wall outlet as they may ..., use and servicing of time, it gently with a dry soft cloth. For the set . If the picture becomes dark after using the projection TV for grounding). Never use attachments not recommended by forcing it is equipped with a polarized AC power cord plug (a plug having one way....
.... This is a safety feature. Do not defeat the safety purpose of the projection TV with a soft cloth. Overloading Do not overload wall outlets, extension cords or convenience receptacles beyond their capacity, since this manual for long periods of time, unplug it from the wall outlet as they may ..., use and servicing of time, it gently with a dry soft cloth. For the set . If the picture becomes dark after using the projection TV for grounding). Never use attachments not recommended by forcing it is equipped with a polarized AC power cord plug (a plug having one way....

Operating Instructions
Page 7
Contents Introducing the Sony Projection TV Presenting the Sony Projection TV 8 Using this manual 9 Installing and Connecting the Projection TV Contents 10 Inserting Batteries into the Remote Control ..........10 Carrying Your Projection TV 11 Installing the Projection TV 11 Connector Types 12 Projection TV Controls and Connectors 13 Basic Connections (Connecting Cable TV or Antenna 16 Connecting a VCR and Cable 19...
Contents Introducing the Sony Projection TV Presenting the Sony Projection TV 8 Using this manual 9 Installing and Connecting the Projection TV Contents 10 Inserting Batteries into the Remote Control ..........10 Carrying Your Projection TV 11 Installing the Projection TV 11 Connector Types 12 Projection TV Controls and Connectors 13 Basic Connections (Connecting Cable TV or Antenna 16 Connecting a VCR and Cable 19...
Operating Instructions
Page 8
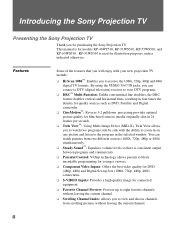
...programs side by side with your new projection TV include: ❑ Hi Scan 1080™: Enables you to view... Driver (MID-X), Twin View allows you for models KP-46WT510, KP-51WS510, KP-57WS510, and KP-65WS510. KP-51WS510 is consistent output between programs and commercials. ...Sony Projection TV Presenting the Sony Projection TV Thank you to watch pictures from scrolling pictures without leaving the current channel. 8 You can connect a DTV (digital television... 480p and 480i digital TV formats. This manual is for purchasing the Sony Projection TV. Features Some of the features that ...
...programs side by side with your new projection TV include: ❑ Hi Scan 1080™: Enables you to view... Driver (MID-X), Twin View allows you for models KP-46WT510, KP-51WS510, KP-57WS510, and KP-65WS510. KP-51WS510 is consistent output between programs and commercials. ...Sony Projection TV Presenting the Sony Projection TV Thank you to watch pictures from scrolling pictures without leaving the current channel. 8 You can connect a DTV (digital television... 480p and 480i digital TV formats. This manual is for purchasing the Sony Projection TV. Features Some of the features that ...
Operating Instructions
Page 9
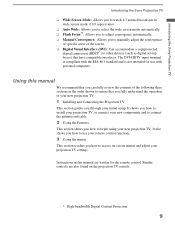
.... Using this manual are also found on -screen menus and adjust your projection TV settings. Introducing the Sony Projection TV Introducing the Sony Projection TV ❑ Wide Screen Mode: Allows you to watch 4:3 normal broadcasts in wide screen mode (16:9 aspect ratio). ❑ Auto Wide: Allows you to select the wide screen mode automatically. ❑ Flash Focus...
.... Using this manual are also found on -screen menus and adjust your projection TV settings. Introducing the Sony Projection TV Introducing the Sony Projection TV ❑ Wide Screen Mode: Allows you to watch 4:3 normal broadcasts in wide screen mode (16:9 aspect ratio). ❑ Auto Wide: Allows you to select the wide screen mode automatically. ❑ Flash Focus...

Operating Instructions
Page 15
See the instruction manual that came with your VCR or other devices (such as digital set up your VCR or other Sony equipment with the projection TV's remote control, connect the CONTROL S IN jack of the picture displayed on the screen). This is tuned to view local and ...quality when switching between local and cable channels easily by pressing ANT on your equipment for another Sony product, connect the CONTROL S OUT jack of your projection TV to the CONTROL S OUT jack on the projection TV with the CONTROL S cable. The DVI-HDTV input terminal is compliant with the TV...
See the instruction manual that came with your VCR or other devices (such as digital set up your VCR or other Sony equipment with the projection TV's remote control, connect the CONTROL S IN jack of the picture displayed on the screen). This is tuned to view local and ...quality when switching between local and cable channels easily by pressing ANT on your equipment for another Sony product, connect the CONTROL S OUT jack of your projection TV to the CONTROL S OUT jack on the projection TV with the CONTROL S cable. The DVI-HDTV input terminal is compliant with the TV...

Operating Instructions
Page 22
... VCR (playback) VCR (recording) AUDIO-R (red) AUDIO-L (white) VIDEO (yellow) VMC-810S/820S (not supplied) ✍ To perform tape editing, set the projection TV to the video input intended for playback by pressing TV/VIDEO on the remote control. ✍ You may need to change the video input ... connect audio cables to provide sound. ✍ You cannot record signals from one VCR to the other while using your VCR. Consult your VCR's operating manual for Tape Editing If you connect two VCRs, you can use an S VIDEO cable, connect the VIDEO OUT jack of the playback VCR to the...
... VCR (playback) VCR (recording) AUDIO-R (red) AUDIO-L (white) VIDEO (yellow) VMC-810S/820S (not supplied) ✍ To perform tape editing, set the projection TV to the video input intended for playback by pressing TV/VIDEO on the remote control. ✍ You may need to change the video input ... connect audio cables to provide sound. ✍ You cannot record signals from one VCR to the other while using your VCR. Consult your VCR's operating manual for Tape Editing If you connect two VCRs, you can use an S VIDEO cable, connect the VIDEO OUT jack of the playback VCR to the...
Operating Instructions
Page 24
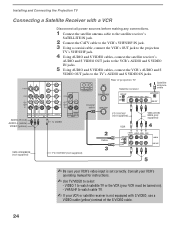
...instead of projection TV Satellite receiver Satellite antenna cable AUDIO-R (red) AUDIO-L (white) VIDEO (yellow) VMC-810S/820S (not supplied) 24 S VIDEO Coaxial cable YC-15V/30V (not supplied) VCR YC-15V/30V (not supplied) Cable VMC-810S/ 820S (not supplied) ✍ Be sure your VCR's operating manual for ... IN jack. 2 Connect the CATV cable to the VCR's VHF/UHF IN jack. 3 Using a coaxial cable, connect the VCR's OUT jack to the projection TV's VHF/UHF jack. 4 Using AUDIO and S VIDEO cables, connect the satellite receiver's AUDIO and S VIDEO OUT jacks to the VCR's AUDIO and ...
...instead of projection TV Satellite receiver Satellite antenna cable AUDIO-R (red) AUDIO-L (white) VIDEO (yellow) VMC-810S/820S (not supplied) 24 S VIDEO Coaxial cable YC-15V/30V (not supplied) VCR YC-15V/30V (not supplied) Cable VMC-810S/ 820S (not supplied) ✍ Be sure your VCR's operating manual for ... IN jack. 2 Connect the CATV cable to the VCR's VHF/UHF IN jack. 3 Using a coaxial cable, connect the VCR's OUT jack to the projection TV's VHF/UHF jack. 4 Using AUDIO and S VIDEO cables, connect the satellite receiver's AUDIO and S VIDEO OUT jacks to the VCR's AUDIO and ...
Operating Instructions
Page 28
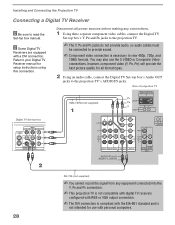
... formats. You may also use with a DVI connection. Refer to your Digital TV Receiver manual for all power sources before making any equipment connected into the Y, PB and PR connectors. ✍ This projection TV is not compatible with digital TV receivers configured with RGB or VGA output connectors. &#...9997; The DVI connection is compliant with the EIA-861 standard and is necessary to the projection TV's AUDIO IN jacks. Rear of projection TV PR VMC-10HG (not supplied) PB Y Digital TV Set-top box AUDIO-R (red) AUDIO-L (white) RK-74A (not...
... formats. You may also use with a DVI connection. Refer to your Digital TV Receiver manual for all power sources before making any equipment connected into the Y, PB and PR connectors. ✍ This projection TV is not compatible with digital TV receivers configured with RGB or VGA output connectors. &#...9997; The DVI connection is compliant with the EIA-861 standard and is necessary to the projection TV's AUDIO IN jacks. Rear of projection TV PR VMC-10HG (not supplied) PB Y Digital TV Set-top box AUDIO-R (red) AUDIO-L (white) RK-74A (not...
Operating Instructions
Page 33
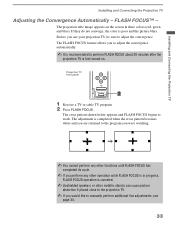
..., green and blue). The cross pattern shown below appears and FLASH FOCUS begins to manually perform additional fine adjustments, see page 34. 33 Installing and Connecting the Projection TV Installing and Connecting the Projection TV Adjusting the Convergence Automatically - The projection tube image appears on . Before you to adjust the convergence automatically. ✍ It...
..., green and blue). The cross pattern shown below appears and FLASH FOCUS begins to manually perform additional fine adjustments, see page 34. 33 Installing and Connecting the Projection TV Installing and Connecting the Projection TV Adjusting the Convergence Automatically - The projection tube image appears on . Before you to adjust the convergence automatically. ✍ It...

Operating Instructions
Page 34
... to yellow again. 7 Repeat steps 4 to 6 to red. 5 If the cross that you want to exit the manual convergence screen and the Setup menu. 34 Installing and Connecting the Projection TV Adjusting the Convergence Manually The Manual Convergence feature gives you more control over the TV's picture than the Flash Focus feature, allowing you...
... to yellow again. 7 Repeat steps 4 to 6 to red. 5 If the cross that you want to exit the manual convergence screen and the Setup menu. 34 Installing and Connecting the Projection TV Adjusting the Convergence Manually The Manual Convergence feature gives you more control over the TV's picture than the Flash Focus feature, allowing you...

Operating Instructions
Page 35
... screen. ❑ You can make separate adjustments to each wide mode, but the adjustment procedure is the same. Installing and Connecting the Projection TV Notes on Adjusting the Convergence Manually ❑ For best results, stand about 3 to toggle through the wide mode screens. Press the WIDE MODE button on the edges of...
... screen. ❑ You can make separate adjustments to each wide mode, but the adjustment procedure is the same. Installing and Connecting the Projection TV Notes on Adjusting the Convergence Manually ❑ For best results, stand about 3 to toggle through the wide mode screens. Press the WIDE MODE button on the edges of...

Operating Instructions
Page 42
For details, see page 28) 2 Press TV/VIDEO to VIDEO 5, 6 or 7 IN on the DTV receiver. Using the Features Watching the Digital TV When you have connected the DTV receiver, you can enjoy digital TV programs. This projection TV is capable of the projection TV as 480p). To view a digital TV program 1 Connect the DTV receiver to select VIDEO 5, 6 or 7. 3 Select a digital channel on the projection TV. (for details, see the Operating Manual of the DTV receiver. 4 Adjust the volume of receiving 1080i, 720p, 480p and 480i digital TV formats (note that 720p is displayed as necessary. 42
For details, see page 28) 2 Press TV/VIDEO to VIDEO 5, 6 or 7 IN on the DTV receiver. Using the Features Watching the Digital TV When you have connected the DTV receiver, you can enjoy digital TV programs. This projection TV is capable of the projection TV as 480p). To view a digital TV program 1 Connect the DTV receiver to select VIDEO 5, 6 or 7. 3 Select a digital channel on the projection TV. (for details, see the Operating Manual of the DTV receiver. 4 Adjust the volume of receiving 1080i, 720p, 480p and 480i digital TV formats (note that 720p is displayed as necessary. 42

Operating Instructions
Page 43
... that channel appears in the preview window. If you want to input your favorite channels: ✍ Your Favorite Channel options can be set automatically or manually. When Favorite Channel is Auto. Press to Auto, the last eight channels selected with 0-9 buttons will be set as Favorite Channel settings, see "Favorite Channel...
... that channel appears in the preview window. If you want to input your favorite channels: ✍ Your Favorite Channel options can be set automatically or manually. When Favorite Channel is Auto. Press to Auto, the last eight channels selected with 0-9 buttons will be set as Favorite Channel settings, see "Favorite Channel...

Operating Instructions
Page 56
Cable On Select if you are using an antenna. ✍ You should run Auto Program after changing the Cable setting. 56 Manual Select if you are receiving cable channels with the 0-9 buttons. Off Select if you want to input your favorites. 3 Press to exit the menu screen. ...
Cable On Select if you are using an antenna. ✍ You should run Auto Program after changing the Cable setting. 56 Manual Select if you are receiving cable channels with the 0-9 buttons. Off Select if you want to input your favorites. 3 Press to exit the menu screen. ...
Operating Instructions
Page 65
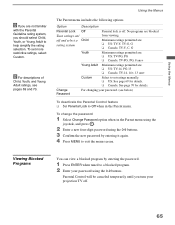
...Custom Select to exit the menu screen. Using the Menus z If you are not familiar with the Parental Guideline rating system, you turn your projection TV off . Option Description Parental Lock Off Turn ratings on/ off and select a Child rating system Parental lock is off . 65 Viewing ...the 0-9 buttons. 3 Confirm the new password by entering the password. 1 Press ENTER when tuned to help simplify the rating selection. To set ratings manually. ❏ US: See page 69 for details. ❏ Canada: See page 70 for details. No programs are blocked from viewing. Change Password ...
...Custom Select to exit the menu screen. Using the Menus z If you are not familiar with the Parental Guideline rating system, you turn your projection TV off . Option Description Parental Lock Off Turn ratings on/ off and select a Child rating system Parental lock is off . 65 Viewing ...the 0-9 buttons. 3 Confirm the new password by entering the password. 1 Press ENTER when tuned to help simplify the rating selection. To set ratings manually. ❏ US: See page 69 for details. ❏ Canada: See page 70 for details. No programs are blocked from viewing. Change Password ...

Operating Instructions
Page 78
...'s TO CONVERTER jack. Other Information Problem Possible Remedies You get anything but TV ❏ Be sure the video label has not been set to your projection TV's VHF/UHF input (this will only unscramble one signal at a time, so you press TV/ VIDEO ❏ Ensure that is not set to... Manual in the Channel menu (see "Video Label" on page 62). The cable box will only work with your digital cable box. Try changing channels in ...
...'s TO CONVERTER jack. Other Information Problem Possible Remedies You get anything but TV ❏ Be sure the video label has not been set to your projection TV's VHF/UHF input (this will only unscramble one signal at a time, so you press TV/ VIDEO ❏ Ensure that is not set to... Manual in the Channel menu (see "Video Label" on page 62). The cable box will only work with your digital cable box. Try changing channels in ...
Operating Instructions
Page 81
...MENU button 39 DVD player using 40, 47 Front Panel Controls 13 FUNCTION buttons (WHITE) 38 H Hookups 16-31 Hue, adjusting 52 I Inputs, labeling 62 Installation of the projection TV 16-31 (Continued) 81 Other Information Index A Activating a Twin View screen 44 Adding channels to the channel... component video connectors, connecting 26 E Effect Off 54 Simulated 54 TruSurround 54 Enlarging pictures, in Twin View 46 Extended Data Service 61 F Favorite Channel auto 56 described 8 manual 56 setting up 56 using 43 FAVORITES button 37 Features 8 Flash Focus described 9 performing 33 FREEZE button ...
...MENU button 39 DVD player using 40, 47 Front Panel Controls 13 FUNCTION buttons (WHITE) 38 H Hookups 16-31 Hue, adjusting 52 I Inputs, labeling 62 Installation of the projection TV 16-31 (Continued) 81 Other Information Index A Activating a Twin View screen 44 Adding channels to the channel... component video connectors, connecting 26 E Effect Off 54 Simulated 54 TruSurround 54 Enlarging pictures, in Twin View 46 Extended Data Service 61 F Favorite Channel auto 56 described 8 manual 56 setting up 56 using 43 FAVORITES button 37 Features 8 Flash Focus described 9 performing 33 FREEZE button ...


