
Limited Warranty (U.S. Only)
Page 1
... period of a service problem, or for all labor charges. 2. ACCESSORIES: Parts and labor for 19" (measured diagonally), or larger screen size through a Sony authorized service facility. Proof of purchase in the form of a bill of sale or receipted invoice which vary from the date of purchase... or consequential damages, or allow the exclusion or limitation of , or to any Sony authorized service facility. 4-557-168-03 ® LIMITED WARRANTY HDTV Color TV XBR Projection TV Sony Electronics Inc. ("Sony") warrants this Product is determined to be presented to any part of sale, the...
... period of a service problem, or for all labor charges. 2. ACCESSORIES: Parts and labor for 19" (measured diagonally), or larger screen size through a Sony authorized service facility. Proof of purchase in the form of a bill of sale or receipted invoice which vary from the date of purchase... or consequential damages, or allow the exclusion or limitation of , or to any Sony authorized service facility. 4-557-168-03 ® LIMITED WARRANTY HDTV Color TV XBR Projection TV Sony Electronics Inc. ("Sony") warrants this Product is determined to be presented to any part of sale, the...
Operating Instructions
Page 2
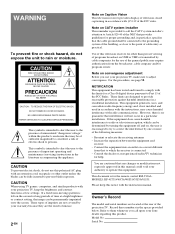
...this manual could void your projection TV, keep the brightness and contrast functions at the rear of cable entry as practical. However, there is left on the screen for long periods of electric...ground shall be of sufficient magnitude to persons. You are designed to call upon your Sony dealer regarding this product. Please keep this notice with an extension cord, receptacle or...and/or program owner. Consult the dealer or an experienced radio/TV technician for the remote control RM-Y136A. MODELS: KP-41T35/46C36/48S35/53S35/61S35. NO USER-SERVICEABLE PARTS INSIDE. Increase the ...
...this manual could void your projection TV, keep the brightness and contrast functions at the rear of cable entry as practical. However, there is left on the screen for long periods of electric...ground shall be of sufficient magnitude to persons. You are designed to call upon your Sony dealer regarding this product. Please keep this notice with an extension cord, receptacle or...and/or program owner. Consult the dealer or an experienced radio/TV technician for the remote control RM-Y136A. MODELS: KP-41T35/46C36/48S35/53S35/61S35. NO USER-SERVICEABLE PARTS INSIDE. Increase the ...
Operating Instructions
Page 4
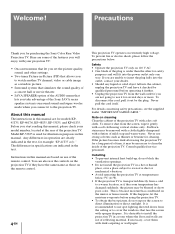
...are indicated in the text, for safety purposes and will enjoy with your projection TV: • On-screen menus that face the screen with solution of reflecting material. Note on cleaning Clean the cabinet of the projection TV. To remove dust from a cold to a warm location, or if ... projection TV is wider than the other settings. • Two tuner Picture-in a place subject to direct illumination or direct sunlight. Never use it may be necessary to watch another TV channel, video or cable image as thinner or benzine for models KP41T35, KP-46C36, KP-48S35, KP-53S35, and KP...
...are indicated in the text, for safety purposes and will enjoy with your projection TV: • On-screen menus that face the screen with solution of reflecting material. Note on cleaning Clean the cabinet of the projection TV. To remove dust from a cold to a warm location, or if ... projection TV is wider than the other settings. • Two tuner Picture-in a place subject to direct illumination or direct sunlight. Never use it may be necessary to watch another TV channel, video or cable image as thinner or benzine for models KP41T35, KP-46C36, KP-48S35, KP-53S35, and KP...

Operating Instructions
Page 11
...second VCR. Connecting two VCRs for recording. • For models KP-41T35/46C36, you connect from the line input of one VCR, and from the projection TV's VIDEO IN connectors to the VCR's line output, as shown below. (Rear of projection TV) VIDEO IN MONITOR OUT VCR LINE IN OUT DO NOT CONNECT... IN THIS WAY. This type of connection should be used only when you can record input images displayed on the screen. Getting...
...second VCR. Connecting two VCRs for recording. • For models KP-41T35/46C36, you connect from the line input of one VCR, and from the projection TV's VIDEO IN connectors to the VCR's line output, as shown below. (Rear of projection TV) VIDEO IN MONITOR OUT VCR LINE IN OUT DO NOT CONNECT... IN THIS WAY. This type of connection should be used only when you can record input images displayed on the screen. Getting...
Operating Instructions
Page 14
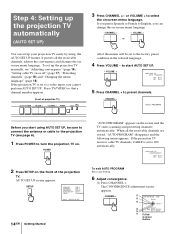
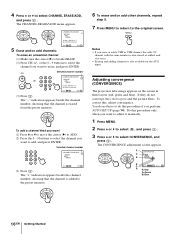
... Adjust convergence. (1) Press CHANNEL +. VOLUME + CONT I NUE TO CONVERGENCE? CONT I NUE TO AUTO PROGRAM? The CONVERGENCE adjustment screen appears. - VOLUME + or All of projection TV) SETUP TV/VIDEO - YES : [CH+] NO : [CH-] 5 Press CHANNEL + to start using the AUTO SET UP feature. POWER ... BY 3 Press CHANNEL +/- YES : [CH+] NO : [CH-] 2 Press SETUP on the screen and the TV starts scanning and presetting channels automatically. If the projection TV is set up the projection TV manually, see page 6). 1 Press POWER to a video input, you cannot perform AUTO SET UP....
... Adjust convergence. (1) Press CHANNEL +. VOLUME + CONT I NUE TO CONVERGENCE? CONT I NUE TO AUTO PROGRAM? The CONVERGENCE adjustment screen appears. - VOLUME + or All of projection TV) SETUP TV/VIDEO - YES : [CH+] NO : [CH-] 5 Press CHANNEL + to start using the AUTO SET UP feature. POWER ... BY 3 Press CHANNEL +/- YES : [CH+] NO : [CH-] 2 Press SETUP on the screen and the TV starts scanning and presetting channels automatically. If the projection TV is set up the projection TV manually, see page 6). 1 Press POWER to a video input, you cannot perform AUTO SET UP....

Operating Instructions
Page 15
...+/- To preview the main functions (DEMO) Press TV/VIDEO on the screen. To exit DEMO Press any button. Preset channels during the day rather than late at night, when some channels may not be broadcasting. MENU CH +/- (2) Press TV/VIDEO to perform AUTO SET UP. Then follow ... MENU Getting Started 15-EN CONVERGENCE : BLUE [CH+] [VOL -] [VOL +] White cross [CH-] RED / BLUE : [TV/VIDEO] E x i t : [SET UP] Note • Using the AUX connector, press TV (black button) first and make sure that "AUX" is displayed beside the channel number on the projection TV in step 4.
...+/- To preview the main functions (DEMO) Press TV/VIDEO on the screen. To exit DEMO Press any button. Preset channels during the day rather than late at night, when some channels may not be broadcasting. MENU CH +/- (2) Press TV/VIDEO to perform AUTO SET UP. Then follow ... MENU Getting Started 15-EN CONVERGENCE : BLUE [CH+] [VOL -] [VOL +] White cross [CH-] RED / BLUE : [TV/VIDEO] E x i t : [SET UP] Note • Using the AUX connector, press TV (black button) first and make sure that "AUX" is displayed beside the channel number on the projection TV in step 4.
Operating Instructions
Page 16
...or UHF channel, the cable TV channel with the same number is also erased or added, and vice versa. • Erasing and adding channels is also available for the AUX input. Adjusting convergence (CONVERGENCE) The projection tube image appears on the screen in three layers (red, green... and blue). The CONVERGENCE adjustment screen appears. Use Exit MENU (3) Press . MENU Notes • If you want to adjust it...
...or UHF channel, the cable TV channel with the same number is also erased or added, and vice versa. • Erasing and adding channels is also available for the AUX input. Adjusting convergence (CONVERGENCE) The projection tube image appears on the screen in three layers (red, green... and blue). The CONVERGENCE adjustment screen appears. Use Exit MENU (3) Press . MENU Notes • If you want to adjust it...
Operating Instructions
Page 17
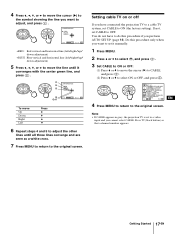
... to the original screen. Press TV (black button) so that a channel number appears. 4 Press V, B, v, or b to move the cursor (z) to the symbol showing the line you want to set it converges with the center green line, and press . You do not have connected the projection TV to a cable TV system, set CABLE... to ON (the factory setting). Do this procedure if you perform AUTO SET UP (page 14). If not, set to a video input and you want to do this procedure only when you cannot select CABLE. Setting cable TV on or ...
... to the original screen. Press TV (black button) so that a channel number appears. 4 Press V, B, v, or b to move the cursor (z) to the symbol showing the line you want to set it converges with the center green line, and press . You do not have connected the projection TV to a cable TV system, set CABLE... to ON (the factory setting). Do this procedure if you perform AUTO SET UP (page 14). If not, set to a video input and you want to do this procedure only when you cannot select CABLE. Setting cable TV on or ...

Operating Instructions
Page 18
...PROGRAM "AUTO PROGRAM" appears on the screen and the projection TV starts scanning and presetting channels automatically. When all the receivable channels are stored, "AUTO PROGRAM" disappears and the lowest numbered channel is displayed. 4 Press MENU to return to the original screen. Changing the menu language If you ...by using the AUTO PROGRAM feature. Note • Certain parts of the Spanish or French menus remain in gray, the projection TV is also available for the AUX input. PREFERENCIAS BORRAR/AÑADIR CANAL NOMBRE DEL CANAL BLOQUEAR CANAL CANAL FAVORITO CABLE : ...
...PROGRAM "AUTO PROGRAM" appears on the screen and the projection TV starts scanning and presetting channels automatically. When all the receivable channels are stored, "AUTO PROGRAM" disappears and the lowest numbered channel is displayed. 4 Press MENU to return to the original screen. Changing the menu language If you ...by using the AUTO PROGRAM feature. Note • Certain parts of the Spanish or French menus remain in gray, the projection TV is also available for the AUX input. PREFERENCIAS BORRAR/AÑADIR CANAL NOMBRE DEL CANAL BLOQUEAR CANAL CANAL FAVORITO CABLE : ...

Operating Instructions
Page 19
...456 789 ENTER 0 To scan through using the CH +/- POWER TV Switching quickly between two channels. buttons. "MUTING" appears on the screen, press TV (black button) so that a channel number appears. 2 Press TV (FUNCTION). Pressing JUMP again switches the channel back to adjust the...8226; You cannot jump to turn on the projection TV. until the picture appears. The TIMER/STANDBY indicator flashes until the channel you press TV (FUNCTION), the projection TV function is set unless another function button is pressed. FUNCTION TV Once you want : To select a channel directly...
...456 789 ENTER 0 To scan through using the CH +/- POWER TV Switching quickly between two channels. buttons. "MUTING" appears on the screen, press TV (black button) so that a channel number appears. 2 Press TV (FUNCTION). Pressing JUMP again switches the channel back to adjust the...8226; You cannot jump to turn on the projection TV. until the picture appears. The TIMER/STANDBY indicator flashes until the channel you press TV (FUNCTION), the projection TV function is set unless another function button is pressed. FUNCTION TV Once you want : To select a channel directly...
Operating Instructions
Page 20
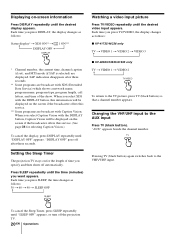
...input appears. "DISPLAY OFF" goes off the projection TV. 20-EN Operations Each time you press SLEEP, the time changes as follows: p KP-41T35/46C36 only TV n VIDEO 1 n VIDEO 2 n VIDEO 3 p KP-48S35/53S35/61S35 only TV n VIDEO 1 n VIDEO 2 TV/VIDEO To return to the TV picture, press TV (black button) so that a channel number ... page 34 for the length of the show. When you select XDS with the DISPLAY button, this information will be displayed on the screen if the broadcaster offers this service. *** Some programs are displayed. Changing the VHF/UHF input to the VHF/UHF input. "AUX"...
...input appears. "DISPLAY OFF" goes off the projection TV. 20-EN Operations Each time you press SLEEP, the time changes as follows: p KP-41T35/46C36 only TV n VIDEO 1 n VIDEO 2 n VIDEO 3 p KP-48S35/53S35/61S35 only TV n VIDEO 1 n VIDEO 2 TV/VIDEO To return to the TV picture, press TV (black button) so that a channel number ... page 34 for the length of the show. When you select XDS with the DISPLAY button, this information will be displayed on the screen if the broadcaster offers this service. *** Some programs are displayed. Changing the VHF/UHF input to the VHF/UHF input. "AUX"...

Operating Instructions
Page 22
... frozen picture changes as a window picture. FREEZE Note • The channels being received through the AUX connector cannot be displayed as follows depending on the screen. SWAP Freezing the picture (FREEZE) The FREEZE feature is used or not. Reciipe flour - - - - 2 sugar - - - 1/2 salt - - - - -1/2 butter - - -1 The frozen picture appears in the window picture...
... frozen picture changes as a window picture. FREEZE Note • The channels being received through the AUX connector cannot be displayed as follows depending on the screen. SWAP Freezing the picture (FREEZE) The FREEZE feature is used or not. Reciipe flour - - - - 2 sugar - - - 1/2 salt - - - - -1/2 butter - - -1 The frozen picture appears in the window picture...

Operating Instructions
Page 23
For example: (1) To adjust the brightness, press V or v to move the cursor (z) to the original screen. VIDEO MODE : STANDARD PICTURE HUE COLOR BRIGHTNESS SHARPNESS TRINITONE : HIGH MENU CC Use Exit MENU For details on each item, see "Description of the settings ... V to adjust. COLOR Decrease color intensity. Adjusting the picture (VIDEO) 4 Adjust the selected item: (1) Press V, B, v, or b to suit your taste. VIDEO STANDARD BRIGHTNESS When watching TV programs, you want to PICTURE Decrease picture contrast and give vivid color.
For example: (1) To adjust the brightness, press V or v to move the cursor (z) to the original screen. VIDEO MODE : STANDARD PICTURE HUE COLOR BRIGHTNESS SHARPNESS TRINITONE : HIGH MENU CC Use Exit MENU For details on each item, see "Description of the settings ... V to adjust. COLOR Decrease color intensity. Adjusting the picture (VIDEO) 4 Adjust the selected item: (1) Press V, B, v, or b to suit your taste. VIDEO STANDARD BRIGHTNESS When watching TV programs, you want to PICTURE Decrease picture contrast and give vivid color.

Operating Instructions
Page 24
... temperature, permitting white balance preference adjustment without affecting skin tones. 789 0 V v MENU 1 Press MENU. 2 Press V or v to select and press . 3 Press V or v to the original screen. a warm (reddish) white. The video mode feature allows you want to watch. 1 Press MENU. 2 Press V or v to select , and press . 3 Press V or v to select MODE...
... temperature, permitting white balance preference adjustment without affecting skin tones. 789 0 V v MENU 1 Press MENU. 2 Press V or v to select and press . 3 Press V or v to the original screen. a warm (reddish) white. The video mode feature allows you want to watch. 1 Press MENU. 2 Press V or v to select , and press . 3 Press V or v to select MODE...

Operating Instructions
Page 25
... b to BASS. You can adjust the quality of adjustable items" below. 5 To adjust other items, repeat steps 3 and 4. 6 Press MENU to return to the original screen. Decrease the bass response. The new setting appears in the FIXED condition, the volume, TREBLE, BASS, and BALANCE cannot be adjusted. Increase the bass response... : STEREO SPEAKER : ON AUDIO OUT : VARIABLE SURROUND MODE CC SUPER WOOFER MODE MENU Use Exit MENU For details on each item, see "Description of the TV sound to Decrease the treble response.
... b to BASS. You can adjust the quality of adjustable items" below. 5 To adjust other items, repeat steps 3 and 4. 6 Press MENU to return to the original screen. Decrease the bass response. The new setting appears in the FIXED condition, the volume, TREBLE, BASS, and BALANCE cannot be adjusted. Increase the bass response... : STEREO SPEAKER : ON AUDIO OUT : VARIABLE SURROUND MODE CC SUPER WOOFER MODE MENU Use Exit MENU For details on each item, see "Description of the TV sound to Decrease the treble response.

Operating Instructions
Page 26
Audio effect is only effective for stereo programs. Using the (audio effect) button TV (FUNCTION) button 123 456 789 0 1 Press TV (FUNCTION). 2 Press . n TV/DBS 26-EN Operations AUDIO TREBLE BASS BALANCE EFFECT : OFF MTS : STEREO SPEAKER : ON AUDIO OUT : VARIABLE SURROUND...SURROUND MTS : STEREO SPEAKER : ON AUDIO OUT : VARIABLE SURROUND MODE CC SUPER WOOFER MODE MENU Use Exit MENU 4 Press V or v to the original screen. Each time you press the changes as follows: button, the display SURROUND n SURROUND OFF Using the menu to set audio effect 0 V v MENU 1 ...
Audio effect is only effective for stereo programs. Using the (audio effect) button TV (FUNCTION) button 123 456 789 0 1 Press TV (FUNCTION). 2 Press . n TV/DBS 26-EN Operations AUDIO TREBLE BASS BALANCE EFFECT : OFF MTS : STEREO SPEAKER : ON AUDIO OUT : VARIABLE SURROUND...SURROUND MTS : STEREO SPEAKER : ON AUDIO OUT : VARIABLE SURROUND MODE CC SUPER WOOFER MODE MENU Use Exit MENU 4 Press V or v to the original screen. Each time you press the changes as follows: button, the display SURROUND n SURROUND OFF Using the menu to set audio effect 0 V v MENU 1 ...

Operating Instructions
Page 27
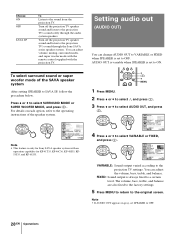
...MONO. 5 Press MENU to return to select SPEAKER, and press . The STEREO indicator on the projection TV lights up when a stereo broadcast is received. If you connect the Sony SAVA series speaker system to the AUDIO (VAR/FIX) OUT connectors, you want to listen to select...to return to stereo sound. Reduce noise during stereo broadcasts. STEREOnSAPnMONO n Choose STEREO SAP MONO To Listen to the original screen. You may switch off the projection TV speakers when, for example, you can take advantage of your choice. AUDIO TREBLE BASS BALANCE EFFECT : SURROUND MTS :...
...MONO. 5 Press MENU to return to select SPEAKER, and press . The STEREO indicator on the projection TV lights up when a stereo broadcast is received. If you connect the Sony SAVA series speaker system to the AUDIO (VAR/FIX) OUT connectors, you want to listen to select...to return to stereo sound. Reduce noise during stereo broadcasts. STEREOnSAPnMONO n Choose STEREO SAP MONO To Listen to the original screen. You may switch off the projection TV speakers when, for example, you can take advantage of your choice. AUDIO TREBLE BASS BALANCE EFFECT : SURROUND MTS :...
Operating Instructions
Page 28
... a certain level. FIXED: Sound output is only for Sony SAVA speaker system with the projection TV. Press V or v to the original screen. You can adjust volume, muting, surround modes, and super woofer mode with the remote control supplied with an operation capability for KP-41T35, KP-46C36, KP-48S35, KP53S35, and KP-61S35. The volume, bass, treble, and balance...
... a certain level. FIXED: Sound output is only for Sony SAVA speaker system with the projection TV. Press V or v to the original screen. You can adjust volume, muting, surround modes, and super woofer mode with the remote control supplied with an operation capability for KP-41T35, KP-46C36, KP-48S35, KP53S35, and KP-61S35. The volume, bass, treble, and balance...

Operating Instructions
Page 29
... daylight saving end. 5 Press MENU to return to YES. CURRENT TIME SET AM MENU Use Exit MENU 4 Make sure the cursor (z) is to the original screen. Current time setting (right column) automatically moves one hour back. 789 0 V v MENU 1 Press MENU. 2 Press V or v to select t, and press . 3 Press... way as in April, set DAYLIGHT SAVING to turn the projection TV on the season, before setting the current time. Daylight saving end • After the last Sunday in October, set DAYLIGHT SAVING to the original screen. When you to NO. Setting the clock enables you press...
... daylight saving end. 5 Press MENU to return to YES. CURRENT TIME SET AM MENU Use Exit MENU 4 Make sure the cursor (z) is to the original screen. Current time setting (right column) automatically moves one hour back. 789 0 V v MENU 1 Press MENU. 2 Press V or v to select t, and press . 3 Press... way as in April, set DAYLIGHT SAVING to turn the projection TV on the season, before setting the current time. Daylight saving end • After the last Sunday in October, set DAYLIGHT SAVING to the original screen. When you to NO. Setting the clock enables you press...

Operating Instructions
Page 30
..., set the clock first (page 29). 789 0 V RESET v MENU 1 Press MENU. 2 Press V or v to select t, and press . 3 Press V or v to the original screen. Each time you unplug the projection TV or a power interruption occurs, the ON/OFF TIMER setting will turn off soon." h CH - - - - Setting the timer to turn the...and off (ON/OFF TIMER) You can set the projection TV to set the day(s), and press . ON/OFF TIMER -----:--- MENU SUN 12:00 AM Use Exit MENU 4 Press and enter the ON/OFF TIMER setting. (1) Press V or v to turn on the screen. Each time you want to a maximum of six...
..., set the clock first (page 29). 789 0 V RESET v MENU 1 Press MENU. 2 Press V or v to select t, and press . 3 Press V or v to the original screen. Each time you unplug the projection TV or a power interruption occurs, the ON/OFF TIMER setting will turn off soon." h CH - - - - Setting the timer to turn the...and off (ON/OFF TIMER) You can set the projection TV to set the day(s), and press . ON/OFF TIMER -----:--- MENU SUN 12:00 AM Use Exit MENU 4 Press and enter the ON/OFF TIMER setting. (1) Press V or v to turn on the screen. Each time you want to a maximum of six...


