
Limited Warranty (U.S. Only)
Page 1
... Parts and labor for all accessories are for one (1) year (color picture tube - In-home diagnostic warranty service is invalid if the factory applied serial number has been altered or removed from your convenience, Sony Electronics Inc. This warranty does not cover customer instruction, installation, ...: For a period of one (1) year period for a period of one (1) year. 4-557-168-03 ® LIMITED WARRANTY HDTV Color TV XBR Projection TV Sony Electronics Inc. ("Sony") warrants this Product is determined to be presented to state. After the Warranty Period, you . PARTS: In addition...
... Parts and labor for all accessories are for one (1) year (color picture tube - In-home diagnostic warranty service is invalid if the factory applied serial number has been altered or removed from your convenience, Sony Electronics Inc. This warranty does not cover customer instruction, installation, ...: For a period of one (1) year period for a period of one (1) year. 4-557-168-03 ® LIMITED WARRANTY HDTV Color TV XBR Projection TV Sony Electronics Inc. ("Sony") warrants this Product is determined to be presented to state. After the Warranty Period, you . PARTS: In addition...
Operating Instructions
Page 2
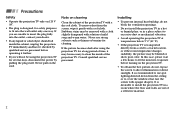
... transmitted by your warranty because they are cautioned that any changes or modifications not expressly approved in this manual could void your projection TV, make sure to the point of the FCC Rules. REFER SERVICING TO QUALIFIED SERVICE PERSONNEL. Note on the screen, keep... If this notice with radio communications. As an ENERGY STAR Partner, Sony Corporation has determined that this product meets the ENERGY STAR guidelines for the remote control RM-Y906 MODELS: KP-43T75, KP-48S75, KP-53S75, KP-53N77, KP-61S75 Please keep the brightness and contrast functions at a high brightness ...
... transmitted by your warranty because they are cautioned that any changes or modifications not expressly approved in this manual could void your projection TV, make sure to the point of the FCC Rules. REFER SERVICING TO QUALIFIED SERVICE PERSONNEL. Note on the screen, keep... If this notice with radio communications. As an ENERGY STAR Partner, Sony Corporation has determined that this product meets the ENERGY STAR guidelines for the remote control RM-Y906 MODELS: KP-43T75, KP-48S75, KP-53S75, KP-53N77, KP-61S75 Please keep the brightness and contrast functions at a high brightness ...
Operating Instructions
Page 3
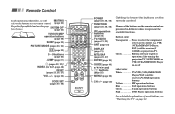
... operation buttons For a detailed explanation of the buttons on page 20. VTR (VCR)/MDP/DVD Player, SAT (satellite receiver)/ CABLE, or projection TV. Button color Transparent .... Green Buttons relevant to control; e.g. SYSTEM OFF (page 22) VCR/DVD/MDP operation buttons (page 48) SLEEP (page 22)...(page 20) CODE SET (pages 47, 49) MUTING DVD/ VTR SAT/ POWER CABLE TV SYSTEM FUNCTION OFF DVD/VTR SAT/CABLE TV TV/VTR FREEZE SWAP PIP m N M POSITION AUDIO ACTIVE X z x SLEEP ANT TV/VIDEO PICTURE MODE CC MTS/SAP DISPLAY 123 456 789 JUMP ENTER 0 INDEX GUIDE RESET VOL ...
... operation buttons For a detailed explanation of the buttons on page 20. VTR (VCR)/MDP/DVD Player, SAT (satellite receiver)/ CABLE, or projection TV. Button color Transparent .... Green Buttons relevant to control; e.g. SYSTEM OFF (page 22) VCR/DVD/MDP operation buttons (page 48) SLEEP (page 22)...(page 20) CODE SET (pages 47, 49) MUTING DVD/ VTR SAT/ POWER CABLE TV SYSTEM FUNCTION OFF DVD/VTR SAT/CABLE TV TV/VTR FREEZE SWAP PIP m N M POSITION AUDIO ACTIVE X z x SLEEP ANT TV/VIDEO PICTURE MODE CC MTS/SAP DISPLAY 123 456 789 JUMP ENTER 0 INDEX GUIDE RESET VOL ...
Operating Instructions
Page 4
... Ratings Mean 43 Ratings in U.S.A 43 Ratings in Canada 45 Open Here For Table of Contents and Remote Control Graphics Table of Contents Welcome 1 Using This Manual 1 Precautions 2 Important Safeguards 3 Installing and Connecting the Projection TV 7 Carrying Your Projection TV 7 Installing the Projection TV 7 Connector... a DVD Player with component video output connectors 15 Connecting an audio system 16 Connecting a Sony SAVA series speaker system 17 Basic Set Up 18 Using the Remote Control 18 Setting Up the Projection TV Automatically 18 Adjusting the Convergence ...
... Ratings Mean 43 Ratings in U.S.A 43 Ratings in Canada 45 Open Here For Table of Contents and Remote Control Graphics Table of Contents Welcome 1 Using This Manual 1 Precautions 2 Important Safeguards 3 Installing and Connecting the Projection TV 7 Carrying Your Projection TV 7 Installing the Projection TV 7 Connector... a DVD Player with component video output connectors 15 Connecting an audio system 16 Connecting a Sony SAVA series speaker system 17 Basic Set Up 18 Using the Remote Control 18 Setting Up the Projection TV Automatically 18 Adjusting the Convergence ...
Operating Instructions
Page 5
.... • Three AUDIO/VIDEO/S VIDEO inputs. Similar controls may be found on the TV box (white label). This manual is used for models KP-43T75, KP48S75, KP-53S75, KP-53N77, KP-61S75. It shows you how...KP-53S75 is for illustration purposes. Using This Manual Operating Video Equipment 47 Setting the Manufacturer's Code 47 Operating a Cable Box or Satellite Receiver (SAT 49 Setting the Manufacturer's Code 49 Troubleshooting 50 Specifications 52 Index 53 Owner's Record The model and serial numbers are written for purchasing the Sony Color Rear Video Projection TV...
.... • Three AUDIO/VIDEO/S VIDEO inputs. Similar controls may be found on the TV box (white label). This manual is used for models KP-43T75, KP48S75, KP-53S75, KP-53N77, KP-61S75. It shows you how...KP-53S75 is for illustration purposes. Using This Manual Operating Video Equipment 47 Setting the Manufacturer's Code 47 Operating a Cable Box or Satellite Receiver (SAT 49 Setting the Manufacturer's Code 49 Troubleshooting 50 Specifications 52 Index 53 Owner's Record The model and serial numbers are written for purchasing the Sony Color Rear Video Projection TV...
Operating Instructions
Page 6
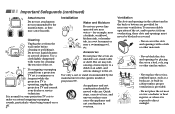
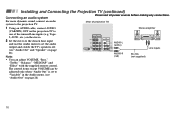
IPnrsetcaalulintigonasnd Connecting the Projection TV (continued) Safety • Operate the projection TV only on 120 V AC. • The plug is transported directly from a cold to a warm location, or if the room temperature changes suddenly, the picture may be blurred or show poor color. Installing • To ...prevent internal heat buildup, do not expose the screen to direct illumination or direct sunlight. To remove dust from the ceiling or to clean the inside the cabinet, unplug the projection TV immediately and have it ...
IPnrsetcaalulintigonasnd Connecting the Projection TV (continued) Safety • Operate the projection TV only on 120 V AC. • The plug is transported directly from a cold to a warm location, or if the room temperature changes suddenly, the picture may be blurred or show poor color. Installing • To ...prevent internal heat buildup, do not expose the screen to direct illumination or direct sunlight. To remove dust from the ceiling or to clean the inside the cabinet, unplug the projection TV immediately and have it ...
Operating Instructions
Page 8
...cleaning or polishing it from a projection TV set on a bed, sofa, rug or other materials. - It is operating, unplug the projection TV and consult your dealer or service technician. Use only a cart or stand recommended by the manufacturer for some projection TV sets to make occasional snapping or... direct sunlight. Never block the slots and openings by placing the set is continuous or frequent while the projection TV is normal for the specific model of projection TV. Use a cloth lightly dampened with water for necessary ventilation. Accessories Do not place the set . An...
...cleaning or polishing it from a projection TV set on a bed, sofa, rug or other materials. - It is operating, unplug the projection TV and consult your dealer or service technician. Use only a cart or stand recommended by the manufacturer for some projection TV sets to make occasional snapping or... direct sunlight. Never block the slots and openings by placing the set is continuous or frequent while the projection TV is normal for the specific model of projection TV. Use a cloth lightly dampened with water for necessary ventilation. Accessories Do not place the set . An...
Operating Instructions
Page 11
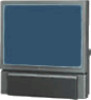
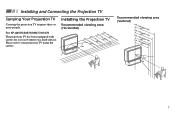
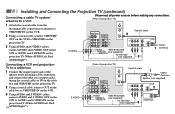
...KP-48S75/53S75/53N77/61S75 The projection TV has been equipped with casters for easy movement on a hard surface. min. min. 2.4m61(a"pprox. 2.1m53(a"pprox. 1.8m48(a"pprox. 1.5m43(a"pprox. 8ft.) 7ft.) 6ft.) 5ft.) 60° 20° 20° 7 Please move your projection TV using the casters. Installing and Connecting the Projection TV Carrying Your Projection TV Carrying the projection TV... requires three or more people. Installing the Projection TV ...
...KP-48S75/53S75/53N77/61S75 The projection TV has been equipped with casters for easy movement on a hard surface. min. min. 2.4m61(a"pprox. 2.1m53(a"pprox. 1.8m48(a"pprox. 1.5m43(a"pprox. 8ft.) 7ft.) 6ft.) 5ft.) 60° 20° 20° 7 Please move your projection TV using the casters. Installing and Connecting the Projection TV Carrying Your Projection TV Carrying the projection TV... requires three or more people. Installing the Projection TV ...
Operating Instructions
Page 12
... only or • VHF/UHF 75-ohm coaxial cable (Rear of projection TV) VHF/UHF 300-ohm twin lead cable (Rear of all Sony equipment. Newer homes will be equipped with standard coaxial cable (see A). Yellow Audio (Left) - Red CONTROL S OUT IN VIDEO 1 VIDEO 3 S VIDEO OUT MONITOR AUDIO (VAR/FIX) VIDEO Y VIDEO CONTROL S OUT L (MONO) AUDIO R PB PR COMPONENT L (MONO...
... only or • VHF/UHF 75-ohm coaxial cable (Rear of projection TV) VHF/UHF 300-ohm twin lead cable (Rear of all Sony equipment. Newer homes will be equipped with standard coaxial cable (see A). Yellow Audio (Left) - Red CONTROL S OUT IN VIDEO 1 VIDEO 3 S VIDEO OUT MONITOR AUDIO (VAR/FIX) VIDEO Y VIDEO CONTROL S OUT L (MONO) AUDIO R PB PR COMPONENT L (MONO...
Operating Instructions
Page 13
...up , you are able to the projection TV. C 75-ohm coaxial cable • VHF (Rear of projection TV) VHF/UHF IN OUT *Cable box Cable box and cable Some pay cable TV systems use scrambled or encoded signals that you can only be able to program your Sony remote control to operate your cable box...feature local channels that require a cable box* to "On" in the main picture. 9 Also, set up if your remote control. Coaxial cable (Rear of projection TV) VHF/UHF and • UHF EAC-66 U/V mixer (not supplied) 300-ohm twin lead cable Cable or antenna This is made directly from ...
...up , you are able to the projection TV. C 75-ohm coaxial cable • VHF (Rear of projection TV) VHF/UHF IN OUT *Cable box Cable box and cable Some pay cable TV systems use scrambled or encoded signals that you can only be able to program your Sony remote control to operate your cable box...feature local channels that require a cable box* to "On" in the main picture. 9 Also, set up if your remote control. Coaxial cable (Rear of projection TV) VHF/UHF and • UHF EAC-66 U/V mixer (not supplied) 300-ohm twin lead cable Cable or antenna This is made directly from ...
Operating Instructions
Page 14
... VHF/UHF IN on the VCR. 3 Using AUDIO and S VIDEO* cables, connect AUDIO and S VIDEO OUT on the VCR to AUDIO and S VIDEO IN on the projection TV (White-AUDIO Left, Red10AUDIO Right**). S VIDEO (Rear of projection TV) Coaxial cable AUX 1 TO CONVERTER Cable/ Antenna IN VIDEO 1 VIDEO 3 S VIDEO OUT MONITOR AUDIO (VAR/FIX) VIDEO Y VIDEO L (MONO) AUDIO R L PB (MONO) AUDIO PR R VHF/UHF...
... VHF/UHF IN on the VCR. 3 Using AUDIO and S VIDEO* cables, connect AUDIO and S VIDEO OUT on the VCR to AUDIO and S VIDEO IN on the projection TV (White-AUDIO Left, Red10AUDIO Right**). S VIDEO (Rear of projection TV) Coaxial cable AUX 1 TO CONVERTER Cable/ Antenna IN VIDEO 1 VIDEO 3 S VIDEO OUT MONITOR AUDIO (VAR/FIX) VIDEO Y VIDEO L (MONO) AUDIO R L PB (MONO) AUDIO PR R VHF/UHF...
Operating Instructions
Page 15
... is connected to by pressing TV/ VIDEO. * If your VCR is connected to by pressing TV/ VIDEO on the remote control. Disconnect all power sources before making any connections. (Rear of the S VIDEO cable. ** If you are connecting a monaural VCR, connect only the single audio output to AUDIO and S VIDEO IN on the projection TV (White-AUDIO Left, Red...
... is connected to by pressing TV/ VIDEO. * If your VCR is connected to by pressing TV/ VIDEO on the remote control. Disconnect all power sources before making any connections. (Rear of the S VIDEO cable. ** If you are connecting a monaural VCR, connect only the single audio output to AUDIO and S VIDEO IN on the projection TV (White-AUDIO Left, Red...
Operating Instructions
Page 16
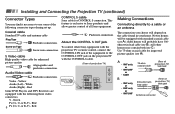
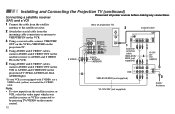
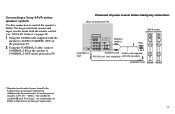
.../UHF OUT LINE VCR OUT IN 5 VMC-810S/820S (not supplied) 2 YC-15V/30V (not supplied) Cable/ Antenna 12 S VIDEO (Rear of the S VIDEO cable. Installing and Connecting the Projection TV (continued) Connecting a satellite receiver Disconnect all power sources before making any connections. (SAT) and a VCR 1 Connect the cable from the satellite antenna to the...
.../UHF OUT LINE VCR OUT IN 5 VMC-810S/820S (not supplied) 2 YC-15V/30V (not supplied) Cable/ Antenna 12 S VIDEO (Rear of the S VIDEO cable. Installing and Connecting the Projection TV (continued) Connecting a satellite receiver Disconnect all power sources before making any connections. (SAT) and a VCR 1 Connect the cable from the satellite antenna to the...
Operating Instructions
Page 17
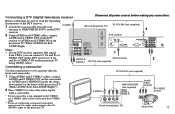
...). S VIDEO (Rear of projection TV) YC-15V/30V (not supplied) 2 AUX IN VIDEO 1 VIDEO 3 S VIDEO OUT MONITOR AUDIO (VAR/FIX) VIDEO Y VIDEO TO CONVERTER VHF/UHF DTV receiver VHF/UHF IN VHF/UHF IN (DTV) SATELLITE IN VHF/SATELLITE OUT VCR LOW SPEED DATA CONTROL VIDEO 1 2 3 ACCESS CARD S VIDEO Y DIGITAL AUDIO OUT (OPTICAL) L PB MONO R PR VGA OUT AUDIO AUDIO/VIDEO OUT...
...). S VIDEO (Rear of projection TV) YC-15V/30V (not supplied) 2 AUX IN VIDEO 1 VIDEO 3 S VIDEO OUT MONITOR AUDIO (VAR/FIX) VIDEO Y VIDEO TO CONVERTER VHF/UHF DTV receiver VHF/UHF IN VHF/UHF IN (DTV) SATELLITE IN VHF/SATELLITE OUT VCR LOW SPEED DATA CONTROL VIDEO 1 2 3 ACCESS CARD S VIDEO Y DIGITAL AUDIO OUT (OPTICAL) L PB MONO R PR VGA OUT AUDIO AUDIO/VIDEO OUT...
Operating Instructions
Page 18
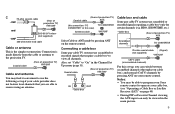
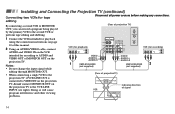
... INPUT (see right). Installing and Connecting the Projection TV (continued) Connecting two VCRs for recording) AUDIO R AUDIO L VIDEO LINE IN OUT IN VIDEO AUDIO-L AUDIO-R VMC-810S/820S 2 (not supplied) (Rear of projectionTV) VIDEO IN VCR MONITOR OUT Indicates direction of MONITOR OUT on the projection TV to VIDEO IN on the projection TV, do not connect MONITOR OUT on the...
... INPUT (see right). Installing and Connecting the Projection TV (continued) Connecting two VCRs for recording) AUDIO R AUDIO L VIDEO LINE IN OUT IN VIDEO AUDIO-L AUDIO-R VMC-810S/820S 2 (not supplied) (Rear of projectionTV) VIDEO IN VCR MONITOR OUT Indicates direction of MONITOR OUT on the projection TV to VIDEO IN on the projection TV, do not connect MONITOR OUT on the...
Operating Instructions
Page 19
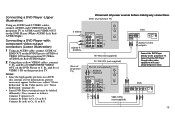
... projection TV. IN VIDEO 1 VIDEO 3 S VIDEO OUT MONITOR AUDIO (VAR/FIX) VIDEO Y VIDEO L (MONO) AUDIO R L PB (MONO) AUDIO PR R COMPONENT PR PB Y VHF/UHF DVD LINE OUT S VIDEO OUT COMPONENT VIDEO OUT S-LINK DIGITAL OUT R-AUDIO 1-L VIDEO Y B-Y R-Y OPTICAL COAXIAL VMC-10HG (not supplied) 15 Disconnect all power sources before making any connections. (Rear of projection TV) AUX S VIDEO IN VIDEO 1 VIDEO 3 S VIDEO OUT MONITOR AUDIO (VAR/FIX) VIDEO Y VIDEO...
... projection TV. IN VIDEO 1 VIDEO 3 S VIDEO OUT MONITOR AUDIO (VAR/FIX) VIDEO Y VIDEO L (MONO) AUDIO R L PB (MONO) AUDIO PR R COMPONENT PR PB Y VHF/UHF DVD LINE OUT S VIDEO OUT COMPONENT VIDEO OUT S-LINK DIGITAL OUT R-AUDIO 1-L VIDEO Y B-Y R-Y OPTICAL COAXIAL VMC-10HG (not supplied) 15 Disconnect all power sources before making any connections. (Rear of projection TV) AUX S VIDEO IN VIDEO 1 VIDEO 3 S VIDEO OUT MONITOR AUDIO (VAR/FIX) VIDEO Y VIDEO...
Operating Instructions
Page 20
...more dynamic sound, connect an audio system to Stereo amplifier one of projection TV) 1 Using an AUDIO cable, connect AUDIO (VAR/FIX) OUT on page 28) Note: CONTROL S OUT IN VIDEO 1 VIDEO 3 S VIDEO OUT MONITOR AUDIO (VAR/FIX) VIDEO Y VIDEO L (MONO) AUDIO R L PB (MONO) AUDIO PR R COMPONENT..." in the Audio menu. (see "Audio Out" and "Speaker" on the projection TV to the projection TV. (Rear of the unused Line inputs (e.g. Installing and Connecting the Projection TV (continued) Connecting an audio system Disconnect all power sources before making any connections.
...more dynamic sound, connect an audio system to Stereo amplifier one of projection TV) 1 Using an AUDIO cable, connect AUDIO (VAR/FIX) OUT on page 28) Note: CONTROL S OUT IN VIDEO 1 VIDEO 3 S VIDEO OUT MONITOR AUDIO (VAR/FIX) VIDEO Y VIDEO L (MONO) AUDIO R L PB (MONO) AUDIO PR R COMPONENT..." in the Audio menu. (see "Audio Out" and "Speaker" on the projection TV to the projection TV. (Rear of the unused Line inputs (e.g. Installing and Connecting the Projection TV (continued) Connecting an audio system Disconnect all power sources before making any connections.
Operating Instructions
Page 21
...Sony SAVA series speaker system Use this connection to CONTROL S OUT on page 28) 1 Using the AUDIO cable supplied with the speakers 2 CONTROL S IN * Manufactured under Canadian patent number 1,037,877. Disconnect all power sources before making any connections. (Rear... of Dolby Laboratories Licensing Corporation. 17 "Dolby," the double-D symbol a and "Pro Logic" are trademarks of projection TV) SAVA series speaker system IN VIDEO 1 VIDEO 3 S VIDEO CONTROL S OUT VIDEO L (MONO) AUDIO R OUT MONITOR AUDIO (VAR/FIX) Y VIDEO L PB (MONO) AUDIO...
...Sony SAVA series speaker system Use this connection to CONTROL S OUT on page 28) 1 Using the AUDIO cable supplied with the speakers 2 CONTROL S IN * Manufactured under Canadian patent number 1,037,877. Disconnect all power sources before making any connections. (Rear... of Dolby Laboratories Licensing Corporation. 17 "Dolby," the double-D symbol a and "Pro Logic" are trademarks of projection TV) SAVA series speaker system IN VIDEO 1 VIDEO 3 S VIDEO CONTROL S OUT VIDEO L (MONO) AUDIO R OUT MONITOR AUDIO (VAR/FIX) Y VIDEO L PB (MONO) AUDIO...
Operating Instructions
Page 22
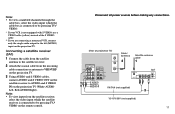
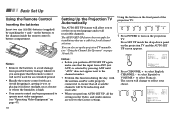
... Press [ SET UP ] to exit. 2 Press CHANNEL + to set the on-screen language and set up the projection TV manually. (see "Operating Video Equipment" on the projection TV and the AUTO SET UP screen appears. VOLUME + - Basic Set Up Using the Remote Control Inserting the batteries Insert two...• Your remote control can also set all channel selection. on the batteries to turn on the front panel of the projection TV: - + FLASH FOCUS TV/VIDEO VOLUME - Using the buttons on the projection TV. POWER English : Español : Français : Auto Set Up : [CH+] [CH-] [VOL+] ...
... Press [ SET UP ] to exit. 2 Press CHANNEL + to set the on-screen language and set up the projection TV manually. (see "Operating Video Equipment" on the projection TV and the AUTO SET UP screen appears. VOLUME + - Basic Set Up Using the Remote Control Inserting the batteries Insert two...• Your remote control can also set all channel selection. on the batteries to turn on the front panel of the projection TV: - + FLASH FOCUS TV/VIDEO VOLUME - Using the buttons on the projection TV. POWER English : Español : Français : Auto Set Up : [CH+] [CH-] [VOL+] ...

Operating Instructions
Page 23
... Program" appears and the projection TV starts scanning and presetting channels automatically. When all the receivable channels are stored, the lowest numbered channel is poor and the picture blurs. FLASH FOCUS Press FLASH FOCUS. 3 Press VOLUME - If they do not converge, the color is displayed. Tips z... No : [CH-] To perform AUTO SET UP again SET UP MENU FLASH FOCUS TV/VIDEO 4 Press CHANNEL + to continue. - The FLASH FOCUS feature allows you use your projection TV, be displayed on the projection TV and perform steps 2-4 above. Press SET UP inside the drop-down panel on the...
... Program" appears and the projection TV starts scanning and presetting channels automatically. When all the receivable channels are stored, the lowest numbered channel is poor and the picture blurs. FLASH FOCUS Press FLASH FOCUS. 3 Press VOLUME - If they do not converge, the color is displayed. Tips z... No : [CH-] To perform AUTO SET UP again SET UP MENU FLASH FOCUS TV/VIDEO 4 Press CHANNEL + to continue. - The FLASH FOCUS feature allows you use your projection TV, be displayed on the projection TV and perform steps 2-4 above. Press SET UP inside the drop-down panel on the...


