Limited Warranty (U.S. Only)
Page 1
... larger screen size through a Sony authorized service facility. After the Warranty Period, you . This warranty does not cover customer instruction, installation, set up adjustments or signal reception problems. This warranty does not cover cosmetic damage or damage due to acts of God, accident, misuse, abuse, negligence, commercial use, or modification of, or to service the Product. This warranty does not cover damage due to improper operation...
... larger screen size through a Sony authorized service facility. After the Warranty Period, you . This warranty does not cover customer instruction, installation, set up adjustments or signal reception problems. This warranty does not cover cosmetic damage or damage due to acts of God, accident, misuse, abuse, negligence, commercial use, or modification of, or to service the Product. This warranty does not cover damage due to improper operation...
Operating Instructions
Page 2
... screen for the remote control RM-Y906 MODELS: KP-43T75, KP-48S75, KP-53S75, KP-53N77, KP-61S75 Please keep the brightness and contrast functions at a high brightness or contrast setting, the image can be determined by cable companies for proper grounding and, in accordance with radio communications. However, there is encouraged to try to the point of the FCC rules. Note on Caption Vision This television receiver provides display of television closed captioning...
... screen for the remote control RM-Y906 MODELS: KP-43T75, KP-48S75, KP-53S75, KP-53N77, KP-61S75 Please keep the brightness and contrast functions at a high brightness or contrast setting, the image can be determined by cable companies for proper grounding and, in accordance with radio communications. However, there is encouraged to try to the point of the FCC rules. Note on Caption Vision This television receiver provides display of television closed captioning...
Operating Instructions
Page 4
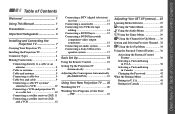
... (SAT) 11 Connecting a satellite receiver (SAT) and a VCR 12 Connecting a DTV (digital television) receiver 13 Connecting a camcorder 13 Connecting two VCRs for tape editing 14 Connecting a DVD Player 15 Connecting a DVD Player with component video output connectors 15 Connecting an audio system 16 Connecting a Sony SAVA series speaker system 17 Basic Set Up 18 Using the Remote Control 18 Setting Up the Projection TV Automatically 18 Adjusting the Convergence Automatically (FLASH FOCUS 19 Using Your New Projection TV .... 20 Watching the TV 20 Watching Two Programs at One Time -
... (SAT) 11 Connecting a satellite receiver (SAT) and a VCR 12 Connecting a DTV (digital television) receiver 13 Connecting a camcorder 13 Connecting two VCRs for tape editing 14 Connecting a DVD Player 15 Connecting a DVD Player with component video output connectors 15 Connecting an audio system 16 Connecting a Sony SAVA series speaker system 17 Basic Set Up 18 Using the Remote Control 18 Setting Up the Projection TV Automatically 18 Adjusting the Convergence Automatically (FLASH FOCUS 19 Using Your New Projection TV .... 20 Watching the TV 20 Watching Two Programs at One Time -
Operating Instructions
Page 5
... projection TV. 1 Installing and Connecting the Projection TV This section guides you call upon your initial set up. Similar controls may be found on the TV box (white label). Using This Manual Operating Video Equipment 47 Setting the Manufacturer's Code 47 Operating a Cable Box or Satellite Receiver (SAT 49 Setting the Manufacturer's Code 49 Troubleshooting 50 Specifications 52 Index 53 Owner's Record The model and serial numbers are written for illustration purposes. Record these numbers in this product. Serial No. Instructions...
... projection TV. 1 Installing and Connecting the Projection TV This section guides you call upon your initial set up. Similar controls may be found on the TV box (white label). Using This Manual Operating Video Equipment 47 Setting the Manufacturer's Code 47 Operating a Cable Box or Satellite Receiver (SAT 49 Setting the Manufacturer's Code 49 Troubleshooting 50 Specifications 52 Index 53 Owner's Record The model and serial numbers are written for illustration purposes. Record these numbers in this product. Serial No. Instructions...
Operating Instructions
Page 7
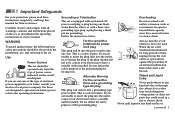
... operating instructions or service manual. When the set through the cabinet slots as a precaution against injury, the following basic safety precautions should still fail to fit, contact your electrician to operate from the type of time, unplug it from the wall outlet as they may touch dangerous voltage points or short out parts that could result in the installation, use...
... operating instructions or service manual. When the set through the cabinet slots as a precaution against injury, the following basic safety precautions should still fail to fit, contact your electrician to operate from the type of time, unplug it from the wall outlet as they may touch dangerous voltage points or short out parts that could result in the installation, use...
Operating Instructions
Page 9
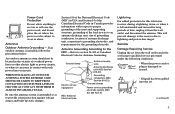
... such power lines or circuits. Refer to lightning and power-line surges. When the power cord or plug is installed, follow the precautions below. Antennas Outdoor Antenna Grounding - Be sure the antenna system is grounded so as to wear or abuse. Ground clamp Electric service equipment NEC: National Electrical Code Antenna lead-in wire to an antenna discharge unit, size of grounding conductors, location of time, unplug...
... such power lines or circuits. Refer to lightning and power-line surges. When the power cord or plug is installed, follow the precautions below. Antennas Outdoor Antenna Grounding - Be sure the antenna system is grounded so as to wear or abuse. Ground clamp Electric service equipment NEC: National Electrical Code Antenna lead-in wire to an antenna discharge unit, size of grounding conductors, location of time, unplug...
Operating Instructions
Page 13
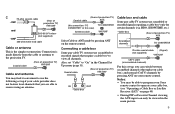
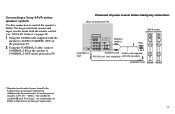
... this set "Cable" to receive using an antenna. (Rear of projection TV) Coaxial cable AUX (No connection "TO CONVERTER" in the Channel Set Up menu (page 31). HBO, SHOWTIME, etc.) *Cable box (Rear of projection TV) AUX Scrambled channels TO CONVERTER 75-ohm coaxial cable (Signal) (not supplied) VHF/UHF CATV cable (unscrambled channels) For this case) Antenna cable TO CONVERTER VHF/UHF Select Cable or ANT mode by pressing ANT on page 49) • During PIP or Favorite Channel viewing, the AUX input can...
... this set "Cable" to receive using an antenna. (Rear of projection TV) Coaxial cable AUX (No connection "TO CONVERTER" in the Channel Set Up menu (page 31). HBO, SHOWTIME, etc.) *Cable box (Rear of projection TV) AUX Scrambled channels TO CONVERTER 75-ohm coaxial cable (Signal) (not supplied) VHF/UHF CATV cable (unscrambled channels) For this case) Antenna cable TO CONVERTER VHF/UHF Select Cable or ANT mode by pressing ANT on page 49) • During PIP or Favorite Channel viewing, the AUX input can...
Operating Instructions
Page 17
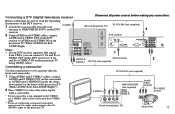
... the projection TV using VIDEO cables. S VIDEO (Rear of projection TV) YC-15V/30V (not supplied) 2 AUX IN VIDEO 1 VIDEO 3 S VIDEO OUT MONITOR AUDIO (VAR/FIX) VIDEO Y VIDEO TO CONVERTER VHF/UHF DTV receiver VHF/UHF IN VHF/UHF IN (DTV) SATELLITE IN VHF/SATELLITE OUT VCR LOW SPEED DATA CONTROL VIDEO 1 2 3 ACCESS CARD S VIDEO Y DIGITAL AUDIO OUT (OPTICAL) L PB MONO R PR VGA OUT AUDIO AUDIO/VIDEO OUT L (MONO) AUDIO R L PB (MONO) AUDIO PR R 1 COMPONENT AUDIO-R Roof antenna 2 AUDIO-L RK-74A (not supplied) TEL LINE Connecting a camcorder Use this connection...
... the projection TV using VIDEO cables. S VIDEO (Rear of projection TV) YC-15V/30V (not supplied) 2 AUX IN VIDEO 1 VIDEO 3 S VIDEO OUT MONITOR AUDIO (VAR/FIX) VIDEO Y VIDEO TO CONVERTER VHF/UHF DTV receiver VHF/UHF IN VHF/UHF IN (DTV) SATELLITE IN VHF/SATELLITE OUT VCR LOW SPEED DATA CONTROL VIDEO 1 2 3 ACCESS CARD S VIDEO Y DIGITAL AUDIO OUT (OPTICAL) L PB MONO R PR VGA OUT AUDIO AUDIO/VIDEO OUT L (MONO) AUDIO R L PB (MONO) AUDIO PR R 1 COMPONENT AUDIO-R Roof antenna 2 AUDIO-L RK-74A (not supplied) TEL LINE Connecting a camcorder Use this connection...
Operating Instructions
Page 18
.... (Rear of projection TV) AUX TO CONVERTER 1 Connect the VCR intended for playback using the connection instructions on page 10 of signal LINE IN OUT 14 Notes: • Do not change the input signal while editing through MONITOR OUT. • When connecting a single VCR to the projection TV: if VCR LINE OUT is connected to the VCR LINE INPUT (see right). Doing so will cause program interference and other viewing problems. VCR (for playback) AUDIO R AUDIO L VIDEO LINE...
.... (Rear of projection TV) AUX TO CONVERTER 1 Connect the VCR intended for playback using the connection instructions on page 10 of signal LINE IN OUT 14 Notes: • Do not change the input signal while editing through MONITOR OUT. • When connecting a single VCR to the projection TV: if VCR LINE OUT is connected to the VCR LINE INPUT (see right). Doing so will cause program interference and other viewing problems. VCR (for playback) AUDIO R AUDIO L VIDEO LINE...
Operating Instructions
Page 20
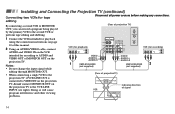
... TV) 1 Using an AUDIO cable, connect AUDIO (VAR/FIX) OUT on page 28) Note: CONTROL S OUT IN VIDEO 1 VIDEO 3 S VIDEO OUT MONITOR AUDIO (VAR/FIX) VIDEO Y VIDEO L (MONO) AUDIO R L PB (MONO) AUDIO PR R COMPONENT AUDIO-L (white) AUDIO-R (red) HRD Line inputs RK-74A (not supplied) • You can be adjusted only when "Audio Out" is set the audio output and switch the TV's speakers off. (see "Audio Out" on page 28) 16 Installing and Connecting the Projection TV (continued) Connecting an audio system Disconnect all power sources before making any connections. The control...
... TV) 1 Using an AUDIO cable, connect AUDIO (VAR/FIX) OUT on page 28) Note: CONTROL S OUT IN VIDEO 1 VIDEO 3 S VIDEO OUT MONITOR AUDIO (VAR/FIX) VIDEO Y VIDEO L (MONO) AUDIO R L PB (MONO) AUDIO PR R COMPONENT AUDIO-L (white) AUDIO-R (red) HRD Line inputs RK-74A (not supplied) • You can be adjusted only when "Audio Out" is set the audio output and switch the TV's speakers off. (see "Audio Out" on page 28) 16 Installing and Connecting the Projection TV (continued) Connecting an audio system Disconnect all power sources before making any connections. The control...
Operating Instructions
Page 21
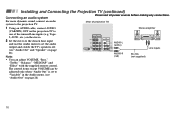
... power sources before making any connections. (Rear of Dolby Laboratories Licensing Corporation. 17 "Dolby," the double-D symbol a and "Pro Logic" are trademarks of projection TV) SAVA series speaker system IN VIDEO 1 VIDEO 3 S VIDEO CONTROL S OUT VIDEO L (MONO) AUDIO R OUT MONITOR AUDIO (VAR/FIX) Y VIDEO L PB (MONO) AUDIO PR R COMPONENT AUDIO-L (white) 1 1 IN L 1 IN R CONTROL S AUDIO-R (red) Audio cord supplied OUT RK-G34, etc. (not supplied) with the speaker to AUDIO (VAR/FIX) OUT on the projection TV. 2 Using the CONTROL S cable, connect CONTROL S IN on the speaker...
... power sources before making any connections. (Rear of Dolby Laboratories Licensing Corporation. 17 "Dolby," the double-D symbol a and "Pro Logic" are trademarks of projection TV) SAVA series speaker system IN VIDEO 1 VIDEO 3 S VIDEO CONTROL S OUT VIDEO L (MONO) AUDIO R OUT MONITOR AUDIO (VAR/FIX) Y VIDEO L PB (MONO) AUDIO PR R COMPONENT AUDIO-L (white) 1 1 IN L 1 IN R CONTROL S AUDIO-R (red) Audio cord supplied OUT RK-G34, etc. (not supplied) with the speaker to AUDIO (VAR/FIX) OUT on the projection TV. 2 Using the CONTROL S cable, connect CONTROL S IN on the speaker...
Operating Instructions
Page 22
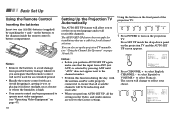
... use a cable box for an extended period. • Handle the remote control with care. CHANNEL + POWER TIMER/STAND BY 1 Press POWER to select Français. to select Español or VOLUME + to turn on the projection TV. Notes: • Remove the batteries to avoid damage from ANT (not AUX) is selected by matching the + and - Using the buttons on the front panel of the projection TV: - + FLASH FOCUS TV/VIDEO VOLUME - The screen will change...
... use a cable box for an extended period. • Handle the remote control with care. CHANNEL + POWER TIMER/STAND BY 1 Press POWER to select Français. to select Español or VOLUME + to turn on the projection TV. Notes: • Remove the batteries to avoid damage from ANT (not AUX) is selected by matching the + and - Using the buttons on the front panel of the projection TV: - + FLASH FOCUS TV/VIDEO VOLUME - The screen will change...

Operating Instructions
Page 23
... use your projection TV, be displayed on page 35. The adjustment is displayed. to preset channels automatically. - 3 Press VOLUME - When all the receivable channels are stored, the lowest numbered channel is completed when the cross pattern becomes white. FLASH FOCUS Press FLASH FOCUS. Note: • FLASH FOCUS is canceled if you to Auto Program ? Press SET UP inside the drop-down panel on the screen in three layers (red, green and blue). Adjusting the Convergence Automatically (FLASH FOCUS) The projection tube image appears on the projection TV...
... use your projection TV, be displayed on page 35. The adjustment is displayed. to preset channels automatically. - 3 Press VOLUME - When all the receivable channels are stored, the lowest numbered channel is completed when the cross pattern becomes white. FLASH FOCUS Press FLASH FOCUS. Note: • FLASH FOCUS is canceled if you to Auto Program ? Press SET UP inside the drop-down panel on the screen in three layers (red, green and blue). Adjusting the Convergence Automatically (FLASH FOCUS) The projection tube image appears on the projection TV...

Operating Instructions
Page 24
... White Labeled Buttons for enhanced picture contrast and sharpness. MUTING Activates the remote control for direct channel selection. Turns the projection TV on the screen, press TV/VIDEO until a channel number appears. Personal 1, Personal 2: Select to customize the "Picture Adjustment" of five different video modes that best suits the program you can also perform the "Picture Adjustment" (such as "Brightness," "Color," etc.) to mute the sound. Use for use with the projection TV. Press 0-9 to select a channel (for example, to display...
... White Labeled Buttons for enhanced picture contrast and sharpness. MUTING Activates the remote control for direct channel selection. Turns the projection TV on the screen, press TV/VIDEO until a channel number appears. Personal 1, Personal 2: Select to customize the "Picture Adjustment" of five different video modes that best suits the program you can also perform the "Picture Adjustment" (such as "Brightness," "Color," etc.) to mute the sound. Use for use with the projection TV. Press 0-9 to select a channel (for example, to display...
Operating Instructions
Page 30
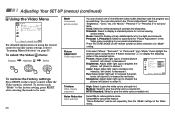
... Video menu: Display / Highlight / Select MENU To restore the factory settings Press RESET on the remote control for direct selection of a "Mode" setting. Standard: Select to cancel the feature. Press PICTURE MODE on the remote control while the Video menu is selected. Brightness: Adjust slider right (up ) to sharpen the picture; Sharpness: Adjust slider right (up ) to brighten the picture; High: Select to give the white colors a neutral tint. "Noise Reduction" can be reset. 26 Mode Customized picture viewing Picture Adjustment Picture adjustment Trinitone White...
... Video menu: Display / Highlight / Select MENU To restore the factory settings Press RESET on the remote control for direct selection of a "Mode" setting. Standard: Select to cancel the feature. Press PICTURE MODE on the remote control while the Video menu is selected. Brightness: Adjust slider right (up ) to sharpen the picture; Sharpness: Adjust slider right (up ) to brighten the picture; High: Select to give the white colors a neutral tint. "Noise Reduction" can be reset. 26 Mode Customized picture viewing Picture Adjustment Picture adjustment Trinitone White...
Operating Instructions
Page 53
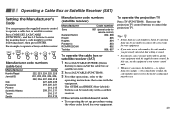
... much time is listed, try entering them , for your equipment with the equipment. Then use the equipment's own remote control unit. • Whenever you may revert to replace them one by one until you come with the supplied remote control. Operating a Cable Box or Satellite Receiver (SAT) Setting the Manufacturer's Code You can be reset. 49 The GUIDE and INDEX (blue-labeled) buttons can program the supplied remote control to enter the manufacturer's code number (see...
... much time is listed, try entering them , for your equipment with the equipment. Then use the equipment's own remote control unit. • Whenever you may revert to replace them one by one until you come with the supplied remote control. Operating a Cable Box or Satellite Receiver (SAT) Setting the Manufacturer's Code You can be reset. 49 The GUIDE and INDEX (blue-labeled) buttons can program the supplied remote control to enter the manufacturer's code number (see...
Operating Instructions
Page 54
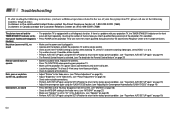
... following numbers (English only). Dark, poor or no picture (screen lit), good sound • Adjust "Picture" in the Video menu. (see "Picture Adjustment" on page 26) • Adjust "Brightness" in the Video menu. (see "Picture Adjustment" on page 26) • Check antenna/cable connections. • Perform AUTO SET UP again using the SET UP button to return to the factory preset condition. (see "To perform AUTO SET UP again" on page 19) • Adjust the convergence again using the FLASH FOCUS button. (see "Adjusting the Convergence Automatically (FLASH FOCUS...
... following numbers (English only). Dark, poor or no picture (screen lit), good sound • Adjust "Picture" in the Video menu. (see "Picture Adjustment" on page 26) • Adjust "Brightness" in the Video menu. (see "Picture Adjustment" on page 26) • Check antenna/cable connections. • Perform AUTO SET UP again using the SET UP button to return to the factory preset condition. (see "To perform AUTO SET UP again" on page 19) • Adjust the convergence again using the FLASH FOCUS button. (see "Adjusting the Convergence Automatically (FLASH FOCUS...
Operating Instructions
Page 55
... picture using the AUDIO button, the main picture will be recorded. Cannot receive any channels when using cable TV • Make sure "Cable" is broadcasting programs. • Press ANT to change the input mode. (see "ANT" on page 22) Dotted lines or stripes • Adjust the antenna. • Keep the projection TV away from the other program. For details, see the instruction manual supplied with the video game software. 51 Then press TV (FUNCTION) and adjust the projection TV's volume. Cannot play shooting...
... picture using the AUDIO button, the main picture will be recorded. Cannot receive any channels when using cable TV • Make sure "Cable" is broadcasting programs. • Press ANT to change the input mode. (see "ANT" on page 22) Dotted lines or stripes • Adjust the antenna. • Keep the projection TV away from the other program. For details, see the instruction manual supplied with the video game software. 51 Then press TV (FUNCTION) and adjust the projection TV's volume. Cannot play shooting...
Operating Instructions
Page 56
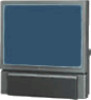
Specifications Projection system 3 picture tubes, 3 lenses, horizontal in-line system Picture tube 7-inch high-brightness monochrome tubes (6.3 raster size), with optical coupling and liquid cooling system Projection lenses High performance, large diameter hybrid lens F1.05 Television system American TV standard Channel coverage VHF: 2-13/UHF: 14 -69/CATV: 1 - 125 Antenna 75 ohm external terminal for VHF/UHF Screen size (measured diagonally) 43 inches (KP-43T75) 48 inches (KP-48S75) 53 inches (KP-53S75/53N77) 61 inches (KP-61S75) Inputs/outputs VIDEO 1 IN VIDEO 2 INPUT S VIDEO IN (4-pin mini ...
Specifications Projection system 3 picture tubes, 3 lenses, horizontal in-line system Picture tube 7-inch high-brightness monochrome tubes (6.3 raster size), with optical coupling and liquid cooling system Projection lenses High performance, large diameter hybrid lens F1.05 Television system American TV standard Channel coverage VHF: 2-13/UHF: 14 -69/CATV: 1 - 125 Antenna 75 ohm external terminal for VHF/UHF Screen size (measured diagonally) 43 inches (KP-43T75) 48 inches (KP-48S75) 53 inches (KP-53S75/53N77) 61 inches (KP-61S75) Inputs/outputs VIDEO 1 IN VIDEO 2 INPUT S VIDEO IN (4-pin mini ...
Operating Instructions
Page 57
... Connecting Projection TV to antenna 8 audio system 16 cable 8 cable box 9 cable box and VCR 10 camcorder 13 DTV receiver 13 DVD Player 15 satellite receiver (SAT 11 satellite receiver (SAT) and VCR 12 Sony SAVA series speaker system 17 two VCRs 14 VCR 10 CONTROL S OUT jack 8 Convergence 19 Current Time 29 D Daylight Savings 29 DISPLAY button 21 DVD connection 15 operation 48 DVD/VTR (FUNCTION 48 E Editing using MONITOR OUT ....... 14 Effect 27 (BBE/Surround/Simulated/Off ) F, G Factory settings...
... Connecting Projection TV to antenna 8 audio system 16 cable 8 cable box 9 cable box and VCR 10 camcorder 13 DTV receiver 13 DVD Player 15 satellite receiver (SAT 11 satellite receiver (SAT) and VCR 12 Sony SAVA series speaker system 17 two VCRs 14 VCR 10 CONTROL S OUT jack 8 Convergence 19 Current Time 29 D Daylight Savings 29 DISPLAY button 21 DVD connection 15 operation 48 DVD/VTR (FUNCTION 48 E Editing using MONITOR OUT ....... 14 Effect 27 (BBE/Surround/Simulated/Off ) F, G Factory settings...


