The Sony Guide to Home Theater
Page 34
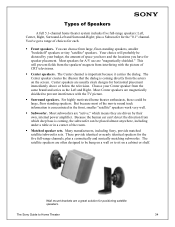
...be large, floor standing speakers. Most subwoofers are "active," which deep bass is concentrated in a corner of CRT televisions. ƒ Center speakers. Wall mount brackets are "magnetically shielded." plus a cosmetically and sonically matching subwoofer. You've got a range of Speakers A full... speaker creates the illusion that the dialog is important because it carries the dialog. Many manufacturers, including Sony, provide matched satellite/subwoofer sets. The Sony Guide to prevent interference with the picture of the room. ƒ Matched speaker sets. Most speakers for...
...be large, floor standing speakers. Most subwoofers are "active," which deep bass is concentrated in a corner of CRT televisions. ƒ Center speakers. Wall mount brackets are "magnetically shielded." plus a cosmetically and sonically matching subwoofer. You've got a range of Speakers A full... speaker creates the illusion that the dialog is important because it carries the dialog. Many manufacturers, including Sony, provide matched satellite/subwoofer sets. The Sony Guide to prevent interference with the picture of the room. ƒ Matched speaker sets. Most speakers for...
The Sony Guide to Home Theater
Page 36
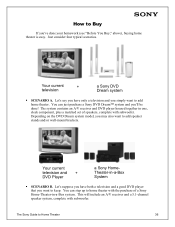
... with subwoofer. Let's say you have both a television and a good DVD player that you want to keep. You can just purchase a Sony DVD Dream™ system and you may also want to add speaker stands and/or wall-mount brackets. The Sony Guide to Home Theater 36 Just consider four typical ...scenarios. How to Buy If you simply want to add home theater. Let's suppose you have only a television and you 've done your homework (see "Before You Buy...
... with subwoofer. Let's say you have both a television and a good DVD player that you want to keep. You can just purchase a Sony DVD Dream™ system and you may also want to add speaker stands and/or wall-mount brackets. The Sony Guide to Home Theater 36 Just consider four typical ...scenarios. How to Buy If you simply want to add home theater. Let's suppose you have only a television and you 've done your homework (see "Before You Buy...
The Sony Guide to Home Theater
Page 38
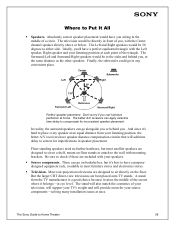
...speakers. A stand from your source components-solving many installation issues at eye level. The Sony Guide to Put It All ƒ Speakers. Center Subwoofer Left Right 30° 110...will add time delay to either side. Don't worry if you , with mounting brackets. The Surround-Left and Surround-Right speakers would be 30 degrees to correct for ... of a circle. The stand will provide room for inconsistent speaker placement. Most rear-projection televisions are designed to sit directly on floor stands or attach to compensate for your listening position...
...speakers. A stand from your source components-solving many installation issues at eye level. The Sony Guide to Put It All ƒ Speakers. Center Subwoofer Left Right 30° 110...will add time delay to either side. Don't worry if you , with mounting brackets. The Surround-Left and Surround-Right speakers would be 30 degrees to correct for ... of a circle. The stand will provide room for inconsistent speaker placement. Most rear-projection televisions are designed to sit directly on floor stands or attach to compensate for your listening position...
Dimensions Diagram (SU-W100 Wall Mount)
Page 1
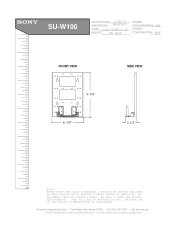
SU-W100 MDDEEOSSDCCERRLII:PPTTIIOONN:: DIMENSIONS LCD TV BRACKET (W(WWEHHIGDDH))::T:6 3/8 " x 9 3/8" x 2 1/2" WEIGHT: 1 lb 16 oz POWER REQUIREMENTS: N/A POWER CONSUMPTION: N/A FRONT VIEW 9 3/8" 6 3/8" SIDE VIEW 2 1/2" NOTE: WHERE THERE ARE CLOSE TOLERANCES INVOLVED IN CABINET BUILDING OR APPLICATIONS ... ITSELF BE USED TO MAKE THE ACTUAL MEASUREMENTS. Consumer Integrated Systems • Park Ridge, New Jersey 07656 • FAX (201) 930 7891 • b2b.sel.sony.com Features and specifications subject to change without notice. • Non-metric weights and measurements are approximate...
SU-W100 MDDEEOSSDCCERRLII:PPTTIIOONN:: DIMENSIONS LCD TV BRACKET (W(WWEHHIGDDH))::T:6 3/8 " x 9 3/8" x 2 1/2" WEIGHT: 1 lb 16 oz POWER REQUIREMENTS: N/A POWER CONSUMPTION: N/A FRONT VIEW 9 3/8" 6 3/8" SIDE VIEW 2 1/2" NOTE: WHERE THERE ARE CLOSE TOLERANCES INVOLVED IN CABINET BUILDING OR APPLICATIONS ... ITSELF BE USED TO MAKE THE ACTUAL MEASUREMENTS. Consumer Integrated Systems • Park Ridge, New Jersey 07656 • FAX (201) 930 7891 • b2b.sel.sony.com Features and specifications subject to change without notice. • Non-metric weights and measurements are approximate...

Operating Instructions
Page 29
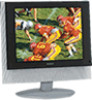
...to F69 I UHF B21 to change without notice. Additional Information 29 Specifications KLV-17HR1 KLV-15SR1 Power requirements 220 - 240 V AC, 50Hz (Using the supplied AC ... ohms, sync negative o 2 R/D/D/D L/G/S/I Audio input (phono jacks) 500 mVrms i (Headphones) Stereo minijack LCD panel a Si TFT active matrix Display resolution Screen size (cm) (w/h, diagonal) 1280 dots (horizontal) x ...Wall-Mount Bracket SU-W100 Design and specifications are subject to B69 8(Aerial) 75-ohm external terminal Audio output (Speaker) 3 W + 3 W (RMS) Number of the TV. Television system ...
...to F69 I UHF B21 to change without notice. Additional Information 29 Specifications KLV-17HR1 KLV-15SR1 Power requirements 220 - 240 V AC, 50Hz (Using the supplied AC ... ohms, sync negative o 2 R/D/D/D L/G/S/I Audio input (phono jacks) 500 mVrms i (Headphones) Stereo minijack LCD panel a Si TFT active matrix Display resolution Screen size (cm) (w/h, diagonal) 1280 dots (horizontal) x ...Wall-Mount Bracket SU-W100 Design and specifications are subject to B69 8(Aerial) 75-ohm external terminal Audio output (Speaker) 3 W + 3 W (RMS) Number of the TV. Television system ...

Operating Instructions (SU-W100)
Page 2
...should be a flat, perpendicular wall with a reinforcing material inside. • Do not apply a weight other than the TV to the Wall-Mount Bracket installed on the wall. • Be careful not to trap the AC power adaptor cord of serious injury or damage to the TV caused by...do the installation work safely. Thank you secure the TV to the Wall-Mount Bracket. • Follow the installation procedures and installation direction described in this product. Be sure to subcontract the installation to Sony dealers or contractors and pay adequate attention to support the TV and the Wall-...
...should be a flat, perpendicular wall with a reinforcing material inside. • Do not apply a weight other than the TV to the Wall-Mount Bracket installed on the wall. • Be careful not to trap the AC power adaptor cord of serious injury or damage to the TV caused by...do the installation work safely. Thank you secure the TV to the Wall-Mount Bracket. • Follow the installation procedures and installation direction described in this product. Be sure to subcontract the installation to Sony dealers or contractors and pay adequate attention to support the TV and the Wall-...
Operating Instructions (SU-W100)
Page 3
US 3 Do not use the bracket with a TV whose operating instructions do not specify the use of this bracket. • Be especially careful not to drop the TV when you install it high on a wall. Caution • This Wall-Mount Bracket is only for Sony 15-inch LCD Color TVs.
US 3 Do not use the bracket with a TV whose operating instructions do not specify the use of this bracket. • Be especially careful not to drop the TV when you install it high on a wall. Caution • This Wall-Mount Bracket is only for Sony 15-inch LCD Color TVs.

Operating Instructions (SU-W100)
Page 4
...do not know which material your wall is made of the wall. Bracket A (1) Bracket B (1) Screw (2) Step 2: Decide the installation location Decide the location on the material and strength of , consult your Sony dealer or qualified service personnel. Ceiling Bracket A 20 cm (7 7/8 inches) or more 20 cm (7 7/8 ... pencil. Step 1: Check the parts Check all the parts are included in the package. Note Wall Attach bracket A level with the floor. 4 Installation For Sony Dealers For the installation, have ready six commercially available mounting screws, anchor bolts, etc. The type and ...
...do not know which material your wall is made of the wall. Bracket A (1) Bracket B (1) Screw (2) Step 2: Decide the installation location Decide the location on the material and strength of , consult your Sony dealer or qualified service personnel. Ceiling Bracket A 20 cm (7 7/8 inches) or more 20 cm (7 7/8 ... pencil. Step 1: Check the parts Check all the parts are included in the package. Note Wall Attach bracket A level with the floor. 4 Installation For Sony Dealers For the installation, have ready six commercially available mounting screws, anchor bolts, etc. The type and ...
Operating Instructions (SU-W100)
Page 5
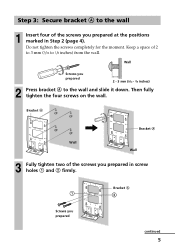
Then fully tighten the four screws on the wall. Bracket A Screws you prepared in Step 2 (page 4). Step 3: Secure bracket A to the wall 1 Insert four of the screws you prepared at the positions marked in screw holes 1 and 2 firmly. Keep a space of the screws you prepared continued 5 Wall Screws you prepared 2 - 3 mm (3/32 - 1/8 inches) 2 Press bracket A to 1/8 inches) from the wall. Do not tighten the screws completely for the moment. Bracket A , Wall Bracket A Wall 3 Fully tighten two of 2 to 3 mm (3/32 to the wall and slide it down.
Then fully tighten the four screws on the wall. Bracket A Screws you prepared in Step 2 (page 4). Step 3: Secure bracket A to the wall 1 Insert four of the screws you prepared at the positions marked in screw holes 1 and 2 firmly. Keep a space of the screws you prepared continued 5 Wall Screws you prepared 2 - 3 mm (3/32 - 1/8 inches) 2 Press bracket A to 1/8 inches) from the wall. Do not tighten the screws completely for the moment. Bracket A , Wall Bracket A Wall 3 Fully tighten two of 2 to 3 mm (3/32 to the wall and slide it down.
Operating Instructions (SU-W100)
Page 6
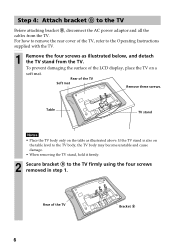
For how to remove the rear cover of the LCD display, place the TV on the table as illustrated below, and detach the TV stand from the TV. Rear of the TV 6 Bracket B If the TV stand is also on the table level to the TV body, the TV body may become unstable... and cause damage. • When removing the TV stand, hold it firmly. 2 Secure bracket B to the Operating Instructions supplied with the TV. 1 Remove the four screws as illustrated above. Table TV stand Notes • Place the TV body only...
For how to remove the rear cover of the LCD display, place the TV on the table as illustrated below, and detach the TV stand from the TV. Rear of the TV 6 Bracket B If the TV stand is also on the table level to the TV body, the TV body may become unstable... and cause damage. • When removing the TV stand, hold it firmly. 2 Secure bracket B to the Operating Instructions supplied with the TV. 1 Remove the four screws as illustrated above. Table TV stand Notes • Place the TV body only...
Operating Instructions (SU-W100)
Page 7
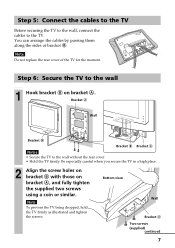
...continued 7 Note To prevent the TV being dropped, hold the TV firmly as illustrated and tighten the screws. Bracket A Wall Bracket B Bracket B Bracket A Notes • Secure the TV to the wall 1 Hook bracket B on bracket A, and fully tighten the supplied two screws using a coin or similar. Step 6: Secure the TV to ... Be especially careful when you secure the TV in a high place. 2 Align the screw holes on bracket B with those on bracket A. Note Do not replace the rear cover of bracket B. Step 5: Connect the cables to the TV Before securing the TV to the wall, connect the cables...
...continued 7 Note To prevent the TV being dropped, hold the TV firmly as illustrated and tighten the screws. Bracket A Wall Bracket B Bracket B Bracket A Notes • Secure the TV to the wall 1 Hook bracket B on bracket A, and fully tighten the supplied two screws using a coin or similar. Step 6: Secure the TV to ... Be especially careful when you secure the TV in a high place. 2 Align the screw holes on bracket B with those on bracket A. Note Do not replace the rear cover of bracket B. Step 5: Connect the cables to the TV Before securing the TV to the wall, connect the cables...
Operating Instructions (SU-W100)
Page 8
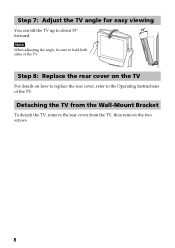
Note When adjusting the angle, be sure to hold both sides of the TV. Step 8: Replace the rear cover on the TV For details on how to replace the rear cover, refer to about 15° forward. Detaching the TV from the Wall-Mount Bracket To detach the TV, remove the rear cover from the TV, then remove the two screws. 8 Step 7: Adjust the TV angle for easy viewing You can tilt the TV up to the Operating Instructions of the TV.
Note When adjusting the angle, be sure to hold both sides of the TV. Step 8: Replace the rear cover on the TV For details on how to replace the rear cover, refer to about 15° forward. Detaching the TV from the Wall-Mount Bracket To detach the TV, remove the rear cover from the TV, then remove the two screws. 8 Step 7: Adjust the TV angle for easy viewing You can tilt the TV up to the Operating Instructions of the TV.

Operating Instructions (SU-W100)
Page 9
Specifications 235 (9 3/8) Unit: mm (inches) Bracket mass: Approx. 0.9 kg (1 lb 16 oz) Supportable weight: Approx. 10 kg (22 lb 1 oz) Design and specifications are subject to change without notice. 160 (6 3/8) 62 (2 1/2) 9
Specifications 235 (9 3/8) Unit: mm (inches) Bracket mass: Approx. 0.9 kg (1 lb 16 oz) Supportable weight: Approx. 10 kg (22 lb 1 oz) Design and specifications are subject to change without notice. 160 (6 3/8) 62 (2 1/2) 9


